协程
进程时代
最初的计算机上面没有操作系统,更别提进程、线程和协程了。
后来,现代化的计算机有了操作系统,每个程序都是一个进程,但是操作系统在一段时间只能运行一个进程,直到这个进程运行完,才能运行下一个进程,这个时期可以成为单进程时代——串行时代。
后来操作系统就具有了最早的并发能力:多进程并发,当一个进程阻塞的时候,切换到另外等待执行的进程,这样就能尽量把CPU利用起来,CPU就不浪费了。
线程时代
有了对进程的调度能力之后,发现进程拥有太多资源,在创建、切换和销毁的时候,都会占用很长的时间,CPU虽然利用起来了,但CPU有很大的一部分都被用来进行进程调度了,怎么才能提高CPU的利用率呢?
大家希望能有一种轻量级的进程,调度不怎么花时间,这样CPU就有更多的时间 用在执行任务上。
后来,操作系统支持了线程,线程在进程里面,线程运行所需要资源比进程少多了,跟进程比起来,切换简直是“不算事”。
一个进程可以有多个线程,CPU在执行调度的时候切换的是线程,如果下一个线程也是当前进程的,就只有线程切换,“很快”就能完成,如果下一个线程不是当前的进程,就需要切换进程,这就得费点时间了。
传统的编程语言比如C、C++等的并发实现实际上就是基于操作系统调度的,即程序负责创建线程(一般通过pthread等lib调用实现),操作系统负责调度。这种传统支持并发的方式有诸多不足:
复杂:
- 创建容易,退出难:做过C/C++ Programming的童鞋都知道,创建一个thread(比如利用pthread)虽然参数也不少,但好歹可以接受。但一旦涉及到thread的退出,就要考虑thread是detached,还是需要parent thread去join?是否需要在thread中设置cancel point,以保证join时能顺利退出?
- 并发单元间通信困难,易错:多个thread之间的通信虽然有多种机制可选,但用起来是相当复杂;并且一旦涉及到shared memory,就会用到各种lock,死锁便成为家常便饭;
- thread stack size的设定:是使用默认的,还是设置的大一些,或者小一些呢?
难于scaling:
- 一个thread的代价已经比进程小了很多了,但我们依然不能大量创建thread,因为除了每个thread占用的资源不小之外,操作系统调度切换thread的代价也不小;
- 对于很多网络服务程序,由于不能大量创建thread,就要在少量thread里做网络多路复用,即:使用epoll/kqueue/IoCompletionPort这套机制,即便有libevent/libev这样的第三方库帮忙,写起这样的程序也是很不易的,存在大量callback,给程序员带来不小的心智负担。
协程时代
多进程、多线程已经提高了系统的并发能力,但是在当今互联网高并发场景下,为每个任务都创建一个线程是不现实的,因为会消耗大量的内存(每个线程的内存占用级别为MB),线程多了之后调度也会消耗大量的CPU。如何才能充分利用CPU、内存等资源的情况下,实现更高的并发?
既然线程的资源占用、调度在高并发的情况下,依然是比较大的,是否有一种东西,更加轻量?
你可能知道:线程分为内核态线程和用户态线程,用户态线程需要绑定内核态线程,CPU并不能感知用户态线程的存在,它只知道它在运行1个线程,这个线程实际是内核态线程。
用户态线程实际有个名字叫协程(co-routine),为了容易区分,我们使用协程指用户态线程,使用线程指内核态线程。
User-level threads, Application-level threads, Green threads都指一样的东西,就是不受OS感知的线程,如果你Google coroutine相关的资料,会看到它指的就是用户态线程,在Green threads的维基百科里,看Green threads的实现列表,你会看到好很多coroutine实现,比如Java、Lua、Go、Erlang、Common Lisp、Haskell、Rust、PHP、Stackless Python,所以,我认为用户态线程就是协程。
协程跟线程是有区别的,线程由CPU调度是抢占式的,协程由用户态调度是协作式的,一个协程让出CPU后,才执行下一个协程。
协程和线程有3种映射关系:
N:1模型:N个协程在1个内核空间线程上运行。优势是上下文切换非常快但是无法利用多核系统的优点。
1:1模型:1个线程运行一个协程。这种充分利用了多核系统的优势但是上下文切换非常慢,因为每一次调度都会在用户态和内核态之间切换。(POSIX线程模型(pthread),Java)
M:N模型:每个协程对应多个线程,同时也可以一个线程对应多个协程。Go打算采用这种模型,使用任意个内核模型管理任意个goroutine。这样结合了以上两种模型的优点,但缺点就是调度的复杂性。
Goroutine
Go采用了用户层轻量级thread或者说是类coroutine的概念来解决这些问题,Go将之称为”goroutine“。goroutine占用的资源非常小(Go 1.4将每个goroutine stack的size默认设置为2k),goroutine调度的切换也不用陷入(trap)操作系统内核层完成,代价很低。因此,一个Go程序中可以创建成千上万个并发的goroutine。所有的Go代码都在goroutine中执行,哪怕是go的runtime也不例外。将这些goroutines按照一定算法放到“CPU”上执行的程序就称为goroutine调度器或goroutine scheduler。
不过,一个Go程序对于操作系统来说只是一个用户层程序,对于操作系统而言,它的眼中只有thread,它甚至不知道有什么叫Goroutine的东西的存在。goroutine的调度全要靠Go自己完成,实现Go程序内goroutine之间“公平”的竞争“CPU”资源,这个任务就落到了Go runtime头上,要知道在一个Go程序中,除了用户代码,剩下的就是go runtime了。
于是Goroutine的调度问题就演变为go runtime如何将程序内的众多goroutine按照一定算法调度到“CPU”资源上运行了。在操作系统层面,Thread竞争的“CPU”资源是真实的物理CPU,但在Go程序层面,各个Goroutine要竞争的”CPU”资源是什么呢?Go程序是用户层程序,它本身整体是运行在一个或多个操作系统线程上的,因此goroutine们要竞争的所谓“CPU”资源就是操作系统线程。这样Go scheduler的任务就明确了:将goroutines按照一定算法放到不同的操作系统线程中去执行。这种在语言层面自带调度器的,我们称之为原生支持并发。
goroutine和线程的区别
我们可以从三个角度区别:内存消耗、创建与销毀、切换。
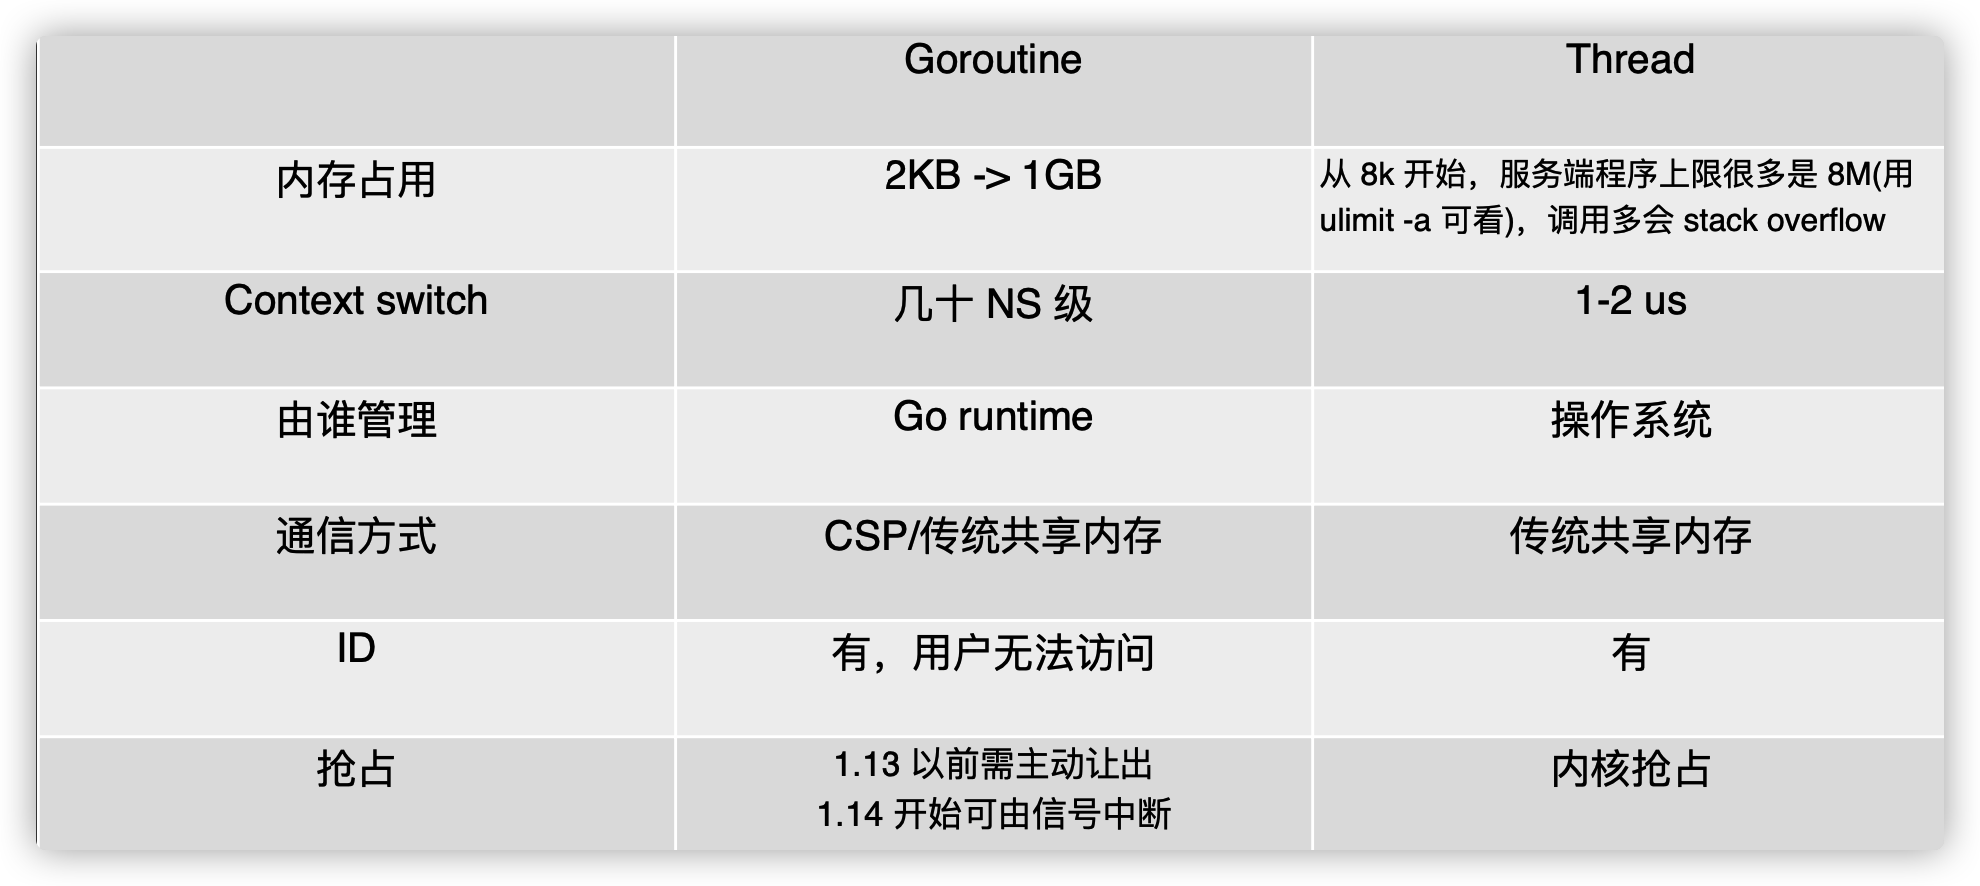
内存占用
创建一个 goroutine 的栈内存消耗为 2 KB,实际运行过程中,如果栈空间不够用,会自动进行扩容。创建一个 thread 则需要消耗 1 MB 栈内存,而且还需要一个被称为 “a guard page” 的区域用于和其他 thread 的栈空间进行隔离。
对于一个用 Go 构建的 HTTP Server 而言,对到来的每个请求,创建一个 goroutine 用来处理是非常轻松的一件事。而如果用一个使用线程作为并发原语的语言构建的服务,例如 Java 来说,每个请求对应一个线程则太浪费资源了,很快就会出 OOM 错误(OutOfMermoryError)。
创建和销毀
Thread 创建和销毀都会有巨大的消耗,因为要和操作系统打交道,是内核级的,通常解决的办法就是线程池。而 goroutine 因为是由 Go runtime 负责管理的,创建和销毁的消耗非常小,是用户级。
切换
当 threads 切换时,需要保存各种寄存器,以便将来恢复:
16 general purpose registers, PC (Program Counter), SP (Stack Pointer), segment registers, 16 XMM registers, FP coprocessor state, 16 AVX registers, all MSRs etc.
而 goroutines 切换只需保存三个寄存器:Program Counter, Stack Pointer and BP。
gobuf 描述一个 goroutine 所有现场,从一个 g 切换到另一个 g,只要把这几个现场字段保存下来 再把 g 往队列里一扔,m 就可以执行其它 g 了 无需进入内核态
 1
 2
 3
 4
 5
 6
 7
 8
 9
10
11
12
13
|
type gobuf struct {
    // 存储 rsp 寄存器的值
    sp   uintptr
    // 存储 rip 寄存器的值
    pc   uintptr
    // 指向 goroutine
    g    guintptr
    ctxt unsafe.Pointer // this has to be a pointer so that gc scans it
    // 保存系统调用的返回值
    ret  sys.Uintreg
    lr   uintptr
    bp   uintptr // for GOEXPERIMENT=framepointer
}
|
- sp — 栈指针(Stack Pointer);
- pc — 程序计数器(Program Counter);
- g — 持有 runtime.gobuf 的 Goroutine;
- ret — 系统调用的返回值;
一般而言,线程切换会消耗 1000-1500 纳秒,一个纳秒平均可以执行 12-18 条指令。所以由于线程切换,执行指令的条数会减少 12000-18000。
Goroutine 的切换约为 200 ns,相当于 2400-3600 条指令。
因此,goroutines 切换成本比 threads 要小得多。
G-P-M模型
GPM:
-
G: 表示goroutine,存储了goroutine的执行stack信息、goroutine状态以及goroutine的任务函数等;另外G对象是可以重用的。
-
P: 表示逻辑processor,P的数量决定了系统内最大可并行的G的数量(前提:系统的物理cpu核数>=P的数量);P的最大作用还是其拥有的各种G对象队列、链表、一些cache和状态。
-
M: M代表着真正的执行计算资源。在绑定有效的p后,进入schedule循环;而schedule循环的机制大致是从各种队列、p的本地队列中获取G,切换到G的执行栈上并执行G的函数,调用goexit做清理工作并回到m,如此反复。M并不保留G状态,这是G可以跨M调度的基础。
P是一个“逻辑Proccessor”,每个G要想真正运行起来,首先需要被分配一个P(进入到P的local runq中,这里暂忽略global runq那个环节)。对于G来说,P就是运行它的“CPU”,可以说:G的眼里只有P。但从Go scheduler视角来看,真正的“CPU”是M,只有将P和M绑定才能让P的runq中G得以真实运行起来。这样的P与M的关系,就好比Linux操作系统调度层面用户线程(user thread)与核心线程(kernel thread)的对应关系那样(N x M)。
P必须和M组合起来执行G,但是两者也并不是完全1:1对应,通常情况下P的数量固定和CPU的核数一样(GOMAXPROCS参数),M则是按需创建,比如当M因为陷入系统调用而长时间阻塞的时候,P就会被监控线程抢回,去新建或者唤醒另一个M去执行,因此M的数量会增加,系统中可能存在一些阻塞的M。
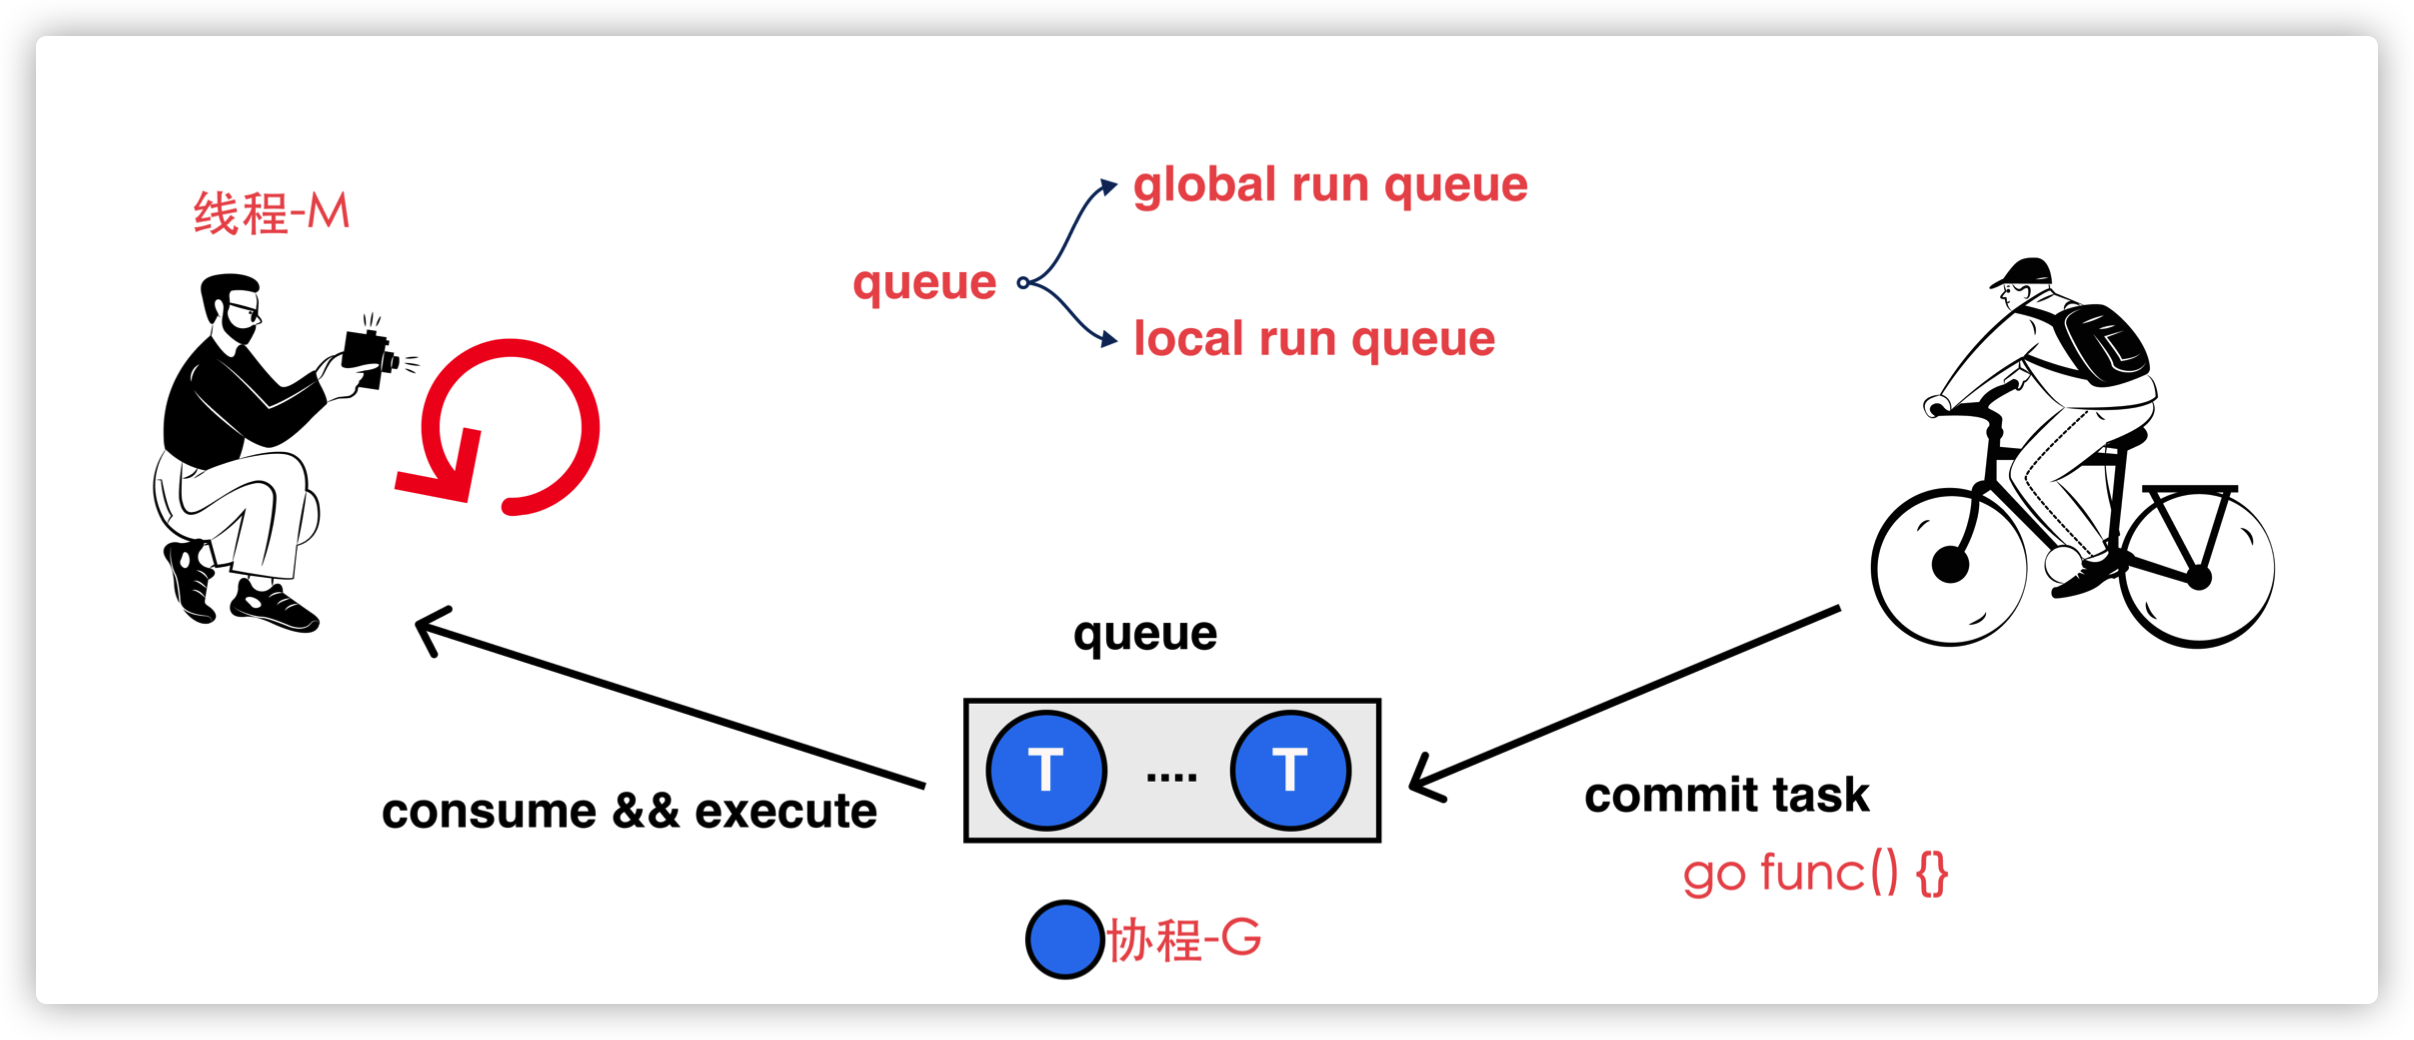
Goroutine调度器和系统调度器是通过M结合起来的,每个M都代表了1个内核线程,系统调度器负责把内核线程分配到CPU的核上执行。
这幅图,展示了goroutine调度器和系统调度器的关系,而不是把二者割裂开来,并且从宏观的角度展示了调度器的重要组成。
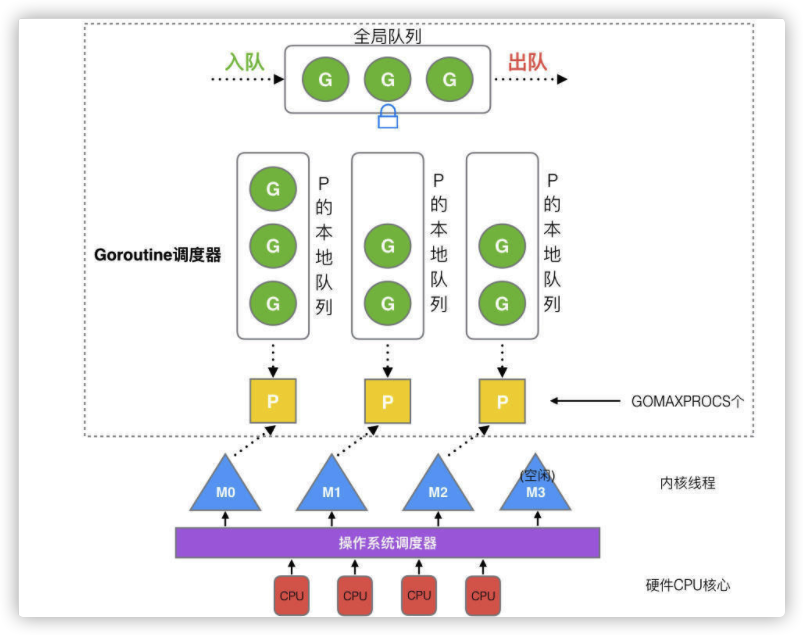
自顶向下是调度器的4个部分:
- 全局队列(Global Queue):存放等待运行的G。
- P的本地队列:同全局队列类似,存放的也是等待运行的G,存的数量有限,不超过256个。新建G’时,G’优先加入到P的本地队列,如果队列满了,则会把本地队列中一半的G移动到全局队列。
- P列表:所有的P都在程序启动时创建,并保存在数组中,最多有GOMAXPROCS个。
- M线程想运行任务就得获取P,从P的本地队列获取G,P队列为空时,M也会尝试从全局队列拿一批G放到P的本地队列,或从其他P的本地队列偷一半放到自己P的本地队列。M运行G,G执行之后,M会从P获取下一个G,不断重复下去。
G
G:goroutine,一个计算任务。由需要执行的代码和其上下文组成,上下文包括:当前代码位置,栈顶、栈底地址,状态等。
Goroutine 就是 Go 语言调度器中待执行的任务,它在运行时调度器中的地位与线程在操作系统中差不多,但是它占用了更小的内存空间,也降低了上下文切换的开销。
Goroutine 只存在于 Go 语言的运行时,它是 Go 语言在用户态提供的线程,作为一种粒度更细的资源调度单元,如果使用得当能够在高并发的场景下更高效地利用机器的 CPU。
当 goroutine 被调离 CPU 时,调度器负责把 CPU 寄存器的值保存在 g 对象的成员变量之中。
当 goroutine 被调度起来运行时,调度器又负责把 g 对象的成员变量所保存的寄存器值恢复到 CPU 的寄存器。
G 既然是 Goroutine,必然需要定义自身的执行栈:
除了执行栈之外,还有很多与调试和 profiling 相关的字段。 一个 G 没有什么黑魔法,无非是将需要执行的函数参数进行了拷贝,保存了要执行的函数体的入口地址,用于执行。
 1
 2
 3
 4
 5
 6
 7
 8
 9
10
11
12
13
14
15
16
17
18
19
20
21
22
23
24
25
26
27
28
29
30
31
32
33
34
35
36
37
38
39
40
41
42
43
44
45
46
47
48
49
50
51
52
53
54
55
56
57
58
59
60
61
62
63
64
65
66
67
68
69
70
71
72
73
74
75
76
77
78
79
|
type g struct {
	// Stack parameters.
	// stack describes the actual stack memory: [stack.lo, stack.hi).
	// stackguard0 is the stack pointer compared in the Go stack growth prologue.
	// It is stack.lo+StackGuard normally, but can be StackPreempt to trigger a preemption.
	// stackguard1 is the stack pointer compared in the C stack growth prologue.
	// It is stack.lo+StackGuard on g0 and gsignal stacks.
	// It is ~0 on other goroutine stacks, to trigger a call to morestackc (and crash).
	// goroutine 使用的栈
	stack       stack   // offset known to runtime/cgo //执行栈
	// 用于栈的扩张和收缩检查,抢占标志
	stackguard0 uintptr // offset known to liblink
	stackguard1 uintptr // offset known to liblink

	_panic         *_panic // innermost panic - offset known to liblink
	_defer         *_defer // innermost defer
	// 当前与 g 绑定的 m
	m              *m      // current m; offset known to arm liblink
	sched          gobuf    //用于保存执行现场
	syscallsp      uintptr        // if status==Gsyscall, syscallsp = sched.sp to use during gc
	syscallpc      uintptr        // if status==Gsyscall, syscallpc = sched.pc to use during gc
	// 期望 sp 位于栈顶,用于回溯检查
	stktopsp       uintptr        // expected sp at top of stack, to check in traceback
	// wakeup 唤醒时候传递的参数
	param          unsafe.Pointer // passed parameter on wakeup
	atomicstatus   uint32
	stackLock      uint32 // sigprof/scang lock; TODO: fold in to atomicstatus
	goid           int64    //唯一序号
	// 指向全局队列里下一个 g
	schedlink      guintptr //链表
	// g 被阻塞之后的近似时间
	waitsince      int64      // approx time when the g become blocked
	// g 被阻塞的原因
	waitreason     waitReason // if status==Gwaiting
	// 抢占调度标志。这个为 true 时,stackguard0 等于 stackpreempt
	// 抢占信号,stackguard0 = stackpreempt 的副本
	preempt        bool       // preemption signal, duplicates stackguard0 = stackpreempt
	paniconfault   bool       // panic (instead of crash) on unexpected fault address
	preemptscan    bool       // preempted g does scan for gc
	gcscandone     bool       // g has scanned stack; protected by _Gscan bit in status
	gcscanvalid    bool       // false at start of gc cycle, true if G has not run since last scan; TODO: remove?
	throwsplit     bool       // must not split stack
	raceignore     int8       // ignore race detection events
	sysblocktraced bool       // StartTrace has emitted EvGoInSyscall about this goroutine
	// syscall 返回之后的 cputicks,用来做 tracing
	sysexitticks   int64      // cputicks when syscall has returned (for tracing)
	traceseq       uint64     // trace event sequencer
	tracelastp     puintptr   // last P emitted an event for this goroutine
	// 如果调用了 LockOsThread,那么这个 g 会绑定到某个 m 上
	lockedm        muintptr
	sig            uint32
	writebuf       []byte
	sigcode0       uintptr
	sigcode1       uintptr
	sigpc          uintptr
	// 创建该 goroutine 的语句的指令地址
	gopc           uintptr         // pc of go statement that created this goroutine    //调用者PC/IP
	ancestors      *[]ancestorInfo // ancestor information goroutine(s) that created this goroutine (only used if debug.tracebackancestors)
	// goroutine 函数的指令地址
	startpc        uintptr         // pc of goroutine function  //任务函数
	racectx        uintptr
	waiting        *sudog         // sudog structures this g is waiting on (that have a valid elem ptr); in lock order
	cgoCtxt        []uintptr      // cgo traceback context
	labels         unsafe.Pointer // profiler labels
	// time.Sleep 缓存的定时器
	timer          *timer         // cached timer for time.Sleep
	selectDone     uint32         // are we participating in a select and did someone win the race?

	// Per-G GC state

	// gcAssistBytes is this G's GC assist credit in terms of
	// bytes allocated. If this is positive, then the G has credit
	// to allocate gcAssistBytes bytes without assisting. If this
	// is negative, then the G must correct this by performing
	// scan work. We track this in bytes to make it fast to update
	// and check for debt in the malloc hot path. The assist ratio
	// determines how this corresponds to scan work debt.
	gcAssistBytes int64
}
|
Goroutine 在 Go 语言运行时使用私有结构体 runtime.g 表示。这个私有结构体非常复杂,总共包含 40 多个用于表示各种状态的成员变量,我们在这里也不会介绍全部字段,而是会挑选其中的一部分进行介绍,首先是与栈相关的两个字段:
1
2
3
4
|
type g struct {
	stack       stack
	stackguard0 uintptr
}
|
stack 字段描述了当前 Goroutine 的栈内存范围 [stack.lo, stack.hi),另一个字段 stackguard0 可以用于调度器抢占式调度。
1
2
3
4
5
6
7
|
// 描述栈的数据结构,栈的范围:[lo, hi)
type stack struct {
    // 栈顶,低地址
    lo uintptr
    // 栈低,高地址
    hi uintptr
}
|
除了 stackguard0 之外,Goroutine 中还包含另外三个与抢占密切相关的字段:
1
2
3
4
5
|
type g struct {
	preempt       bool // 抢占信号
	preemptStop   bool // 抢占时将状态修改成 `_Gpreempted`
	preemptShrink bool // 在同步安全点收缩栈
}
|
我们再节选一些比较有趣或者重要的字段:
1
2
3
4
5
6
|
type g struct {
	m              *m
	sched          gobuf
	atomicstatus   uint32
	goid           int64
}
|
- m — 当前 Goroutine 占用的线程,可能为空;
- atomicstatus — Goroutine 的状态;
- sched — 存储 Goroutine 的调度相关的数据;
- goid — Goroutine 的 ID,该字段对开发者不可见,Go 团队认为引入 ID 会让部分 Goroutine 变得更特殊,从而限制语言的并发能力;
上述四个字段中,我们需要展开介绍 sched 字段的 runtime.gobuf 结构体中包含哪些内容:
 1
 2
 3
 4
 5
 6
 7
 8
 9
10
11
12
13
|
type gobuf struct {
    // 存储 rsp 寄存器的值
    sp   uintptr
    // 存储 rip 寄存器的值
    pc   uintptr
    // 指向 goroutine
    g    guintptr
    ctxt unsafe.Pointer // this has to be a pointer so that gc scans it
    // 保存系统调用的返回值
    ret  sys.Uintreg
    lr   uintptr
    bp   uintptr // for GOEXPERIMENT=framepointer
}
|
- sp — 栈指针(Stack Pointer);
- pc — 程序计数器(Program Counter);
- g — 持有 runtime.gobuf 的 Goroutine;
- ret — 系统调用的返回值;
如果你知道程序时如何在计算机中执行的话(取指、译码、执行),那你就不会对这个结构体感到陌生。由于go的两级线程模型,所以G既要包含代码,又要包含用于执行该代码的栈以以及sp和pc。SP指向的是保存程序数据的栈的栈顶,PC指向的是正在取指的指令。而gogo函数的作用就是从sched结构中恢复出上次G被调度器暂停时的寄存器现场(SP、PC等),这样G就可以从上次暂停的地方继续执行了。
Goroutine 与 defer 和 panic 也有千丝万缕的联系,每一个 Goroutine 上都持有两个分别存储 defer 和 panic 对应结构体的链表:
1
2
3
4
|
type g struct {
	_panic       *_panic // 最内侧的 panic 结构体
	_defer       *_defer // 最内侧的延迟函数结构体
}
|
结构体 runtime.g 的 atomicstatus 字段就存储了当前 Goroutine 的状态。除了几个已经不被使用的以及与 GC 相关的状态之外,Goroutine 可能处于以下 9 个状态:
| 状态 |
描述 |
| _Gidle |
刚刚被分配并且还没有被初始化 |
| _Grunnable |
没有执行代码,没有栈的所有权,存储在运行队列中 |
| _Grunning |
可以执行代码,拥有栈的所有权,被赋予了内核线程 M 和处理器 P |
| _Gsyscall |
正在执行系统调用,拥有栈的所有权,没有执行用户代码,被赋予了内核线程 M 但是不在运行队列上 |
| _Gwaiting |
由于运行时而被阻塞,没有执行用户代码并且不在运行队列上,但是可能存在于 Channel 的等待队列上 |
| _Gdead |
没有被使用,没有执行代码,可能有分配的栈 |
| _Gcopystack |
栈正在被拷贝,没有执行代码,不在运行队列上 |
| _Gpreempted |
由于抢占而被阻塞,没有执行用户代码并且不在运行队列上,等待唤醒 |
| _Gscan |
GC 正在扫描栈空间,没有执行代码,可以与其他状态同时存在 |
上述状态中比较常见是_Grunnable、_Grunning、_Gsyscall、_Gwaiting 和_Gpreempted 五个状态,我们会重点介绍这几个状态,Goroutine 的状态迁移是一个复杂的过程,触发 Goroutine 状态迁移的方法也很多,在这里我们也没有办法介绍全部的迁移线路,我们会从中选择一些进行介绍。
虽然 Goroutine 在运行时中定义的状态非常多而且复杂,但是我们可以将这些不同的状态聚合成最终的三种:等待中、可运行、运行中,在运行期间我们会在这三种不同的状态来回切换:
- 等待中:Goroutine 正在等待某些条件满足,例如:系统调用结束等,包括 _Gwaiting、_Gsyscall 和 _Gpreempted 几个状态;
- 可运行:Goroutine 已经准备就绪,可以在线程运行,如果当前程序中有非常多的 Goroutine,每个 Goroutine 就可能会等待更多的时间,即_Grunnable;
- 运行中:Goroutine 正在某个线程上运行,即 _Grunning;
golang-goroutine-state-transition
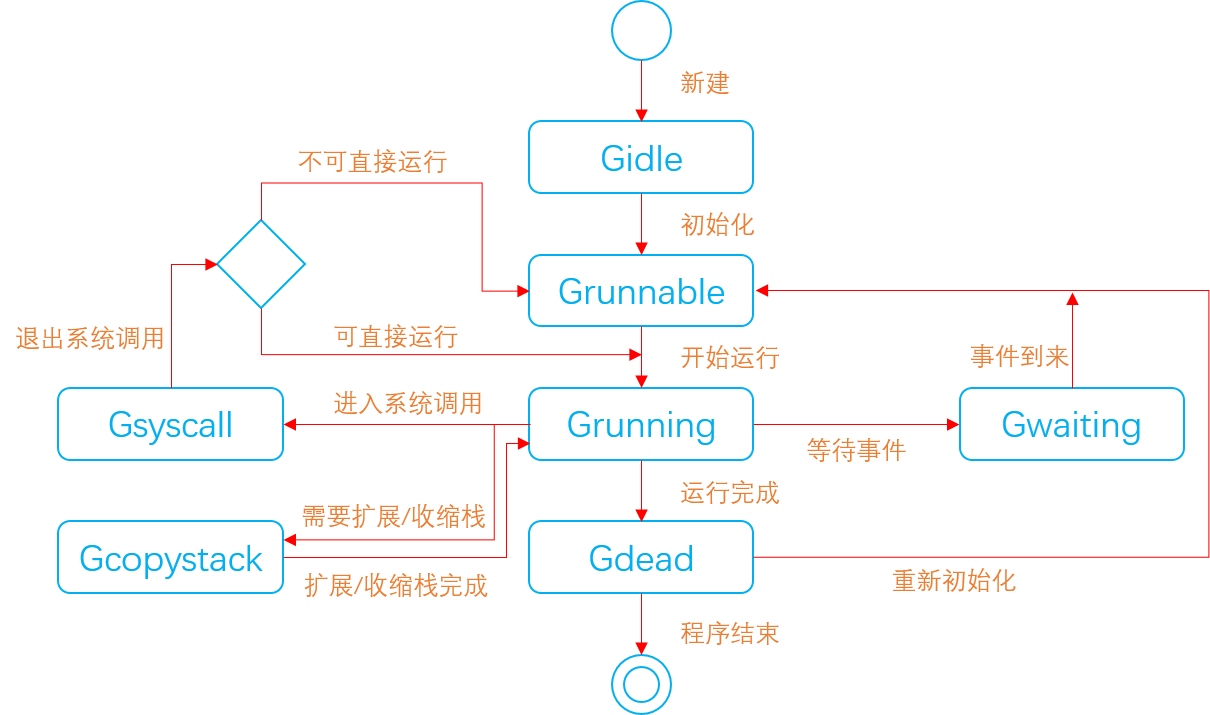
上图展示了 Goroutine 状态迁移的常见路径,其中包括创建 Goroutine 到 Goroutine 被执行、触发系统调用或者抢占式调度器的状态迁移过程。
一个G在创建之初是Gidle状态。只有被初始化之后,其状态才变成Grunnable。一个G真正开始被使用是在其状态设置为Grunnabel之后。
一个G在运行过程中是否会等待某个事件以及等待什么事件,完全由其封装的go函数决定。涉及通道操作,网络I/O以及操纵定时器和调用time.sleep函数会使G进入Gwaiting状态。
事件到来之后,等待的G会被唤醒,并置于Grunnable状态,等待运行。
G在退出系统调用时,运行时系统会首先尝试直接运行这个G。仅当无法直接运行时,才会把它转换为Grunnable状态并放入调度器的可运行G队列。那么为什么不是放入本地P的可运行G队列呢?因为在G进入系统调用之后,本地P就与当前M分离开了。当G退出系统调用时,本地P已经不在了,也就是说这个G没有本地P,所以只能让调度器去接纳它了。
进入死亡状态(Gdead)的G会被放入本地P或调度器的自由G列表,可以在需要的时候重新初始化并使用。相比之下,P在进入死亡状态(Pdead)之后,只能面临销毁的结局。
G 的状态流转:
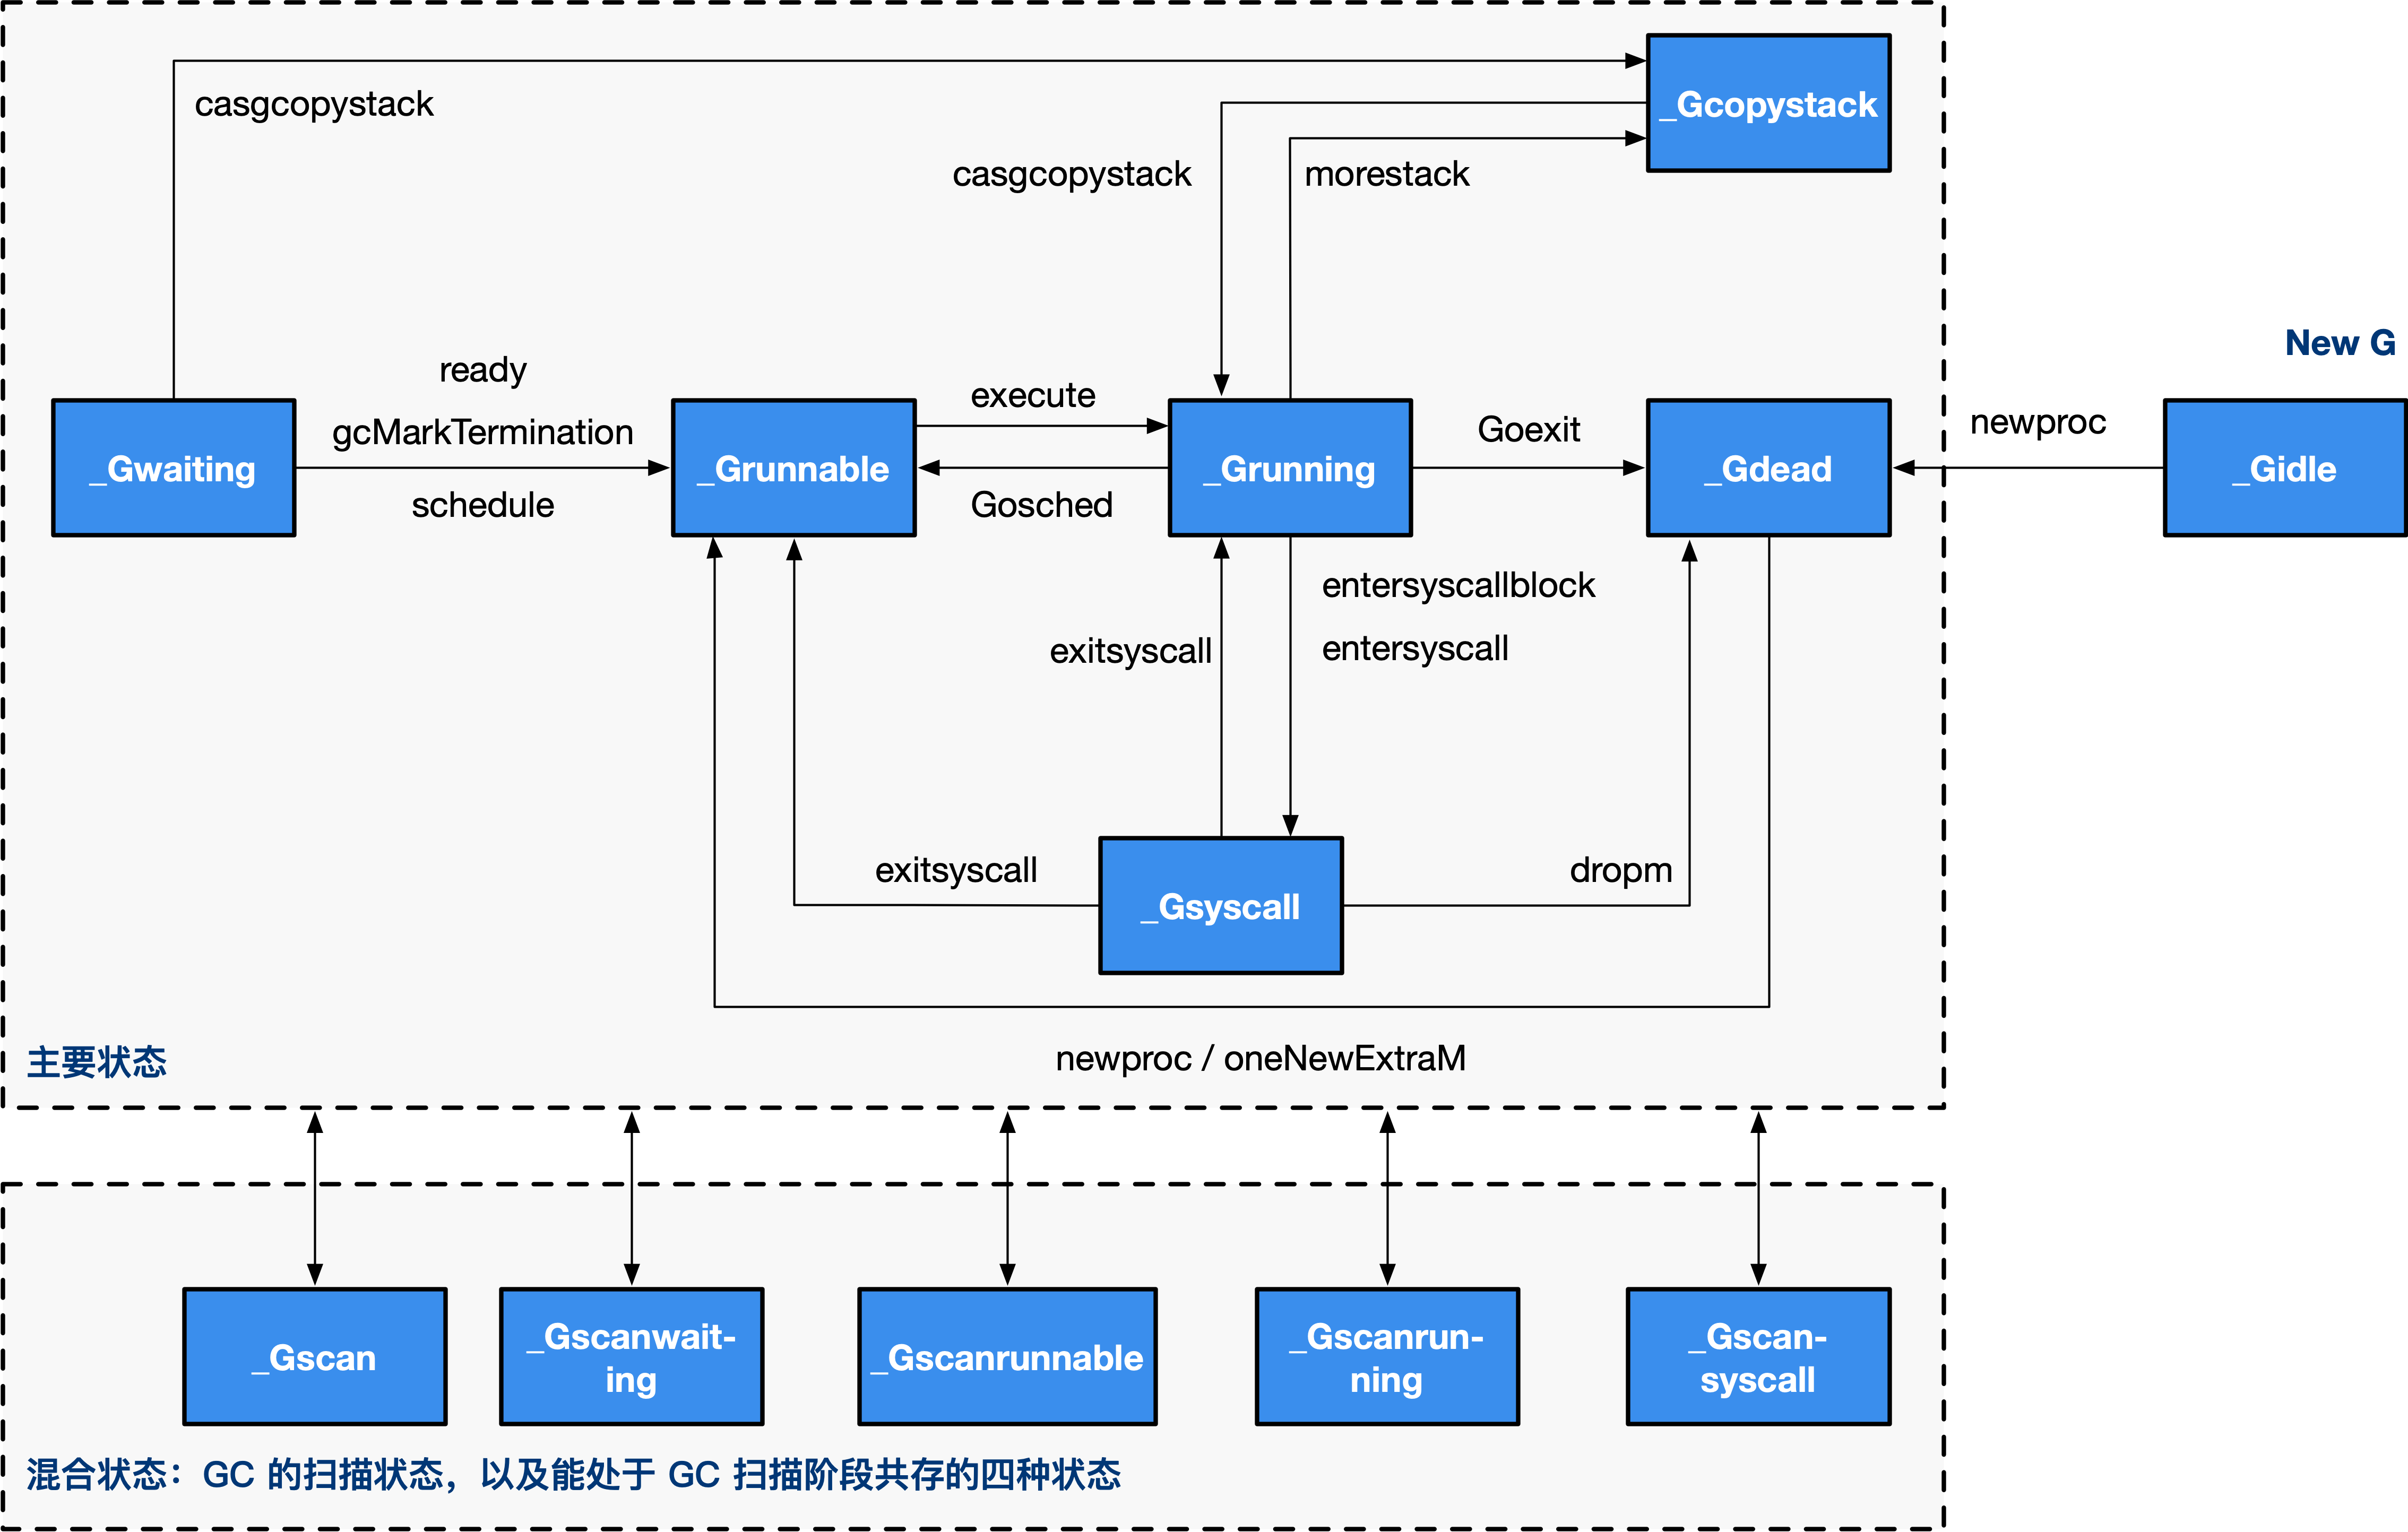
说明一下,上图省略了一些垃圾回收的状态。
M
M:machine,系统线程,执行实体,想要在 CPU 上执行代码,必须有线程,与 C 语言中的线程相同,通过系统调用 clone 来创建。
Go 语言并发模型中的 M 是操作系统线程。调度器最多可以创建 10000 个线程,但是其中大多数的线程都不会执行用户代码(可能陷入系统调用),最多只会有 GOMAXPROCS 个活跃线程能够正常运行。
在默认情况下,运行时会将 GOMAXPROCS 设置成当前机器的核数,我们也可以使用 runtime.GOMAXPROCS 来改变GOMAXPROCS。
在默认情况下,一个四核机器上会创建四个活跃的操作系统线程,每一个线程都对应一个运行时中的 runtime.m 结构体。
在大多数情况下,我们都会使用 Go 的默认设置,也就是线程数等于 CPU 个数,在这种情况下不会触发操作系统的线程调度和上下文切换,所有的调度都会发生在用户态,由 Go 语言调度器触发,能够减少非常多的额外开销。
操作系统线程在 Go 语言中会使用私有结构体 runtime.m 来表示.
 1
 2
 3
 4
 5
 6
 7
 8
 9
10
11
12
13
14
15
16
17
18
19
20
21
22
23
24
25
26
27
28
29
30
31
32
33
34
35
36
37
38
39
40
41
42
43
44
45
46
47
48
49
50
51
52
53
54
55
56
57
58
59
60
61
62
63
64
65
66
67
68
69
70
71
72
73
74
75
76
77
78
79
80
81
82
83
84
85
86
87
88
89
90
91
92
|
type m struct {
	// 记录工作线程(也就是内核线程)使用的栈信息。在执行调度代码时需要使用
    // 执行用户 goroutine 代码时,使用用户 goroutine 自己的栈,因此调度时会发生栈的切换
	g0      *g     // goroutine with scheduling stack	//提供系统栈空间
	morebuf gobuf  // gobuf arg to morestack
	divmod  uint32 // div/mod denominator for arm - known to liblink

	// Fields not known to debuggers.
	procid        uint64       // for debuggers, but offset not hard-coded
	// 处理 signal 的 g
	gsignal       *g           // signal-handling g
	goSigStack    gsignalStack // Go-allocated signal handling stack
	sigmask       sigset       // storage for saved signal mask
	// 通过 tls 结构体实现 m 与工作线程的绑定
    // 线程本地存储
	tls           [6]uintptr   // thread-local storage (for x86 extern register)
	//在新的M上启动某个特殊任务的函数,可能系统监控,GC辅助或M自旋。
	mstartfn      func()	//启动函数
	//当前M正在运行的那个G(goroutine)的指针。
	curg          *g       // current running goroutine	//当前运行G
	caughtsig     guintptr // goroutine running during fatal signal
	// 执行 go 代码时持有的 p (如果没有执行则为 nil)
	p             puintptr // attached p for executing go code (nil if not executing go code)	//绑定P
	//暂存与当前M有潜在关联的P,将P赋给M的nextp字段称为M和P的预联。
	nextp         puintptr	//临时存放P
	oldp          puintptr // the p that was attached before executing a syscall
	id            int64
	mallocing     int32
	throwing      int32
	// 该字段不等于空字符串的话,要保持 curg 始终在这个 m 上运行
	preemptoff    string // if != "", keep curg running on this m
	locks         int32
	dying         int32
	profilehz     int32
	// 为 true 时表示当前 m 处于自旋状态,正在从其他线程偷工作
	spinning      bool // m is out of work and is actively looking for work	//自旋状态
	// m 正阻塞在 note 上
	blocked       bool // m is blocked on a note
	// m 正在执行 write barrier
	inwb          bool // m is executing a write barrier
	newSigstack   bool // minit on C thread called sigaltstack
	printlock     int8
	// 正在执行 cgo 调用
	incgo         bool   // m is executing a cgo call
	freeWait      uint32 // if == 0, safe to free g0 and delete m (atomic)
	fastrand      [2]uint32
	needextram    bool
	traceback     uint8
	// cgo 调用总计数
	ncgocall      uint64      // number of cgo calls in total
	ncgo          int32       // number of cgo calls currently in progress
	cgoCallersUse uint32      // if non-zero, cgoCallers in use temporarily
	// cgo 调用崩溃的 cgo 回溯
	cgoCallers    *cgoCallers // cgo traceback if crashing in cgo call
	// 没有 goroutine 需要运行时,工作线程睡眠在这个 park 成员上,
    // 其它线程通过这个 park 唤醒该工作线程
	park          note	//休眠锁
	// 记录所有工作线程的链表
	alllink       *m // on allm
	schedlink     muintptr	//链表
	mcache        *mcache
	//与当前M锁定的G。一旦锁定,这个M只能运行这个G,这个G也只能由该M运行。
	lockedg       guintptr
	createstack   [32]uintptr    // stack that created this thread.
	lockedExt     uint32         // tracking for external LockOSThread
	lockedInt     uint32         // tracking for internal lockOSThread
	// 正在等待锁的下一个 m
	nextwaitm     muintptr       // next m waiting for lock
	waitunlockf   unsafe.Pointer // todo go func(*g, unsafe.pointer) bool
	waitlock      unsafe.Pointer
	waittraceev   byte
	waittraceskip int
	startingtrace bool
	syscalltick   uint32
	//线程句柄。真正用来执行go代码的系统线程。
	// 工作线程 id
	thread        uintptr // thread handle
	freelink      *m      // on sched.freem

	// these are here because they are too large to be on the stack
	// of low-level NOSPLIT functions.
	libcall   libcall
	libcallpc uintptr // for cpu profiler
	libcallsp uintptr
	libcallg  guintptr
	syscall   libcall // stores syscall parameters on windows

	vdsoSP uintptr // SP for traceback while in VDSO call (0 if not in call)
	vdsoPC uintptr // PC for traceback while in VDSO call

	mOS
}
|
M 是 OS 线程的实体。我们介绍几个比较重要的字段,包括:
- 持有用于执行调度器的 g0
- 持有用于信号处理的 gsignal
- 持有线程本地存储 tls
- 持有当前正在运行的 curg
- 持有运行 Goroutine 时需要的本地资源 p
- 表示自身的自旋和非自旋状态 spining
- 管理在它身上执行的 cgo 调用
- 将自己与其他的 M 进行串联
- 持有当前线程上进行内存分配的本地缓存 mcache
等等其他五十多个字段,包括关于 M 的一些调度统计、调试信息等。
1
2
3
4
5
|
type m struct {
	g0   *g
	curg *g
	...
}
|
其中 g0 是持有调度栈的 Goroutine,curg 是在当前线程上运行的用户 Goroutine,这也是操作系统线程唯一关心的两个 Goroutine。

g0 是一个运行时中比较特殊的 Goroutine,它会深度参与运行时的调度过程,包括 Goroutine 的创建、大内存分配和 CGO 函数的执行。在后面的小节中,我们会经常看到 g0 的身影。runtime.m 结构体中还存在着三个处理器字段,它们分别表示正在运行代码的处理器 p、暂存的处理器 nextp 和执行系统调用之前的使用线程的处理器 oldp:
1
2
3
4
5
|
type m struct {
	p             puintptr
	nextp         puintptr
	oldp          puintptr
}
|
除了在上面介绍的字段之外,runtime.m 中还包含大量与线程状态、锁、调度、系统调用有关的字段,我们会在分析调度过程时详细介绍。
M 的状态变化:
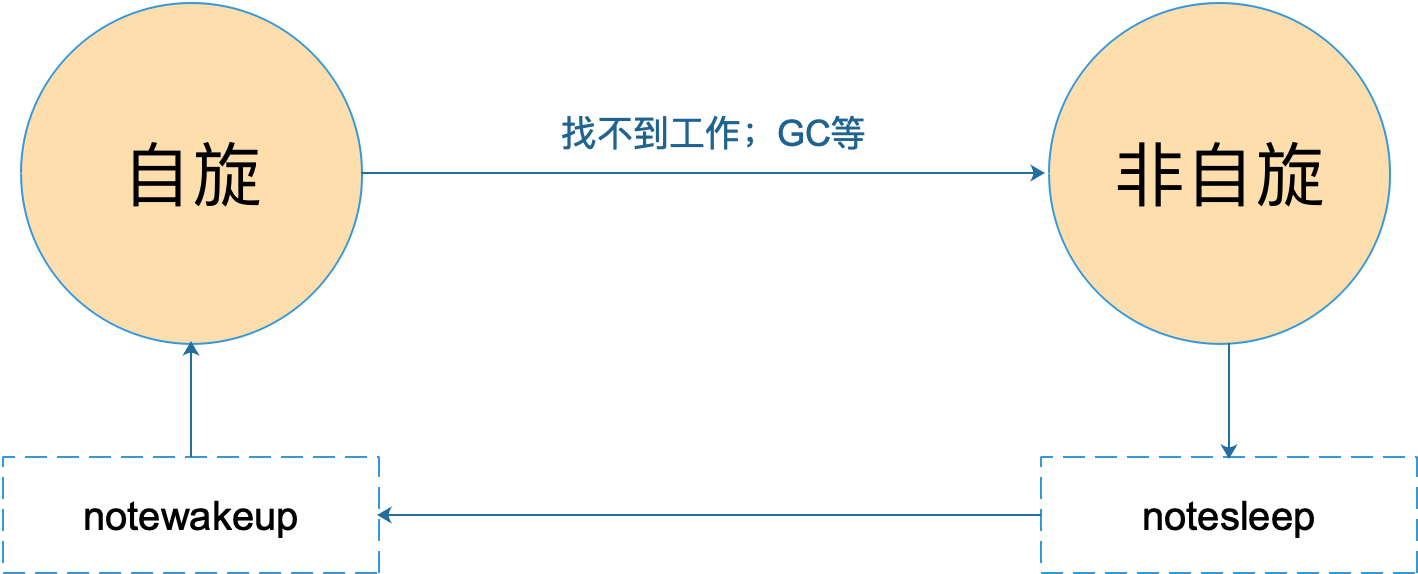
M 只有自旋和非自旋两种状态。自旋的时候,会努力找工作;找不到的时候会进入非自旋状态,之后会休眠,直到有工作需要处理时,被其他工作线程唤醒,又进入自旋状态。
P
P:processor,虚拟处理器,M 必须获得 P 才能执行代码,否则必须陷入休眠(后台监控线程除外),你也可以将其理解为一种 token,有这个 token,才 有在物理 CPU 核心上执行的权力。
调度器中的处理器 P 是线程和 Goroutine 的中间层,它能提供线程需要的上下文环境,也会负责调度线程上的等待队列,通过处理器 P 的调度,每一个内核线程都能够执行多个 Goroutine,它能在 Goroutine 进行一些 I/O 操作时及时切换,提高线程的利用率。
因为调度器在启动时就会创建 GOMAXPROCS 个处理器,所以 Go 语言程序的处理器数量一定会等于 GOMAXPROCS,这些处理器会绑定到不同的内核线程上并利用线程的计算资源运行 Goroutine。
P 只是处理器的抽象,而非处理器本身,它存在的意义在于实现工作窃取(work stealing)算法。 简单来说,每个 P 持有一个 G 的本地队列。
在没有 P 的情况下,所有的 G 只能放在一个全局的队列中。 当 M 执行完 G 而没有 G 可执行时,必须将队列锁住从而取值。
当引入了 P 之后,P 持有 G 的本地队列,而持有 P 的 M 执行完 G 后在 P 本地队列中没有 发现其他 G 可以执行时,虽然仍然会先检查全局队列、网络,但这时增加了一个从其他 P 的 队列偷取(steal)一个 G 来执行的过程。优先级为本地 > 全局 > 网络 > 偷取。
所以整个结构除去 P 的本地 G 队列外,就是一些统计、调试、GC 辅助的字段了。
 1
 2
 3
 4
 5
 6
 7
 8
 9
10
11
12
13
14
15
16
17
18
19
20
21
22
23
24
25
26
27
28
29
30
31
32
33
34
35
36
37
38
39
40
41
42
43
44
45
46
47
48
49
50
51
52
53
54
55
56
57
58
59
60
61
62
63
64
65
66
67
68
69
70
71
72
73
74
75
76
77
78
79
80
81
82
83
84
85
86
87
88
89
90
91
92
93
|
type p struct {
	lock mutex
	// 在 allp 中的索引
	id          int32
	//P的状态
	status      uint32 // one of pidle/prunning/...
	link        puintptr
	// 调度计数 每次调用 schedule 时会加一
	schedtick   uint32     // incremented on every scheduler call
	// 系统调用计数  每次系统调用时加一
	syscalltick uint32     // incremented on every system call
	// sysmon持有的调用计数备份,用于 sysmon 线程记录被监控 p 的系统调用时间和运行时间
	sysmontick  sysmontick // last tick observed by sysmon
	// 反向链接到关联的 m (nil 则表示 idle)
	m           muintptr   // back-link to associated m (nil if idle)
	mcache      *mcache
	racectx     uintptr
	// 不同大小的可用的 defer 结构池
	deferpool    [5][]*_defer // pool of available defer structs of different sizes (see panic.go)
	deferpoolbuf [5][32]*_defer

	// Cache of goroutine ids, amortizes accesses to runtime·sched.goidgen.
	goidcache    uint64
	goidcacheend uint64

	// Queue of runnable goroutines. Accessed without lock.
	//可运行G队列的队头
	runqhead uint32
	//可运行G队列的队尾
	runqtail uint32
	//可运行G队列,固定长度为256
	runq     [256]guintptr //本地队列,访问时无须加锁
	// runnext, if non-nil, is a runnable G that was ready'd by
	// the current G and should be run next instead of what's in
	// runq if there's time remaining in the running G's time
	// slice. It will inherit the time left in the current time
	// slice. If a set of goroutines is locked in a
	// communicate-and-wait pattern, this schedules that set as a
	// unit and eliminates the (potentially large) scheduling
	// latency that otherwise arises from adding the ready'd
	// goroutines to the end of the run queue.
	// runnext 非空时,代表的是一个 runnable 状态的 G,
    // 这个 G 被 当前 G 修改为 ready 状态,相比 runq 中的 G 有更高的优先级。
    // 如果当前 G 还有剩余的可用时间,那么就应该运行这个 G
    // 运行之后,该 G 会继承当前 G 的剩余时间
	runnext guintptr    //优先执行

	// Available G's (status == Gdead)
	//自由G队列
	gFree struct {
		gList
		n int32
	}

	sudogcache []*sudog
	sudogbuf   [128]*sudog

	tracebuf traceBufPtr

	// traceSweep indicates the sweep events should be traced.
	// This is used to defer the sweep start event until a span
	// has actually been swept.
	traceSweep bool
	// traceSwept and traceReclaimed track the number of bytes
	// swept and reclaimed by sweeping in the current sweep loop.
	traceSwept, traceReclaimed uintptr

	palloc persistentAlloc // per-P to avoid mutex

	// Per-P GC state
	gcAssistTime         int64 // Nanoseconds in assistAlloc
	gcFractionalMarkTime int64 // Nanoseconds in fractional mark worker
	gcBgMarkWorker       guintptr
	gcMarkWorkerMode     gcMarkWorkerMode

	// gcMarkWorkerStartTime is the nanotime() at which this mark
	// worker started.
	gcMarkWorkerStartTime int64

	// gcw is this P's GC work buffer cache. The work buffer is
	// filled by write barriers, drained by mutator assists, and
	// disposed on certain GC state transitions.
	gcw gcWork

	// wbBuf is this P's GC write barrier buffer.
	//
	// TODO: Consider caching this in the running G.
	wbBuf wbBuf

	runSafePointFn uint32 // if 1, run sched.safePointFn at next safe point

	pad cpu.CacheLinePad
}
|
runtime.p 是处理器的运行时表示,作为调度器的内部实现,它包含的字段也非常多,其中包括与性能追踪、垃圾回收和计时器相关的字段,这些字段也非常重要,但是在这里就不一一展示了,我们主要关注处理器中的线程和运行队列:
1
2
3
4
5
6
7
8
|
type p struct {
	m           	muintptr
	runqhead 	uint32
	runqtail 	uint32
	runq     	[256]guintptr
	runnext 	guintptr
	...
}
|
反向存储的线程维护着线程与处理器之间的关系,而 runhead、runqtail 和 runq 三个字段表示处理器持有的运行队列,其中存储着待执行的 Goroutine 列表,runnext 中是线程下一个需要执行的 Goroutine。
runtime.p 结构体中的状态 status 字段会是以下五种中的一种:
| 状态 |
描述 |
| _Pidle |
处理器没有运行用户代码或者调度器,被空闲队列或者改变其状态的结构持有,运行队列为空 |
| _Prunning |
被线程 M 持有,并且正在执行用户代码或者调度器 |
| _Psyscall |
没有执行用户代码,当前线程陷入系统调用 |
| _Pgcstop |
被线程 M 持有,当前处理器由于垃圾回收被停止 |
| _Pdead |
当前处理器已经不被使用 |
通过分析处理器 P 的状态,我们能够对处理器的工作过程有一些简单理解,例如处理器在执行用户代码时会处于 _Prunning 状态,在当前线程执行 I/O 操作时会陷入_Psyscall 状态。
P在创建之初的状态是Pgcstop,但这并不意味着运行时系统要进行垃圾回收。P出于这一状态的时间会非常短暂,在紧接着的初始化后,运行时系统会将其状态设置为Pidle并放入调度器的空闲P列表。
非Pdead状态的P在运行时系统停止调度时都会被置于Pgcstop状态。重启调度时(如垃圾回收结束后),所有P都会被置于Pidle状态,而不是他们原来的状态。
非Pgcstop状态的P都会因最大P数量的减小而被认为是多余的,并被置于Pdead状态。当P进入Pdead状态之前,该P的可运行G队列会被转移到调度器的可运行G队列,它的自由G列表会被转移到调度器的自由G列表。
每个P中有一个可运行的G队列,以及一个自由G列表。自由G列表中包含了已运行完成的G。随着已运行完成的G越来越多,该列表会不断增长。如果它增长到一定程度,运行时系统会把其中部分G转移到调度器的自由G列表。同样,当调度器发现其中的自由G太少时,会预先尝试从调度器的自由G列表中转移一些G过来。
当使用go语句启用一个G时,运行时系统会先从相应P的自由G列表中获取一个G来封装这个go语句的函数。仅当获取不到的时候,也就是调度器的自由G列表也空了,才会创建一个新的G。
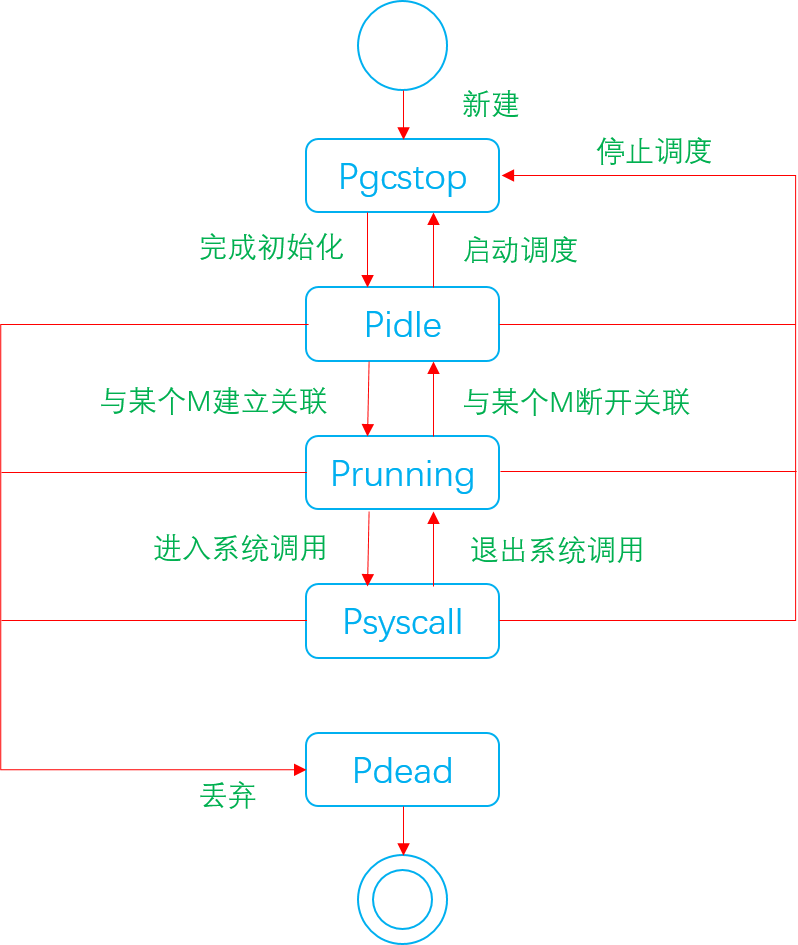
P 的状态流转:
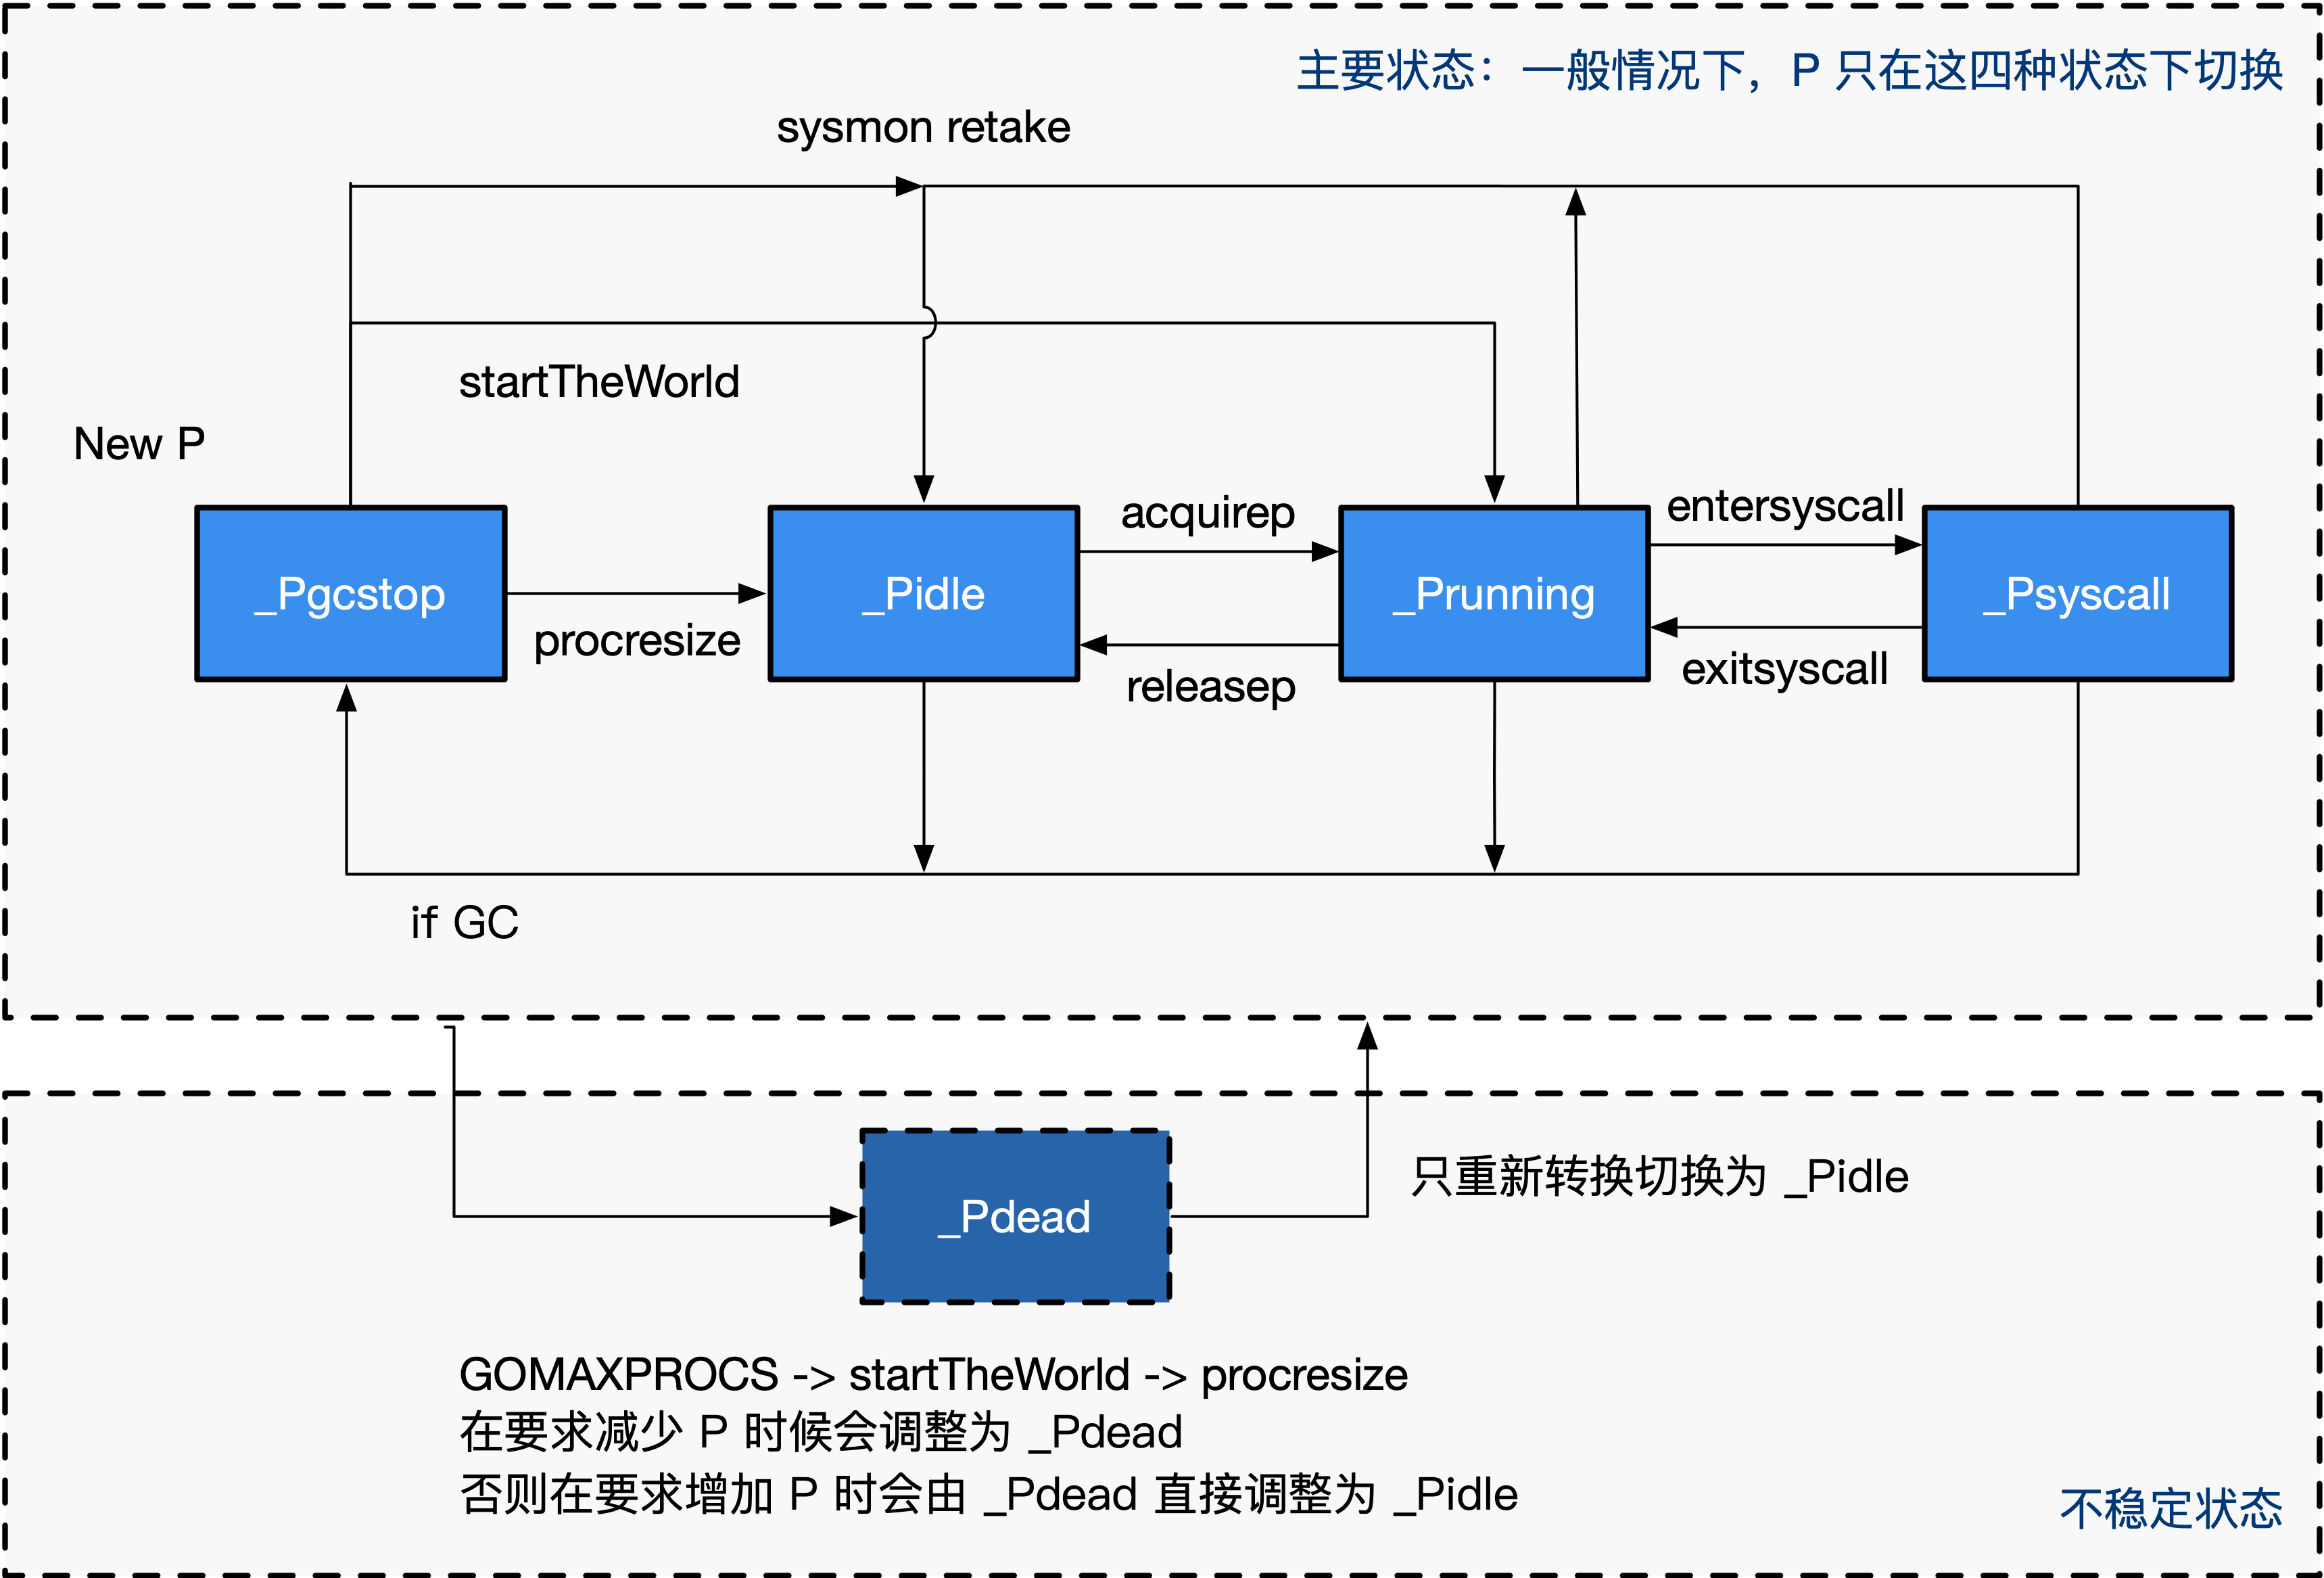
通常情况下(在程序运行时不调整 P 的个数),P 只会在上图中的四种状态下进行切换。 当程序刚开始运行进行初始化时,所有的 P 都处于 _Pgcstop 状态, 随着 P 的初始化(runtime.procresize),会被置于_Pidle。
当 M 需要运行时,会 runtime.acquirep 来使 P 变成 Prunning 状态,并通过 runtime.releasep 来释放。
当 G 执行时需要进入系统调用,P 会被设置为 _Psyscall, 如果这个时候被系统监控抢夺(runtime.retake),则 P 会被重新修改为_Pidle。
如果在程序运行中发生 GC,则 P 会被设置为 _Pgcstop, 并在 runtime.startTheWorld 时重新调整为_Pidle 或者 _Prunning。
schedt
调度器,所有 Goroutine 被调度的核心,存放了调度器持有的全局资源,访问这些资源需要持有锁:
- 管理了能够将 G 和 M 进行绑定的 M 队列
- 管理了空闲的 P 链表(队列)
- 管理了 G 的全局队列
- 管理了可被复用的 G 的全局缓存
调度器的数据结构是一个结构体,但是不能单纯的说调度器就是一个结构体。结构体只是为了辅助调度,真正的调度行为还的靠调度函数来完成。
 1
 2
 3
 4
 5
 6
 7
 8
 9
10
11
12
13
14
15
16
17
18
19
20
21
22
23
24
25
26
27
28
29
30
31
32
33
34
35
36
37
38
39
40
41
42
43
44
45
46
47
48
49
50
51
52
53
54
55
56
57
58
59
60
61
62
63
64
65
66
67
68
69
70
71
72
73
74
75
76
77
78
79
80
81
82
83
84
85
86
87
88
89
90
91
92
93
94
95
96
97
|
type schedt struct {
	// accessed atomically. keep at top to ensure alignment on 32-bit systems.
    	// 需以原子访问访问。
    	// 保持在 struct 顶部,以使其在 32 位系统上可以对齐
	goidgen  uint64
	lastpoll uint64

	lock mutex

	// When increasing nmidle, nmidlelocked, nmsys, or nmfreed, be
	// sure to call checkdead().
	//闲置M链表 由空闲的工作线程组成的链表
	midle        muintptr // idle m's waiting for work
	//闲置的M数量 空闲的工作线程数量
	nmidle       int32    // number of idle m's waiting for work
	//因锁定而停止的M的数量 空闲的且被 lock 的 m 计数
	nmidlelocked int32    // number of locked m's waiting for work
	//已创建的M的数量,也是下一个M的ID号
	mnext        int64    // number of m's that have been created and next M ID
	// 表示最多所能创建的工作线程数量
	maxmcount    int32    // maximum number of m's allowed (or die)	//M最大闲置数
	//执行系统监测任务的M的数量
	nmsys        int32    // number of system m's not counted for deadlock
	//已被释放的M的数量
	nmfreed      int64    // cumulative number of freed m's
	// goroutine 的数量,自动更新
	ngsys uint32 // number of system goroutines; updated atomically
	// 由空闲的 p 结构体对象组成的链表
	pidle      puintptr // idle p's
	// 空闲的 p 结构体对象的数量
	npidle     uint32
	// 自旋状态的 M 的数量
	nmspinning uint32 // See "Worker thread parking/unparking" comment in proc.go.

	// Global runnable queue.
	// 全局 runnable G 队列
	runq     gQueue
	// 元素数量
	runqsize int32

	// disable controls selective disabling of the scheduler.
	//
	// Use schedEnableUser to control this.
	//
	// disable is protected by sched.lock.
	disable struct {
		// user disables scheduling of user goroutines.
		user     bool
		runnable gQueue // pending runnable Gs
		n        int32  // length of runnable
	}

	// Global cache of dead G's.
	// dead G 的全局缓存
    	// 已退出的 goroutine 对象,缓存下来
    	// 避免每次创建 goroutine 时都重新分配内存
	gFree struct {
		lock    mutex
		// 包含栈的 Gs
		stack   gList // Gs with stacks
		// 没有栈的 Gs
		noStack gList // Gs without stacks
		// 空闲 g 的数量
		n       int32
	}

	// Central cache of sudog structs.
	// sudog 结构的集中缓存
	sudoglock  mutex
	sudogcache *sudog

	// Central pool of available defer structs of different sizes.
	// 不同大小的可用的 defer struct 的集中缓存池
	deferlock mutex
	deferpool [5]*_defer

	// freem is the list of m's waiting to be freed when their
	// m.exited is set. Linked through m.freelink.
	freem *m

	gcwaiting  uint32 // gc is waiting to run  //是否需要因一些任务而停止调度
	stopwait   int32//需要停止但仍未停止的P的数量
	stopnote   note//实现与stopwait相关的事件通知机制
	sysmonwait uint32//停止调度期间,系统监控任务是否在等待
	sysmonnote note//实现与sysmonwait相关的事件通知机制

	// safepointFn should be called on each P at the next GC
	// safepoint if p.runSafePointFn is set.
	safePointFn   func(*p)
	safePointWait int32
	safePointNote note

	profilehz int32 // cpu profiling rate
	// 上次修改 gomaxprocs 的纳秒时间
	procresizetime int64 // nanotime() of last change to gomaxprocs
	totaltime      int64 // ∫gomaxprocs dt up to procresizetime
}
|
在程序运行过程中,schedt 对象只有一份实体,它维护了调度器的所有信息。
在go运行时系统中,一些任务执行前需要停止调度。例如垃圾回收任务中的某些子任务,发起运行时恐慌的任务。下面我们将这类任务统称为串行运行时任务。上面的字段都是和串行运行时任务相关的。并且它们也是并发安全的。
暂停调度任务:主要与gcwaiting、stopwait、stopnote字段有关。
- gcwaiting字段表示是否需要停止调度。在停止调度前,该值被设置为1;恢复调度前,该值被设置为0。
- 一些调度任务在执行时,一旦发现gcwaiting的值为1,就会把当前P的状态设置为Pgcstop,然后自减stopwait字段的值。
- 当自减后发现stopwait的值为0,说明所有P都进入了Pgcstop状态。然后就利用stopnote字段唤醒因等待调度停止而暂停的串行运行时任务。
暂停系统检测任务:主要与sysmonwait和sysmonnote字段相关。
- 串行运行时任务执行前,系统检测任务也要暂停。
- sysmonwait字段表示是否已暂停。0表示未暂停,1表示已暂停。
- 系统监测任务是一直执行的,它处于无限循环中。在每个循环的开始,系统监测程序都会检查调度情况。
- 一旦发现调度停止(gcwaiting的值不为0或所有P都已闲置),就会把sysmonwait字段的值设置为1,并利用sysmonnote字段暂停自身。
- 恢复调度之前,调度器若发现sysmonwait的值不为0,就把它置为0,并利用sysmonnote字段恢复系统监测任务的执行。
调度循环流程
当我们每次写下:
1
2
3
|
go func(){
	println("hello world)
}()
|
的时候,到底发生了什么?其实是向runtime提交了一个计算任务.func(){xxxxx}里包裹的代码就是这个计算任务的内容.
Go 的调度流程本质上是一个生产-消费流程
G-P-M调度模型如下:

goroutine 的生产端:
goroutine 的消费端:
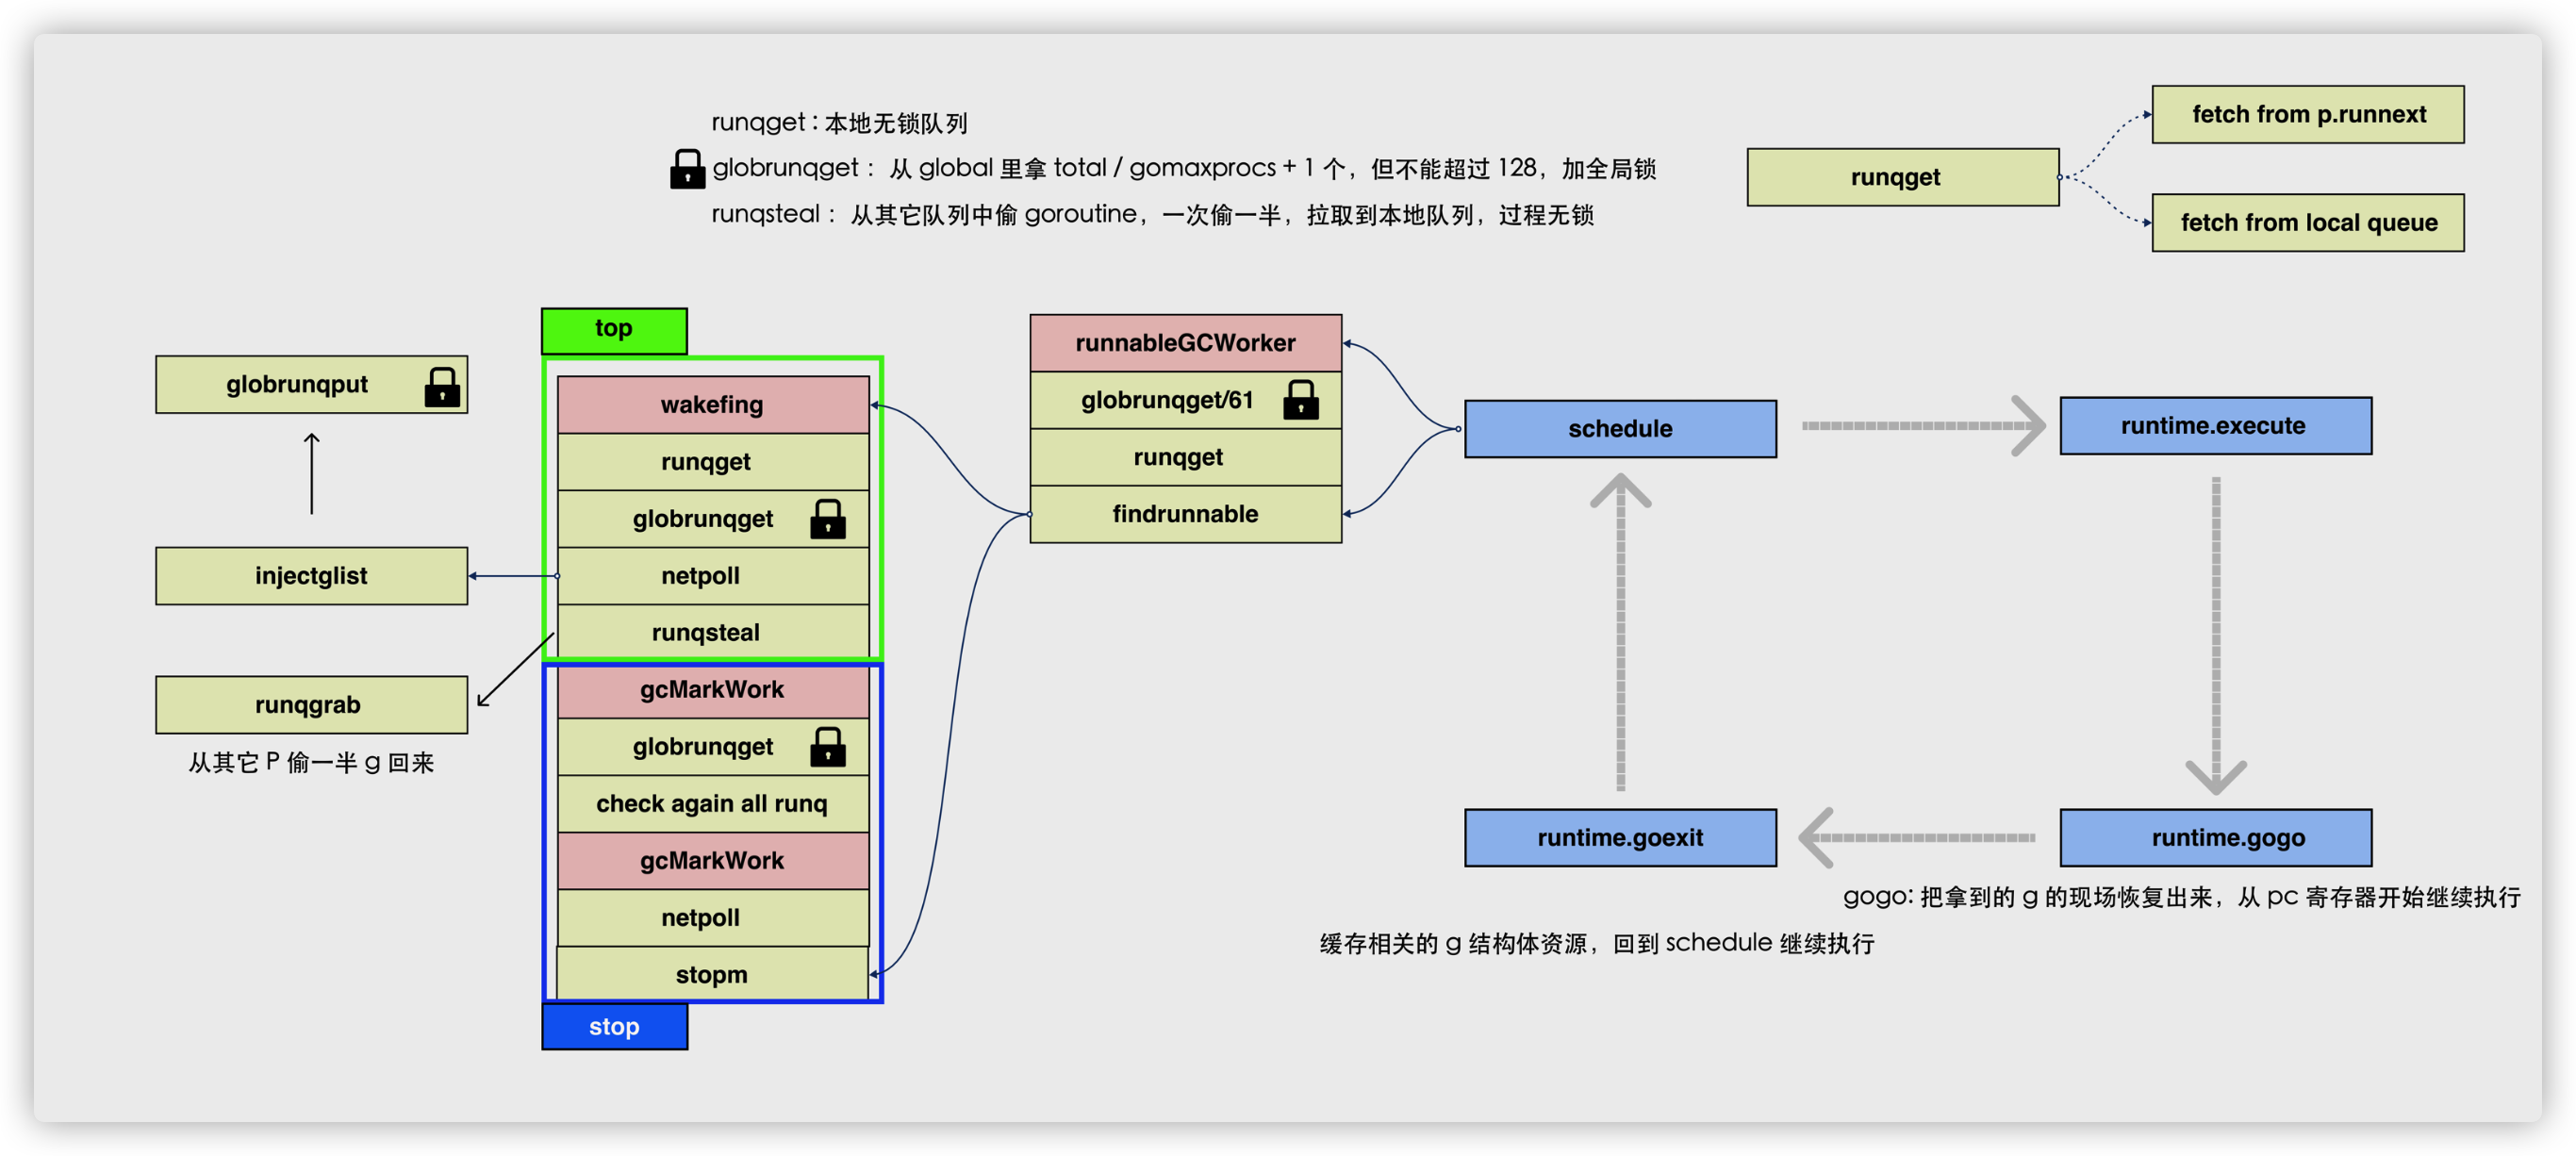
M 执行调度循环时, 必须与一个 P 绑定.
Work stealing 就是说的 runqsteal -> runqgrab 这个流程
考虑如下代码输出:
 1
 2
 3
 4
 5
 6
 7
 8
 9
10
11
12
13
14
15
16
17
18
|
package main

import (
	"fmt"
	"runtime"
	"time"
)

func main() {
	runtime.GOMAXPROCS(1)
	for i := 0; i < 10; i++ {
		i := i
		go func() {
			fmt.Println(i)
		}()
	}
	time.Sleep(time.Hour)
}
|
 1
 2
 3
 4
 5
 6
 7
 8
 9
10
|
9
0
1
2
3
4
5
6
7
8
|
考虑下面代码:
 1
 2
 3
 4
 5
 6
 7
 8
 9
10
11
12
13
|
package main

func main() {
	i := 1
	go func() {
		// 这个goroutine会导致进程在gc时hang 死
		// GC时需要停止所有goroutine.而老版本的Go的g停止需要主动让出
		// 1.14增加基于信号的抢占之后,该问题被解决
		for {
			i++
		}
	}()
}
|
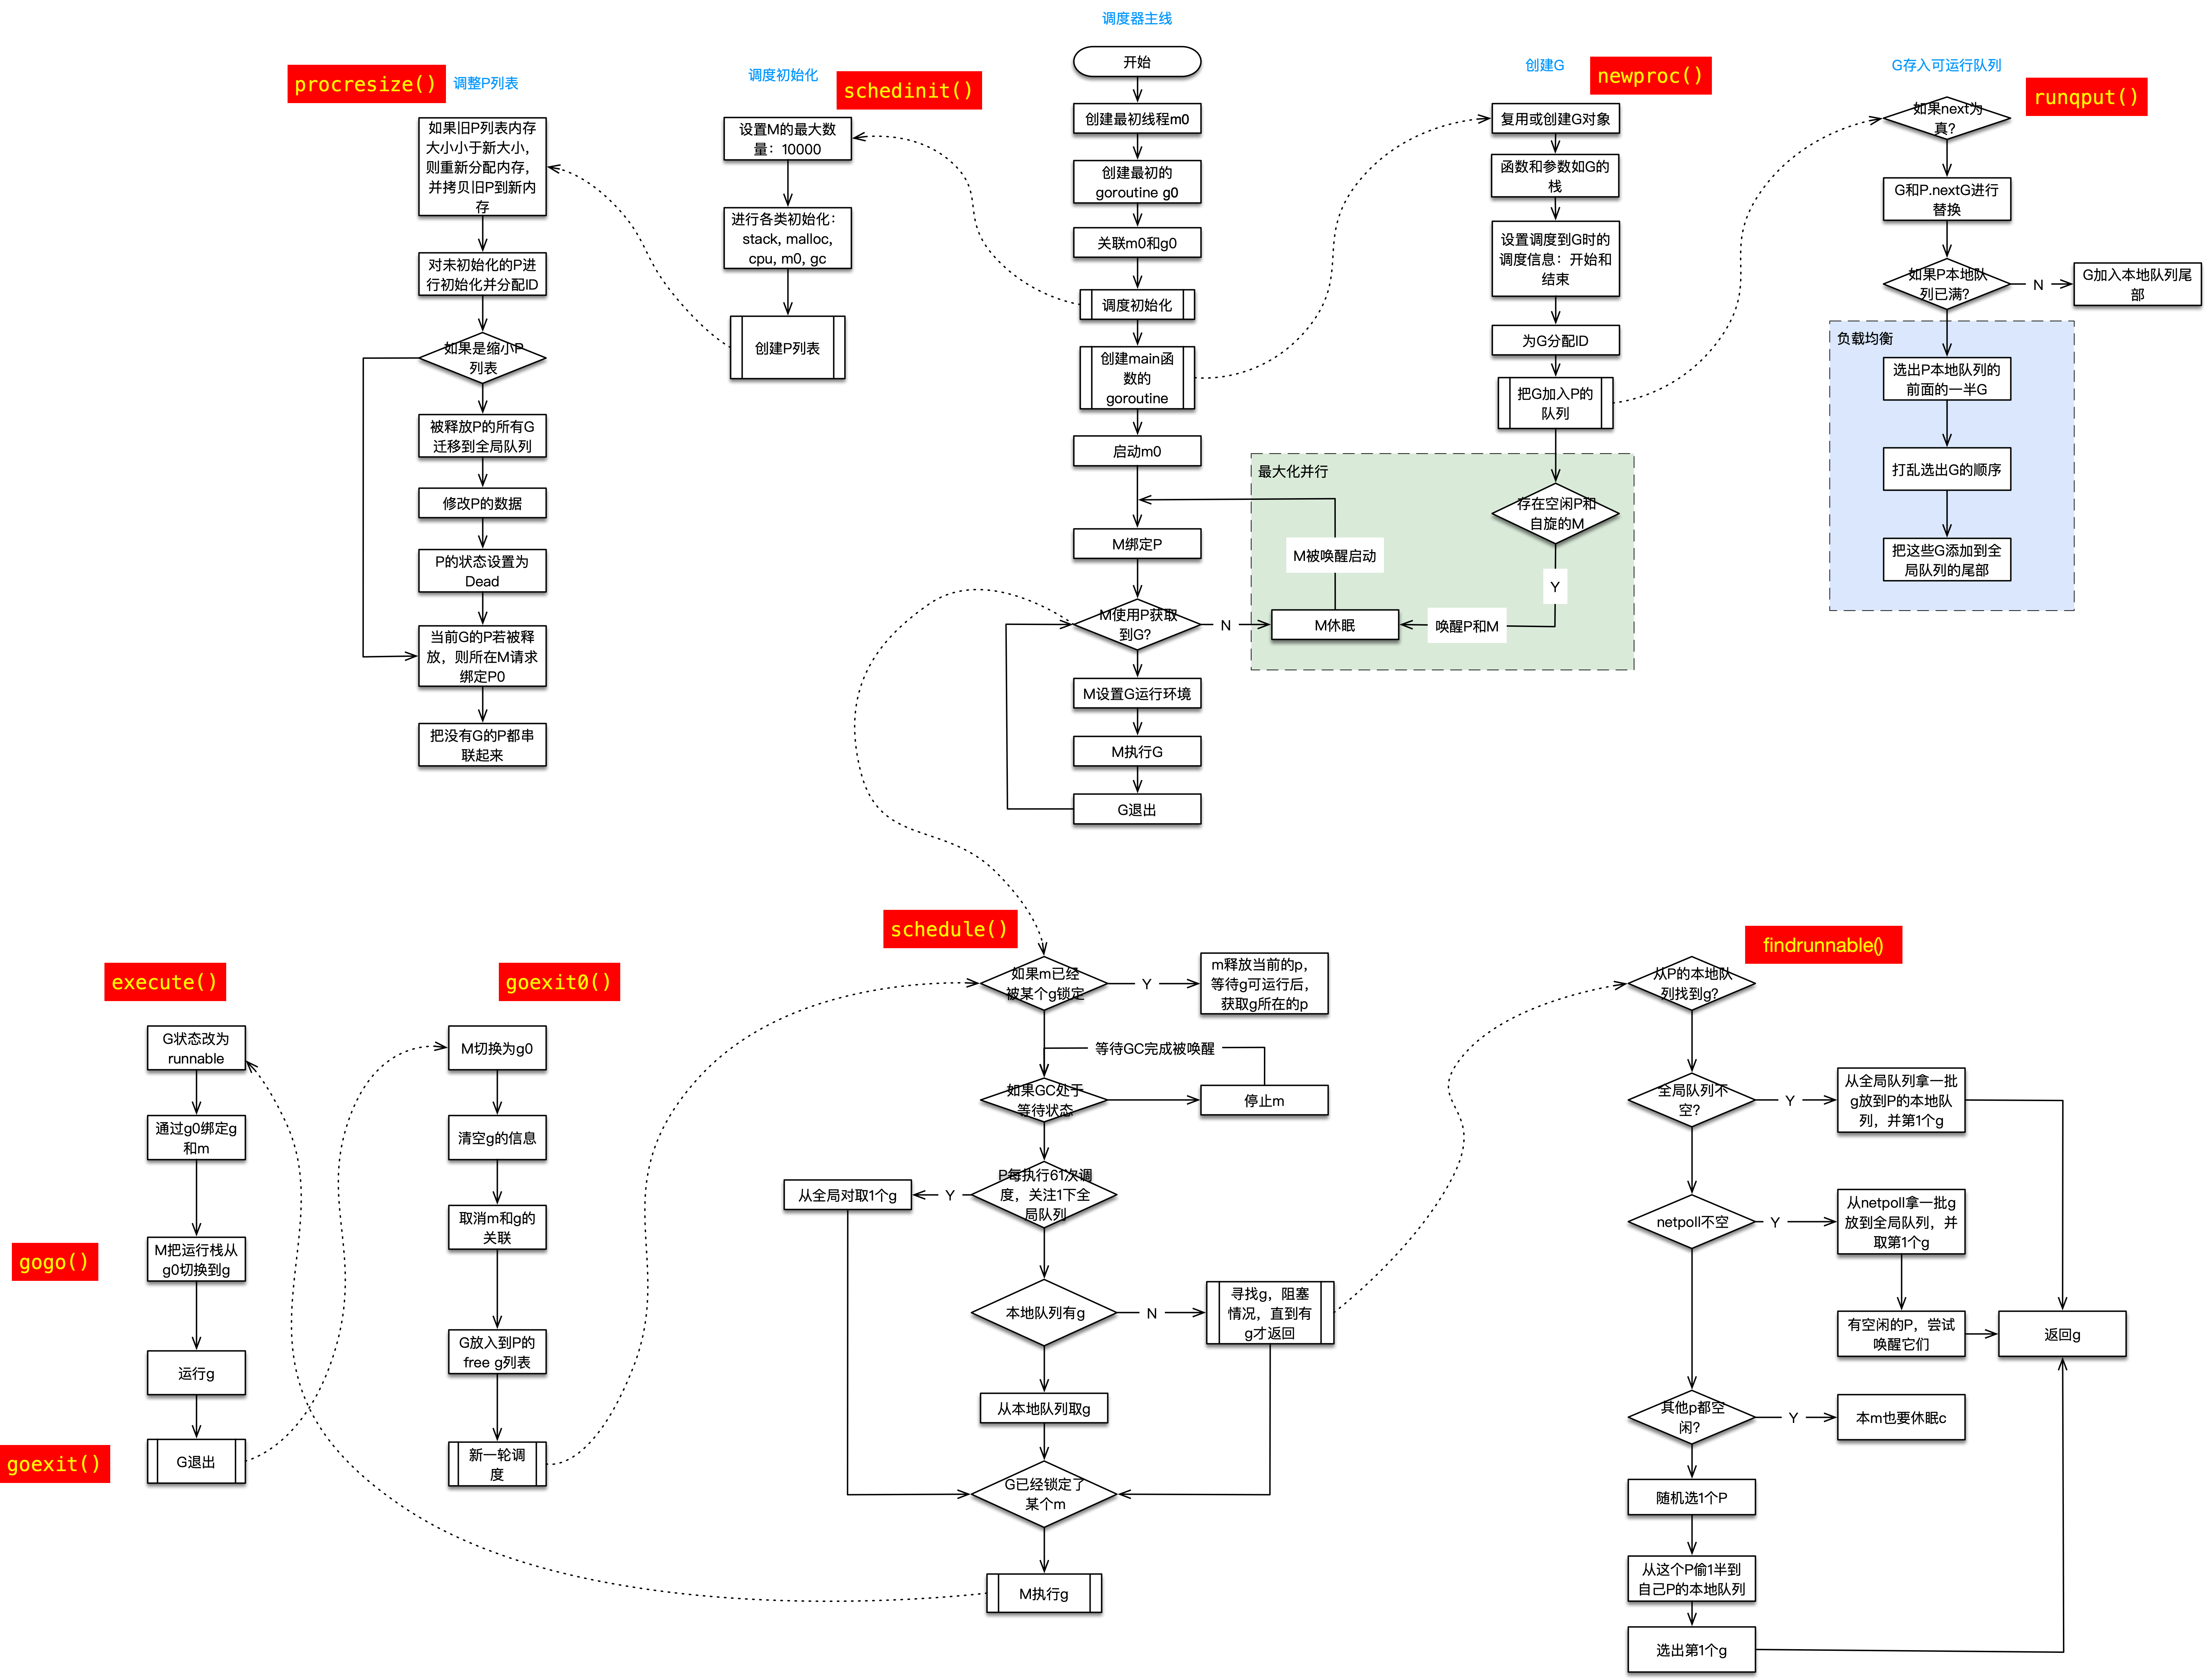
下面流程图,画出了主要的调度流程,现在我们根据流程图分析相关源码
调度器初始化
schedinit
运行时通过 runtime.schedinit 函数初始化调度器:
在调度器初始函数执行的过程中会将 maxmcount 设置成 10000,这也就是一个 Go 语言程序能够创建的最大线程数,虽然最多可以创建 10000 个线程,但是可以同时运行的线程还是由 GOMAXPROCS 变量控制。
同时runtime/debug包的SetMaxThreads函数可以用来修改这一限制。该函数会返回旧的M数量的最大值。需要注意的是,如果你给定的新值比当时已有的M的数量小,运行时系统会立即引发一个运行时恐慌。所以调用这个函数一定要慎重,而且如果真的有必要,那么越早调用越好。因为调整的过程中会损耗部分性能。
我们从环境变量 GOMAXPROCS 获取了程序能够同时运行的最大处理器数之后就会调用 runtime.procresize 更新程序中处理器的数量,在这时整个程序不会执行任何用户 Goroutine,调度器也会进入锁定状态.
 1
 2
 3
 4
 5
 6
 7
 8
 9
10
11
12
13
14
15
16
17
18
19
20
21
22
23
24
25
26
27
28
29
30
31
32
33
34
35
36
37
38
39
40
41
42
43
44
45
46
47
48
49
50
51
52
53
54
55
56
57
58
59
60
61
62
63
64
65
66
67
68
69
70
71
|
// The bootstrap sequence is:
//
//	call osinit 初始化系统核心数。
//	call schedinit	初始化调度器。
//	make & queue new G	创建新的 goroutine。
//	call runtime·mstart	调用 mstart,启动调度。
//
// The new G calls runtime·main.	在新的 goroutine 上运行 runtime.main 函数。
func schedinit() {
	// raceinit must be the first call to race detector.
	// In particular, it must be done before mallocinit below calls racemapshadow.
	// getg 由编译器实现
    	// get_tls(CX)
    	// MOVQ g(CX), BX; BX存器里面现在放的是当前g结构体对象的地址
	_g_ := getg()
	if raceenabled {
		_g_.racectx, raceprocctx0 = raceinit()
	}
    //设置最大M数量
	sched.maxmcount = 10000

	tracebackinit()
    	moduledataverify()
    	//初始化栈空间复用管理链表
	stackinit()
   	 mallocinit()
    	// 初始化 m0
	mcommoninit(_g_.m)
	cpuinit()       // must run before alginit
	alginit()       // maps must not be used before this call
	modulesinit()   // provides activeModules
	typelinksinit() // uses maps, activeModules
	itabsinit()     // uses activeModules

	msigsave(_g_.m)
	initSigmask = _g_.m.sigmask

	goargs()
	goenvs()
	parsedebugvars()
	gcinit()

    sched.lastpoll = uint64(nanotime())
    // 初始化 P 的个数
    // 系统中有多少核,就创建和初始化多少个 p 结构体对象
	procs := ncpu
	if n, ok := atoi32(gogetenv("GOMAXPROCS")); ok && n > 0 {
		procs = n
    }
    //调整P数量
    //注意:此刻所有P都是新建的,所以不可能返回有本地任务的P
	if procresize(procs) != nil {
		throw("unknown runnable goroutine during bootstrap")
	}

	// For cgocheck > 1, we turn on the write barrier at all times
	// and check all pointer writes. We can't do this until after
	// procresize because the write barrier needs a P.
	if debug.cgocheck > 1 {
		writeBarrier.cgo = true
		writeBarrier.enabled = true
		for _, p := range allp {
			p.wbBuf.reset()
		}
	}
	if buildVersion == "" {
		// Condition should never trigger. This code just serves
		// to ensure runtime·buildVersion is kept in the resulting binary.
		buildVersion = "unknown"
	}
}
|
mcommoninit函数初始化m0.
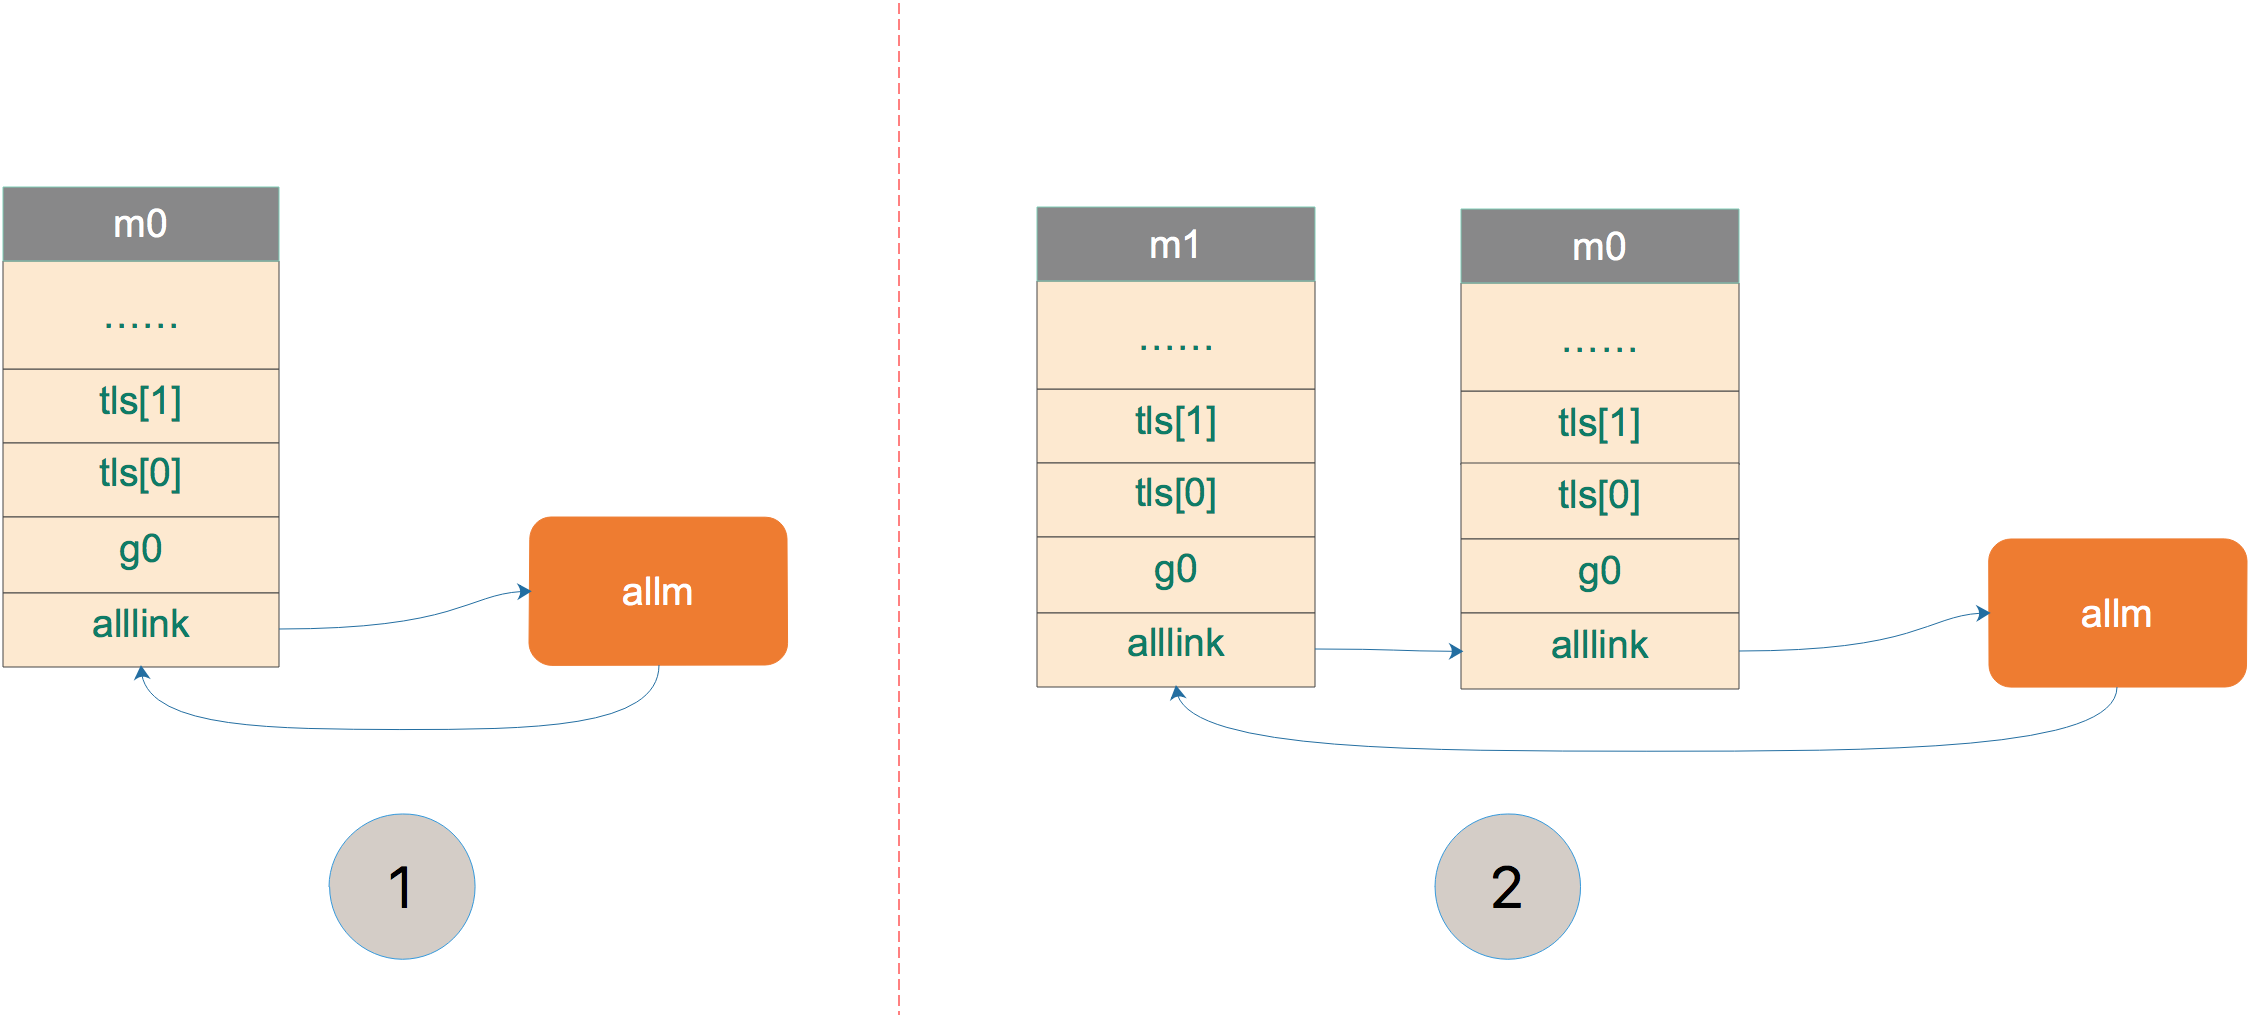
上图中,将 m0 挂在 allm 上。之后,若新创建 m,则 m1 会和 m0 相连。
M 其实就是 OS 线程,它只有两个状态:自旋、非自旋。 在调度器初始化阶段,只有一个 M,那就是主 OS 线程,因此这里的 commoninit 仅仅只是对 M 进行一个初步的初始化, 该初始化包含对 M 及用于处理 M 信号的 G 的相关运算操作,未涉及工作线程的暂止和复始。
getg
函数首先调用 getg() 函数获取当前正在运行的 g,getg() 在 src/runtime/stubs.go 中声明,真正的代码由编译器生成。
1
2
3
4
|
// getg returns the pointer to the current g.
// The compiler rewrites calls to this function into instructions
// that fetch the g directly (from TLS or from the dedicated register).
func getg() *g
|
getg 返回当前正在运行的 goroutine 的指针,它会从 tls 里取出 tls[0],也就是当前运行的 goroutine 的地址。编译器插入类似下面的代码:
1
2
|
get_tls(CX)
MOVQ g(CX), BX; // BX存器里面现在放的是当前g结构体对象的地址
|
调整P列表
procresize
默认只有schedinit和startTheWorldWithSema会调用procresize函数.
- 在schedinit阶段,所有P对象都是新建的.除分配给当前主线程的外,其他都被放入空闲链表.
- 而startTheWorldWithSema会激活全部有本地任务的P对象
runtime.procresize 的执行过程如下:
- 调用时已经 STW,记录调整 P 的时间;
- 如果全局变量 allp 切片中的处理器数量少于期望数量,就会对切片进行扩容;
- 使用 new 创建新的处理器结构体并调用 runtime.p.init 方法初始化刚刚扩容的处理器;
- 如果当前的 P 还可以继续使用(没有被移除),则将 P 设置为 _Prunning;
- 否则将第一个 P 抢过来给当前 G 的 M 进行绑定,通过指针将线程 m0 和处理器 allp[0] 绑定到一起;
- 调用 runtime.p.destroy 方法释放不再使用的处理器结构;
- 通过截断改变全局变量 allp 的长度保证与期望处理器数量相等;
- 将除 allp[0] 之外的处理器 P 全部设置成 _Pidle 并加入到全局的空闲队列中;
调用 runtime.procresize 就是调度器启动的最后一步,在这一步过后调度器会完成相应数量处理器的启动,等待用户创建运行新的 Goroutine 并为 Goroutine 调度处理器资源。
  1
  2
  3
  4
  5
  6
  7
  8
  9
 10
 11
 12
 13
 14
 15
 16
 17
 18
 19
 20
 21
 22
 23
 24
 25
 26
 27
 28
 29
 30
 31
 32
 33
 34
 35
 36
 37
 38
 39
 40
 41
 42
 43
 44
 45
 46
 47
 48
 49
 50
 51
 52
 53
 54
 55
 56
 57
 58
 59
 60
 61
 62
 63
 64
 65
 66
 67
 68
 69
 70
 71
 72
 73
 74
 75
 76
 77
 78
 79
 80
 81
 82
 83
 84
 85
 86
 87
 88
 89
 90
 91
 92
 93
 94
 95
 96
 97
 98
 99
100
101
102
103
104
105
106
107
108
109
110
111
112
113
114
115
116
117
118
119
120
121
122
123
124
125
126
127
128
129
130
131
132
133
134
135
136
137
138
139
140
141
142
143
144
145
146
147
148
149
150
151
152
153
154
155
156
157
158
159
160
161
162
163
164
165
166
167
168
169
170
171
172
173
174
175
176
177
178
179
180
181
182
183
184
185
186
187
188
189
190
191
192
193
194
195
196
197
198
199
200
201
202
203
204
205
206
207
208
209
210
211
212
213
214
215
216
217
218
219
220
221
222
223
224
225
226
227
228
229
230
231
232
233
234
235
236
237
238
239
240
241
242
243
244
245
246
247
248
249
250
251
252
253
254
255
256
257
258
259
260
261
262
263
264
265
266
267
268
269
270
271
272
273
274
275
276
277
278
279
280
281
282
283
284
285
286
287
288
289
290
291
292
|
// Change number of processors. The world is stopped, sched is locked.
// gcworkbufs are not being modified by either the GC or
// the write barrier code.
// Returns list of Ps with local work, they need to be scheduled by the caller.
func procresize(nprocs int32) *p {
    //p的数量
	old := gomaxprocs
	//首先再检查一遍新值和旧值,如果不合法就引发一个运行时恐慌,并终止该流程。
	if old < 0 || nprocs <= 0 {
		throw("procresize: invalid arg")
	}
	if trace.enabled {
		traceGomaxprocs(nprocs)
	}

	// update statistics
	// 更新统计信息,记录此次修改 gomaxprocs 的时间
	now := nanotime()
	if sched.procresizetime != 0 {
		sched.totaltime += int64(old) * (now - sched.procresizetime)
	}
	sched.procresizetime = now

    	// Grow allp if necessary.
	//如果allp的长度不够,allp上锁,调整allp的长度,去余补缺即可
	//如果新值比全局P列表的长度大,则增长全局P列表切片(allp)。如果容量够就扩容,如果容量不够就新建一个新的切片,并把全局P列表中的P都拷贝到新切片中。
	// 必要时增加 allp
	// 这个时候本质上是在检查用户代码是否有调用过 runtime.MAXGOPROCS 调整 p 的数量
	// 此处多一步检查是为了避免内部的锁,如果 nprocs 明显小于 allp 的可见数量(因为 len)
	// 则不需要进行加锁
	if nprocs > int32(len(allp)) {
		// Synchronize with retake, which could be running
		// concurrently since it doesn't run on a P.
		// 此处与 retake 同步,它可以同时运行,因为它不会在 P 上运行。
		lock(&allpLock)
		if nprocs <= int32(cap(allp)) {
			// 如果 nprocs 被调小了,扔掉多余的 p
			allp = allp[:nprocs]
		} else {
			// 否则(调大了)创建更多的 p
			nallp := make([]*p, nprocs)
			// Copy everything up to allp's cap so we
			// never lose old allocated Ps.
			// 将原有的 p 复制到新创建的 new all p 中,不浪费旧的 p
			copy(nallp, allp[:cap(allp)])
			allp = nallp
		}
		unlock(&allpLock)
	}

	// initialize new P's
	// 初始化新的 P
	for i := old; i < nprocs; i++ {
		pp := allp[i]
		//申请新P对象
		// 如果 p 是新创建的(新创建的 p 在数组中为 nil),则申请新的 P 对象
		if pp == nil {
			pp = new(p)
		}
		pp.init(i)
		atomicstorep(unsafe.Pointer(&allp[i]), unsafe.Pointer(pp))
	}
	//经过一番清理之后,执行procresize函数的M的P也可能已经被清理掉了,所以如果侥幸这个P没有被清理掉就把P还给当前M,如果不幸已经被清理了就把全局P列表(allp)中的第一个P给它。
	// 获取当前正在运行的 g 指针,初始化时 _g_ = g0
    	_g_ := getg()
    	//如果当前正在用的P属于被释放的那拨,那就换成allp[0]
    	//调度器初始化阶段,根本没有P,那就绑定allp[0]
	if _g_.m.p != 0 && _g_.m.p.ptr().id < nprocs {
        // continue to use the current P
        //继续使用当前P
		_g_.m.p.ptr().status = _Prunning
		_g_.m.p.ptr().mcache.prepareForSweep()
	} else {
		// 初始化时执行这个分支
        // release the current P and acquire allp[0]
        //释放当前P,因为它已经失效
		if _g_.m.p != 0 {
			_g_.m.p.ptr().m = 0
		}
		_g_.m.p = 0
        _g_.m.mcache = nil
        //换成allp[0]
		p := allp[0]
		p.m = 0
		p.status = _Pidle
		// 如果是调度器初始化阶段,将 p0 和 m0 关联起来
		acquirep(p)
		if trace.enabled {
			traceGoStart()
		}
	}
	// free unused P's
	// 释放多余的 P。由于减少了旧的 procs 的数量,因此需要释放
	// 假设旧值为J,程序还会对全局P列表中第I+1到第J个P(如果有的话)进行清理。
	for i := nprocs; i < old; i++ {
		p := allp[i]
		p.destroy()
		// can't free P itself because it can be referenced by an M in syscall
		// 不能释放 p 本身,因为他可能在 m 进入系统调用时被引用
	}

	// Trim allp.
	// 清理完毕后,修剪 allp, nprocs 个数之外的所有 P
	if int32(len(allp)) != nprocs {
		lock(&allpLock)
		allp = allp[:nprocs]
		unlock(&allpLock)
	}
    //将没有本地任务的P放到空闲链表
	var runnablePs *p
	//最后,程序再次遍历前I个P,也就是新的全局P列表中的所有P,但是会跳过当前执行procresize函数的M的P。
	for i := nprocs - 1; i >= 0; i-- {
        p := allp[i]
		//确保不是当前正在用的P
		// allp[0] 跟 m0 关联了,不会进行之后的“放入空闲链表”
		if _g_.m.p.ptr() == p {
			continue
		}
		// 状态转为 idle
		p.status = _Pidle
		//如果它的可运行G队列为空,就把它加入调度器的空闲P列表。
		if runqempty(p) {
            //放入空闲链表
			pidleput(p)
		} else {
			//否则尝试拿一个M来与这个P关联,成不成功不管,然后把它放入本地的可运行P列表。
            //有本地任务,构建链表
			p.m.set(mget())
			// 第一个循环为 nil,后续则为上一个 p
			// 此处即为构建可运行的 p 链表
			p.link.set(runnablePs)
			runnablePs = p
		}
	}
	//函数的最后,初始化了一个“随机分配器”,将来有些 m 去偷工作的时候,会遍历所有的 P,这时为了偷地随机一些,就会用到 stealOrder 来返回一个随机选择的 P
	stealOrder.reset(uint32(nprocs))
	var int32p *int32 = &gomaxprocs // make compiler check that gomaxprocs is an int32
    	atomic.Store((*uint32)(unsafe.Pointer(int32p)), uint32(nprocs))
	//函数最后会将这个拥有可运行G的P列表作为结果返回给调用者。
	//返回有本地任务的P(链表)
	//负责重启调度工作的程序会检查这个列表中的P,以保证它们一定能与一个M产生关联。随后程序会让与这些P关联的M都运行起来。
	return runnablePs
}

// init initializes pp, which may be a freshly allocated p or a
// previously destroyed p, and transitions it to status _Pgcstop.
func (pp *p) init(id int32) {
	// p 的 id 就是它在 allp 中的索引
	pp.id = id
	// 新创建的 p 处于 _Pgcstop 状态
	pp.status = _Pgcstop
	pp.sudogcache = pp.sudogbuf[:0]
	for i := range pp.deferpool {
		pp.deferpool[i] = pp.deferpoolbuf[i][:0]
	}
	pp.wbBuf.reset()
	//为P分配cache对象
	if pp.mcache == nil {
		// 如果 old == 0 且 i == 0 说明这是引导阶段初始化第一个 p
		if id == 0 {
			if mcache0 == nil {
				throw("missing mcache?")
			}
			// Use the bootstrap mcache0. Only one P will get
			// mcache0: the one with ID 0.
			pp.mcache = mcache0
		} else {
			//创建cache
			pp.mcache = allocmcache()
		}
	}
	if raceenabled && pp.raceprocctx == 0 {
		if id == 0 {
			pp.raceprocctx = raceprocctx0
			raceprocctx0 = 0 // bootstrap
		} else {
			pp.raceprocctx = raceproccreate()
		}
	}
	lockInit(&pp.timersLock, lockRankTimers)
}


// destroy releases all of the resources associated with pp and
// transitions it to status _Pdead.
//
// sched.lock must be held and the world must be stopped.
// 释放未使用的 P,一般情况下不会执行这段代码
func (pp *p) destroy() {
	// Move all runnable goroutines to the global queue
	// 将本地任务转移到全局队列
	// 将所有 runnable Goroutine 移动至全局队列
	for pp.runqhead != pp.runqtail {
		// Pop from tail of local queue
		// 从本地队列中 pop
		pp.runqtail--
		gp := pp.runq[pp.runqtail%uint32(len(pp.runq))].ptr()
		// Push onto head of global queue
		//首先要把P的可运行G队列中的G放入调度器可运行G队列的头部。
		globrunqputhead(gp)
	}
	//其次将P的runnaex字段中的G(如果有的话)放入调度器的可运行G队列的头部。
	if pp.runnext != 0 {
		//将gp加入调度器可运行G队列头部
		globrunqputhead(pp.runnext.ptr())
		pp.runnext = 0
	}
	if len(pp.timers) > 0 {
		plocal := getg().m.p.ptr()
		// The world is stopped, but we acquire timersLock to
		// protect against sysmon calling timeSleepUntil.
		// This is the only case where we hold the timersLock of
		// more than one P, so there are no deadlock concerns.
		lock(&plocal.timersLock)
		lock(&pp.timersLock)
		moveTimers(plocal, pp.timers)
		pp.timers = nil
		pp.numTimers = 0
		pp.adjustTimers = 0
		pp.deletedTimers = 0
		atomic.Store64(&pp.timer0When, 0)
		unlock(&pp.timersLock)
		unlock(&plocal.timersLock)
	}
	// If there's a background worker, make it runnable and put
	// it on the global queue so it can clean itself up.
	//然后是将P持有的GC标记专用G从Gwaiting状态转到Grunnable状态并放入调度器的可运行G队列末尾。
	if gp := pp.gcBgMarkWorker.ptr(); gp != nil {
		casgstatus(gp, _Gwaiting, _Grunnable)
		if trace.enabled {
			traceGoUnpark(gp, 0)
		}
		//将gp加入调度器可运行G队列尾部
		globrunqput(gp)
		// This assignment doesn't race because the
		// world is stopped.
		pp.gcBgMarkWorker.set(nil)
	}
	// Flush p's write barrier buffer.
	if gcphase != _GCoff {
		wbBufFlush1(pp)
		pp.gcw.dispose()
	}
	for i := range pp.sudogbuf {
		pp.sudogbuf[i] = nil
	}
	pp.sudogcache = pp.sudogbuf[:0]
	for i := range pp.deferpool {
		for j := range pp.deferpoolbuf[i] {
			pp.deferpoolbuf[i][j] = nil
		}
		pp.deferpool[i] = pp.deferpoolbuf[i][:0]
	}
	systemstack(func() {
		for i := 0; i < pp.mspancache.len; i++ {
			// Safe to call since the world is stopped.
			mheap_.spanalloc.free(unsafe.Pointer(pp.mspancache.buf[i]))
		}
		pp.mspancache.len = 0
		pp.pcache.flush(&mheap_.pages)
	})
	//释放当前P绑定的cache
	freemcache(pp.mcache)
	pp.mcache = nil
	//将当前P的G复用链转移到全局
	//还需要调用gfpurge函数将P的自由G列表的所有G都转移到调度器的自由G列表中。
	//将P的自由G列表的所有G都转移到调度器的自由G列表
	gfpurge(pp)
	traceProcFree(pp)
	if raceenabled {
		if pp.timerRaceCtx != 0 {
			// The race detector code uses a callback to fetch
			// the proc context, so arrange for that callback
			// to see the right thing.
			// This hack only works because we are the only
			// thread running.
			mp := getg().m
			phold := mp.p.ptr()
			mp.p.set(pp)

			racectxend(pp.timerRaceCtx)
			pp.timerRaceCtx = 0

			mp.p.set(phold)
		}
		raceprocdestroy(pp.raceprocctx)
		pp.raceprocctx = 0
	}
	pp.gcAssistTime = 0
	//最后将P设置为Pdead状态,以便之后进行销毁。之所以不能在这里立即销毁,是因为它们可能被正在进行系统调用的M引用,如果现在就销毁,就会在那些M完成系统调用时造成错误。
	pp.status = _Pdead
}
|
这样,整个 procresize 函数就讲完了,这也意味着,调度器的初始化工作已经完成了。
- 使用 make([]p, nprocs) 初始化全局变量 allp,即 allp = make([]p, nprocs)
- 循环创建并初始化 nprocs 个 p 结构体对象并依次保存在 allp 切片之中
- 把 m0 和 allp[0] 绑定在一起,即 m0.p = allp[0],allp[0].m = m0
- 把除了 allp[0] 之外的所有 p 放入到全局变量 sched 的 pidle 空闲队列之中
说明一下,最后一步,代码里是将所有空闲的 P 放入到调度器的全局空闲队列;对于非空闲的 P(本地队列里有 G 待执行),则是生成一个 P 链表,返回给 procresize 函数的调用者。
最后我们将 allp 和 allm 都添加到图上:

acquirep
用 acquirep(p) 绑定获取到的 p 和 m,主要的动作就是设置 p 的 m 字段,更改 p 的工作状态为 _Prunning,并且设置 m 的 p 字段。
 1
 2
 3
 4
 5
 6
 7
 8
 9
10
11
12
13
14
15
16
17
18
19
20
|
// Associate p and the current m.
//
// This function is allowed to have write barriers even if the caller
// isn't because it immediately acquires _p_.
//
//go:yeswritebarrierrec
func acquirep(_p_ *p) {
	// Do the part that isn't allowed to have write barriers.
	wirep(_p_)

	// Have p; write barriers now allowed.

	// Perform deferred mcache flush before this P can allocate
	// from a potentially stale mcache.
	_p_.mcache.prepareForSweep()

	if trace.enabled {
		traceProcStart()
	}
}
|
先调用 wirep 函数真正地进行关联,之后,将 p0 的 mcache 资源赋给 m0。再来看 wirep:
 1
 2
 3
 4
 5
 6
 7
 8
 9
10
11
12
13
14
15
16
17
18
19
20
21
22
23
24
|
// wirep is the first step of acquirep, which actually associates the
// current M to _p_. This is broken out so we can disallow write
// barriers for this part, since we don't yet have a P.
//
//go:nowritebarrierrec
//go:nosplit
func wirep(_p_ *p) {
	_g_ := getg()

	if _g_.m.p != 0 {
		throw("wirep: already in go")
	}
	if _p_.m != 0 || _p_.status != _Pidle {
		id := int64(0)
		if _p_.m != 0 {
			id = _p_.m.ptr().id
		}
		print("wirep: p->m=", _p_.m, "(", id, ") p->status=", _p_.status, "\n")
		throw("wirep: invalid p state")
	}
	_g_.m.p.set(_p_)
	_p_.m.set(_g_.m)
	_p_.status = _Prunning
}
|
可以看到就是一些字段相互设置,执行完成后:
1
2
|
g0.m.p = p0
p0.m = m0
|
并且,p0 的状态变成了 _Prunning。
runqempty
函数 runqempty 用来判断一个 P 是否是空闲,依据是 P 的本地 run queue 队列里有没有 runnable 的 G,如果没有,那 P 就是空闲的。
 1
 2
 3
 4
 5
 6
 7
 8
 9
10
11
12
13
14
15
16
17
18
|
// runqempty reports whether _p_ has no Gs on its local run queue.
// It never returns true spuriously.
// 如果 _p_ 的本地队列里没有待运行的 G,则返回 true
func runqempty(_p_ *p) bool {
	// Defend against a race where 1) _p_ has G1 in runqnext but runqhead == runqtail,
	// 2) runqput on _p_ kicks G1 to the runq, 3) runqget on _p_ empties runqnext.
	// Simply observing that runqhead == runqtail and then observing that runqnext == nil
	// does not mean the queue is empty.
	// 这里涉及到一些数据竞争,并不是简单地判断 runqhead == runqtail 并且 runqnext == nil 就可以
	for {
		head := atomic.Load(&_p_.runqhead)
		tail := atomic.Load(&_p_.runqtail)
		runnext := atomic.Loaduintptr((*uintptr)(unsafe.Pointer(&_p_.runnext)))
		if tail == atomic.Load(&_p_.runqtail) {
			return head == tail && runnext == 0
		}
	}
}
|
并不是简单地判断 head == tail 并且 runnext == nil 为真,就可以说明 runq 是空的。因为涉及到一些数据竞争,例如在比较 head == tail 时为真,但此时 runnext 上其实有一个 G,之后再去比较 runnext == nil 的时候,这个 G 又通过 runqput跑到了 runq 里去了或者通过 runqget 拿走了,runnext 也为真,于是函数就判断这个 P 是空闲的,这就会形成误判。
因此 runqempty 函数先是通过原子操作取出了 head,tail,runnext,然后再次确认 tail 没有发生变化,最后再比较 head == tail 以及 runnext == nil,保证了在观察三者都是在“同时”观察到的,因此,返回的结果就是正确的。
说明一下,runnext 上有时会绑定一个 G,这个 G 是被当前 G 唤醒的,相比其他 G 有更高的执行优先级,因此把它单独拿出来。
pidleput
将P放入全局空闲 P 列表:
 1
 2
 3
 4
 5
 6
 7
 8
 9
10
11
12
13
14
|
// Put p to on _Pidle list.
// Sched must be locked.
// May run during STW, so write barriers are not allowed.
//go:nowritebarrierrec
// 将 p 放到 _Pidle 列表里
func pidleput(_p_ *p) {
	if !runqempty(_p_) {
		throw("pidleput: P has non-empty run queue")
	}
	_p_.link = sched.pidle
	sched.pidle.set(_p_)
	// 增加全局空闲 P 的数量
	atomic.Xadd(&sched.npidle, 1) // TODO: fast atomic
}
|
构造链表的过程其实比较简单,先将 p.link 指向原来的 sched.pidle 所指向的 p,也就是原空闲链表的最后一个 P,最后,再更新 sched.pidle,使其指向当前 p,这样,新的链表就构造完成。
pidleget
 1
 2
 3
 4
 5
 6
 7
 8
 9
10
11
12
13
|
// Try get a p from _Pidle list.
// Sched must be locked.
// May run during STW, so write barriers are not allowed.
//go:nowritebarrierrec
// 试图从 _Pidle 列表里获取 p
func pidleget() *p {
	_p_ := sched.pidle.ptr()
	if _p_ != nil {
		sched.pidle = _p_.link
		atomic.Xadd(&sched.npidle, -1) // TODO: fast atomic
	}
	return _p_
}
|
比较简单,获取链表最后一个,再更新 sched.pidle,使其指向前一个 P。
releasep
解除当前工作线程和当前 P 的绑定关系:
 1
 2
 3
 4
 5
 6
 7
 8
 9
10
11
12
13
14
15
16
17
18
19
20
21
|
// Disassociate p and the current m.
// 解除 p 与 m 的关联
func releasep() *p {
	_g_ := getg()

	if _g_.m.p == 0 {
		throw("releasep: invalid arg")
	}
	_p_ := _g_.m.p.ptr()
	if _p_.m.ptr() != _g_.m || _p_.status != _Prunning {
		print("releasep: m=", _g_.m, " m->p=", _g_.m.p.ptr(), " p->m=", hex(_p_.m), " p->status=", _p_.status, "\n")
		throw("releasep: invalid p state")
	}
	if trace.enabled {
		traceProcStop(_g_.m.p.ptr())
	}
	_g_.m.p = 0
	_p_.m = 0
	_p_.status = _Pidle
	return _p_
}
|
主要的工作就是将 p 的 m 字段清空,并将 p 的状态修改为 _Pidle。
handoffp
handoffp函数实现抢占p的功能.
当 p 的本地运行队列或全局运行队列里面有待运行的 goroutine,说明还有很多工作要做,调用 startm(p, false) 启动一个 m 来结合 p,继续工作。
当除了当前的 p 外,其他所有的 p 都在运行 goroutine,说明天下太平,每个人都有自己的事做,唯独自己没有。为了全局更快地完成工作,需要启动一个 m,且要使得 m 处于自旋状态,和 p 结合之后,尽快找到工作。
最后,如果实在没有工作要处理,就将 p 放入全局空闲队列里。
 1
 2
 3
 4
 5
 6
 7
 8
 9
10
11
12
13
14
15
16
17
18
19
20
21
22
23
24
25
26
27
28
29
30
31
32
33
34
35
36
37
38
39
40
41
42
43
44
45
46
47
48
49
50
51
52
53
54
55
56
57
58
59
|
// Hands off P from syscall or locked M.
// Always runs without a P, so write barriers are not allowed.
//go:nowritebarrierrec
func handoffp(_p_ *p) {
	// handoffp must start an M in any situation where
	// findrunnable would return a G to run on _p_.

	// if it has local work, start it straight away
	//如果P本地或全局有任务,直接唤醒某个M开始工作
	if !runqempty(_p_) || sched.runqsize != 0 {
		startm(_p_, false)
		return
	}
	// if it has GC work, start it straight away
	if gcBlackenEnabled != 0 && gcMarkWorkAvailable(_p_) {
		startm(_p_, false)
		return
	}
	// no local work, check that there are no spinning/idle M's,
	// otherwise our help is not required
	// 所有其它 p 都在运行 goroutine,说明系统比较忙,需要启动 m
	if atomic.Load(&sched.nmspinning)+atomic.Load(&sched.npidle) == 0 && atomic.Cas(&sched.nmspinning, 0, 1) { // TODO: fast atomic
		startm(_p_, true)
		return
	}
	lock(&sched.lock)
	if sched.gcwaiting != 0 {
		_p_.status = _Pgcstop
		sched.stopwait--
		if sched.stopwait == 0 {
			notewakeup(&sched.stopnote)
		}
		unlock(&sched.lock)
		return
	}
	if _p_.runSafePointFn != 0 && atomic.Cas(&_p_.runSafePointFn, 1, 0) {
		sched.safePointFn(_p_)
		sched.safePointWait--
		if sched.safePointWait == 0 {
			notewakeup(&sched.safePointNote)
		}
	}
	// 全局队列有工作
	if sched.runqsize != 0 {
		unlock(&sched.lock)
		startm(_p_, false)
		return
	}
	// If this is the last running P and nobody is polling network,
	// need to wakeup another M to poll network.
	if sched.npidle == uint32(gomaxprocs-1) && atomic.Load64(&sched.lastpoll) != 0 {
		unlock(&sched.lock)
		startm(_p_, false)
		return
	}
	// 没有工作要处理,把 p 放入全局空闲队列
	pidleput(_p_)
	unlock(&sched.lock)
}
|
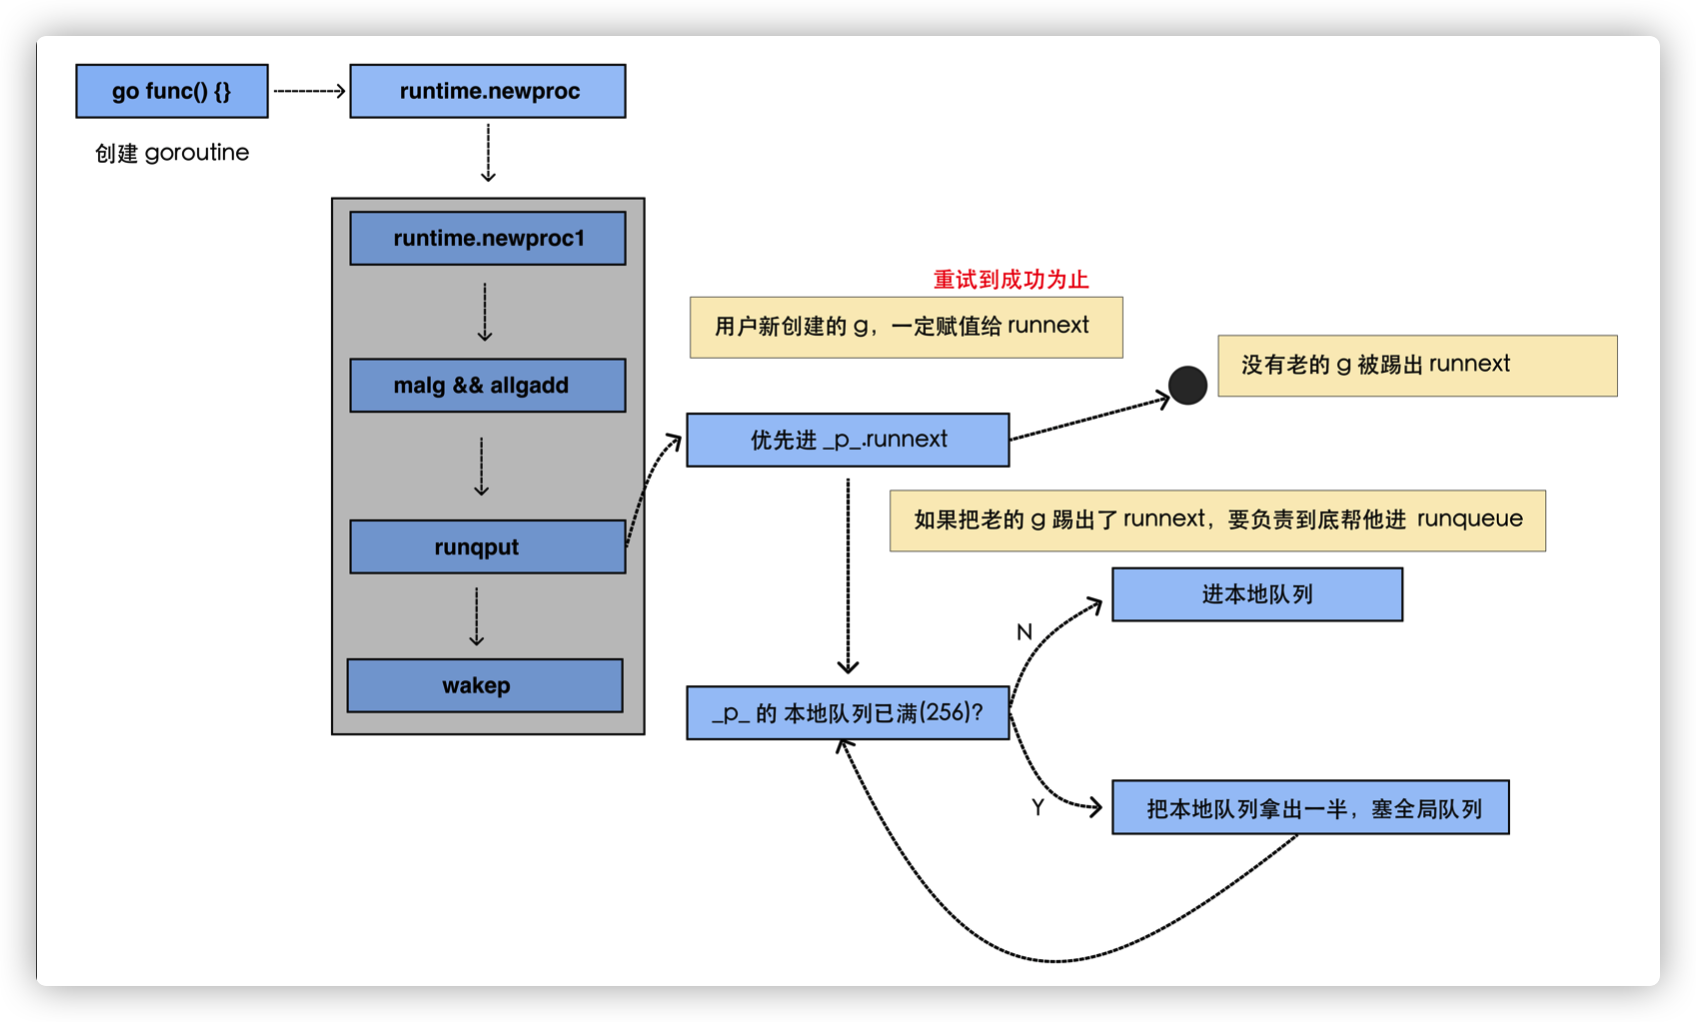
创建G
创建 G 的过程也是相对比较复杂的,我们来总结一下这个过程:
- 首先尝试从 P 本地 gfree 链表或全局 gfree 队列获取已经执行过的 g
- 初始化过程中程序无论是本地队列还是全局队列都不可能获取到 g,因此创建一个新的 g,并为其分配运行线程(执行栈),这时 g 处于 _Gidle 状态
- 创建完成后,g 被更改为 _Gdead 状态,并根据要执行函数的入口地址和参数,初始化执行栈的 SP 和参数的入栈位置,并将需要的参数拷贝一份存入执行栈中
- 根据 SP、参数,在 g.sched 中保存 SP 和 PC 指针来初始化 g 的运行现场
- 将调用方、要执行的函数的入口 PC 进行保存,并将 g 的状态更改为 _Grunnable
- 给 Goroutine 分配 id,并将其放入 P 本地队列的队头或全局队列(初始化阶段队列肯定不是满的,因此不可能放入全局队列)
- 检查空闲的 P,将其唤醒,准备执行 G,但我们目前处于初始化阶段,主 Goroutine 尚未开始执行,因此这里不会唤醒 P。
值得一提的是,newproc 是由 go:nosplit 修饰的函数, 因此这个函数在执行过程中不会发生扩张和抢占,这个函数中的每一行代码都是深思熟虑过、确保能够在有限的栈空间内 完成执行。
newproc
编译器会将所有的 go 关键字被转换成 runtime.newproc 函数,该函数会接收大小和表示函数的指针 funcval。在这个函数中我们还会获取 Goroutine 以及调用方的程序计数器,然后调用 runtime.newproc1 函数
newproc 函数需要两个参数:一个是新创建的 goroutine 需要执行的任务,也就是 fn,它代表一个函数 func;还有一个是 fn 的参数大小。
可能会感到奇怪,为什么要给 newproc 传一个表示 fn 的参数大小的参数呢?
我们知道,goroutine 和线程一样,都有自己的栈,不同的是 goroutine 的初始栈比较小,只有 2K,而且是可伸缩的,这也是创建 goroutine 的代价比创建线程代价小的原因。
换句话说,每个 goroutine 都有自己的栈空间,newproc 函数会新创建一个新的 goroutine 来执行 fn 函数,在新 goroutine 上执行指令,就要用新 goroutine 的栈。而执行函数需要参数,这个参数又是在老的 goroutine 上,所以需要将其拷贝到新 goroutine 的栈上。拷贝的起始位置就是栈顶,这好办,那拷贝多少数据呢?由 siz 来确定。
继续看代码,newproc 函数的第二个参数:
1
2
3
4
|
type funcval struct {
	fn uintptr
	// variable-size, fn-specific data here
}
|
有一个例子:
1
2
3
4
5
6
7
8
9
|
package main

func hello(msg string) {
    println(msg)
}

func main() {
    go hello("hello world")
}
|
栈布局是这样的:
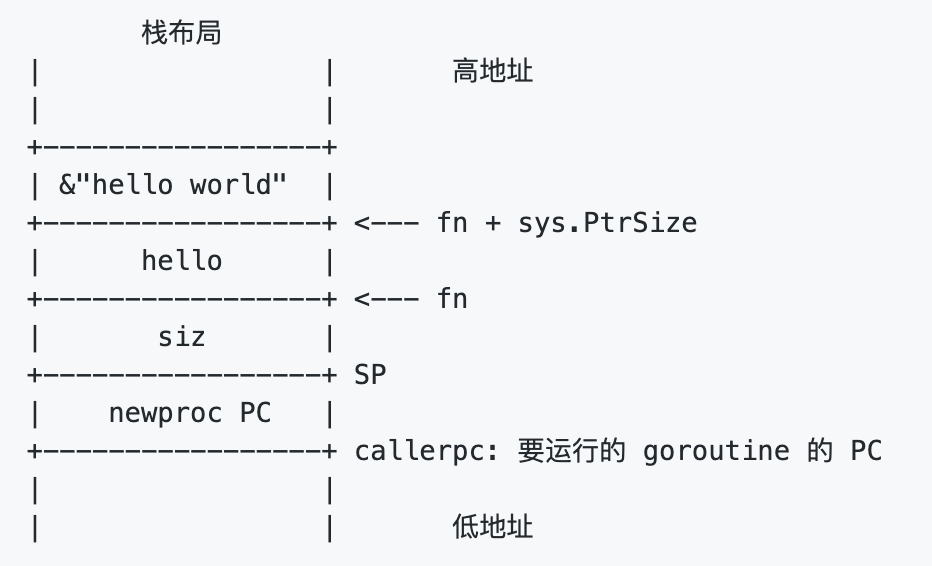
栈顶是 siz,再往上是函数的地址,再往上就是传给 hello 函数的参数,string 在这里是一个地址。因此前面代码里先 push 参数的地址,再 push 参数大小。
 1
 2
 3
 4
 5
 6
 7
 8
 9
10
11
12
13
14
15
16
17
18
19
20
21
22
23
24
25
26
27
28
29
30
31
32
33
34
|
// Create a new g running fn with siz bytes of arguments.
// Put it on the queue of g's waiting to run.
// The compiler turns a go statement into a call to this.
// Cannot split the stack because it assumes that the arguments
// are available sequentially after &fn; they would not be
// copied if a stack split occurred.
//go:nosplit
func newproc(siz int32, fn *funcval) {
	//获取第一参数地址
	//argp 跳过 fn,向上跳一个指针的长度,拿到 fn 参数的地址。
	argp := add(unsafe.Pointer(&fn), sys.PtrSize)
    gp := getg()
	// 获取调用者的指令地址,也就是调用 newproc 时由 call 指令压栈的函数返回地址
	//通过 getcallerpc 获取调用者的指令地址,也就是调用 newproc 时由 call 指令压栈的函数返回地址,也就是 runtime·rt0_go 函数里 CALL runtime·newproc(SB) 指令后面的 POPQ AX 这条指令的地址。
    pc := getcallerpc()
    // systemstack 的作用是切换到 g0 栈执行作为参数的函数
    // 用 g0 系统栈创建 goroutine 对象
	// 传递的参数包括 fn 函数入口地址,argp 参数起始地址,siz 参数长度,调用方 pc(goroutine)
	//调用 systemstack 函数在 g0 栈执行 fn 函数。如果是初始化过程中,由 runtime·rt0_go 函数调用,本身是在 g0 栈执行,因此会直接执行 fn 函数。而如果是我们在程序中写的 go xxx 代码,在执行时,就会先切换到 g0 栈执行,然后再切回来。
	systemstack(func() {
		newproc1(fn, (*uint8)(argp), siz, gp, pc)
	})
}

// Should be a built-in for unsafe.Pointer?
//go:nosplit
func add(p unsafe.Pointer, x uintptr) unsafe.Pointer {
	return unsafe.Pointer(uintptr(p) + x)
}

// getg returns the pointer to the current g.
// The compiler rewrites calls to this function into instructions
// that fetch the g directly (from TLS or from the dedicated register).
func getg() *g
|
runtime.newproc1 会根据传入参数初始化一个 g 结构体,我们可以将该函数分成以下几个部分介绍它的实现:
- 获取或者创建新的 Goroutine 结构体;
- 将传入的参数移到 Goroutine 的栈上;
- 更新 Goroutine 调度相关的属性;
- 将 Goroutine 加入处理器的运行队列;
  1
  2
  3
  4
  5
  6
  7
  8
  9
 10
 11
 12
 13
 14
 15
 16
 17
 18
 19
 20
 21
 22
 23
 24
 25
 26
 27
 28
 29
 30
 31
 32
 33
 34
 35
 36
 37
 38
 39
 40
 41
 42
 43
 44
 45
 46
 47
 48
 49
 50
 51
 52
 53
 54
 55
 56
 57
 58
 59
 60
 61
 62
 63
 64
 65
 66
 67
 68
 69
 70
 71
 72
 73
 74
 75
 76
 77
 78
 79
 80
 81
 82
 83
 84
 85
 86
 87
 88
 89
 90
 91
 92
 93
 94
 95
 96
 97
 98
 99
100
101
102
103
104
105
106
107
108
109
110
111
112
113
114
115
116
117
118
119
120
121
122
123
124
125
126
127
128
129
130
131
132
133
134
135
136
137
138
139
140
141
142
143
144
145
146
147
148
149
150
151
152
153
154
155
156
157
158
159
160
161
162
163
164
165
166
167
168
169
170
171
172
173
174
175
176
177
178
|
// mainStarted indicates that the main M has started.
var mainStarted bool
// Create a new g running fn with narg bytes of arguments starting
// at argp. callerpc is the address of the go statement that created
// this. The new g is put on the queue of g's waiting to run.
// 创建一个运行 fn 的新 g,具有 narg 字节大小的参数,从 argp 开始。
// callerps 是 go 语句的起始地址。新创建的 g 会被放入 g 的队列中等待运行。
func newproc1(fn *funcval, argp *uint8, narg int32, callergp *g, callerpc uintptr) {
	/*
	首先是 Goroutine 结构体的创建过程
	*/
	// 当前 goroutine 的指针
    // 因为已经切换到 g0 栈,所以无论什么场景都是 _g_ = g0
    // g0 是指当前工作线程的 g0
	_g_ := getg()

	if fn == nil {
		_g_.m.throwing = -1 // do not dump full stacks
		throw("go of nil func value")
	}
	// 禁止这时 g 的 m 被抢占因为它可以在一个局部变量中保存 p
    _g_.m.locks++ // disable preemption because it can be holding p in a local var
	//"参数+返回值"所需空间(对齐)
	// 参数加返回值所需要的空间(经过内存对齐)
	siz := narg
	siz = (siz + 7) &^ 7

	// We could allocate a larger initial stack if necessary.
	// Not worth it: this is almost always an error.
	// 4*sizeof(uintreg): extra space added below
	// sizeof(uintreg): caller's LR (arm) or return address (x86, in gostartcall).
	if siz >= _StackMin-4*sys.RegSize-sys.RegSize {
		throw("newproc: function arguments too large for new goroutine")
	}
	//从当前P复用链表获取空闲的G对象
	// 当前工作线程所绑定的 p
    // 初始化时 _p_ = g0.m.p,也就是 _p_ = allp[0]
	_p_ := _g_.m.p.ptr()
	// 从 p 的本地缓冲里获取一个没有使用的 g
	//初始化时为空,返回 nil
    newg := gfget(_p_)
	// 初始化阶段,gfget 是不可能找到 g 的
	// 也可能运行中本来就已经耗尽了
	if newg == nil {
		// new 一个 g 结构体对象,然后从堆上为其分配栈,并设置 g 的 stack 成员和两个 stackgard 成员
		// 创建一个拥有 _StackMin 大小的栈的 g
		newg = malg(_StackMin)
		// 初始化 g 的状态为 _Gdead
		casgstatus(newg, _Gidle, _Gdead)
		// 放入全局变量 allgs 切片中
		// 将 Gdead 状态的 g 添加到 allg,这样 GC 不会扫描未初始化的栈
		allgadd(newg) // publishes with a g->status of Gdead so GC scanner doesn't look at uninitialized stack.
	}
	/*
	上述代码会先从处理器的 gFree 列表中查找空闲的 Goroutine,如果不存在空闲的 Goroutine,就会通过 runtime.malg 函数创建一个栈大小足够的新结构体。
	*/
    //测试 G stack
	if newg.stack.hi == 0 {
		throw("newproc1: newg missing stack")
	}
    //测试G status
	if readgstatus(newg) != _Gdead {
		throw("newproc1: new g is not Gdead")
	}
	/*
	接下来,我们会调用 runtime.memmove 函数将 fn 函数的全部参数拷贝到栈上,argp 和 narg 分别是参数的内存空间和大小,我们在该方法中会直接将所有参数对应的内存空间整片的拷贝到栈上:
	*/
    //计算所需空间大小,并对齐
	totalSize := 4*sys.RegSize + uintptr(siz) + sys.MinFrameSize // extra space in case of reads slightly beyond frame
    totalSize += -totalSize & (sys.SpAlign - 1)                  // align to spAlign
    //确定SP位置
	sp := newg.stack.hi - totalSize
	// 确定参数入栈位置
	spArg := sp
	if usesLR {
		// caller's LR
		*(*uintptr)(unsafe.Pointer(sp)) = 0
		prepGoExitFrame(sp)
		spArg += sys.MinFrameSize
	}
	// 处理参数,当有参数时,将参数拷贝到 Goroutine 的执行栈中
	if narg > 0 {
		// 从 argp 参数开始的位置,复制 narg 个字节到 spArg(参数拷贝)
		memmove(unsafe.Pointer(spArg), unsafe.Pointer(argp), uintptr(narg))
		// This is a stack-to-stack copy. If write barriers
		// are enabled and the source stack is grey (the
		// destination is always black), then perform a
		// barrier copy. We do this *after* the memmove
		// because the destination stack may have garbage on
		// it.
		// 栈到栈的拷贝。
		// 如果启用了 write barrier 并且 源栈为灰色(目标始终为黑色),
		// 则执行 barrier 拷贝。
		// 因为目标栈上可能有垃圾,我们在 memmove 之后执行此操作。
		if writeBarrier.needed && !_g_.m.curg.gcscandone {
			f := findfunc(fn.fn)
			stkmap := (*stackmap)(funcdata(f, _FUNCDATA_ArgsPointerMaps))
			if stkmap.nbit > 0 {
				// We're in the prologue, so it's always stack map index 0.
				// 我们正位于序言部分,因此栈 map 索引总是 0
				bv := stackmapdata(stkmap, 0)
				bulkBarrierBitmap(spArg, spArg, uintptr(bv.n)*sys.PtrSize, 0, bv.bytedata)
			}
		}
	}
	/*
	拷贝了栈上的参数之后,runtime.newproc1 会设置新的 Goroutine 结构体的参数,包括栈指针、程序计数器并更新其状态到 _Grunnable:
	*/
	//初始化用于保存执行现场的区域
	// 把 newg.sched 结构体成员的所有成员设置为 0
	memclrNoHeapPointers(unsafe.Pointer(&newg.sched), unsafe.Sizeof(newg.sched))
	// 设置 newg 的 sched 成员,调度器需要依靠这些字段才能把 goroutine 调度到 CPU 上运行
	//设置 sched 的 sp 字段,当 goroutine 被调度到 m 上运行时,需要通过 sp 字段来指示栈顶的位置,这里设置的就是新栈的栈顶位置。
	newg.sched.sp = sp
	newg.stktopsp = sp
	//此处保存的是goexit地址
	// newg.sched.pc 表示当 newg 被调度起来运行时从这个地址开始执行指令
	//设置 pc 字段为函数 goexit 的地址加 1,也说是 goexit 函数的第二条指令,goexit 函数是 goroutine 退出后的一些清理工作。
	newg.sched.pc = funcPC(goexit) + sys.PCQuantum // +PCQuantum so that previous instruction is in same function
	//设置 g 字段为 newg 的地址。
	newg.sched.g = guintptr(unsafe.Pointer(newg))
	//此处的调用是关键,调整sched成员和newg的栈
    gostartcallfn(&newg.sched, fn)
    // 初始化 g 的基本状态
	newg.gopc = callerpc
	newg.ancestors = saveAncestors(callergp)	// 调试相关,追踪调用方
	// 设置 newg 的 startpc 为 fn.fn,该成员主要用于函数调用栈的 traceback 和栈收缩
    // newg 真正从哪里开始执行并不依赖于这个成员,而是 sched.pc
	newg.startpc = fn.fn
	if _g_.m.curg != nil {
		newg.labels = _g_.m.curg.labels
	}
	if isSystemGoroutine(newg, false) {
		atomic.Xadd(&sched.ngsys, +1)
	}
	newg.gcscanvalid = false
	// 设置 g 的状态为 _Grunnable,可以运行了
	casgstatus(newg, _Gdead, _Grunnable)
    //设置唯一id
	if _p_.goidcache == _p_.goidcacheend {
		// Sched.goidgen is the last allocated id,
		// this batch must be [sched.goidgen+1, sched.goidgen+GoidCacheBatch].
        // At startup sched.goidgen=0, so main goroutine receives goid=1.
        //Sched.goidgen是一个全局计数器
		//每次取回一段有效区间,然后在该区间分配,避免频繁地去全局操作.
		// Sched.goidgen 为最后一个分配的 id,相当于一个全局计数器
		// 这一批必须为 [sched.goidgen+1, sched.goidgen+GoidCacheBatch].
		// 启动时 sched.goidgen=0, 因此主 Goroutine 的 goid 为 1
		_p_.goidcache = atomic.Xadd64(&sched.goidgen, _GoidCacheBatch)
		_p_.goidcache -= _GoidCacheBatch - 1
		_p_.goidcacheend = _p_.goidcache + _GoidCacheBatch
	}
	// 设置 goid
	newg.goid = int64(_p_.goidcache)
	_p_.goidcache++
	if raceenabled {
		newg.racectx = racegostart(callerpc)
	}
	if trace.enabled {
		traceGoCreate(newg, newg.startpc)
	}
	/*
	在最后,该函数会将初始化好的 Goroutine 加入处理器的运行队列并在满足条件时调用 runtime.wakep 函数唤醒新的处理执行 Goroutine:
	*/
	// 将这里新创建的 g 放入 p 的本地队列或直接放入全局队列
	// true 表示放入执行队列的下一个,false 表示放入队尾
	runqput(_p_, newg, true)
    //如果有其他空闲P,则尝试唤醒某个M出来执行任务
    //如果有M处于自旋等待P或G状态,放弃
    //如果当前创建的是main goroutine(runtime.main),那么还没有其他任务需要执行,放弃
	if atomic.Load(&sched.npidle) != 0 && atomic.Load(&sched.nmspinning) == 0 && mainStarted {
		wakep()
	}
	_g_.m.locks--
	if _g_.m.locks == 0 && _g_.preempt { // restore the preemption request in case we've cleared it in newstack
		_g_.stackguard0 = stackPreempt
	}
}
|
newproc1通过两种不同的方式获取新的 runtime.g 结构体:
- 调用runtime.gfget 从 Goroutine 所在处理器的 gFree 列表或者调度器的 sched.gFree 列表中获取 runtime.g 结构体;
- 调用 runtime.malg 函数生成一个新的 runtime.g 函数并将当前结构体追加到全局的 Goroutine 列表 allgs 中。
gostartcallfn
在newproc1创建G任务时,我们在初始化G.sched时,pc保存的是goexit而非fn.关键秘密就是随后调用的gostartcallfn函数.
运行时创建 Goroutine 时会通过下面的代码设置调度相关的信息,前两行代码会分别将程序计数器和 Goroutine 设置成 runtime.goexit 函数和新创建的 Goroutine:
1
2
3
4
5
|
	...
	newg.sched.pc = funcPC(goexit) + sys.PCQuantum
	newg.sched.g = guintptr(unsafe.Pointer(newg))
	gostartcallfn(&newg.sched, fn)
	...
|
但是这里的调度信息 sched 不是初始化后的 Goroutine 的最终结果,经过 runtime.gostartcallfn 和 runtime.gostartcall 两个函数的处理:
 1
 2
 3
 4
 5
 6
 7
 8
 9
10
11
12
|
// adjust Gobuf as if it executed a call to fn
// and then did an immediate gosave.
func gostartcallfn(gobuf *gobuf, fv *funcval) {
	var fn unsafe.Pointer
	if fv != nil {
		// fn: gorotine 的入口地址,初始化时对应的是 runtime.main
		fn = unsafe.Pointer(fv.fn)
	} else {
		fn = unsafe.Pointer(funcPC(nilfunc))
	}
	gostartcall(gobuf, fn, unsafe.Pointer(fv))
}
|
 1
 2
 3
 4
 5
 6
 7
 8
 9
10
11
12
13
14
15
16
17
18
19
20
21
|
// adjust Gobuf as if it executed a call to fn with context ctxt
// and then did an immediate gosave.
func gostartcall(buf *gobuf, fn, ctxt unsafe.Pointer) {
	// newg 的栈顶,目前 newg 栈上只有 fn 函数的参数,sp 指向的是 fn 的第一参数
	sp := buf.sp
	if sys.RegSize > sys.PtrSize {
		sp -= sys.PtrSize
		*(*uintptr)(unsafe.Pointer(sp)) = 0
	}
	// 为返回地址预留空间
	sp -= sys.PtrSize
	// 这里填的是 newproc1 函数里设置的 goexit 函数的第二条指令
    // 伪装 fn 是被 goexit 函数调用的,使得 fn 执行完后返回到 goexit 继续执行,从而完成清理工作
	*(*uintptr)(unsafe.Pointer(sp)) = buf.pc
	// 重新设置 buf.sp
	//然后再次设置sp和pc,此时pc才是G任务函数
	buf.sp = sp
	// 当 goroutine 被调度起来执行时,会从这里的 pc 值开始执行,初始化时就是 runtime.main
	buf.pc = uintptr(fn)
	buf.ctxt = ctxt
}
|
函数 gostartcallfn 只是拆解出了包含在 funcval 结构体里的函数指针,转过头就调用 gostartcall。将 sp 减小了一个指针的位置,这是给返回地址留空间。果然接着就把 buf.pc 填入了栈顶的位置:
1
|
*(*uintptr)(unsafe.Pointer(sp)) = buf.pc
|
原来 buf.pc 只是做了一个搬运工。重新设置 buf.sp 为送减掉一个指针位置之后的值,设置 buf.pc 为 fn,指向要执行的函数,这里就是指的 runtime.main 函数。之后,当调度器“光顾”此 goroutine 时,取出 buf.sp 和 buf.pc,恢复 CPU 相应的寄存器,就可以构造出 goroutine 的运行环境。
newg 栈顶位置的内容是一个跳转地址,指向 runtime.goexit 的第二条指令,当 goroutine 退出时,这条地址会载入 CPU 的 PC 寄存器,跳转到这里执行“扫尾”工作。
gfget
首先,G对象默认会复用.除P本地的复用链表外,还有全局链表在多个P之间共享.
runtime.gfget 中包含两部分逻辑,它会根据处理器中 gFree 列表中 Goroutine 的数量做出不同的决策:
- 当处理器的 Goroutine 列表为空时,会将调度器持有的空闲 Goroutine 转移到当前处理器上,直到 gFree 列表中的 Goroutine 数量达到 32;
- 当处理器的 Goroutine 数量充足时,会从列表头部返回一个新的 Goroutine;
 1
 2
 3
 4
 5
 6
 7
 8
 9
10
11
12
13
14
15
16
17
18
19
20
21
22
23
24
25
26
27
28
29
30
31
32
33
34
35
36
37
38
39
40
41
42
43
44
45
46
47
48
49
|
// Get from gfree list.
// If local list is empty, grab a batch from global list.
func gfget(_p_ *p) *g {
retry:
    //如果本地P的G队列为空且全局G队列不空,尝试从全局链表中转移一批到G本地
	if _p_.gFree.empty() && (!sched.gFree.stack.empty() || !sched.gFree.noStack.empty()) {
		lock(&sched.gFree.lock)
        // Move a batch of free Gs to the P.
        //最多转移32个
		for _p_.gFree.n < 32 {
			// Prefer Gs with stacks.
			gp := sched.gFree.stack.pop()
			if gp == nil {
				gp = sched.gFree.noStack.pop()
				if gp == nil {
					break
				}
			}
			sched.gFree.n--
			_p_.gFree.push(gp)
			_p_.gFree.n++
		}
        unlock(&sched.gFree.lock)
        //再试
		goto retry
    }
    //从P本地G队列提取复用对象
	gp := _p_.gFree.pop()
	if gp == nil {
		return nil
	}
    _p_.gFree.n--
	if gp.stack.lo == 0 {
        //分配新栈
		// Stack was deallocated in gfput. Allocate a new one.
		systemstack(func() {
			gp.stack = stackalloc(_FixedStack)
		})
		gp.stackguard0 = gp.stack.lo + _StackGuard
	} else {
		if raceenabled {
			racemalloc(unsafe.Pointer(gp.stack.lo), gp.stack.hi-gp.stack.lo)
		}
		if msanenabled {
			msanmalloc(unsafe.Pointer(gp.stack.lo), gp.stack.hi-gp.stack.lo)
		}
	}
	return gp
}
|
当goroutine执行完毕,调度器相关函数会将G对象放回P复用G链表
 1
 2
 3
 4
 5
 6
 7
 8
 9
10
11
12
13
14
15
16
17
18
19
20
21
22
23
24
25
26
27
28
29
30
31
32
33
34
35
36
|
// Put on gfree list.
// If local list is too long, transfer a batch to the global list.
func gfput(_p_ *p, gp *g) {
	if readgstatus(gp) != _Gdead {
		throw("gfput: bad status (not Gdead)")
	}

	stksize := gp.stack.hi - gp.stack.lo
    	//如果栈发生过扩张,则释放
	if stksize != _FixedStack {
		// non-standard stack size - free it.
		stackfree(gp.stack)
		gp.stack.lo = 0
		gp.stack.hi = 0
		gp.stackguard0 = 0
	}
    	//放回P本地复用链表
	_p_.gFree.push(gp)
    	_p_.gFree.n++
    	//如果本地复用对象过多,则转移一批到全局链表
	if _p_.gFree.n >= 64 {
        lock(&sched.gFree.lock)
        //本地保留32个
		for _p_.gFree.n >= 32 {
			_p_.gFree.n--
			gp = _p_.gFree.pop()
			if gp.stack.lo == 0 {
				sched.gFree.noStack.push(gp)
			} else {
				sched.gFree.stack.push(gp)
			}
			sched.gFree.n++
		}
		unlock(&sched.gFree.lock)
	}
}
|
gfput
 1
 2
 3
 4
 5
 6
 7
 8
 9
10
11
12
13
14
15
16
17
18
19
20
21
22
23
24
25
26
27
28
29
30
31
32
33
34
35
36
37
38
39
40
41
42
|
// Put on gfree list.
// If local list is too long, transfer a batch to the global list.
func gfput(_p_ *p, gp *g) {
	if readgstatus(gp) != _Gdead {
		throw("gfput: bad status (not Gdead)")
	}

	stksize := gp.stack.hi - gp.stack.lo

	if stksize != _FixedStack {
		// non-standard stack size - free it.
		stackfree(gp.stack)
		gp.stack.lo = 0
		gp.stack.hi = 0
		gp.stackguard0 = 0
	}

	_p_.gFree.push(gp)
	_p_.gFree.n++
	if _p_.gFree.n >= 64 {
		var (
			inc      int32
			stackQ   gQueue
			noStackQ gQueue
		)
		for _p_.gFree.n >= 32 {
			gp = _p_.gFree.pop()
			_p_.gFree.n--
			if gp.stack.lo == 0 {
				noStackQ.push(gp)
			} else {
				stackQ.push(gp)
			}
			inc++
		}
		lock(&sched.gFree.lock)
		sched.gFree.noStack.pushAll(noStackQ)
		sched.gFree.stack.pushAll(stackQ)
		sched.gFree.n += inc
		unlock(&sched.gFree.lock)
	}
}
|
malg
最初,G对象都是由malg创建的.
当调度器的 gFree 和处理器的 gFree 列表都不存在结构体时,运行时会调用 runtime.malg 初始化一个新的 runtime.g 结构体,如果申请的堆栈大小大于 0,在这里我们会通过 runtime.stackalloc 分配 2KB 的栈空间:
 1
 2
 3
 4
 5
 6
 7
 8
 9
10
11
12
13
14
15
16
17
18
19
20
21
22
23
24
25
26
|
// The minimum size of stack used by Go code
_StackMin = 2048
// Allocate a new g, with a stack big enough for stacksize bytes.
//给新的g分配足以容纳stacksize 字节的空间,即至少stacksize 个字节
func malg(stacksize int32) *g {
	newg := new(g)
	if stacksize >= 0 {
		stacksize = round2(_StackSystem + stacksize)
		systemstack(func() {
			//真正申请内存stacksize大小的内存
			newg.stack = stackalloc(uint32(stacksize))
		})
		newg.stackguard0 = newg.stack.lo + _StackGuard
		newg.stackguard1 = ^uintptr(0)
	}
	return newg
}
//函数的功能:取得一个值使得不等式 2^n >= x 成立且左边是所有成立值中的最小值
//如:round2(15) = 16 ; round2(18)=32 ...
func round2(x int32) int32 {
    s := uint(0)
    for 1<<s < x {
        s++
    }
    return 1 << s
}
|
runtime.malg 返回的 Goroutine 会存储到全局变量 allgs 中。
默认采用2KB栈空间,并且都被allg引用.这是垃圾回收遍历扫描的需要,以便获取指针引用,收缩栈空间.
 1
 2
 3
 4
 5
 6
 7
 8
 9
10
11
12
13
14
15
|
var (
	allgs    []*g
	allglock mutex
)

func allgadd(gp *g) {
	if readgstatus(gp) == _Gidle {
		throw("allgadd: bad status Gidle")
	}

	lock(&allglock)
	allgs = append(allgs, gp)
	allglen = uintptr(len(allgs))
	unlock(&allglock)
}
|
G似乎从来不被释放,会不会有存留过多的问题?不过好在垃圾回收会调用shrinkstack将其栈空间回收.
runqput
runtime.runqput 函数会将新创建的 Goroutine 放到运行队列上,这既可能是全局的运行队列,也可能是处理器本地的运行队列:
创建完毕的G任务被优先放入P本地队列等待执行,这属于无锁操作.
- 当 next 为 true 时,将 Goroutine 设置到处理器的 runnext 上作为下一个处理器执行的任务;
- 当 next 为 false 并且本地运行队列还有剩余空间时,将 Goroutine 加入处理器持有的本地运行队列;
- 当处理器的本地运行队列已经没有剩余空间时就会把本地队列中的一部分 Goroutine 和待加入的 Goroutine 通过 runqputslow 添加到调度器持有的全局运行队列上;
因为代码的局部性原理,新创建的goroutine所需要的变量,极大概率在当前CPU的Cache中,所以在新创建goroutine时,next为true.
 1
 2
 3
 4
 5
 6
 7
 8
 9
10
11
12
13
14
15
16
17
18
19
20
21
22
23
24
25
26
27
28
29
30
31
32
33
34
35
36
37
38
39
40
41
42
43
44
45
46
47
48
49
50
51
52
53
54
55
56
57
58
|
// runqput tries to put g on the local runnable queue.
// If next is false, runqput adds g to the tail of the runnable queue.
// If next is true, runqput puts g in the _p_.runnext slot.
// If the run queue is full, runnext puts g on the global queue.
// Executed only by the owner P.
// runqput 尝试将 g 放到本地可执行队列里。
// 如果 next 为假,runqput 将 g 添加到可运行队列的尾部
// 如果 next 为真,runqput 将 g 添加到 p.runnext 字段
// 如果 run queue 满了,runnext 将 g 放到全局队列里
//
// runnext 成员中的 goroutine 会被优先调度起来运行
func runqput(_p_ *p, gp *g, next bool) {
	if randomizeScheduler && next && fastrand()%2 == 0 {
		next = false
	}
	//如果可能,将G直接保存在P.runnext,作为下一个优先执行任务
	//尝试把G添加到P的runnext节点,这里确保runnext只有一个G,如果之前已经有一个G则踢出来放到runq里
	if next {
	retryNext:
        oldnext := _p_.runnext
		if !_p_.runnext.cas(oldnext, guintptr(unsafe.Pointer(gp))) {
			// 有其它线程在操作 runnext 成员,需要重试
			goto retryNext
		}
		// 老的 runnext 为 nil,不用管了
		if oldnext == 0 {
			return
		}
        // Kick the old runnext out to the regular run queue.
        // 把之前的 runnext 踢到正常的 runq 中
        // 原本存放在 runnext 的 gp 放入 runq 的尾部
		gp = oldnext.ptr()
	}

retry:
    //runghead是一个数组实现的循环队列
	//head,tail累加,通过取模即可获得索引位置,很典型的算法
	// 如果_p_.runq队列不满,则放到队尾就结束了。
  	// 试想如果不放到队尾而放到队头里会怎样?如果频繁的创建G则可能后面的G总是不被执行,对后面的G不公平
	h := atomic.LoadAcq(&_p_.runqhead) // load-acquire, synchronize with consumers
    t := _p_.runqtail
    //如果本地队列未满,直接放到尾部
	if t-h < uint32(len(_p_.runq)) {
		_p_.runq[t%uint32(len(_p_.runq))].set(gp)
		// 这里使用原子操作写入 runtail,防止编译器和 CPU 指令重排,保证上一行代码对 runq 的修改发生在修改 runqtail 之前,并且保证当前线程对队列的修改对其它线程立即可见。
		atomic.StoreRel(&_p_.runqtail, t+1) // store-release, makes the item available for consumption
		return
    }

	//如果队列满了,尝试把G和当前P里的一部分runq放到全局队列
 	//因为操作全局需要加锁,所以名字里带个slow
	if runqputslow(_p_, gp, h, t) {
		return
	}
	// the queue is not full, now the put above must succeed
	//如果将 newg 添加到全局队列失败了,说明本地队列在此过程中发生了变化,又有了位置可以添加 newg,因此重试 retry 代码段。我们也可以发现,P 的本地可运行队列的长度为 256,它是一个循环队列,因此最多只能放下 256 个 goroutine。
	goto retry
}
|
任务队列分为三级,桉优先级从高到低分别是P.runnext,P.runq,Sched.runq,很有些CPU多级缓存的意思.
往全局队列添加任务,显然需要加锁,只是专门取名为runqputslow就很有说法了
 1
 2
 3
 4
 5
 6
 7
 8
 9
10
11
12
13
14
15
16
17
18
19
20
21
22
23
24
25
26
27
28
29
30
31
32
33
34
35
36
37
38
39
40
41
42
43
44
45
46
47
48
49
50
51
52
53
54
55
|
// Put g and a batch of work from local runnable queue on global queue.
// Executed only by the owner P.
// 将 g 和 _p_ 本地队列的一半 goroutine 放入全局队列。
// 因为要获取锁,所以会慢
func runqputslow(_p_ *p, gp *g, h, t uint32) bool {
    //这意思显然是要从P本地转移一半任务到全局队列.
    //"+1"是别忘了当前这个gp
	var batch [len(_p_.runq)/2 + 1]*g

    // First, grab a batch from local queue.
    //计算一半的实际数量
	n := t - h
	n = n / 2
	if n != uint32(len(_p_.runq)/2) {
		throw("runqputslow: queue is not full")
    }
	//从队列头部提取
	// 从runq头部开始取出一半的runq放到临时变量batch里
	for i := uint32(0); i < n; i++ {
		batch[i] = _p_.runq[(h+i)%uint32(len(_p_.runq))].ptr()
    }
	//调整P队列头部位置
	//如果修改失败,说明 runq 的本地队列被其他线程修改了,因此后面的操作就不进行了,直接返回 false,表示 newg 没被添加进来。
	if !atomic.CasRel(&_p_.runqhead, h, h+n) { // cas-release, commits consume
		return false
    }
	//加上当前gp
	// 把要put的g也放进batch去
	batch[n] = gp
    //对顺序进行洗牌
	if randomizeScheduler {
		for i := uint32(1); i <= n; i++ {
			j := fastrandn(i + 1)
			batch[i], batch[j] = batch[j], batch[i]
		}
	}
    // 全局运行队列是一个链表,这里首先把所有需要放入全局运行队列的 g 链接起来,
    // 减小锁粒度,从而降低锁冲突,提升性能
	// Link the goroutines.
	// 通过循环将 batch 数组里的所有 g 串成链表:
	for i := uint32(0); i < n; i++ {
		batch[i].schedlink.set(batch[i+1])
    }
	var q gQueue
	q.head.set(batch[0])
	q.tail.set(batch[n])

	// Now put the batch on global queue.
	// 将一半的runq放到global队列里,一次多转移一些省得转移频繁
    lock(&sched.lock)
    //添加到全局队列尾部
	globrunqputbatch(&q, int32(n+1))
	unlock(&sched.lock)
	return true
}
|
如果全局的队列尾 sched.runqtail 不为空,则直接将其和前面生成的链表头相接,否则说明全局的可运行列队为空,那就直接将前面生成的链表头设置到 sched.runqhead。
1
2
3
4
5
6
7
8
|
// Put a batch of runnable goroutines on the global runnable queue.
// This clears *batch.
// Sched must be locked.
func globrunqputbatch(batch *gQueue, n int32) {
	sched.runq.pushBackAll(*batch)
	sched.runqsize += n
	*batch = gQueue{}
}
|
若本地队列已满,一次性转移半数到全局队列.这个好理解,因为其他P可能正饿着呢.这也正好解释了newproc1最后尝试用wakep唤醒其他M/P去执行任务的意图.
runqput 方法归还执行完的G,runq 定义是 runq [256]guintptr,有固定的长度,因此当前P里的待运行G超过256的时候说明过多了,则执行 runqputslow 方法把一半G扔给全局G链表,globrunqputbatch 连接全局链表的头尾指针。
wake
当newproc1成功创建G任务后,会尝试用wakep唤醒M执行任务.
 1
 2
 3
 4
 5
 6
 7
 8
 9
10
|
// Tries to add one more P to execute G's.
// Called when a G is made runnable (newproc, ready).
func wakep() {
    //被唤醒的线程需要绑定P,累加自旋计数,避免newproc1唤醒过多线程
	// be conservative about spinning threads
	if !atomic.Cas(&sched.nmspinning, 0, 1) {
		return
	}
	startm(nil, true)
}
|
唤醒M
startm
一个M被唤醒的原因总是有新工作要做。比如有了新的自由的P,或有了新的可运行G。如果调用startm函数传入的参数_p_为空,那么就从调度器的空闲P列表获取一个P作为M运行G的上下文环境。如果没有空闲的P,startm函数会直接返回,因为没有P,M也运行不了G。如果有幸得到了一个P,startm函数就会再从调度器的空闲M列表获取一个M,如果没有空闲的M就新建一个M。这个M会和P进行预联,并做好执行准备。
非M0的启动首先从 startm 方法开始启动,要进行调度工作必须有调度处理器P,因此先从空闲的P链表里获取一个P,在 newm 方法创建一个M与P绑定。
 1
 2
 3
 4
 5
 6
 7
 8
 9
10
11
12
13
14
15
16
17
18
19
20
21
22
23
24
25
26
27
28
29
30
31
32
33
34
35
36
37
38
39
40
41
42
43
44
45
46
47
48
49
50
51
52
53
54
55
56
57
58
59
60
61
62
63
64
65
|
// Schedules some M to run the p (creates an M if necessary).
// If p==nil, tries to get an idle P, if no idle P's does nothing.
// May run with m.p==nil, so write barriers are not allowed.
// If spinning is set, the caller has incremented nmspinning and startm will
// either decrement nmspinning or set m.spinning in the newly started M.
//go:nowritebarrierrec
// 调用 m 来绑定 p,如果没有 m,那就新建一个
// 如果 p 为空,那就尝试获取一个处于空闲状态的 p,如果找不到 p,那就什么都不做
func startm(_p_ *p, spinning bool) {
	lock(&sched.lock)
	//如果没有指定P,尝试获取空闲P
	if _p_ == nil {
		_p_ = pidleget()
		//获取失败,终止
		if _p_ == nil {
			unlock(&sched.lock)
			if spinning {
				// The caller incremented nmspinning, but there are no idle Ps,
				// so it's okay to just undo the increment and give up.
				//递减自旋计数
				// 如果找到 p,放弃。还原全局处于自旋状态的 m 的数量
				if int32(atomic.Xadd(&sched.nmspinning, -1)) < 0 {
					throw("startm: negative nmspinning")
				}
			}
			// 没有空闲的 p,直接返回
			return
		}
	}
	//获取休眠的闲置M
	// 从 m 空闲队列中获取正处于睡眠之中的工作线程,
    	// 所有处于睡眠状态的 m 都在此队列中
	mp := mget()
	unlock(&sched.lock)
	//如没有闲置M,新建
	// 如果没有找到 m
	if mp == nil {
		//默认启动函数
		//主要是判断M.nextp是否有暂存的P,以此调整自旋计数
		var fn func()
		if spinning {
			// The caller incremented nmspinning, so set m.spinning in the new M.
			fn = mspinning
		}
		// 创建新的工作线程
		newm(fn, _p_)
		return
	}
	if mp.spinning {
		throw("startm: m is spinning")
	}
	if mp.nextp != 0 {
		throw("startm: m has p")
	}
	if spinning && !runqempty(_p_) {
		throw("startm: p has runnable gs")
	}
	// The caller incremented nmspinning, so set m.spinning in the new M.
	//设置自旋状态和暂存P
	mp.spinning = spinning
	// 设置 m 马上要结合的 p
	mp.nextp.set(_p_)
	//唤醒M
	notewakeup(&mp.park)
}
|
首先处理 p 为空的情况,直接从全局空闲 p 队列里找,如果没找到,则直接返回。如果设置了 spinning 为 true 的话,还需要还原全局的处于自旋状态的 m 的数值:&sched.nmspinning 。
搞定了 p,接下来看 m。先调用 mget 函数从全局空闲的 m 队列里获取一个 m,如果没找到 m,则要调用 newm 新创建一个 m,并且如果设置了 spinning 为 true 的话,先要设置好 mstartfn:
1
2
3
4
|
func mspinning() {
    // startm's caller incremented nmspinning. Set the new M's spinning.
    getg().m.spinning = true
}
|
这样,启动 m 后,在 mstart1 函数里,进入 schedule 循环前,执行 mstartfn 函数,使得 m 处于自旋状态。
接下来是正常情况下(找到了 p 和 m)的处理:
1
2
3
4
5
|
mp.spinning = spinning
// 设置 m 马上要结合的 p
mp.nextp.set(_p_)
// 唤醒 m
notewakeup(&mp.park)
|
设置 nextp 为找到的 p,调用 notewakeup 唤醒 m。之前我们讲 findrunnable 函数的时候,对于最后没有找到工作的 m,我们调用 notesleep(&g.m.park),使得 m 进入睡眠状态。现在终于有工作了,需要老将出山,将其唤醒:
mget
startm默认优先选用闲置M,这个闲置的M从何而来?尝试从 sched 的 midel 列表中获取一个 M:
 1
 2
 3
 4
 5
 6
 7
 8
 9
10
11
12
13
14
|
// Try to get an m from midle list.
// Sched must be locked.
// May run during STW, so write barriers are not allowed.
//go:nowritebarrierrec
// 调度器必须锁住
// 可能在 STW 期间运行,故不允许 write barrier
func mget() *m {
	mp := sched.midle.ptr()
	if mp != nil {
		sched.midle = mp.schedlink
		sched.nmidle--
	}
	return mp
}
|
被唤醒而进入工作状态的M,会陷入调度循环,从各种可能场所获取并执行G任务.只有当彻底找不到可执行任务,或因任务用时过长,系统调用阻塞等原因被剥夺P时,M才会进入休眠状态.
mput
将m放入sched的闲置队列。
 1
 2
 3
 4
 5
 6
 7
 8
 9
10
11
12
|
// Put mp on midle list.
// sched.lock must be held.
// May run during STW, so write barriers are not allowed.
//go:nowritebarrierrec
func mput(mp *m) {
	assertLockHeld(&sched.lock)

	mp.schedlink = sched.midle
	sched.midle.set(mp)
	sched.nmidle++
	checkdead()
}
|
 1
 2
 3
 4
 5
 6
 7
 8
 9
10
11
12
13
14
15
16
17
18
19
20
21
22
23
24
25
26
27
28
29
30
31
32
33
34
35
36
37
38
|
//停止M,使其休眠
// Stops execution of the current m until new work is available.
// Returns with acquired P.
func stopm() {
	_g_ := getg()

	if _g_.m.locks != 0 {
		throw("stopm holding locks")
	}
	if _g_.m.p != 0 {
		throw("stopm holding p")
	}
	if _g_.m.spinning {
		throw("stopm spinning")
	}

	lock(&sched.lock)
	mput(_g_.m)
	unlock(&sched.lock)
	//休眠,等待被唤醒
	notesleep(&_g_.m.park)
	noteclear(&_g_.m.park)
	//绑定P
	acquirep(_g_.m.nextp.ptr())
	_g_.m.nextp = 0
}

//将M放入闲置链表
// Put mp on midle list.
// Sched must be locked.
// May run during STW, so write barriers are not allowed.
//go:nowritebarrierrec
func mput(mp *m) {
	mp.schedlink = sched.midle
	sched.midle.set(mp)
	sched.nmidle++
	checkdead()
}
|
最好不要有太多的M,且不说通过系统调用创建线程本身就有很大的性能损耗,大量闲置且不被回收的线程,M对象,g0栈空间都是资源浪费
newm
newm 方法中通过 newosproc 新建一个内核线程,并把内核线程与M以及 mstart 方法进行关联,这样内核线程执行时就可以找到M并且找到启动调度循环的方法。最后 schedule 启动调度循环
 1
 2
 3
 4
 5
 6
 7
 8
 9
10
11
12
13
14
15
16
17
18
19
20
21
22
23
24
25
26
27
28
29
30
31
32
33
34
35
36
37
38
39
40
41
42
43
44
45
46
47
|
// Create a new m. It will start off with a call to fn, or else the scheduler.
// fn needs to be static and not a heap allocated closure.
// May run with m.p==nil, so write barriers are not allowed.
//go:nowritebarrierrec
// 创建一个新的 m. 它会启动并调用 fn 或调度器
// fn 必须是静态、非堆上分配的闭包
// 它可能在 m.p==nil 时运行,因此不允许 write barrier
func newm(fn func(), _p_ *p) {
	//创建M对象
	mp := allocm(_p_, fn)
	//暂存P
	mp.nextp.set(_p_)
	// 设置 signal mask
	mp.sigmask = initSigmask
	if gp := getg(); gp != nil && gp.m != nil && (gp.m.lockedExt != 0 || gp.m.incgo) && GOOS != "plan9" {
		// We're on a locked M or a thread that may have been
		// started by C. The kernel state of this thread may
		// be strange (the user may have locked it for that
		// purpose). We don't want to clone that into another
		// thread. Instead, ask a known-good thread to create
		// the thread for us.
		//
		// This is disabled on Plan 9. See golang.org/issue/22227.
		//
		// 我们处于一个锁定的 M 或可能由 C 启动的线程。这个线程的内核状态可能
		// 很奇怪(用户可能已将其锁定)。我们不想将其克隆到另一个线程。
		// 相反,请求一个已知状态良好的线程来创建给我们的线程。
		//
		// 在 plan9 上禁用,见 golang.org/issue/22227
		// TODO: This may be unnecessary on Windows, which
		// doesn't model thread creation off fork.
		lock(&newmHandoff.lock)
		if newmHandoff.haveTemplateThread == 0 {
			throw("on a locked thread with no template thread")
		}
		mp.schedlink = newmHandoff.newm
		newmHandoff.newm.set(mp)
		if newmHandoff.waiting {
			newmHandoff.waiting = false
			// 唤醒 m, 自旋到非自旋
			notewakeup(&newmHandoff.wake)
		}
		unlock(&newmHandoff.lock)
		return
	}
	newm1(mp)
}
|
先调用 allocm 在堆上创建一个 m,接着调用 newosproc 函数启动一个工作线程:
 1
 2
 3
 4
 5
 6
 7
 8
 9
10
11
12
13
14
15
16
17
18
19
20
21
22
|
func newm1(mp *m) {
	if iscgo {
		var ts cgothreadstart
		if _cgo_thread_start == nil {
			throw("_cgo_thread_start missing")
		}
		ts.g.set(mp.g0)
		ts.tls = (*uint64)(unsafe.Pointer(&mp.tls[0]))
		ts.fn = unsafe.Pointer(funcPC(mstart))
		if msanenabled {
			msanwrite(unsafe.Pointer(&ts), unsafe.Sizeof(ts))
		}
		execLock.rlock() // Prevent process clone.
		asmcgocall(_cgo_thread_start, unsafe.Pointer(&ts))
		execLock.runlock()
		return
	}
	execLock.rlock() // Prevent process clone.
	//创建系统线程
	newosproc(mp)
	execLock.runlock()
}
|
当 m 被创建时,会转去运行 mstart:
- 如果当前程序为 cgo 程序,则会通过 asmcgocall 来创建线程并调用 mstart
- 否则会调用 newosproc 来创建线程,从而调用 mstart。
allocm
allocm 方法中创建M的同时创建了一个G与自己关联,这个G就是我们在上面说到的g0。为什么M要关联一个g0?因为 runtime 下执行一个G也需要用到栈空间来完成调度工作,而拥有执行栈的地方只有G,因此需要为每个执行线程里配置一个g0。
 1
 2
 3
 4
 5
 6
 7
 8
 9
10
11
12
13
14
15
16
17
18
19
20
21
22
23
24
25
26
27
28
29
30
31
32
33
34
35
36
37
38
39
40
41
42
43
44
45
46
47
48
49
50
51
52
53
54
55
56
57
58
59
60
61
|
// Allocate a new m unassociated with any thread.
// Can use p for allocation context if needed.
// fn is recorded as the new m's m.mstartfn.
//
// This function is allowed to have write barriers even if the caller
// isn't because it borrows _p_.
//
//go:yeswritebarrierrec
func allocm(_p_ *p, fn func()) *m {
	_g_ := getg()
	_g_.m.locks++ // disable GC because it can be called from sysmon
	if _g_.m.p == 0 {
		acquirep(_p_) // temporarily borrow p for mallocs in this function
	}

	// Release the free M list. We need to do this somewhere and
	// this may free up a stack we can use.
	if sched.freem != nil {
		lock(&sched.lock)
		var newList *m
		for freem := sched.freem; freem != nil; {
			if freem.freeWait != 0 {
				next := freem.freelink
				freem.freelink = newList
				newList = freem
				freem = next
				continue
			}
			stackfree(freem.g0.stack)
			freem = freem.freelink
		}
		sched.freem = newList
		unlock(&sched.lock)
	}

	mp := new(m)
	//设置它的起始函数(mstartfn字段)。起始函数仅当运行时系统要用此M执行系统监控或垃圾回收等任务时才会被设置。
	mp.mstartfn = fn	//启动函数
	mcommoninit(mp)	//初始化

	//创建g0
	// In case of cgo or Solaris or Darwin, pthread_create will make us a stack.
	// Windows and Plan 9 will layout sched stack on OS stack.
	if iscgo || GOOS == "solaris" || GOOS == "windows" || GOOS == "plan9" || GOOS == "darwin" {
		mp.g0 = malg(-1)
	} else {
		mp.g0 = malg(8192 * sys.StackGuardMultiplier)
	}
	// 把新创建的g0与M做关联
	mp.g0.m = mp

	if _p_ == _g_.m.p.ptr() {
		releasep()
	}
	_g_.m.locks--
	if _g_.m.locks == 0 && _g_.preempt { // restore the preemption request in case we've cleared it in newstack
		_g_.stackguard0 = stackPreempt
	}

	return mp
}
|
M最特别的就是自带一个名为g0,默认8KB栈内存的G对象属性.它的栈内存地址被传给newosproc函数,作为系统线程的默认堆栈空间(并非所有系统都支持).
M初始化操作会检查已有的M数量,如超出最大限制(默认为10000),会导致进程崩溃.所有M被添加到allm链表,且不被释放.
全局M列表除了可以通过它获取到所有M的信息以及防止M被当作垃圾回收掉之外,并没有特殊意义。
mcommoninit
commoninit 仅仅只是对 M 进行一个初步的初始化, 该初始化包含对 M 及用于处理 M 信号的 G 的相关运算操作,未涉及工作线程的暂止和复始。
 1
 2
 3
 4
 5
 6
 7
 8
 9
10
11
12
13
14
15
16
17
18
19
20
21
22
23
24
25
26
27
28
29
30
31
32
33
34
35
36
37
38
39
40
41
42
43
44
45
46
47
48
49
50
51
52
53
54
55
56
|
// 初始化 m
func mcommoninit(mp *m) {
	//如果是初始化m0, _g_ = g0
	_g_ := getg()

	// g0 stack won't make sense for user (and is not necessary unwindable).
	if _g_ != _g_.m.g0 {
		callers(1, mp.createstack[:])
	}
	//因为 sched 是一个全局变量,多个线程同时操作 sched 会有并发问题,因此先要加锁,操作结束之后再解锁。
	lock(&sched.lock)
	if sched.mnext+1 < sched.mnext {
		throw("runtime: thread ID overflow")
	}
	// 设置 m 的 id
	// m0 的 id 是 0,并且之后创建的 m 的 id 是递增的。
	mp.id = sched.mnext
	sched.mnext++
	// 检查已创建系统线程是否超过了数量限制(10000)
	checkmcount()
	// random 初始化
	mp.fastrand[0] = 1597334677 * uint32(mp.id)
	mp.fastrand[1] = uint32(cputicks())
	if mp.fastrand[0]|mp.fastrand[1] == 0 {
		mp.fastrand[1] = 1
	}

	mpreinit(mp)
	if mp.gsignal != nil {
		mp.gsignal.stackguard1 = mp.gsignal.stack.lo + _StackGuard
	}

	// Add to allm so garbage collector doesn't free g->m
	// when it is just in a register or thread-local storage.
	// 将 m 挂到全局变量 allm 上,allm 是一个指向 m 的的指针。
	mp.alllink = allm

	// NumCgoCall() iterates over allm w/o schedlock,
	// so we need to publish it safely.
	//这一行将 allm 变成 m 的地址,这样变成了一个循环链表。之后再新建 m 的时候,新 m 的 alllink 就会指向本次的 m,最后 allm 又会指向新创建的 m。
	atomicstorep(unsafe.Pointer(&allm), unsafe.Pointer(mp))
	unlock(&sched.lock)

	// Allocate memory to hold a cgo traceback if the cgo call crashes.
	if iscgo || GOOS == "solaris" || GOOS == "windows" {
		mp.cgoCallers = new(cgoCallers)
	}
}

func checkmcount() {
	// sched lock is held
	if mcount() > sched.maxmcount {
		print("runtime: program exceeds ", sched.maxmcount, "-thread limit\n")
		throw("thread exhaustion")
	}
}
|
newosproc
既然是 newosproc ,我们此刻仍在 Go 的空间中,那么实现就是操作系统特定的了
 1
 2
 3
 4
 5
 6
 7
 8
 9
10
11
12
13
14
15
16
17
18
19
20
21
22
23
24
25
26
27
28
29
|
// May run with m.p==nil, so write barriers are not allowed.
// 可能在 m.p==nil 情况下运行,因此不允许 write barrier
//go:nowritebarrier
func newosproc(mp *m) {
	stk := unsafe.Pointer(mp.g0.stack.hi)
	/*
	 * note: strace gets confused if we use CLONE_PTRACE here.
	 */
	if false {
		print("newosproc stk=", stk, " m=", mp, " g=", mp.g0, " clone=", funcPC(clone), " id=", mp.id, " ostk=", &mp, "\n")
	}

	// Disable signals during clone, so that the new thread starts
	// with signals disabled. It will enable them in minit.
	// 在 clone 期间禁用信号,以便新线程启动时信号被禁止。
	// 他们会在 minit 中重新启用。
	var oset sigset
	sigprocmask(_SIG_SETMASK, &sigset_all, &oset)
	ret := clone(cloneFlags, stk, unsafe.Pointer(mp), unsafe.Pointer(mp.g0), unsafe.Pointer(funcPC(mstart)))
	sigprocmask(_SIG_SETMASK, &oset, nil)

	if ret < 0 {
		print("runtime: failed to create new OS thread (have ", mcount(), " already; errno=", -ret, ")\n")
		if ret == -_EAGAIN {
			println("runtime: may need to increase max user processes (ulimit -u)")
		}
		throw("newosproc")
	}
}
|
核心就是调用 clone 函数创建系统线程,新线程从 mstart 函数开始执行。clone 函数由汇编语言实现:
 1
 2
 3
 4
 5
 6
 7
 8
 9
10
11
12
13
14
15
16
17
18
19
20
21
22
23
24
25
26
27
28
29
30
31
32
33
34
35
36
37
38
39
40
41
42
43
44
45
46
47
48
49
50
51
52
53
54
55
56
57
58
59
60
61
62
63
|
// int32 clone(int32 flags, void *stk, M *mp, G *gp, void (*fn)(void));
TEXT runtime·clone(SB),NOSPLIT,$0
    // 准备系统调用的参数
    MOVL    flags+0(FP), DI
    MOVQ    stk+8(FP), SI
    MOVQ    $0, DX
    MOVQ    $0, R10

    // 将 mp,gp,fn 拷贝到寄存器,对子线程可见
    MOVQ    mp+16(FP), R8
    MOVQ    gp+24(FP), R9
    MOVQ    fn+32(FP), R12

    // 系统调用 clone
    MOVL    $56, AX
    SYSCALL

    // In parent, return.
    CMPQ    AX, $0
    JEQ    3(PC)
    // 父线程,返回
    MOVL    AX, ret+40(FP)
    RET

    // In child, on new stack.
    // 在子线程中。设置 CPU 栈顶寄存器指向子线程的栈顶
    MOVQ    SI, SP

    // If g or m are nil, skip Go-related setup.
    CMPQ    R8, $0    // m
    JEQ    nog
    CMPQ    R9, $0    // g
    JEQ    nog

    // Initialize m->procid to Linux tid
    // 通过 gettid 系统调用获取线程 ID(tid)
    MOVL    $186, AX    // gettid
    SYSCALL
    // 设置 m.procid = tid
    MOVQ    AX, m_procid(R8)

    // Set FS to point at m->tls.
    // 新线程刚刚创建出来,还未设置线程本地存储,即 m 结构体对象还未与工作线程关联起来,
    // 下面的指令负责设置新线程的 TLS,把 m 对象和工作线程关联起来
    LEAQ    m_tls(R8), DI
    CALL    runtime·settls(SB)

    // In child, set up new stack
    get_tls(CX)
    MOVQ    R8, g_m(R9) // g.m = m
    MOVQ    R9, g(CX) // tls.g = &m.g0
    CALL    runtime·stackcheck(SB)

nog:
    // Call fn
    // 调用 mstart 函数。永不返回
    CALL    R12

    // It shouldn't return. If it does, exit that thread.
    MOVL    $111, DI
    MOVL    $60, AX
    SYSCALL
    JMP    -3(PC)    // keep exiting
|
先是为 clone 系统调用准备参数,参数通过寄存器传递。第一个参数指定内核创建线程时的选项,第二个参数指定新线程应该使用的栈,这两个参数都是通过 newosproc 函数传递进来的。
接着将 m, g0, fn 分别保存到寄存器中,待子线程创建好后再拿出来使用。因为这些参数此时是在父线程的栈上,若不保存到寄存器中,子线程就取不出来了。
这个几个参数保存在父线程的寄存器中,创建子线程时,操作系统内核会把父线程所有的寄存器帮我们复制一份给子线程,所以当子线程开始运行时就能拿到父线程保存在寄存器中的值,从而拿到这几个参数。
之后,调用 clone 系统调用,内核帮我们创建出了一个子线程。相当于原来的一个执行分支现在变成了两个执行分支,于是会有两个返回。这和著名的 fork 系统调用类似,根据返回值来判断现在是处于父线程还是子线程。
如果是父线程,就直接返回了。如果是子线程,接着还要执行一堆操作,例如设置 tls,设置 m.procid 等等。
systemstack
在进程执行过程中,有两类代码需要运行.一类自然是用户逻辑,直接使用G栈内存;另一类是运行时管理指令,它并不便于直接在用户栈上执行,因为这需要处理与用户逻辑现场有关的一大堆事务.
举例来说,G任务可在中途暂停,放回队列后由其他M获取执行.如果不更改执行栈,可能会造成多个线程共享内存,从而引发混乱.另外,在执行垃圾回收操作时,如何收缩依旧被线程持有的G栈空间?因此,当需要执行管理指令时,会将线程栈临时切换到g0,与用户逻辑彻底隔离
systemstack就是切换到g0栈后再执行运行时相关管理操作的.
 1
 2
 3
 4
 5
 6
 7
 8
 9
10
11
12
13
14
15
16
17
18
19
20
21
22
23
24
25
26
27
28
29
30
31
32
33
34
35
|
// mcall switches from the g to the g0 stack and invokes fn(g),
// where g is the goroutine that made the call.
// mcall saves g's current PC/SP in g->sched so that it can be restored later.
// It is up to fn to arrange for that later execution, typically by recording
// g in a data structure, causing something to call ready(g) later.
// mcall returns to the original goroutine g later, when g has been rescheduled.
// fn must not return at all; typically it ends by calling schedule, to let the m
// run other goroutines.
//
// mcall can only be called from g stacks (not g0, not gsignal).
//
// This must NOT be go:noescape: if fn is a stack-allocated closure,
// fn puts g on a run queue, and g executes before fn returns, the
// closure will be invalidated while it is still executing.
func mcall(fn func(*g))

// systemstack runs fn on a system stack.
// If systemstack is called from the per-OS-thread (g0) stack, or
// if systemstack is called from the signal handling (gsignal) stack,
// systemstack calls fn directly and returns.
// Otherwise, systemstack is being called from the limited stack
// of an ordinary goroutine. In this case, systemstack switches
// to the per-OS-thread stack, calls fn, and switches back.
// It is common to use a func literal as the argument, in order
// to share inputs and outputs with the code around the call
// to system stack:
//
//	... set up y ...
//	systemstack(func() {
//		x = bigcall(y)
//	})
//	... use x ...
//
//go:noescape
func systemstack(fn func())
|
mstart
新线程从 mstart 函数开始执行。
我们必须在开始前计算栈边界,因此在 mstart1 之前,就是一些确定执行栈边界的工作。
mstart 函数设置了 stackguard0 和 stackguard1 字段后,就直接调用 mstart1() 函数
  1
  2
  3
  4
  5
  6
  7
  8
  9
 10
 11
 12
 13
 14
 15
 16
 17
 18
 19
 20
 21
 22
 23
 24
 25
 26
 27
 28
 29
 30
 31
 32
 33
 34
 35
 36
 37
 38
 39
 40
 41
 42
 43
 44
 45
 46
 47
 48
 49
 50
 51
 52
 53
 54
 55
 56
 57
 58
 59
 60
 61
 62
 63
 64
 65
 66
 67
 68
 69
 70
 71
 72
 73
 74
 75
 76
 77
 78
 79
 80
 81
 82
 83
 84
 85
 86
 87
 88
 89
 90
 91
 92
 93
 94
 95
 96
 97
 98
 99
100
101
102
103
104
105
106
107
108
109
110
111
112
113
114
|
// Called to start an M.
//
// This must not split the stack because we may not even have stack
// bounds set up yet.
//
// May run during STW (because it doesn't have a P yet), so write
// barriers are not allowed.
//
//go:nosplit
//go:nowritebarrierrec
func mstart() {
	// 启动过程时 _g_ = m0.g0
	_g_ := getg()
	// 终于开始确定执行栈的边界了
	// 通过检查 g 执行占的边界来确定是否为系统栈
	osStack := _g_.stack.lo == 0
	if osStack {
		//对于无法使用g0 stack的系统,直接在系统堆栈上划出所需空间
		// Initialize stack bounds from system stack.
		// Cgo may have left stack size in stack.hi.
		// minit may update the stack bounds.
		size := _g_.stack.hi
		if size == 0 {
			size = 8192 * sys.StackGuardMultiplier
		}
		//通过取size变量指针来确定高位地址
		_g_.stack.hi = uintptr(noescape(unsafe.Pointer(&size)))
		_g_.stack.lo = _g_.stack.hi - size + 1024
	}
	// Initialize stack guards so that we can start calling
	// both Go and C functions with stack growth prologues.
	// 初始化栈 guard,进而可以同时调用 Go 或 C 函数。
	_g_.stackguard0 = _g_.stack.lo + _StackGuard
	_g_.stackguard1 = _g_.stackguard0
	// 启动
	mstart1()

	// Exit this thread.
	// 退出线程
	if GOOS == "windows" || GOOS == "solaris" || GOOS == "plan9" || GOOS == "darwin" || GOOS == "aix" {
		// Window, Solaris, Darwin, AIX and Plan 9 always system-allocate
		// the stack, but put it in _g_.stack before mstart,
		// so the logic above hasn't set osStack yet.
		// 由于 windows, solaris, darwin, aix 和 plan9 总是系统分配的栈,在在 mstart 之前放进 _g_.stack 的
		// 因此上面的逻辑还没有设置 osStack。
		osStack = true
	}
	// 退出线程
	mexit(osStack)
}


func mstart1() {
	_g_ := getg()

	if _g_ != _g_.m.g0 {
		throw("bad runtime·mstart")
	}

	// Record the caller for use as the top of stack in mcall and
	// for terminating the thread.
	// We're never coming back to mstart1 after we call schedule,
	// so other calls can reuse the current frame.
	// 初始化g0执行现场
	// 一旦调用 schedule() 函数,永不返回
	// 所以栈帧可以被复用
	// 为了在 mcall 的栈顶使用调用方来结束当前线程,做记录
	// 当进入 schedule 之后,我们再也不会回到 mstart1,所以其他调用可以复用当前帧。
	save(getcallerpc(), getcallersp())
	asminit()
	minit()

	// Install signal handlers; after minit so that minit can
	// prepare the thread to be able to handle the signals.
	// 设置信号 handler;在 minit 之后,因为 minit 可以准备处理信号的的线程
	if _g_.m == &m0 {
		mstartm0()
	}
	//执行启动函数
	//初始化完成后,如果有起始函数,那么该M的起始函数就会执行。如果这个起始函数代表的是系统监控任务,那么该M会一直执行它,而不会继续后面的流程。
	if fn := _g_.m.mstartfn; fn != nil {
		fn()
	}
	// 如果当前 m 并非 m0,则要求绑定 p
	if _g_.m != &m0 {
		//绑定P
		acquirep(_g_.m.nextp.ptr())
		_g_.m.nextp = 0
	}
	//进入任务调度循环(不再返回)
	schedule()
}

// Associate p and the current m.
//
// This function is allowed to have write barriers even if the caller
// isn't because it immediately acquires _p_.
//
//go:yeswritebarrierrec
func acquirep(_p_ *p) {
	// 此处不允许 write barrier
	// Do the part that isn't allowed to have write barriers.
	wirep(_p_)

	// Have p; write barriers now allowed.

	// Perform deferred mcache flush before this P can allocate
	// from a potentially stale mcache.
	_p_.mcache.prepareForSweep()

	if trace.enabled {
		traceProcStart()
	}
}
|
当 mstart1 结束后,会执行 mexit 退出 M。mstart 也是所有新创建的 M 的起点。
调用 save 函数来保存调度信息到 g0.sched 结构体,来看源码:
 1
 2
 3
 4
 5
 6
 7
 8
 9
10
11
12
13
14
15
16
17
18
19
20
21
22
23
|
// save updates getg().sched to refer to pc and sp so that a following
// gogo will restore pc and sp.
//
// save must not have write barriers because invoking a write barrier
// can clobber getg().sched.
//
//go:nosplit
//go:nowritebarrierrec
func save(pc, sp uintptr) {
	_g_ := getg()

	_g_.sched.pc = pc
	_g_.sched.sp = sp
	_g_.sched.lr = 0
	_g_.sched.ret = 0
	_g_.sched.g = guintptr(unsafe.Pointer(_g_))
	// We need to ensure ctxt is zero, but can't have a write
	// barrier here. However, it should always already be zero.
	// Assert that.
	if _g_.sched.ctxt != nil {
		badctxt()
	}
}
|
主要是设置了 g0.sched.sp 和 g0.sched.pc,前者指向 mstart1 函数栈上参数的位置,后者则指向 save 函数返回后的下一条指令。
 1
 2
 3
 4
 5
 6
 7
 8
 9
10
11
12
13
14
15
16
17
18
19
20
21
22
23
24
25
26
27
28
29
|
// wirep is the first step of acquirep, which actually associates the
// current M to _p_. This is broken out so we can disallow write
// barriers for this part, since we don't yet have a P.
//
//go:nowritebarrierrec
//go:nosplit
func wirep(_p_ *p) {
	_g_ := getg()

	if _g_.m.p != 0 || _g_.m.mcache != nil {
		throw("wirep: already in go")
	}
	// 检查 m 是否正常,并检查要获取的 p 的状态
	if _p_.m != 0 || _p_.status != _Pidle {
		id := int64(0)
		if _p_.m != 0 {
			id = _p_.m.ptr().id
		}
		print("wirep: p->m=", _p_.m, "(", id, ") p->status=", _p_.status, "\n")
		throw("wirep: invalid p state")
	}
	//绑定mcache
	// 将 p 绑定到 m,p 和 m 互相引用
	_g_.m.mcache = _p_.mcache
	_g_.m.p.set(_p_)
	_p_.m.set(_g_.m)
	// 修改 p 的状态
	_p_.status = _Prunning
}
|
准备进入工作状态的M必须绑定一个有效P,nextp临时持有待绑定的P对象.因为在未正式执行前,并不适合直接设置相关属性.P为M提供cache,以便为工作线程提供对象分配.
几个需要注意的细节:
- mstart 除了在程序引导阶段会被运行之外,也可能在每个 m 被创建时运行.
- mstart 进入 mstart1 之后,会初始化自身用于信号处理的 g,在 mstartfn 指定时将其执行;
- 调度循环 schedule 无法返回,因此最后一个 mexit 目前还不会被执行,因此当下所有的 Go 程序创建的线程都无法被释放 (只有一个特例,当使用 runtime.LockOSThread 锁住的 G 退出时会使用 gogo 退出 M)。
M寻找G
schedule
执行mstart后,M进入核心调度循环,这是一个由schedule,execute,goroutine fn,goexit函数构成的逻辑循环.
runtime.schedule 函数会从不同地方查找待执行的 Goroutine:
- 为了保证公平,当全局运行队列中有待执行的 Goroutine 时,通过 schedtick 保证有一定几率会从全局的运行队列中查找对应的 Goroutine;
- 从处理器本地的运行队列中查找待执行的 Goroutine;
- 如果前两种方法都没有找到 Goroutine,就会通过 runtime.findrunnable 进行阻塞地查找 Goroutine;
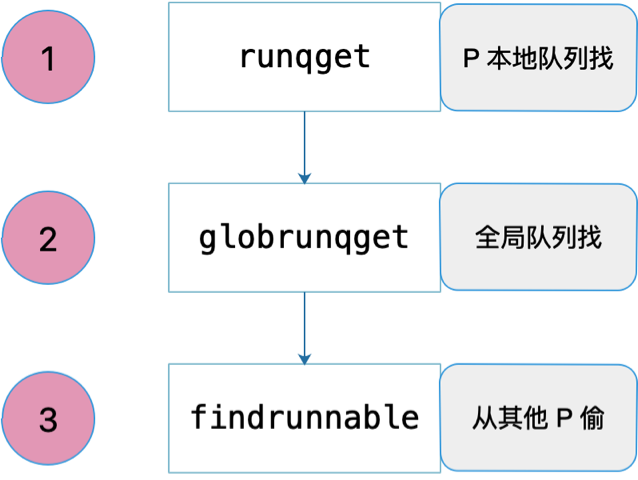
  1
  2
  3
  4
  5
  6
  7
  8
  9
 10
 11
 12
 13
 14
 15
 16
 17
 18
 19
 20
 21
 22
 23
 24
 25
 26
 27
 28
 29
 30
 31
 32
 33
 34
 35
 36
 37
 38
 39
 40
 41
 42
 43
 44
 45
 46
 47
 48
 49
 50
 51
 52
 53
 54
 55
 56
 57
 58
 59
 60
 61
 62
 63
 64
 65
 66
 67
 68
 69
 70
 71
 72
 73
 74
 75
 76
 77
 78
 79
 80
 81
 82
 83
 84
 85
 86
 87
 88
 89
 90
 91
 92
 93
 94
 95
 96
 97
 98
 99
100
101
102
103
104
105
106
107
108
109
110
111
112
113
114
115
116
117
118
119
120
121
122
123
124
125
126
127
128
129
130
131
132
133
134
135
136
137
138
139
140
141
|
// One round of scheduler: find a runnable goroutine and execute it.
// Never returns.
// 执行一轮调度器的工作:找到一个 runnable 的 goroutine,并且执行它
// 永不返回
func schedule() {
	_g_ := getg()

	if _g_.m.locks != 0 {
		throw("schedule: holding locks")
	}

	//如果当前M是lockedm,那么休眠
	//没有立即execute(lockedg),是因为该lockedg此时可能被其他M获取
	//兴许是中途用gosched暂时让出P,进入待运行队列

	// 在调度开始,判断当前M是否已被锁定。如果当前M已和某个G锁定,立即停止调度,并停止当前M
	//(让它阻塞),直到与它锁定的G处于可运行状态时,才会被唤醒并继续运行锁定的G。停止当前M
	// 后,相关内核线程就不能再做其他事了,调度器也不再为这个M寻找可运行的G。
	if _g_.m.lockedg != 0 {
		stoplockedm()
		execute(_g_.m.lockedg.ptr(), false) // Never returns.
	}

	// We should not schedule away from a g that is executing a cgo call,
	// since the cgo call is using the m's g0 stack.
	//如果当前G执行的是cgo调用的话,那么调度也会停止。
	if _g_.m.incgo {
		throw("schedule: in cgo")
	}

top:
	//如果GC处于等待状态,停止M,等待GC完成被唤醒
	//准备进入GC STW,休眠
	//判断是否有串行运行时任务正在等待执行,判断依据就是调度器的gcwaiting字段是否为0。如果
	//gcwaiting不为0,则停止并阻塞当前M直到串行运行时任务结束,才继续执行后面的调度动作。
	//串行运行时任务执行时需要停止Go的调度器,官方称此操作为Stop the world,简称STW。
	if sched.gcwaiting != 0 {
		gcstopm()
		goto top
	}
	if _g_.m.p.ptr().runSafePointFn != 0 {
		runSafePointFn()
	}
	//接下来就是寻找可运行G的过程。首先试图获取执行踪迹读取任务的G。
	var gp *g
	//当从P.next提取G时,inheritTime = true
	//不累加P.schedtick计数,使得它延长本地队列处理时间
	var inheritTime bool
	if trace.enabled || trace.shutdown {
		gp = traceReader()
		if gp != nil {
			casgstatus(gp, _Gwaiting, _Grunnable)
			traceGoUnpark(gp, 0)
		}
	}
	//未果,试图获取执行GC标记任务的G。
	//进入GC MarkWorker工作模式
	if gp == nil && gcBlackenEnabled != 0 {
		gp = gcController.findRunnableGCWorker(_g_.m.p.ptr())
	}
	//未果,从调度器的可运行G队列中获取可运行G。globrunqget函数负责从调度器的可运行G队列获取一个G。
	//调度器每调度 61 次并且全局队列有可运行 goroutine 的情况下才会调用 globrunqget 函数尝试从全局获取可运行 goroutine。毕竟,从全局获取需要上锁,这个开销可就大了,能不做就不做。
	if gp == nil {
		// Check the global runnable queue once in a while to ensure fairness.
		// Otherwise two goroutines can completely occupy the local runqueue
		// by constantly respawning each other.
		// 为了公平,每调用 schedule 函数 61 次就要从全局可运行 goroutine 队列中获取
		if _g_.m.p.ptr().schedtick%61 == 0 && sched.runqsize > 0 {
			lock(&sched.lock)
			// 从全局队列最大获取 1 个 gorutine
			gp = globrunqget(_g_.m.p.ptr(), 1)
			unlock(&sched.lock)
		}
	}
	//未果,从本地P的可运行G队列中获取可运行G。runqget函数从本地P的可运行G队列获取一个G。
	//这里说一下,runqget函数除了返回一个G之外,还会返回一个bool值。
	//inheritTime值为true表示这个G要继承当前剩下的时间片。
	//那么什么情况下runqget函数会返回true呢?
	//当它返回的G来自本地P的runnext字段时,该函数就会返回true。
	//也就是说,本地P的runnext字段中的G在执行时需要继承时间片。
	//从P本地队列获取G任务
	if gp == nil {
		gp, inheritTime = runqget(_g_.m.p.ptr())
		if gp != nil && _g_.m.spinning {
			throw("schedule: spinning with local work")
		}
	}
	//未果,全力查找可运行G。函数findrunnable会一直阻塞直到找到一个可运行的G。
	//也就是说,这个函数返回时,一定是找到一个可运行G了。所谓不撞南墙不回头,说的就是它。
	//为什么这里也有inheritTime?不难想象,这是因为全力寻找可运行G的过程中也会尝试从本地P那里获取可运行G。
	//也就是说在findrunnable函数中也调用了runqget函数。
	//从其他可能的地方获取G任务
	//如果获取失败,会让M进入休眠状态,被唤醒后重试
	// 从本地运行队列和全局运行队列都没有找到需要运行的 goroutine,
	// 调用 findrunnable 函数从其它工作线程的运行队列中偷取,如果偷不到,则当前工作线程进入睡眠
	// 直到获取到 runnable goroutine 之后 findrunnable 函数才会返回。
	if gp == nil {
		gp, inheritTime = findrunnable() // blocks until work is available
	}

	// This thread is going to run a goroutine and is not spinning anymore,
	// so if it was marked as spinning we need to reset it now and potentially
	// start a new spinning M.
	if _g_.m.spinning {
		// 如果 m 是自旋状态,则
		//   1. 从自旋到非自旋
		//   2. 在没有自旋状态的 m 的情况下,再多创建一个新的自旋状态的 m
		resetspinning()
	}

	if sched.disable.user && !schedEnabled(gp) {
		// Scheduling of this goroutine is disabled. Put it on
		// the list of pending runnable goroutines for when we
		// re-enable user scheduling and look again.
		lock(&sched.lock)
		if schedEnabled(gp) {
			// Something re-enabled scheduling while we
			// were acquiring the lock.
			unlock(&sched.lock)
		} else {
			sched.disable.runnable.pushBack(gp)
			sched.disable.n++
			unlock(&sched.lock)
			goto top
		}
	}
	//如果获取到的G是lockedg,那么将其连同P交给lockedm去执行
	//休眠,等待唤醒后重新获取可用G
	//找到的可运行G与某个M锁定。唤醒锁定的M来运行该G,然后继续为当前M寻找可运行G。
	//goto top会回到第3步继续执行。
	if gp.lockedm != 0 {
		// Hands off own p to the locked m,
		// then blocks waiting for a new p.
		startlockedm(gp)//唤醒与gp锁定的M来执行gp
		goto top
	}
	// 执行 goroutine 任务函数
    	// 当前运行的是 runtime 的代码,函数调用栈使用的是 g0 的栈空间
    	// 调用 execute 切换到 gp 的代码和栈空间去运行
	execute(gp, inheritTime)
}
|
runqget
调用 runqget,从 P 本地可运行队列先选出一个可运行的 goroutine.
 1
 2
 3
 4
 5
 6
 7
 8
 9
10
11
12
13
14
15
16
17
18
19
20
21
22
23
24
25
26
27
28
29
30
31
32
33
34
35
36
37
38
39
40
|
// Get g from local runnable queue.
// If inheritTime is true, gp should inherit the remaining time in the
// current time slice. Otherwise, it should start a new time slice.
// Executed only by the owner P.
// 从本地可运行队列里找到一个 g
// 如果 inheritTime 为真,gp 应该继承这个时间片,否则,新开启一个时间片
func runqget(_p_ *p) (gp *g, inheritTime bool) {
	//优先从runnext获取
	//循环尝试cas,为什么用同步操作?因为可能有其他P从本地队列偷任务
	// If there's a runnext, it's the next G to run.
	for {
		next := _p_.runnext
		if next == 0 {
			// 为空,则直接跳出循环
			break
		}
		// 再次比较 next 是否没有变化
		if _p_.runnext.cas(next, 0) {
			// 如果没有变化,则返回 next 所指向的 g。且需要继承时间片
			return next.ptr(), true
		}
	}
	//本地队列
	for {
		// 获取队列头
		h := atomic.LoadAcq(&_p_.runqhead) // load-acquire, synchronize with other consumers
		// 获取队列尾
		t := _p_.runqtail
		if t == h {
			// 头和尾相等,说明本地队列为空,找不到 g
			return nil, false
		}
		// 获取队列头的 g
		gp := _p_.runq[h%uint32(len(_p_.runq))].ptr()
		// 原子操作,防止这中间被其他线程因为偷工作而修改
		if atomic.CasRel(&_p_.runqhead, h, h+1) { // cas-release, commits consume
			return gp, false
		}
	}
}
|
整个源码结构比较简单,主要是两个 for 循环。
第一个 for 循环尝试返回 P 的 runnext 成员,因为 runnext 具有最高的运行优先级,因此要首先尝试获取 runnext。当发现 runnext 为空时,直接跳出循环,进入第二个。否则,用原子操作获取 runnext,并将其值修改为 0,也就是空。这里用到原子操作的原因是防止在这个过程中,有其他线程过来“偷工作”,导致并发修改 runnext 成员。
第二个 for 循环则是在尝试获取 runnext 成员失败后,尝试从本地队列中返回队列头的 goroutine。同样,先用原子操作获取队列头,使用原子操作的原因同样是防止其他线程“偷工作”时并发对队列头的并发写操作。之后,直接获取队列尾,因为不担心其他线程同时更改,所以直接获取。注意,“偷工作”时只会修改队列头。
比较队列头和队列尾,如果两者相等,说明 P 本地队列没有可运行的 goroutine,直接返回空。否则,算出队列头指向的 goroutine,再用一个 CAS 原子操作来尝试修改队列头,使用原子操作的原因同上。
globrunqget
在检查全局队列时,除返回一个可用G外,还会批量转移一批到P本地队列,毕竟不能每次加锁去操作全局队列
 1
 2
 3
 4
 5
 6
 7
 8
 9
10
11
12
13
14
15
16
17
18
19
20
21
22
23
24
25
26
27
28
29
30
31
32
33
34
35
36
37
38
|
// Try get a batch of G's from the global runnable queue.
// Sched must be locked.
// 尝试从全局队列里获取可运行的 goroutine 队列
func globrunqget(_p_ *p, max int32) *g {
	// 如果全局队列中没有 g 直接返回
	if sched.runqsize == 0 {
		return nil
	}
	//将全局队列任务等分,计算最多能批量获取的任务数量
	// 根据 p 的数量平分全局运行队列中的 goroutines
	n := sched.runqsize/gomaxprocs + 1
	if n > sched.runqsize {
		n = sched.runqsize
	}
	// 修正"偷"的数量
	if max > 0 && n > max {
		n = max
	}
	//不能超过runq数组长度的一半(128)
	// 最多只能"偷"本地工作队列一半的数量
	if n > int32(len(_p_.runq))/2 {
		n = int32(len(_p_.runq)) / 2
	}

	// 更新全局可运行队列长度
	sched.runqsize -= n
	//返回第一个G任务,随后的才是要批量转移到本地的任务
	gp := sched.runq.pop()
	n--
	for ; n > 0; n-- {
		// 获取当前队列头
		gp1 := sched.runq.pop()
		// 尝试将 gp1 放入 P 本地,使全局队列得到更多的执行机会
		runqput(_p_, gp1, false)// 放到本地P里
	}
	// 返回最开始获取到的队列头所指向的 goroutine
	return gp
}
|
代码比较简单。首先根据全局队列的可运行 goroutine 长度和 P 的总数,来计算一个数值,表示每个 P 可平均分到的 goroutine 数量。
然后根据函数参数中的 max 以及 P 本地队列的长度来决定把多少全局队列中的 goroutine 转移到 P 本地。
最后,for 循环挨个把全局队列中 n-1 个 goroutine 转移到本地,并且返回最开始获取到的队列头所指向的 goroutine,毕竟它最需要得到运行的机会。
把全局队列中的可运行 goroutine 转移到本地队列,给了全局队列中可运行 goroutine 运行的机会,不然全局队列中的 goroutine 一直得不到运行。
globrunqput
 1
 2
 3
 4
 5
 6
 7
 8
 9
10
|
// Put gp on the global runnable queue.
// sched.lock must be held.
// May run during STW, so write barriers are not allowed.
//go:nowritebarrierrec
func globrunqput(gp *g) {
	assertLockHeld(&sched.lock)

	sched.runq.pushBack(gp)
	sched.runqsize++
}
|
findrunnable
在 findrunnable 这个过程中,是最能说明 M 找工作的锲而不舍精神:尽力去各个运行队列中寻找 goroutine,如果实在找不到则进入睡眠状态,等待有工作时,被其他 M 唤醒。
先获取当前指向的 g,也就是 g0,然后拿到其绑定的 p,即 _p_。
首先再次尝试从 _p_ 本地队列获取 goroutine,如果没有获取到,则尝试从全局队列获取。如果还没有获取到就会尝试去“偷”了,这也是没有办法的事。
不过,在偷之前,先看大的局势。如果其他所有的 P 都处于空闲状态,就说明其他 P 肯定没有工作可做,就没必要再去偷了,毕竟“地主家也没有余粮了”,跳到 stop 部分。接着再看下当前正在“偷工作”的线程数量“太多了”,就没必要扎堆了,这么多人,竞争肯定大,工作肯定不好找,也不好偷。
在真正的“偷”工作之前,把自己的自旋状态设置为 true,全局自旋数量加 1。
终于到了“偷工作”的部分了,好紧张!整个过程由两层 for 循环组成,外层控制尝试偷的次数,内层控制“偷”的顺序,并真正的去“偷”。实际上,内层会遍历所有的 P,因此,整体看来,会尝试 4 次扫遍所有的 P,并去“偷工作”,是不是非常有毅力!
第二层的循环并不是每次都按一个固定的顺序去遍历所有的 P,这样不太科学,而是使用了一些方法,“随机”地遍历。具体是使用了下面这个变量:
1
2
3
4
5
6
|
var stealOrder randomOrder

type randomOrder struct {
    count    uint32
    coprimes []uint32
}
|
初始化的时候会给 count 赋一个值,例如 8,根据 count 计算出 coprimes,里面的元素是小于 count 的值,且和 8 互质,算出来是:[1, 3, 5, 7]。
第二层循环,开始随机给一个值,例如 2,则第一个访问的 P 就是 P2;从 coprimes 里取出索引为 2 的值为 5,那么,第二个访问的 P 索引就是 2+5=7;依此类推,第三个就是 7+5=12,和 count 做一个取余操作,即 12%8=4……
在最后一次遍历所有的 P 的过程中,连人家的 runnext 也要尝试偷过来,毕竟前三次的失败经验证明,工作太不好“偷”了,民不聊生啊,只能做得绝一点了,stealRunNextG 控制是否要打 runnext 的主意:
确定好准备偷的对象 allp[enum.position() 之后,调用 runqsteal(_p_, allp[enum.position()], stealRunNextG) 函数执行。
回到 findrunnable 函数,经过上述三个层面的“偷窃”过程,我们仍然没有找到工作,真惨!于是就走到了 stop 这个代码块。
先上锁,因为要将 P 放到全局空闲 P 链表里去。在这之前还不死心,再瞧一下全局队列里是否有工作,如果有,再去尝试偷全局。
如果没有,就先解除当前工作线程和当前 P 的绑定关系(releasep).这之后,将其放入全局空闲 P 列表(pidleput),接下来就要真正地准备休眠了,但是仍然不死心!还要再查看一次所有的 P 是否有工作,如果发现任何一个 P 有工作的话(判断 P 的本地队列不空),就先从全局空闲 P 链表里先拿到一个 P(pidleget),做完这些之后,再次进入 top 代码段,再走一遍之前找工作的过程.最后休眠.
当其他线程发现有工作要做时,就会先找到空闲的 m,再通过 m.park 字段来唤醒本线程。唤醒之后,回到 findrunnable 函数,继续寻找 goroutine,找到后返回 schedule 函数,然后就会去运行找到的 goroutine。
  1
  2
  3
  4
  5
  6
  7
  8
  9
 10
 11
 12
 13
 14
 15
 16
 17
 18
 19
 20
 21
 22
 23
 24
 25
 26
 27
 28
 29
 30
 31
 32
 33
 34
 35
 36
 37
 38
 39
 40
 41
 42
 43
 44
 45
 46
 47
 48
 49
 50
 51
 52
 53
 54
 55
 56
 57
 58
 59
 60
 61
 62
 63
 64
 65
 66
 67
 68
 69
 70
 71
 72
 73
 74
 75
 76
 77
 78
 79
 80
 81
 82
 83
 84
 85
 86
 87
 88
 89
 90
 91
 92
 93
 94
 95
 96
 97
 98
 99
100
101
102
103
104
105
106
107
108
109
110
111
112
113
114
115
116
117
118
119
120
121
122
123
124
125
126
127
128
129
130
131
132
133
134
135
136
137
138
139
140
141
142
143
144
145
146
147
148
149
150
151
152
153
154
155
156
157
158
159
160
161
162
163
164
165
166
167
168
169
170
171
172
173
174
175
176
177
178
179
180
181
182
183
184
185
186
187
188
189
190
191
192
193
194
195
196
197
198
199
200
201
202
203
204
205
206
207
208
209
210
211
212
213
214
215
216
217
218
219
220
221
222
223
224
225
226
227
228
229
230
231
232
233
234
235
236
237
238
239
240
241
242
243
244
245
246
247
248
249
250
251
252
253
254
255
256
257
258
259
260
261
262
263
264
265
266
267
268
269
270
271
272
273
274
275
276
277
278
279
280
281
282
283
284
285
286
287
288
289
290
291
292
293
294
295
296
297
298
299
300
301
302
303
304
305
306
307
308
309
310
311
312
313
314
|
// Finds a runnable goroutine to execute.
// Tries to steal from other P's, get g from global queue, poll network.
// 寻找一个可运行的 Goroutine 来执行。
// 尝试从其他的 P 偷取、从全局队列中获取、poll 网络
func findrunnable() (gp *g, inheritTime bool) {
	_g_ := getg()

	// The conditions here and in handoffp must agree: if
	// findrunnable would return a G to run, handoffp must start
	// an M.
	// 这里的条件与 handoffp 中的条件必须一致:
	// 如果 findrunnable 将返回 G 运行,handoffp 必须启动 M.

top:
	_p_ := _g_.m.p.ptr()
	//垃圾回收
	//该流程依然会因串行运行时任务等待执行(gcwaiting不为0)而暂停和阻塞。
	if sched.gcwaiting != 0 {
		gcstopm()
		goto top
	}
	//2. 获取执行终结器的G。
	//获取执行终结器的G。一个终结器(或称终结函数)可以与一个对象关联,通过调用runtime.SetFinalizer函数就能产生这种关联。
	//当一个对象变得不可达(未被任何其他对象引用)时,垃圾回收器在回收该对象之前,就会执行与之关联的终结函数。
	//终结函数由一个专用的G执行,调度器在判定这个专用G已完成任务之后试图获取它,然后把它置为Grunnable状态并放入本地P的可运行G队列。
	if _p_.runSafePointFn != 0 {
		runSafePointFn()
	}
	//fing是用来执行finalizer的goroutine
	if fingwait && fingwake {
		if gp := wakefing(); gp != nil {
			ready(gp, 0, true)
		}
	}
	// cgo 调用被终止,继续进入
	if *cgo_yield != nil {
		asmcgocall(*cgo_yield, nil)
	}
	//3. 从本地P的可运行G队列获取G。获取到就返回。
	//从本地队列获取
	// local runq
	if gp, inheritTime := runqget(_p_); gp != nil {
		return gp, inheritTime
	}
	//4. 从调度器的可运行G队列获取G。获取到就返回。
	//从全局队列获取
	// global runq
	if sched.runqsize != 0 {
		lock(&sched.lock)
		gp := globrunqget(_p_, 0)
		unlock(&sched.lock)
		if gp != nil {
			return gp, false
		}
	}
	//5. 从网络I/O轮询器(netpoller)获取G。
	//如果netpoller已被初始化且已有过网络I/O操作,那么调度器会尝试从netpoller那里获取一个G列表。
	//表头的G会作为结果返回,其余的G放入调度器的可运行G队列。
	//如果netpoller还未初始化或未进行过I/O操作,就跳过。这里的获取即使没有成功也不会阻塞,那么怎么看出来是非阻塞的呢?
	//因为netpoll函数带入的参数是false,它返回的是一个G的列表。
	//最后要说一下的是injectglist函数,它的参数是一个G列表。
	//它做的工作也很简单:将列表中的所有G从Gwaiting状态转换到Grunnable状态,然后将这些G加入调度器的可运行G队列,最后如果还有在休息的P就把这些休息的P都叫起来干活。
	//这里还要注意,给injectglist函数的参数是gp.schedlink.ptr(),这其实是gp列表的第二个G。
	//也就是说从网络轮询器获取的G列表的第一个G直接返回了,其余G则进入了调度器的可运行G队列。
	//检查netpoll任务
	// Poll network.
	// This netpoll is only an optimization before we resort to stealing.
	// We can safely skip it if there are no waiters or a thread is blocked
	// in netpoll already. If there is any kind of logical race with that
	// blocked thread (e.g. it has already returned from netpoll, but does
	// not set lastpoll yet), this thread will do blocking netpoll below
	// anyway.
	if netpollinited() && atomic.Load(&netpollWaiters) > 0 && atomic.Load64(&sched.lastpoll) != 0 {
		if list := netpoll(false); !list.empty() { // non-blocking
			//返回的是多任务链表,将其他任务放回全局队列
			//gp.schedlink 链表结构
			gp := list.pop()
			injectglist(&list)
			casgstatus(gp, _Gwaiting, _Grunnable)//将获取的G的状态从Gwaiting变为Grunnable
			if trace.enabled {
				traceGoUnpark(gp, 0)
			}
			return gp, false
		}
	}
	//6. 从其他P的可运行G队列偷取G。不过在盗窃之前,还需要满足两个条件。所谓盗亦有道是也。
	//第一个条件是:除了本地P还有其他P在干活。如果除了自己,其他P都已经休息了,那也就没必要偷了,因为他们一定比你还穷(空闲P的可运行G队列一定为空)。这时直接去第二阶段。
	//虽然正在进行系统调用、cgo调用、网络I/O等待、定时等待的G会与P分离导致P处于空闲状态,但是这些G变回Grunnable状态后会加入到调度器的可运行G队列,而不会回到本地P的可运行G队列。所以也没必要去P那里偷。
	// Steal work from other P's.
	procs := uint32(gomaxprocs)// 获得 p 的数量
	if atomic.Load(&sched.npidle) == procs-1 {
		// Either GOMAXPROCS=1 or everybody, except for us, is idle already.
		// New work can appear from returning syscall/cgocall, network or timers.
		// Neither of that submits to local run queues, so no point in stealing.
		// GOMAXPROCS = 1 或除了我们之外的所有人都已经 idle 了。
		// 新的 work 可能出现在 syscall/cgocall/网络/timer返回时
		// 它们均没有提交到本地运行队列,因此偷取没有任何意义。
		goto stop
	}
	//第二个条件是:当前M处于自旋状态,或者处于自旋状态的M的两倍比正在干活的P还要少,也就是说干活的P多,自旋的M少。
	//如果当前M没有自旋,并且干活的P还少于自旋M的两倍,那也没必要偷,直接去第二 阶段。
	//这主要是为了控制自旋M的数量,因为过多的自旋M会消耗大量CPU资源。
	// If number of spinning M's >= number of busy P's, block.
	// This is necessary to prevent excessive CPU consumption
	// when GOMAXPROCS>>1 but the program parallelism is low.
	// 如果自旋状态下 m 的数量 >= busy 状态下 p 的数量,直接进入阻塞
	// 该步骤是有必要的,它用于当 GOMAXPROCS>>1 时但程序的并行机制很慢时
	// 昂贵的 CPU 消耗。
	if !_g_.m.spinning && 2*atomic.Load(&sched.nmspinning) >= procs-atomic.Load(&sched.npidle) {
		goto stop
	}
	//如果满足了以上两个条件,就把当前M置于自旋状态,并开始偷取G。
	//调度器会使用一种伪随机算法在全局P列表中选取P,然后试着从它的可运行G队列中偷一半的G到本地P的可运行G队列。
	//选P偷G的过程会重复多次,成功即停止。如果成功,返回偷到的第一个G。注意,偷取G的过程中也会因串行运行时任务等待执行(gcwaiting不为0)而停止调度并阻塞。
	if !_g_.m.spinning {
		// 设置自旋状态为 true
		_g_.m.spinning = true
		// 自旋状态数加 1
		atomic.Xadd(&sched.nmspinning, 1)
	}
	//随机挑一个P,偷些任务
	//stealOrder是一个序列随机数生成器,它会返回一个包含很多随机数的容器,也就是enum。enum.next就是取下一个随机数,enum.position就是真正的随机数。
	//所以allp[enum.position]就是从全局P队列中随机选一个P。runqsteal是真正执行偷G工作的函数。
	for i := 0; i < 4; i++ {
		for enum := stealOrder.start(fastrand()); !enum.done(); enum.next() {
			if sched.gcwaiting != 0 {
				goto top
			}
			//如果尝试次数太多,连目标P.runnext都偷,这是饿得很了
			stealRunNextG := i > 2 // first look for ready queues with more than 1 g
			 // 在这里开始针对P进行偷取操作
			if gp := runqsteal(_p_, allp[enum.position()], stealRunNextG); gp != nil {
				return gp, false
			}
		}
	}

stop:
	//1. 获取执行GC标记任务的G。如果恰巧正处于GC标记阶段,且本地P可用于GC标记任务。
	//那么调度器会把本地P持有的GC标记专用G置为Grunnable状态并返回这个G。
	//检查GC MarkWorker
	// We have nothing to do. If we're in the GC mark phase, can
	// safely scan and blacken objects, and have work to do, run
	// idle-time marking rather than give up the P.
	if gcBlackenEnabled != 0 && _p_.gcBgMarkWorker != 0 && gcMarkWorkAvailable(_p_) {
		_p_.gcMarkWorkerMode = gcMarkWorkerIdleMode
		gp := _p_.gcBgMarkWorker.ptr() //获取用于GC标记的专用G
		casgstatus(gp, _Gwaiting, _Grunnable)//将gp并发安全的从Gwaiting状态转为Grunnable状态
		if trace.enabled {
			traceGoUnpark(gp, 0)
		}
		return gp, false
	}

	// wasm only:
	// If a callback returned and no other goroutine is awake,
	// then pause execution until a callback was triggered.
	// 仅限于 wasm
	// 如果一个回调返回后没有其他 Goroutine 是苏醒的
	// 则暂停执行直到回调被触发。
	if beforeIdle() {
		// At least one goroutine got woken.
		goto top
	}
	//2. 再次从调度器的可运行G队列获取G。如果这次还是获取不到,就解除本地P与当前M的关联,并将该P放入调度器的空闲P列表。在这一步之前会将全局P列表(allp)复制一份,称为快照。
	// Before we drop our P, make a snapshot of the allp slice,
	// which can change underfoot once we no longer block
	// safe-points. We don't need to snapshot the contents because
	// everything up to cap(allp) is immutable.
	// 放弃当前的 P 之前,对 allp 做一个快照
	// 一旦我们不再阻塞在 safe-point 时候,可以立刻在下面进行修改
	allpSnapshot := allp//快照

	// return P and block
	// 准备归还 p,对调度器加锁
	lock(&sched.lock)
	//再次检查垃圾回收状态
	// 进入了 gc,回到顶部暂止 m
	if sched.gcwaiting != 0 || _p_.runSafePointFn != 0 {
		unlock(&sched.lock)
		goto top
	}
	//再次尝试全局队列
	if sched.runqsize != 0 {
		gp := globrunqget(_p_, 0) //从调度器的可运行G列表获取G
		unlock(&sched.lock)
		return gp, false
	}
	// 当前工作线程解除与 p 之间的绑定,准备去休眠
	if releasep() != _p_ {//从调度器的可运行G列表获取G
		throw("findrunnable: wrong p")
	}
	pidleput(_p_) //将P放入调度器的空闲P列表
	// 完成归还,解锁
	unlock(&sched.lock)

	// Delicate dance: thread transitions from spinning to non-spinning state,
	// potentially concurrently with submission of new goroutines. We must
	// drop nmspinning first and then check all per-P queues again (with
	// #StoreLoad memory barrier in between). If we do it the other way around,
	// another thread can submit a goroutine after we've checked all run queues
	// but before we drop nmspinning; as the result nobody will unpark a thread
	// to run the goroutine.
	// If we discover new work below, we need to restore m.spinning as a signal
	// for resetspinning to unpark a new worker thread (because there can be more
	// than one starving goroutine). However, if after discovering new work
	// we also observe no idle Ps, it is OK to just park the current thread:
	// the system is fully loaded so no spinning threads are required.
	// Also see "Worker thread parking/unparking" comment at the top of the file.
	// 这里要非常小心:
	// 线程从自旋到非自旋状态的转换,可能与新 Goroutine 的提交同时发生。
	// 我们必须首先丢弃 nmspinning,然后再次检查所有的 per-P 队列(并在期间伴随 #StoreLoad 内存屏障)
	// 如果反过来,其他线程可以在我们检查了所有的队列、然后提交一个 Goroutine、再丢弃了 nmspinning
	// 进而导致无法复始一个线程来运行那个 Goroutine 了。
	// 如果我们发现下面的新 work,我们需要恢复 m.spinning 作为重置的信号,
	// 以取消暂止新的工作线程(因为可能有多个 starving 的 Goroutine)。
	// 但是,如果在发现新 work 后我们也观察到没有空闲 P,可以暂停当前线程
	// 因为系统已满载,因此不需要自旋线程。
	wasSpinning := _g_.m.spinning
	if _g_.m.spinning {
		// m 即将睡眠,不再处于自旋
		_g_.m.spinning = false
		if int32(atomic.Xadd(&sched.nmspinning, -1)) < 0 {
			throw("findrunnable: negative nmspinning")
		}
	}

	// check all runqueues once again
	//3. 从全局P列表中的每个P的可运行G队列获取G。这里要迭代的全局P列表就是上一步的快照。
	//只要发现某个P的可运行G队列不为空,就从调度器的空闲P列表中取出一个P。判定其可用后与当前M关联在一起,然后返回第一阶段重新搜索可运行的G。如果所有P的可运行队列都是空,就继续后面的搜索。
	//这一步的意义是:正在干活的P还有活没干完,然而有些P却在休息,这怎么能忍?于是叫醒一个休息的P,然后给它找一个活干。
	//再次检查所有P任务队列
	for _, _p_ := range allpSnapshot {
		// 再次检查所有的 runqueue
		if !runqempty(_p_) {
			// 重新获取 p
			lock(&sched.lock)
			//绑定一个空闲P,回到头部尝试偷取任务
			_p_ = pidleget()
			unlock(&sched.lock)
			// 如果能获取到 p
			if _p_ != nil {
				// 绑定 p
				acquirep(_p_)
				// 如果此前已经被切换为自旋
				if wasSpinning {
					// 重新切换回非自旋
					_g_.m.spinning = true
					atomic.Xadd(&sched.nmspinning, 1)
				}
				// 这时候是有 work 的,回到顶部重新 find g
				goto top
			}
			// 看来没有 idle 的 p,不需要重新 find g 了
			break
		}
	}
	//4. 再次获取执行GC标记任务的G。如果正好处于GC标记阶段,且GC标记任务相关的全局资源可用。调度器就从空闲P列表中取出一个P,如果这个P持有GC标记专用G,就将该P与当前M关联,并从第二阶段开始继续执行。否则该P会被重新放回空闲P列表。
	// Check for idle-priority GC work again.
	if gcBlackenEnabled != 0 && gcMarkWorkAvailable(nil) {
		lock(&sched.lock)
		_p_ = pidleget()
		if _p_ != nil && _p_.gcBgMarkWorker == 0 {
			pidleput(_p_)
			_p_ = nil
		}
		unlock(&sched.lock)
		if _p_ != nil {
			acquirep(_p_)
			if wasSpinning {
				_g_.m.spinning = true
				atomic.Xadd(&sched.nmspinning, 1)
			}
			// Go back to idle GC check.
			goto stop
		}
	}
	//5. 再次从网络I/O轮询器(netpoller)处获取G。如果netpoller已被初始化,并且有过网络I/O操作。
	//调度器会再次试图从netpoller那里获取一个G列表。注意,这里的获取是阻塞的,你可以看到这里netpoll函数带入的参数是true。
	//只有当netpoller那里有可用G时,阻塞才会解除。如果netpoller还未被初始化或没进行过网络I/O操作,此步骤会跳过。
	//此外这一步和第4步还有一点差别:只有当获取到一个空闲P的时候,才将获取的G返回,否则只是将获取的所有G都加入到调度器的可运行G队列。
	//这是因为如果没有空闲的P,那么获得了G也执行不了,当前M还是只能先停下,也就没必要为这个M返回一个G了。
	// poll network
	if netpollinited() && atomic.Load(&netpollWaiters) > 0 && atomic.Xchg64(&sched.lastpoll, 0) != 0 {
		if _g_.m.p != 0 {
			throw("findrunnable: netpoll with p")
		}
		if _g_.m.spinning {
			throw("findrunnable: netpoll with spinning")
		}
		list := netpoll(true) // block until new work is available
		atomic.Store64(&sched.lastpoll, uint64(nanotime()))
		if !list.empty() {
			lock(&sched.lock)
			_p_ = pidleget()
			unlock(&sched.lock)
			if _p_ != nil {
				acquirep(_p_)
				gp := list.pop()
				injectglist(&list)
				casgstatus(gp, _Gwaiting, _Grunnable)
				if trace.enabled {
					traceGoUnpark(gp, 0)
				}
				return gp, false
			}
			injectglist(&list)
		}
	}
	//如果经历以上强劲的搜索仍然找不到一个可运行的G,那么也就只好停止当前M了。等到该M再次被唤醒的时候,它还会从第一阶段开始继续搜索。
	//一无所得 休眠
	stopm()
	goto top
}
|
runqsteal
只有当本地和全局队列都为空时,才会考虑去检查其他P任务队列.这个优先级最低,因为会影响目标P的执行(必须使用原子操作)
执行runqsteal函数期间m处于自旋状态,为什么要让m自旋,自旋本质是在运行,线程在运行却没有执行g,就变成了浪费CPU?销毁线程不是更好吗?可以节约CPU资源。创建和销毁CPU都是浪费时间的,我们希望当有新goroutine创建时,立刻能有m运行它,如果销毁再新建就增加了时延,降低了效率。
当然也考虑了过多的自旋线程是浪费CPU,所以线程要自旋需要满足以下两个条件,多余的没事做线程会让他们休眠.
- 除了本地P还有其他P在干活。如果除了自己,其他P都已经休息了,那也就没必要偷了,因为他们一定比你还穷(空闲P的可运行G队列一定为空)。
- 当前M处于自旋状态,或者处于自旋状态的M的两倍比正在干活的P还要少,也就是说干活的P多,自旋的M少。如果当前M没有自旋,并且干活的P还少于自旋M的两倍,那也没必要偷.
 1
 2
 3
 4
 5
 6
 7
 8
 9
10
11
12
13
14
15
16
17
18
19
20
21
22
23
24
25
26
27
28
29
30
31
32
33
|
// Steal half of elements from local runnable queue of p2
// and put onto local runnable queue of p.
// Returns one of the stolen elements (or nil if failed)
//尝试从p2偷取一半任务存入p本地队列
func runqsteal(_p_, p2 *p, stealRunNextG bool) *g {
	// 队尾
	t := _p_.runqtail
	// 从 p2 偷取工作,放到 _p_.runq 的队尾
	n := runqgrab(p2, &_p_.runq, t, stealRunNextG)
	if n == 0 {
		return nil
	}
	//返回尾部的G任务
	n--
	// 找到最后一个 g,准备返回
	//随机数取模确定目标P
	gp := _p_.runq[(t+n)%uint32(len(_p_.runq))].ptr()

	if n == 0 {
		// 说明只偷了一个 g
		return gp
	}
	// 队列头
	h := atomic.LoadAcq(&_p_.runqhead) // load-acquire, synchronize with consumers
	// 判断是否偷太多了
	if t-h+n >= uint32(len(_p_.runq)) {
		throw("runqsteal: runq overflow")
	}
	//调整目标队列尾部状态
	// 更新队尾,将偷来的工作加入队列
	atomic.StoreRel(&_p_.runqtail, t+n) // store-release, makes the item available for consumption
	return gp
}
|
调用 runqgrab 从 p2 偷走它一半的工作放到 p 本地:
1
|
n := runqgrab(p2, &_p_.runq, t, stealRunNextG)
|
runqgrab 函数将从 p2 偷来的工作放到以 t 为地址的数组里,数组就是 p.runq。 我们知道,t 是 p.runq 的队尾,因此这行代码表达的真正意思是将从 p2 偷来的工作,神不知,鬼不觉地放到 p.runq 的队尾,之后,再悄悄改一下 p.runqtail 就把这些偷来的工作据为己有了。
接着往下看,返回的 n 表示偷到的工作数量。先将 n 自减 1,目的是把第 n 个工作(也就是 g)直接返回,如果这时候 n 变成 0 了,说明就只偷到了一个 g,那就直接返回。否则,将队尾往后移动 n,把偷来的工作合法化,简直完美!
runqgrab
 1
 2
 3
 4
 5
 6
 7
 8
 9
10
11
12
13
14
15
16
17
18
19
20
21
22
23
24
25
26
27
28
29
30
31
32
33
34
35
36
37
38
39
40
41
42
43
44
45
46
47
48
49
50
51
52
53
54
55
56
57
58
59
60
61
62
63
64
65
66
67
68
69
70
71
72
73
74
75
76
77
78
|
// Grabs a batch of goroutines from _p_'s runnable queue into batch.
// Batch is a ring buffer starting at batchHead.
// Returns number of grabbed goroutines.
// Can be executed by any P.
// 从 _p_ 批量获取可运行 goroutine,放到 batch 数组里
// batch 是一个环,起始于 batchHead
// 返回偷的数量,返回的 goroutine 可被任何 P 执行
func runqgrab(_p_ *p, batch *[256]guintptr, batchHead uint32, stealRunNextG bool) uint32 {
	for {
		//计算批量转移任务数量
		// 队列头
		h := atomic.LoadAcq(&_p_.runqhead) // load-acquire, synchronize with other consumers
		// 队列尾
		t := atomic.LoadAcq(&_p_.runqtail) // load-acquire, synchronize with the producer
		// g 的数量
		n := t - h
		// 取一半
		n = n - n/2
		//如果没有,那就尝试偷runnext
		if n == 0 {
			if stealRunNextG {
				// Try to steal from _p_.runnext.
				if next := _p_.runnext; next != 0 {
					if _p_.status == _Prunning {
						// Sleep to ensure that _p_ isn't about to run the g
						// we are about to steal.
						// The important use case here is when the g running
						// on _p_ ready()s another g and then almost
						// immediately blocks. Instead of stealing runnext
						// in this window, back off to give _p_ a chance to
						// schedule runnext. This will avoid thrashing gs
						// between different Ps.
						// A sync chan send/recv takes ~50ns as of time of
						// writing, so 3us gives ~50x overshoot.
						// 这里是为了防止 _p_ 执行当前 g,并且马上就要阻塞,所以会马上执行 runnext,
                    				// 这个时候偷就没必要了,因为让 g 在 P 之间"游走"不太划算,
                    				// 就不偷了,给他们一个机会。
                    				// channel 一次同步的的接收发送需要 50ns 左右,因此 3us 差不多给了他们 50 次机会了,做得还是不错的
						if GOOS != "windows" {
							usleep(3)
						} else {
							// On windows system timer granularity is
							// 1-15ms, which is way too much for this
							// optimization. So just yield.
							osyield()
						}
					}
					if !_p_.runnext.cas(next, 0) {
						continue
					}
					// 真的偷走了 next
					batch[batchHead%uint32(len(batch))] = next
					// 返回偷的数量,只有 1 个
					return 1
				}
			}
			// 没偷到
			return 0
		}
		//数据异常,不可能超过一半值,重试
		// 如果 n 这时变得太大了,重新来一遍了,不能偷的太多,做得太过分了
		if n > uint32(len(_p_.runq)/2) { // read inconsistent h and t
			continue
		}
		//转移任务
		// 将 g 放置到 bacth 中
		for i := uint32(0); i < n; i++ {
			g := _p_.runq[(h+i)%uint32(len(_p_.runq))]
			batch[(batchHead+i)%uint32(len(batch))] = g
		}
		//修改源P队列状态
		//失败重试.因为没有修改源和目标队列位置状态,所以没有影响
		// 工作被偷走了,更新一下队列头指针
		if atomic.CasRel(&_p_.runqhead, h, h+n) { // cas-release, commits consume
			return n
		}
	}
}
|
外层直接就是一个无限循环,先用原子操作取出 p 的队列头和队列尾,算出一半的 g 的数量,如果 n == 0,说明地主家也没有余粮,这时看 stealRunNextG 的值。如果为假,说明不偷 runnext,那就直接返回 0,啥也没偷到;如果为真,则要尝试偷一下 runnext。
先判断 runnext 不为空,那就真的准备偷了。不过在这之前,要先休眠 3 us。这是为了防止 p 正在执行当前的 g,马上就要阻塞(可能是向一个非缓冲的 channel 发送数据,没有接收者),之后会马上执行 runnext。这个时候偷就没必要了,因为 runnext 马上就要执行了,偷走它还不是要去执行,那何必要偷呢?大家的愿望就是提高效率,这样让 g 在 P 之间"游走"不太划算,索性先不偷了,给他们一个机会。channel 一次同步的的接收或发送需要 50ns 左右,因此休眠 3us 差不多给了他们 50 次机会了,做得还是挺厚道的。
继续看,再次判断 n 是否小于等于 p.runq 长度的一半,因为这个时候很可能 p 也被其他线程偷了,它的 p.runq 就没那么多工作了,这个时候就不能偷这么多了,要重新再走一次循环。
最后一个 for 循环,将 p.runq 里的 g 放到 batch 数组里。使用原子操作更新 p 的队列头指针,往后移动 n 个位置.
M休眠
无论出于什么原因,当 M 需要被暂止时,可能(因为还有其他暂止 M 的方法)会执行该调用。 此调用会将 M 进行暂止,并阻塞到它被复始时。这一过程就是工作线程的暂止和复始。
相关函数:
- stopm():停止当前M的执行,直到有新的G变得可运行而被唤醒。
- gcstopm():停止当前M的执行,串行运行时任务执行完毕后被唤醒。
stopm
stopm函数会先把当前M放入调度器的空闲M列表,然后停止当前M。注意stopm函数并不会返回,而是停在其中,当M再次被唤醒的时候,会从stopm停下的地方继续执行。接下来有两件事要做。一是如果M是因GC任务而被唤醒,那么执行完该任务之后,当前M再次停止。否则关联与M预联的P,为M的执行做最后的准备。
 1
 2
 3
 4
 5
 6
 7
 8
 9
10
11
12
13
14
15
16
17
18
19
20
21
22
23
24
25
26
27
28
29
|
// Stops execution of the current m until new work is available.
// Returns with acquired P.
// 休眠,停止执行工作,直到有新的工作需要做为止
func stopm() {
	// 当前 goroutine,g0
	_g_ := getg()

	if _g_.m.locks != 0 {
		throw("stopm holding locks")
	}
	if _g_.m.p != 0 {
		throw("stopm holding p")
	}
	if _g_.m.spinning {
		throw("stopm spinning")
	}
	// 将 m 放回到 空闲列表中,因为我们马上就要暂止了
	lock(&sched.lock)
	// 将 m 放到全局空闲链表里去
	mput(_g_.m)
	unlock(&sched.lock)
	// 暂止当前的 M,在此阻塞,直到被唤醒
	notesleep(&_g_.m.park)
	// 这里被其他工作线程唤醒
	noteclear(&_g_.m.park)
	// 此时已经被复始,说明有任务要执行
	acquirep(_g_.m.nextp.ptr())
	_g_.m.nextp = 0
}
|
先将 m 放入全局空闲链表里,注意涉及到全局变量的修改,要上锁。接着,调用 notesleep(&_g_.m.park) 使得当前工作线程进入休眠状态。其他工作线程在检测到“当前有很多工作要做”,会调用 noteclear(&_g_.m.park) 将其唤醒。
一旦M要停止,就会把它的本地P转手给别的M。一旦M被唤醒,就会先找到一个P与之关联,并且这个P一定是该M被唤醒之前由别的M预联给它的。如果handoffp函数无法把作为其参数的P转手给一个M,那么就把该P放入空闲P列表。
notesleep
相比gosched,gopark,反应更敏捷的notesleep既不让出M,也就不会让G重回任务队列.它直接让线程休眠直到被唤醒,更适合stopm,gcMark这类近似自旋的场景.
在Linux,DragonFly,FreeBSD平台,notesleep是基于Futex的高性能实现
note类型如下:
 1
 2
 3
 4
 5
 6
 7
 8
 9
10
11
12
13
14
15
16
17
18
19
20
21
22
23
24
25
26
|
// sleep and wakeup on one-time events.
// before any calls to notesleep or notewakeup,
// must call noteclear to initialize the Note.
// then, exactly one thread can call notesleep
// and exactly one thread can call notewakeup (once).
// once notewakeup has been called, the notesleep
// will return.  future notesleep will return immediately.
// subsequent noteclear must be called only after
// previous notesleep has returned, e.g. it's disallowed
// to call noteclear straight after notewakeup.
//
// notetsleep is like notesleep but wakes up after
// a given number of nanoseconds even if the event
// has not yet happened.  if a goroutine uses notetsleep to
// wake up early, it must wait to call noteclear until it
// can be sure that no other goroutine is calling
// notewakeup.
//
// notesleep/notetsleep are generally called on g0,
// notetsleepg is similar to notetsleep but is called on user g.
type note struct {
	// Futex-based impl treats it as uint32 key,
	// while sema-based impl as M* waitm.
	// Used to be a union, but unions break precise GC.
	key uintptr
}
|
note 的底层实现机制跟操作系统相关,不同系统使用不同的机制,比如 linux 下使用的 futex 系统调用,而 mac 下则是使用的 pthread_cond_t 条件变量,note 对这些底层机制做了一个抽象和封装。
这种封装给扩展性带来了很大的好处,比如当睡眠和唤醒功能需要支持新平台时,只需要在 note 层增加对特定平台的支持即可,不需要修改上层的任何代码。
 1
 2
 3
 4
 5
 6
 7
 8
 9
10
11
12
13
14
15
16
17
18
19
20
21
22
23
24
25
|
func notesleep(n *note) {
	// g0
	gp := getg()
	if gp != gp.m.g0 {
		throw("notesleep not on g0")
	}
	// -1 表示无限期休眠
	ns := int64(-1)
	if *cgo_yield != nil {
		// Sleep for an arbitrary-but-moderate interval to poll libc interceptors.
		ns = 10e6
	}
	// 这里之所以需要用一个循环,是因为 futexsleep 有可能意外从睡眠中返回,
    	// 所以 futexsleep 函数返回后还需要检查 note.key 是否还是 0,
    	// 如果是 0 则表示并不是其它工作线程唤醒了我们,
    	// 只是 futexsleep 意外返回了,需要再次调用 futexsleep 进入睡眠
	for atomic.Load(key32(&n.key)) == 0 {
		gp.m.blocked = true
		futexsleep(key32(&n.key), 0, ns)
		if *cgo_yield != nil {
			asmcgocall(*cgo_yield, nil)
		}
		gp.m.blocked = false
	}
}
|
 1
 2
 3
 4
 5
 6
 7
 8
 9
10
11
12
13
14
15
16
17
18
19
20
|
// Atomically,
//	if(*addr == val) sleep
// Might be woken up spuriously; that's allowed.
// Don't sleep longer than ns; ns < 0 means forever.
//go:nosplit
func futexsleep(addr *uint32, val uint32, ns int64) {
	// Some Linux kernels have a bug where futex of
	// FUTEX_WAIT returns an internal error code
	// as an errno. Libpthread ignores the return value
	// here, and so can we: as it says a few lines up,
	// spurious wakeups are allowed.
	if ns < 0 {
		futex(unsafe.Pointer(addr), _FUTEX_WAIT_PRIVATE, val, nil, nil, 0)
		return
	}

	var ts timespec
	ts.setNsec(ns)
	futex(unsafe.Pointer(addr), _FUTEX_WAIT_PRIVATE, val, unsafe.Pointer(&ts), nil, 0)
}
|
当 *addr 和 val 相等的时候,休眠。futex 由汇编语言实现:
 1
 2
 3
 4
 5
 6
 7
 8
 9
10
11
12
13
14
15
|
TEXT runtime·futex(SB),NOSPLIT,$0
    // 为系统调用准备参数
    MOVQ    addr+0(FP), DI
    MOVL    op+8(FP), SI
    MOVL    val+12(FP), DX
    MOVQ    ts+16(FP), R10
    MOVQ    addr2+24(FP), R8
    MOVL    val3+32(FP), R9
    // 系统调用编号
    MOVL    $202, AX
    // 执行 futex 系统调用进入休眠,被唤醒后接着执行下一条 MOVL 指令
    SYSCALL
    // 保存系统调用的返回值
    MOVL    AX, ret+40(FP)
    RET
|
1
2
3
4
5
|
// One-time notifications.
//重置休眠条件
func noteclear(n *note) {
	n.key = 0
}
|
我们调用 notesleep(&g.m.park),使得 m 进入睡眠状态。notewakeup可以将其唤醒:
 1
 2
 3
 4
 5
 6
 7
 8
 9
10
11
12
|
func notewakeup(n *note) {
	//如果old!=0,表示已经执行过唤醒操作
	// 设置 n.key = 1, 被唤醒的线程通过查看该值是否等于 1
    	// 来确定是被其它线程唤醒还是意外从睡眠中苏醒
	old := atomic.Xchg(key32(&n.key), 1)
	if old != 0 {
		print("notewakeup - double wakeup (", old, ")\n")
		throw("notewakeup - double wakeup")
	}
	//唤醒后n.key==1
	futexwakeup(key32(&n.key), 1)
}
|
notewakeup 函数首先使用 atomic.Xchg 设置 note.key 值为 1,这是为了使被唤醒的线程可以通过查看该值是否等于 1 来确定是被其它线程唤醒还是意外从睡眠中苏醒了过来。
如果该值为 1 则表示是被唤醒的,可以继续工作,但如果该值为 0 则表示是意外苏醒,需要再次进入睡眠。
调用 futexwakeup 来唤醒工作线程,它和 futexsleep 是相对的。
 1
 2
 3
 4
 5
 6
 7
 8
 9
10
11
12
13
14
15
16
17
|
// If any procs are sleeping on addr, wake up at most cnt.
//go:nosplit
func futexwakeup(addr *uint32, cnt uint32) {
	ret := futex(unsafe.Pointer(addr), _FUTEX_WAKE_PRIVATE, cnt, nil, nil, 0)
	if ret >= 0 {
		return
	}

	// I don't know that futex wakeup can return
	// EAGAIN or EINTR, but if it does, it would be
	// safe to loop and call futex again.
	systemstack(func() {
		print("futexwakeup addr=", addr, " returned ", ret, "\n")
	})

	*(*int32)(unsafe.Pointer(uintptr(0x1006))) = 0x1006
}
|
futex 由汇编语言实现,前面已经分析过,这里就不重复了。主要内容就是先准备好参数,然后进行系统调用,由内核唤醒线程。
内核在完成唤醒工作之后当前工作线程从内核返回到 futex 函数继续执行 SYSCALL 指令之后的代码并按函数调用链原路返回,继续执行其它代码。
而被唤醒的工作线程则由内核负责在适当的时候调度到 CPU 上运行。
gcstopm
在调度过程中,如果有串行运行时任务等待执行,gcstopm函数就会被调用。该函数首先判断当前M是否处于自旋状态,如果是就退出自旋,并将调度器的自旋M数减一。一个将要停止的M理应脱离自旋状态。
然后gcstopm函数会依次释放本地P,并将本地P的状态设置为Pgcstop。将调度器的stopwait字段减一,并在该值等于0的时候通过调度器的stopnote字段唤醒等待执行的串行运行时任务。最后调用stopm函数停止当前M并将其放入调度器的空闲M列表。
 1
 2
 3
 4
 5
 6
 7
 8
 9
10
11
12
13
14
15
16
17
18
19
20
21
22
23
24
25
26
|
// Stops the current m for stopTheWorld.
// Returns when the world is restarted.
func gcstopm() {
	_g_ := getg()

	if sched.gcwaiting == 0 {
		throw("gcstopm: not waiting for gc")
	}
	if _g_.m.spinning {
		_g_.m.spinning = false
		// OK to just drop nmspinning here,
		// startTheWorld will unpark threads as necessary.
		if int32(atomic.Xadd(&sched.nmspinning, -1)) < 0 {
			throw("gcstopm: negative nmspinning")
		}
	}
	_p_ := releasep()
	lock(&sched.lock)
	_p_.status = _Pgcstop
	sched.stopwait--
	if sched.stopwait == 0 {
		notewakeup(&sched.stopnote)
	}
	unlock(&sched.lock)
	stopm()
}
|
所有调用因调用stopm函数停止的M,都可以通过调用startm函数唤醒。通过startm唤醒被stopm停止的M可以简化如下:stopm停止一个M并等待唤醒。startm将一个P与一个M预联。stopm将预联的P与M关联。
M运行G
execute
由 runtime.execute 函数执行获取的 Goroutine,做好准备工作后,它会通过 runtime.gogo 将 Goroutine 调度到当前线程上。
 1
 2
 3
 4
 5
 6
 7
 8
 9
10
11
12
13
14
15
16
17
18
19
20
21
22
23
24
25
26
27
28
29
30
31
32
33
34
35
36
37
38
39
40
41
42
43
44
45
46
47
48
49
|
// Schedules gp to run on the current M.
// If inheritTime is true, gp inherits the remaining time in the
// current time slice. Otherwise, it starts a new time slice.
// Never returns.
//
// Write barriers are allowed because this is called immediately after
// acquiring a P in several places.
//
//go:yeswritebarrierrec
// 调度 gp 在当前 M 上运行
// 如果 inheritTime 为真,gp 执行当前的时间片
// 否则,开启一个新的时间片
func execute(gp *g, inheritTime bool) {
	//g0
	_g_ := getg()
	// 将 gp 的状态改为 running
	casgstatus(gp, _Grunnable, _Grunning)
	gp.waitsince = 0
	gp.preempt = false
	gp.stackguard0 = gp.stack.lo + _StackGuard
	if !inheritTime {
		// 调度器调度次数增加 1
		_g_.m.p.ptr().schedtick++
	}
	// 将 gp 和 m 关联起来
	_g_.m.curg = gp
	gp.m = _g_.m

	// Check whether the profiler needs to be turned on or off.
	hz := sched.profilehz
	if _g_.m.profilehz != hz {
		setThreadCPUProfiler(hz)
	}

	if trace.enabled {
		// GoSysExit has to happen when we have a P, but before GoStart.
		// So we emit it here.
		if gp.syscallsp != 0 && gp.sysblocktraced {
			traceGoSysExit(gp.sysexitticks)
		}
		traceGoStart()
	}
	// gogo 完成从 g0 到 gp 真正的切换
    // CPU 执行权的转让以及栈的切换
    // 执行流的切换从本质上来说就是 CPU 寄存器以及函数调用栈的切换,
    // 然而不管是 go 还是 c 这种高级语言都无法精确控制 CPU 寄存器的修改,
    // 因而高级语言在这里也就无能为力了,只能依靠汇编指令来达成目的
	gogo(&gp.sched)
}
|
将 gp 的状态改为 _Grunning,将 m 和 gp 相互关联起来。最后,调用 gogo 完成从 g0 到 gp 的切换,CPU 的执行权将从 g0 转让到 gp。 gogo 函数用汇编语言写成,原因如下:
gogo 函数也是通过汇编语言编写的,这里之所以需要使用汇编,是因为 goroutine 的调度涉及不同执行流之间的切换。
前面我们在讨论操作系统切换线程时已经看到过,执行流的切换从本质上来说就是 CPU 寄存器以及函数调用栈的切换,然而不管是 go 还是 c 这种高级语言都无法精确控制 CPU 寄存器,因而高级语言在这里也就无能为力了,只能依靠汇编指令来达成目的。
继续看 gogo 函数的实现,gogo函数从g0栈切换到G栈,然后用一个JMP指令进入G任务函数代码,传入 &gp.sched 参数,源码如下:
 1
 2
 3
 4
 5
 6
 7
 8
 9
10
11
12
13
14
15
16
17
18
19
20
21
22
23
24
25
26
|
TEXT runtime·gogo(SB), NOSPLIT, $8-4
	// 0(FP) 表示第一个参数,即 buf = &gp.sched
	MOVL buf+0(FP), BX     // 获取调度信息
	MOVL gobuf_g(BX), DX
	MOVL 0(DX), CX         // 保证 Goroutine 不为空
	//get_tls 将 tls 保存到 CX 寄存器
	get_tls(CX)
	// 将 g 放入到 tls[0]
	// 这样,当下次再调用 get_tls 时,取出的就是 gp,而不再是 g0,这一行完成从 g0 栈切换到 gp。
    	// 把要运行的 g 的指针放入线程本地存储,这样后面的代码就可以通过线程本地存储
    	// 获取到当前正在执行的 goroutine 的 g 结构体对象,从而找到与之关联的 m 和 p
    	// 运行这条指令之前,线程本地存储存放的是 g0 的地址
	MOVL DX, g(CX)
	// 把 CPU 的 SP 寄存器设置为 sched.sp,完成了栈的切换
	MOVL gobuf_sp(BX), SP  // 将 runtime.goexit 函数的 PC 恢复到 SP 中
	// 恢复调度上下文到CPU相关寄存器
	MOVL gobuf_ret(BX), AX
	MOVL gobuf_ctxt(BX), DX
	// 清空 sched 的值,因为我们已把相关值放入 CPU 对应的寄存器了,不再需要,这样做可以少 GC 的工作量
	MOVL $0, gobuf_sp(BX)
	MOVL $0, gobuf_ret(BX)
	MOVL $0, gobuf_ctxt(BX)
	// 把 sched.pc 值放入 BX 寄存器
	MOVL gobuf_pc(BX), BX  // 获取待执行函数的程序计数器
	// JMP 把 BX 寄存器的包含的地址值放入 CPU 的 IP 寄存器,于是,CPU 跳转到该地址继续执行指令
	JMP  BX                // 开始执行
|
该函数的实现非常巧妙,它从 runtime.gobuf 中取出了 runtime.goexit 的程序计数器和待执行函数的程序计数器,其中:
- runtime.goexit 的程序计数器被放到了栈 SP 上;
- 待执行函数的程序计数器被放到了寄存器 BX 上;
Go 语言的调用惯例,正常的函数调用都会使用 CALL 指令,该指令会将调用方的返回地址加入栈寄存器 SP 中,然后跳转到目标函数;当目标函数返回后,会从栈中查找调用的地址并跳转回调用方继续执行剩下的代码。
runtime.gogo 就利用了 Go 语言的调用惯例成功模拟这一调用过程,通过以下几个关键指令模拟 CALL 的过程:
1
2
3
|
MOVL gobuf_sp(BX), SP  // 将 runtime.goexit 函数的 PC 恢复到 SP 中
	MOVL gobuf_pc(BX), BX  // 获取待执行函数的程序计数器
	JMP  BX                // 开始执行
|
gp 执行完后,RET 指令弹出 goexit 函数地址(实际上是 funcPC(goexit)+1),CPU 跳转到 goexit 的第二条指令继续执行:
1
2
3
4
5
6
7
8
9
|
// src/runtime/asm_amd64.s

// The top-most function running on a goroutine
// returns to goexit+PCQuantum.
TEXT runtime·goexit(SB),NOSPLIT,$0-0
    BYTE    $0x90    // NOP
    CALL    runtime·goexit1(SB)    // does not return
    // traceback from goexit1 must hit code range of goexit
    BYTE    $0x90    // NOP
|
goexit
gp 执行完后直接调用 runtime·goexit1:
1
2
3
4
5
|
// 完成当前 Goroutine 的执行
func goexit1() {
	// 开始收尾工作
	mcall(goexit0)
}
|
 1
 2
 3
 4
 5
 6
 7
 8
 9
10
11
12
13
14
15
16
17
18
19
20
21
22
23
24
25
26
27
28
29
30
31
32
33
34
35
36
37
38
39
40
41
42
43
44
|
// 切换到 g0 栈,执行 fn(g)
// Fn 不能返回
TEXT runtime·mcall(SB), NOSPLIT, $0-8
    // 取出参数的值放入 DI 寄存器,它是 funcval 对象的指针,此场景中 fn.fn 是 goexit0 的地址
    MOVQ    fn+0(FP), DI

    get_tls(CX)
    // AX = g
    MOVQ    g(CX), AX   // save state in g->sched
    // mcall 返回地址放入 BX
    MOVQ    0(SP), BX   // caller's PC
    // g.sched.pc = BX,保存 g 的 PC
    MOVQ    BX, (g_sched+gobuf_pc)(AX)
    LEAQ    fn+0(FP), BX    // caller's SP
    // 保存 g 的 SP
    MOVQ    BX, (g_sched+gobuf_sp)(AX)
    MOVQ    AX, (g_sched+gobuf_g)(AX)
    MOVQ    BP, (g_sched+gobuf_bp)(AX)

    // switch to m->g0 & its stack, call fn
    MOVQ    g(CX), BX
    MOVQ    g_m(BX), BX
    // SI = g0
    MOVQ    m_g0(BX), SI
    CMPQ    SI, AX  // if g == m->g0 call badmcall
    JNE 3(PC)
    MOVQ    $runtime·badmcall(SB), AX
    JMP AX
    // 把 g0 的地址设置到线程本地存储中
    MOVQ    SI, g(CX)   // g = m->g0
    // 从 g 的栈切换到了 g0 的栈D
    MOVQ    (g_sched+gobuf_sp)(SI), SP  // sp = m->g0->sched.sp
    // AX = g,参数入栈
    PUSHQ   AX
    MOVQ    DI, DX
    // DI 是结构体 funcval 实例对象的指针,它的第一个成员才是 goexit0 的地址
    // 读取第一个成员到 DI 寄存器
    MOVQ    0(DI), DI
    // 调用 goexit0(g)
    CALL    DI
    POPQ    AX
    MOVQ    $runtime·badmcall2(SB), AX
    JMP AX
    RET
|
函数参数是:
1
2
3
4
|
type funcval struct {
    fn uintptr
    // variable-size, fn-specific data here
}
|
字段 fn 就表示 goexit0 函数的地址。
- L5 将函数参数保存到 DI 寄存器,这里 fn.fn 就是 goexit0 的地址。
- L7 将 tls 保存到 CX 寄存器,L9 将 当前线程指向的 goroutine (非 main goroutine,称为 gp)保存到 AX 寄存器,L11 将调用者(调用 mcall 函数)的栈顶,这里就是 mcall 完成后的返回地址,存入 BX 寄存器。
- L13 将 mcall 的返回地址保存到 gp 的 g.sched.pc 字段,L14 将 gp 的栈顶,也就是 SP 保存到 BX 寄存器,* L16 将 SP 保存到 gp 的 g.sched.sp 字段,L17 将 g 保存到 gp 的 g.sched.g 字段,L18 将 BP 保存 到 gp 的 g.sched.bp 字段。这一段主要是保存 gp 的调度信息。
- L21 将当前指向的 g 保存到 BX 寄存器,L22 将 g.m 字段保存到 BX 寄存器,L23 将 g.m.g0 字段保存到 SI,g.m.g0 就是当前工作线程的 g0。
- 现在,SI = g0, AX = gp,L25 判断 gp 是否是 g0,如果 gp == g0 说明有问题,执行 runtime·badmcall。正常情况下,PC 值加 3,跳过下面的两条指令,直接到达 L30。
- L30 将 g0 的地址设置到线程本地存储中,L32 将 g0.SP 设置到 CPU 的 SP 寄存器,这也就意味着我们从 gp 栈切换到了 g0 的栈,要变天了!
- L34 将参数 gp 入栈,为调用 goexit0 构造参数。L35 将 DI 寄存器的内容设置到 DX 寄存器,DI 是结构体 funcval 实例对象的指针,它的第一个成员才是 goexit0 的地址。L36 读取 DI 第一成员,也就是 goexit0 函数的地址。
- L40 调用 goexit0 函数,这已经是在 g0 栈上执行了,函数参数就是 gp。
- 到这里,就会去执行 goexit0 函数,注意,这里永远都不会返回。所以,在 CALL 指令后面,如果返回了,又会去调用 runtime.badmcall2 函数去处理意外情况。
经过一系列函数调用,我们最终在当前线程的 g0 的栈上调用 runtime.goexit0 函数
 1
 2
 3
 4
 5
 6
 7
 8
 9
10
11
12
13
14
15
16
17
18
19
20
21
22
23
24
25
26
27
28
29
30
31
32
33
34
35
36
37
38
39
40
41
42
43
44
45
46
47
48
49
50
51
52
53
54
55
56
57
58
59
60
61
62
63
64
65
66
67
68
69
70
71
72
73
74
75
76
77
78
79
80
|
// goexit 继续在 g0 上执行
func goexit0(gp *g) {
	// g0
	_g_ := getg()
	// 切换当前的 g 为 _Gdead
	casgstatus(gp, _Grunning, _Gdead)
	if isSystemGoroutine(gp, false) {
		atomic.Xadd(&sched.ngsys, -1)
	}
	//解除锁定设置
	// 清空 gp 的一些字段
	gp.m = nil
	locked := gp.lockedm != 0
	gp.lockedm = 0
	_g_.m.lockedg = 0
	gp.paniconfault = false
	// 应该已经为 true,但以防万一
	gp._defer = nil // should be true already but just in case.
	// Goexit 中 panic 则不为 nil, 指向栈分配的数据
	gp._panic = nil // non-nil for Goexit during panic. points at stack-allocated data.
	gp.writebuf = nil
	gp.waitreason = 0
	gp.param = nil
	gp.labels = nil
	gp.timer = nil

	if gcBlackenEnabled != 0 && gp.gcAssistBytes > 0 {
		// Flush assist credit to the global pool. This gives
		// better information to pacing if the application is
		// rapidly creating an exiting goroutines.
		// 刷新 assist credit 到全局池。
		// 如果应用在快速创建 Goroutine,这可以为 pacing 提供更好的信息。
		scanCredit := int64(gcController.assistWorkPerByte * float64(gp.gcAssistBytes))
		atomic.Xaddint64(&gcController.bgScanCredit, scanCredit)
		gp.gcAssistBytes = 0
	}

	// Note that gp's stack scan is now "valid" because it has no
	// stack.
	// 注意 gp 的栈 scan 目前开始变为 valid,因为它没有栈了
	gp.gcscanvalid = true
	// 解除 g 与 m 的关系
	dropg()

	if GOARCH == "wasm" { // no threads yet on wasm
		// wasm 目前还没有线程支持
		// 将 g 扔进 gfree 链表中等待复用
		gfput(_g_.m.p.ptr(), gp)
		// 再次进行调度
		schedule() // never returns
	}

	if _g_.m.lockedInt != 0 {
		print("invalid m->lockedInt = ", _g_.m.lockedInt, "\n")
		throw("internal lockOSThread error")
	}
	// 将 g 放入 free 队列缓存起来
	gfput(_g_.m.p.ptr(), gp)
	if locked {
		// The goroutine may have locked this thread because
		// it put it in an unusual kernel state. Kill it
		// rather than returning it to the thread pool.

		// Return to mstart, which will release the P and exit
		// the thread.
		// 该 Goroutine 可能在当前线程上锁住,因为它可能导致了不正常的内核状态
		// 这时候 kill 该线程,而非将 m 放回到线程池。
		// 此举会返回到 mstart,从而释放当前的 P 并退出该线程
		if GOOS != "plan9" { // See golang.org/issue/22227.
			gogo(&_g_.m.g0.sched)
		} else {
			// Clear lockedExt on plan9 since we may end up re-using
			// this thread.
			// 因为我们可能已重用此线程结束,在 plan9 上清除 lockedExt
			_g_.m.lockedExt = 0
		}
	}
	//重新进入调度循环
	schedule()
}
|
该函数会将 Goroutine 转换会 _Gdead 状态、清理其中的字段、移除 Goroutine 和线程的关联并调用 runtime.gfput 重新加入处理器的 Goroutine 空闲列表 gFree,在最后 runtime.goexit0 函数会重新调用 runtime.schedule 触发新的 Goroutine 调度.
它主要完成最后的清理工作:
- 把 g 的状态从 _Grunning 更新为_Gdead;
- 清空 g 的一些字段;
- 调用 dropg 函数解除 g 和 m 之间的关系,其实就是设置 g->m = nil, m->currg = nil;
- 把 g 放入 p 的 freeg 队列缓存起来供下次创建 g 时快速获取而不用从内存分配。freeg 就是 g 的一个对象池;
- 调用 schedule 函数再次进行调度。
到这里,gp 就完成了它的历史使命,功成身退,进入了 goroutine 缓存池,待下次有任务再重新启用。
而工作线程,又继续调用 schedule 函数进行新一轮的调度,整个过程形成了一个循环。
在一个复杂的程序中,调度可能会进行无数次循环,也就是说会进行无数次没有返回的函数调用,大家都知道,每调用一次函数都会消耗一定的栈空间,而如果一直这样无返回的调用下去无论 g0 有多少栈空间终究是会耗尽的,那么这里是不是有问题?其实没有问题!关键点就在于,每次执行 mcall 切换到 g0 栈时都是切换到 g0.sched.sp 所指的固定位置,这之所以行得通,正是因为从 schedule 函数开始之后的一系列函数永远都不会返回,所以重用这些函数上一轮调度时所使用过的栈内存是没有问题的。
我再解释一下:栈空间在调用函数时会自动“增大”,而函数返回时,会自动“减小”,这里的增大和减小是指栈顶指针 SP 的变化。上述这些函数都没有返回,说明调用者不需要用到被调用者的返回值,有点像“尾递归”。
因为 g0 一直没有动过,所有它之前保存的 sp 还能继续使用。每一次调度循环都会覆盖上一次调度循环的栈数据,完美!
dropg
dropg 听起来很玄乎,但实际上就是指将当前 g 的 m 置空、将当前 m 的 g 置空,从而完成解绑:
 1
 2
 3
 4
 5
 6
 7
 8
 9
10
11
12
13
14
15
16
17
18
19
20
21
22
23
24
25
26
27
28
29
30
31
32
33
34
35
36
|
// dropg removes the association between m and the current goroutine m->curg (gp for short).
// Typically a caller sets gp's status away from Grunning and then
// immediately calls dropg to finish the job. The caller is also responsible
// for arranging that gp will be restarted using ready at an
// appropriate time. After calling dropg and arranging for gp to be
// readied later, the caller can do other work but eventually should
// call schedule to restart the scheduling of goroutines on this m.
// dropg 移除 m 与当前 Goroutine m->curg(简称 gp )之间的关联。
// 通常,调用方将 gp 的状态设置为非 _Grunning 后立即调用 dropg 完成工作。
// 调用方也有责任在 gp 将使用 ready 时重新启动时进行相关安排。
// 在调用 dropg 并安排 gp ready 好后,调用者可以做其他工作,但最终应该
// 调用 schedule 来重新启动此 m 上的 Goroutine 的调度。
func dropg() {
	_g_ := getg()

	setMNoWB(&_g_.m.curg.m, nil)
	setGNoWB(&_g_.m.curg, nil)
}

// setMNoWB performs *mp = new without a write barrier.
// For times when it's impractical to use an muintptr.
// setMNoWB 当使用 muintptr 不可行时,在没有 write barrier 下执行 *mp = new
//go:nosplit
//go:nowritebarrier
func setMNoWB(mp **m, new *m) {
	(*muintptr)(unsafe.Pointer(mp)).set(new)
}

// setGNoWB performs *gp = new without a write barrier.
// For times when it's impractical to use a guintptr.
// setGNoWB 当使用 guintptr 不可行时,在没有 write barrier 下执行 *gp = new
//go:nosplit
//go:nowritebarrier
func setGNoWB(gp **g, new *g) {
	(*guintptr)(unsafe.Pointer(gp)).set(new)
}
|
协程调度
调度理论有两个理念:协作式调度与抢占式调度。
协作式和抢占式这两个理念解释起来很简单: 协作式调度依靠被调度方主动弃权;抢占式调度则依靠调度器强制将被调度方被动中断。
我们在这里会重点介绍运行时触发调度的几个路径:
协作式调度:
- 用户态阻塞 — runtime.gopark -> runtime.park_m
- 系统态阻塞 — runtime.exitsyscall -> runtime.exitsyscall0
- 主动让出 — runtime.Gosched -> runtime.gosched_m -> runtime.goschedImpl
抢占式调度:
- 系统监控 — runtime.sysmon -> runtime.retake -> runtime.preemptone
- 垃圾回收时第一次STW — markroot -> allgs[i] -> g -> suspendG(g) -> scan g stack -> resumeG
我们在这里介绍的调度时间点不是直接将线程的运行权交给其他任务,而是通过调度器的 runtime.schedule 重新调度。
主动让出(锁定G)
Gosched
用户调用runtime.Gosched可将当前G任务暂停,重新放回全局队列,让出当前M去执行其他任务.我们无须对G做唤醒操作,因为它总归被某个M重新拿到,并从"断点"恢复.
协作式调度即使用该方式。runtime.Gosched 就是主动让出处理器,允许其他 Goroutine 运行。该函数无法挂起 Goroutine,调度器会在自动调度当前 Goroutine:
1
2
3
4
5
6
7
8
|
// Gosched yields the processor, allowing other goroutines to run. It does not
// suspend the current goroutine, so execution resumes automatically.
// Gosched 会让出当前的 P,并允许其他 Goroutine 运行。
// 它不会推迟当前的 Goroutine,因此执行会被自动恢复
func Gosched() {
	checkTimeouts()
	mcall(gosched_m)
}
|
它首先会通过 note 机制通知那些等待被 ready 的 Goroutine:
 1
 2
 3
 4
 5
 6
 7
 8
 9
10
|
// checkTimeouts 恢复那些在等待一个 note 且已经触发其 deadline 时的 Goroutine。
func checkTimeouts() {
	now := nanotime()
	for n, nt := range notesWithTimeout {
		if n.key == note_cleared && now > nt.deadline {
			n.key = note_timeout
			goready(nt.gp, 1)
		}
	}
}
|
而后通过 mcall 调用 gosched_m 在 g0 上继续执行并让出 P, 实质上是让 G 放弃当前在 M 上的执行权利,转去执行其他的 G,并在上下文切换时候, 将自身放入全局队列等待后续调度:
 1
 2
 3
 4
 5
 6
 7
 8
 9
10
11
12
13
14
15
16
17
18
19
20
21
22
23
24
25
26
|
// Gosched continuation on g0.
// Gosched 在 g0 上继续执行
func gosched_m(gp *g) {
	if trace.enabled {
		traceGoSched()
	}
	goschedImpl(gp)
}

func goschedImpl(gp *g) {
	//重置属性
	status := readgstatus(gp)
	if status&^_Gscan != _Grunning {
		dumpgstatus(gp)
		throw("bad g status")
	}
	casgstatus(gp, _Grunning, _Grunnable)
	// 使当前 m 放弃 g
	dropg()
	//将当前G放回全局队列
	lock(&sched.lock)
	globrunqput(gp)
	unlock(&sched.lock)
	//重新调度执行其他任务
	schedule()
}
|
经过连续几次跳转,我们最终在 g0 的栈上调用 runtime.goschedImpl 函数,运行时会更新 Goroutine 的状态到 _Grunnable,让出当前的处理器并将 Goroutine 重新放回全局队列,在最后,该函数会调用 runtime.schedule 重新触发调度。
实现"断点恢复"的关键由mcall实现,它将当前执行状态,包括SP,PC寄存器等值保存到G.sched区域.
当execute/gogo再次执行该任务时,自然可从中恢复状态.反正执行栈是G自带的,不用担心执行数据丢失.
触发时机
- 用户主动调用:通过 runtime.Gosched 调用主动让出执行机会
- sysymon.retake抢占:当发生执行栈分段时,检查自身的抢占标记,决定是否继续执行.
- GC:调用 runtime.sweepone 清理全部待处理的内存管理单元并等待所有的清理工作完成,等待期间会调用 runtime.Gosched 让出处理器
用户态阻塞/唤醒(锁定G)
gopark
当 G 在用户态阻塞的时候(例如从 channel 读/写),会将当前 G 的状态从 Running 改为 Wait,同时将 G 放入到一个 wait 队列中(例如 channel 的 wait 队列)。
这些情况不会阻塞调度循环,而是会把 goroutine 挂起 所谓的挂起,其实让 g 先进某个数据结构,待 ready 后再继续执行 不会占用线程.这时候,线程会进入 schedule,继续消费队列,执行其它的 g
与Gosched最大的区别在于,gopark并没将G放回待运行队列.也就是说,必须主动恢复,否则该任务会遗失.
应用层阻塞通常使用这种方式。runtime.gopark 是触发调度最常见的方法,该函数会将当前 Goroutine 暂停,被暂停的任务不会放回运行队列.
gopark函数做的主要事情分为两点:
- 解除当前goroutine的m的绑定关系,将当前goroutine状态机切换为等待状态;
- 调用一次schedule()函数,在局部调度器P发起一轮新的调度。
 1
 2
 3
 4
 5
 6
 7
 8
 9
10
11
12
13
14
15
16
17
18
19
20
21
22
23
24
25
26
27
28
29
30
31
32
33
34
35
36
37
38
39
40
41
42
43
44
45
46
47
48
49
50
|
// Puts the current goroutine into a waiting state and calls unlockf.
// If unlockf returns false, the goroutine is resumed.
// unlockf must not access this G's stack, as it may be moved between
// the call to gopark and the call to unlockf.
// Reason explains why the goroutine has been parked.
// It is displayed in stack traces and heap dumps.
// Reasons should be unique and descriptive.
// Do not re-use reasons, add new ones.
// gopark 会停住当前的 goroutine 并且调用传递进来的回调函数 unlockf
func gopark(unlockf func(*g, unsafe.Pointer) bool, lock unsafe.Pointer, reason waitReason, traceEv byte, traceskip int) {
	if reason != waitReasonSleep {
		checkTimeouts() // timeouts may expire while two goroutines keep the scheduler busy
	}
	mp := acquirem()
	gp := mp.curg
	status := readgstatus(gp)
	if status != _Grunning && status != _Gscanrunning {
		throw("gopark: bad g status")
	}
	mp.waitlock = lock
	mp.waitunlockf = *(*unsafe.Pointer)(unsafe.Pointer(&unlockf))
	gp.waitreason = reason
	mp.waittraceev = traceEv
	mp.waittraceskip = traceskip
	releasem(mp)
	// can't do anything that might move the G between Ms here.
	// gopark 最终会调用 park_m,在这个函数内部会调用 unlockf
	// 然后会把当前的 goroutine,也就是 g 数据结构保存到 pollDesc 的 rg 或者 wg 指针里
	mcall(park_m)
}

// Helpers for Go. Must be NOSPLIT, must only call NOSPLIT functions, and must not block.

//go:nosplit
func acquirem() *m {
	_g_ := getg()
	_g_.m.locks++
	return _g_.m
}

//go:nosplit
func releasem(mp *m) {
	_g_ := getg()
	mp.locks--
	if mp.locks == 0 && _g_.preempt {
		// restore the preemption request in case we've cleared it in newstack
		// 如果我们在 newstack 中清除了抢占请求,则恢复抢占请求
		_g_.stackguard0 = stackPreempt
	}
}
|
可看到gopark同样是由mcall保存执行状态,还有个unlockf作为暂停判断条件.
该函数会通过 runtime.mcall 在切换到 g0 的栈上调用 runtime.park_m 函数
park_m函数主要做的几件事情就是:
- 线程安全更新goroutine的状态,置为_Gwaiting 等待状态;
- 解除goroutine与OS thread的绑定关系;
- 调用schedule()函数,调度器会重新调度选择一个goroutine去运行;
 1
 2
 3
 4
 5
 6
 7
 8
 9
10
11
12
13
14
15
16
17
18
19
20
21
22
23
24
25
26
27
|
// park continuation on g0.
func park_m(gp *g) {
	_g_ := getg()

	if trace.enabled {
		traceGoPark(_g_.m.waittraceev, _g_.m.waittraceskip)
	}
	//重置属性
	casgstatus(gp, _Grunning, _Gwaiting)
	dropg()
	//执行解锁函数.如果返回false,则恢复运行
	if _g_.m.waitunlockf != nil {
		fn := *(*func(*g, unsafe.Pointer) bool)(unsafe.Pointer(&_g_.m.waitunlockf))
		ok := fn(gp, _g_.m.waitlock)
		_g_.m.waitunlockf = nil
		_g_.m.waitlock = nil
		if !ok {
			if trace.enabled {
				traceGoUnpark(gp, 2)
			}
			casgstatus(gp, _Gwaiting, _Grunnable)
			execute(gp, true) // Schedule it back, never returns.
		}
	}
	//调度执行其他任务
	schedule()
}
|
该函数会将当前 Goroutine 的状态从 _Grunning 切换至_Gwaiting,调用 runtime.dropg 移除线程和 Goroutine 之间的关联,在这之后就可以调用 runtime.schedule 触发新一轮的调度了。
goready
当 Goroutine 等待的特定条件满足后,运行时会调用 runtime.goready 将因为调用 runtime.gopark 而陷入休眠的 Goroutine 唤醒。
当 G 被另外一个 G2 唤醒时(通过 goready 函数),那么 G 就会尝试加入到 G2 所在 P 的 runnext 中,如果不成的话,会依次尝试 本地g队列 和 全局g队列。
与之配套,goready用于恢复执行,G被放回优先级最高的P.runnext
 1
 2
 3
 4
 5
 6
 7
 8
 9
10
11
12
13
14
15
16
17
18
19
20
21
22
23
24
25
26
27
28
29
30
31
32
33
34
35
36
37
|
func goready(gp *g, traceskip int) {
	systemstack(func() {
		ready(gp, traceskip, true)
	})
}

// Mark gp ready to run.
// 将 gp 标记为 ready 来运行
func ready(gp *g, traceskip int, next bool) {
	if trace.enabled {
		traceGoUnpark(gp, traceskip)
	}

	status := readgstatus(gp)

	// Mark runnable.
	_g_ := getg()
	// 禁止抢占,因为它可以在局部变量中保存 p
	_g_.m.locks++ // disable preemption because it can be holding p in a local var
	if status&^_Gscan != _Gwaiting {
		dumpgstatus(gp)
		throw("bad g->status in ready")
	}

	// status is Gwaiting or Gscanwaiting, make Grunnable and put on runq
	//修正状态,重新放回本地runnext
	casgstatus(gp, _Gwaiting, _Grunnable)
	runqput(_g_.m.p.ptr(), gp, next)
	if atomic.Load(&sched.npidle) != 0 && atomic.Load(&sched.nmspinning) == 0 {
		wakep()
	}
	_g_.m.locks--
	// 在 newstack 中已经清除它的情况下恢复抢占请求
	if _g_.m.locks == 0 && _g_.preempt { // restore the preemption request in Case we've cleared it in newstack
		_g_.stackguard0 = stackPreempt
	}
}
|
runtime.ready 会将准备就绪的 Goroutine 的状态切换至 _Grunnable 并将其加入处理器的运行队列中,等待调度器的调度。
触发时机
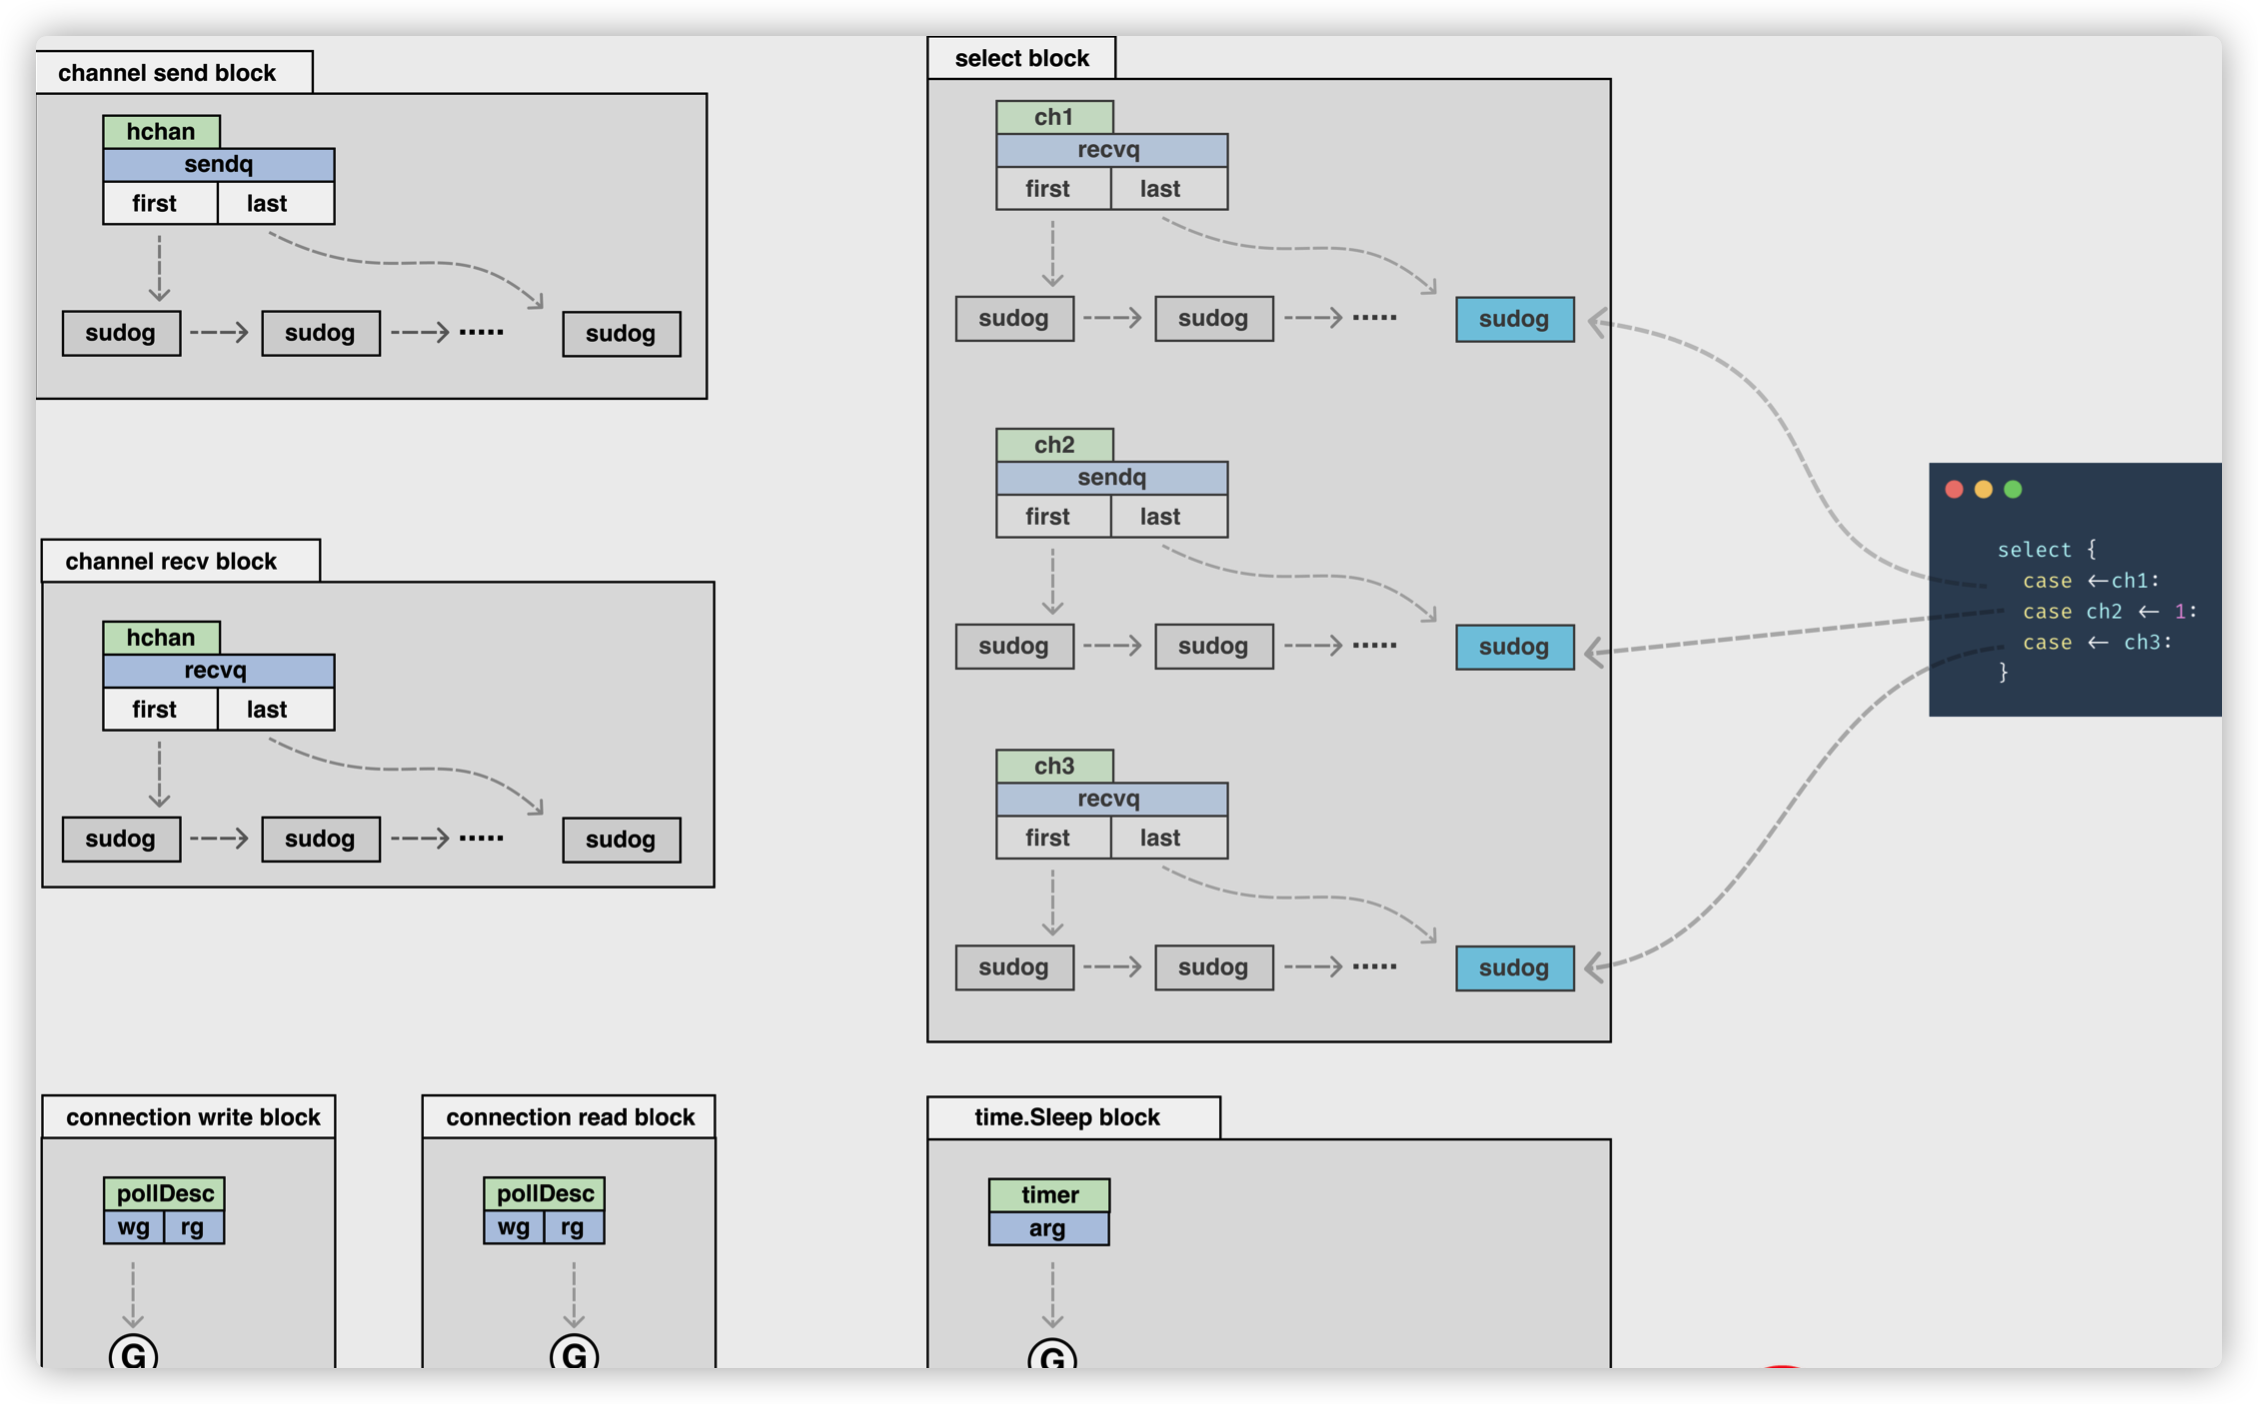
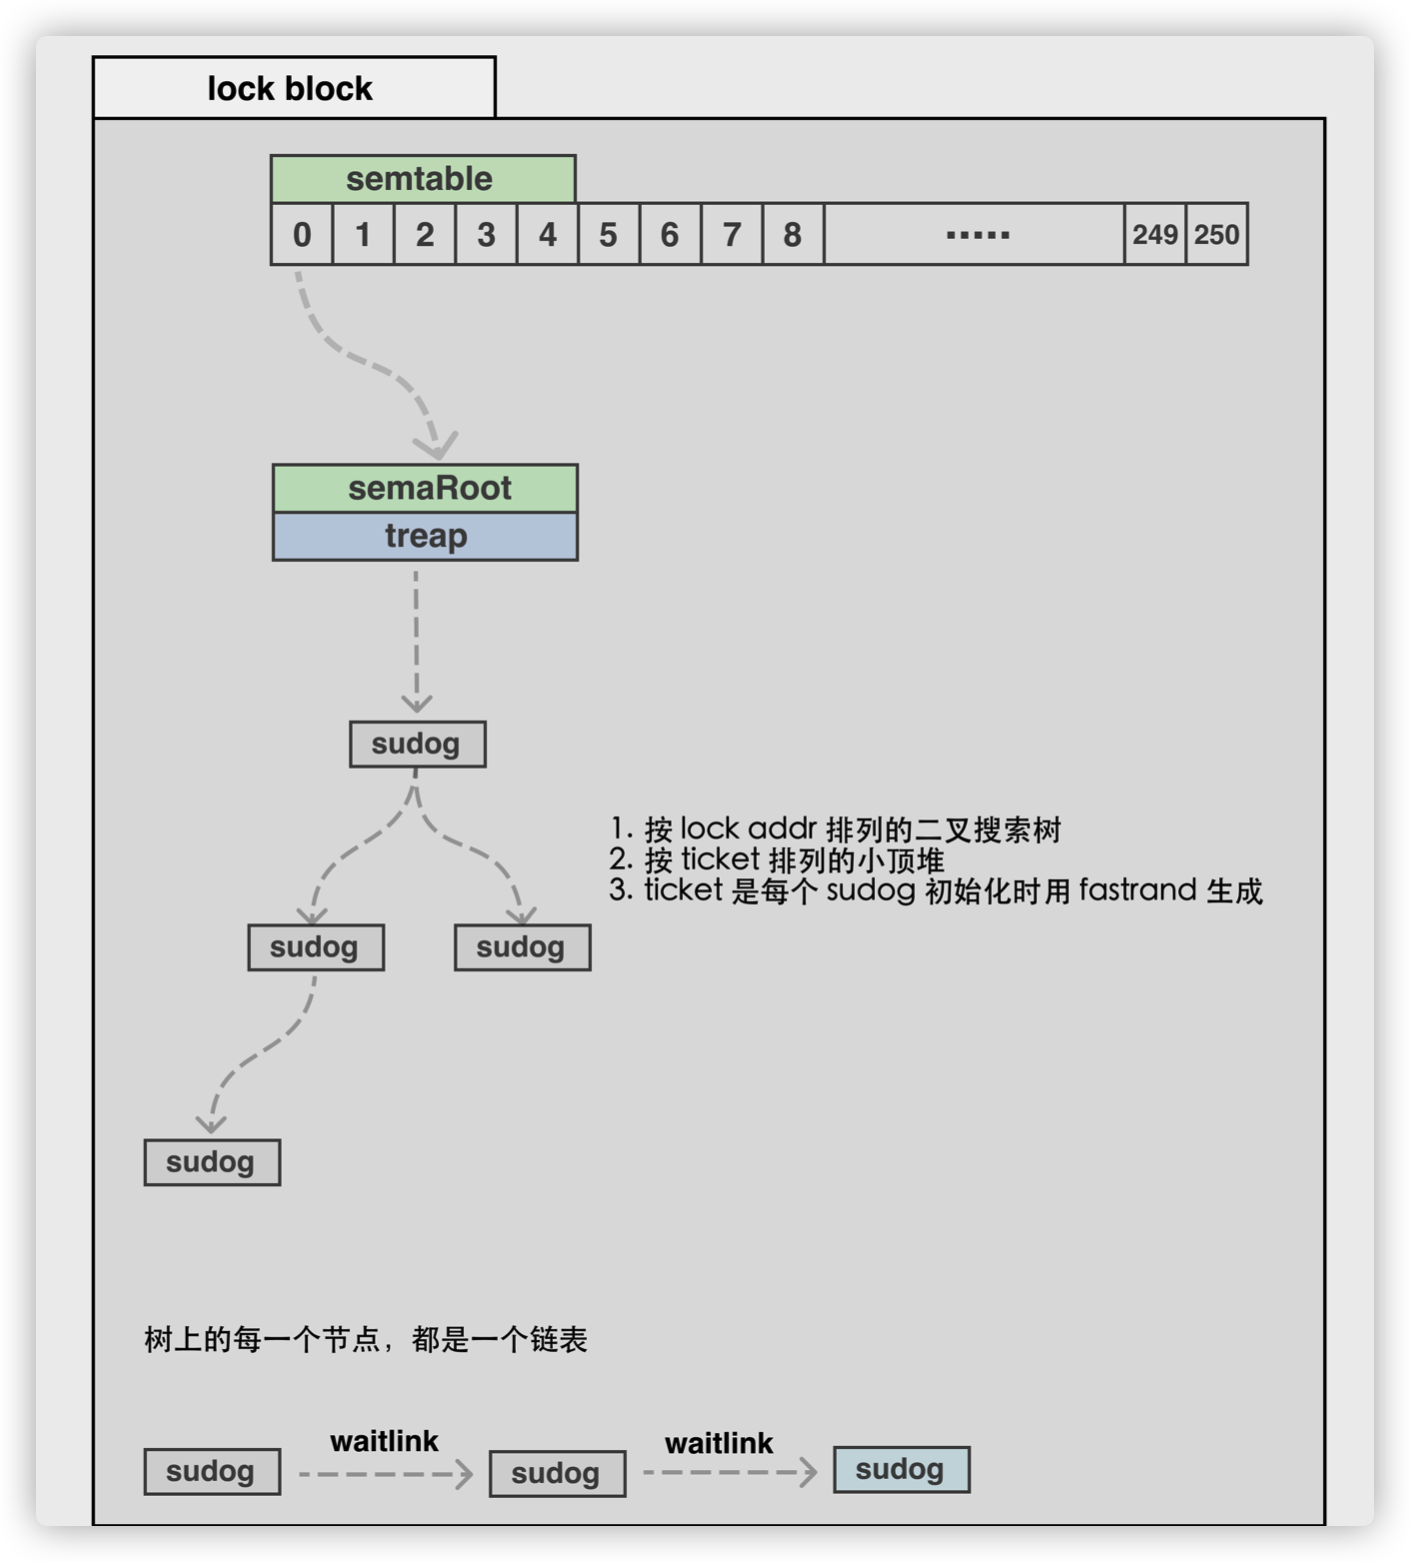
time定时操作
time.Sleep举例:
1
2
3
|
// Sleep pauses the current goroutine for at least the duration d.
// A negative or zero duration causes Sleep to return immediately.
func Sleep(d Duration)
|
实际定义在runtime
 1
 2
 3
 4
 5
 6
 7
 8
 9
10
11
12
13
14
15
16
|
func timeSleep(ns int64) {
	if ns <= 0 {
		return
	}

	gp := getg()
	t := gp.timer
	if t == nil {
		t = new(timer)
		gp.timer = t
	}
	t.f = goroutineReady
	t.arg = gp
	t.nextwhen = nanotime() + ns
	gopark(resetForSleep, unsafe.Pointer(t), waitReasonSleep, traceEvGoSleep, 1)
}
|
调用gopark
使用关键字 go
新开一个协程,g状态会变为_GIdle,触发调度。
atomic,mutex,channel
atomic,mutex,channel 操作等会使 goroutine 阻塞,因此会被调度走。等条件满足后(例如其他 goroutine 解锁了)还会被调度上来继续运行
 1
 2
 3
 4
 5
 6
 7
 8
 9
10
11
12
13
14
15
16
17
18
19
20
21
22
23
24
25
26
27
28
29
30
31
32
33
34
35
36
37
38
39
40
41
42
43
44
45
46
47
48
49
50
51
52
53
54
55
56
57
58
59
|
func chansend(c *hchan, ep unsafe.Pointer, block bool, callerpc uintptr) bool {
	if c == nil {
		if !block {
			return false
		}
		gopark(nil, nil, "chan send (nil chan)", traceEvGoStop, 2)
		throw("unreachable")
	}

	if debugChan {
		print("chansend: chan=", c, "\n")
	}

	if raceenabled {
		racereadpc(unsafe.Pointer(c), callerpc, funcPC(chansend))
	}

    ........
    // 省略无关代码
    ........

	// Block on the channel. Some receiver will complete our operation for us.
	gp := getg()
	mysg := acquireSudog()
	mysg.releasetime = 0
	if t0 != 0 {
		mysg.releasetime = -1
	}
	// No stack splits between assigning elem and enqueuing mysg
	// on gp.waiting where copystack can find it.
	mysg.elem = ep
	mysg.waitlink = nil
	mysg.g = gp
	mysg.selectdone = nil
	mysg.c = c
	gp.waiting = mysg
	gp.param = nil
	c.sendq.enqueue(mysg)
	goparkunlock(&c.lock, "chan send", traceEvGoBlockSend, 3)

	// someone woke us up.
	if mysg != gp.waiting {
		throw("G waiting list is corrupted")
	}
	gp.waiting = nil
	if gp.param == nil {
		if c.closed == 0 {
			throw("chansend: spurious wakeup")
		}
		panic(plainError("send on closed channel"))
	}
	gp.param = nil
	if mysg.releasetime > 0 {
		blockevent(mysg.releasetime-t0, 2)
	}
	mysg.c = nil
	releaseSudog(mysg)
	return true
}
|
可以看到,还是调用ggopark,来进行调度。
网络读写
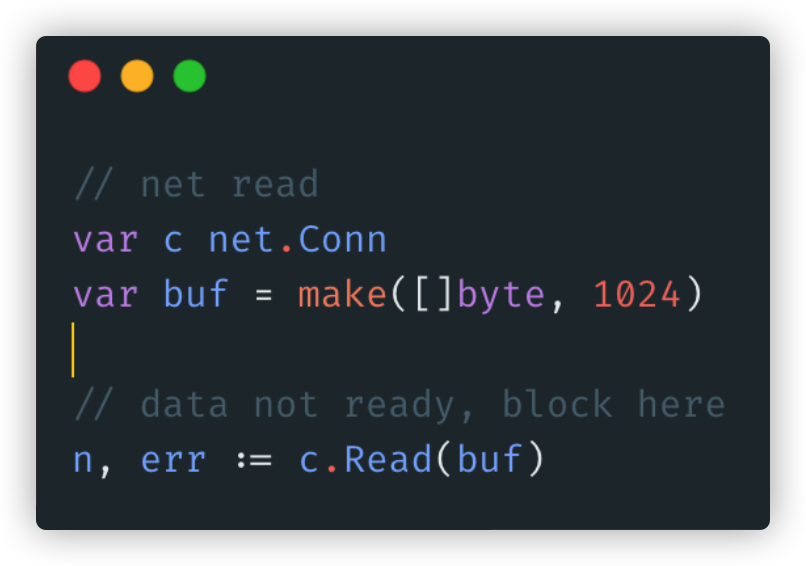
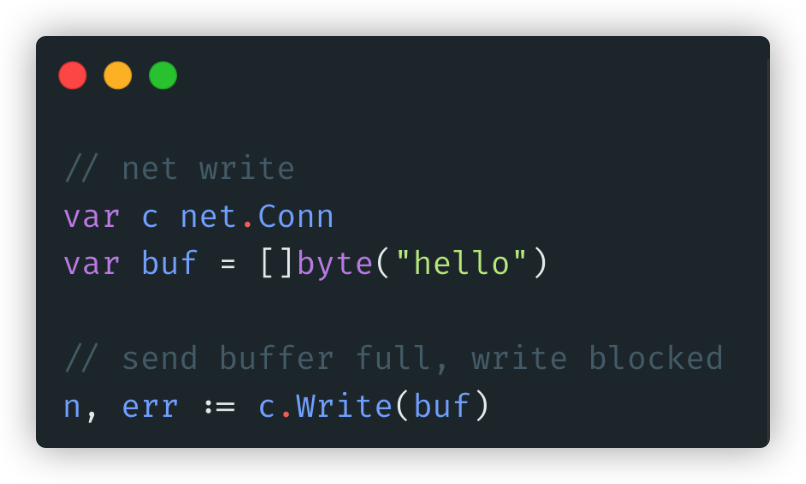
垃圾回收
由于进行 GC 的 goroutine 也需要在 M 上运行,因此肯定会发生调度。当然,Go scheduler 还会做很多其他的调度,例如调度不涉及堆访问的 goroutine 来运行。GC 不管栈上的内存,只会回收堆上的内存
系统态阻塞/唤醒(锁定GM)
同/异步系统调用
同异步系统调用可以用函数注释来区分:
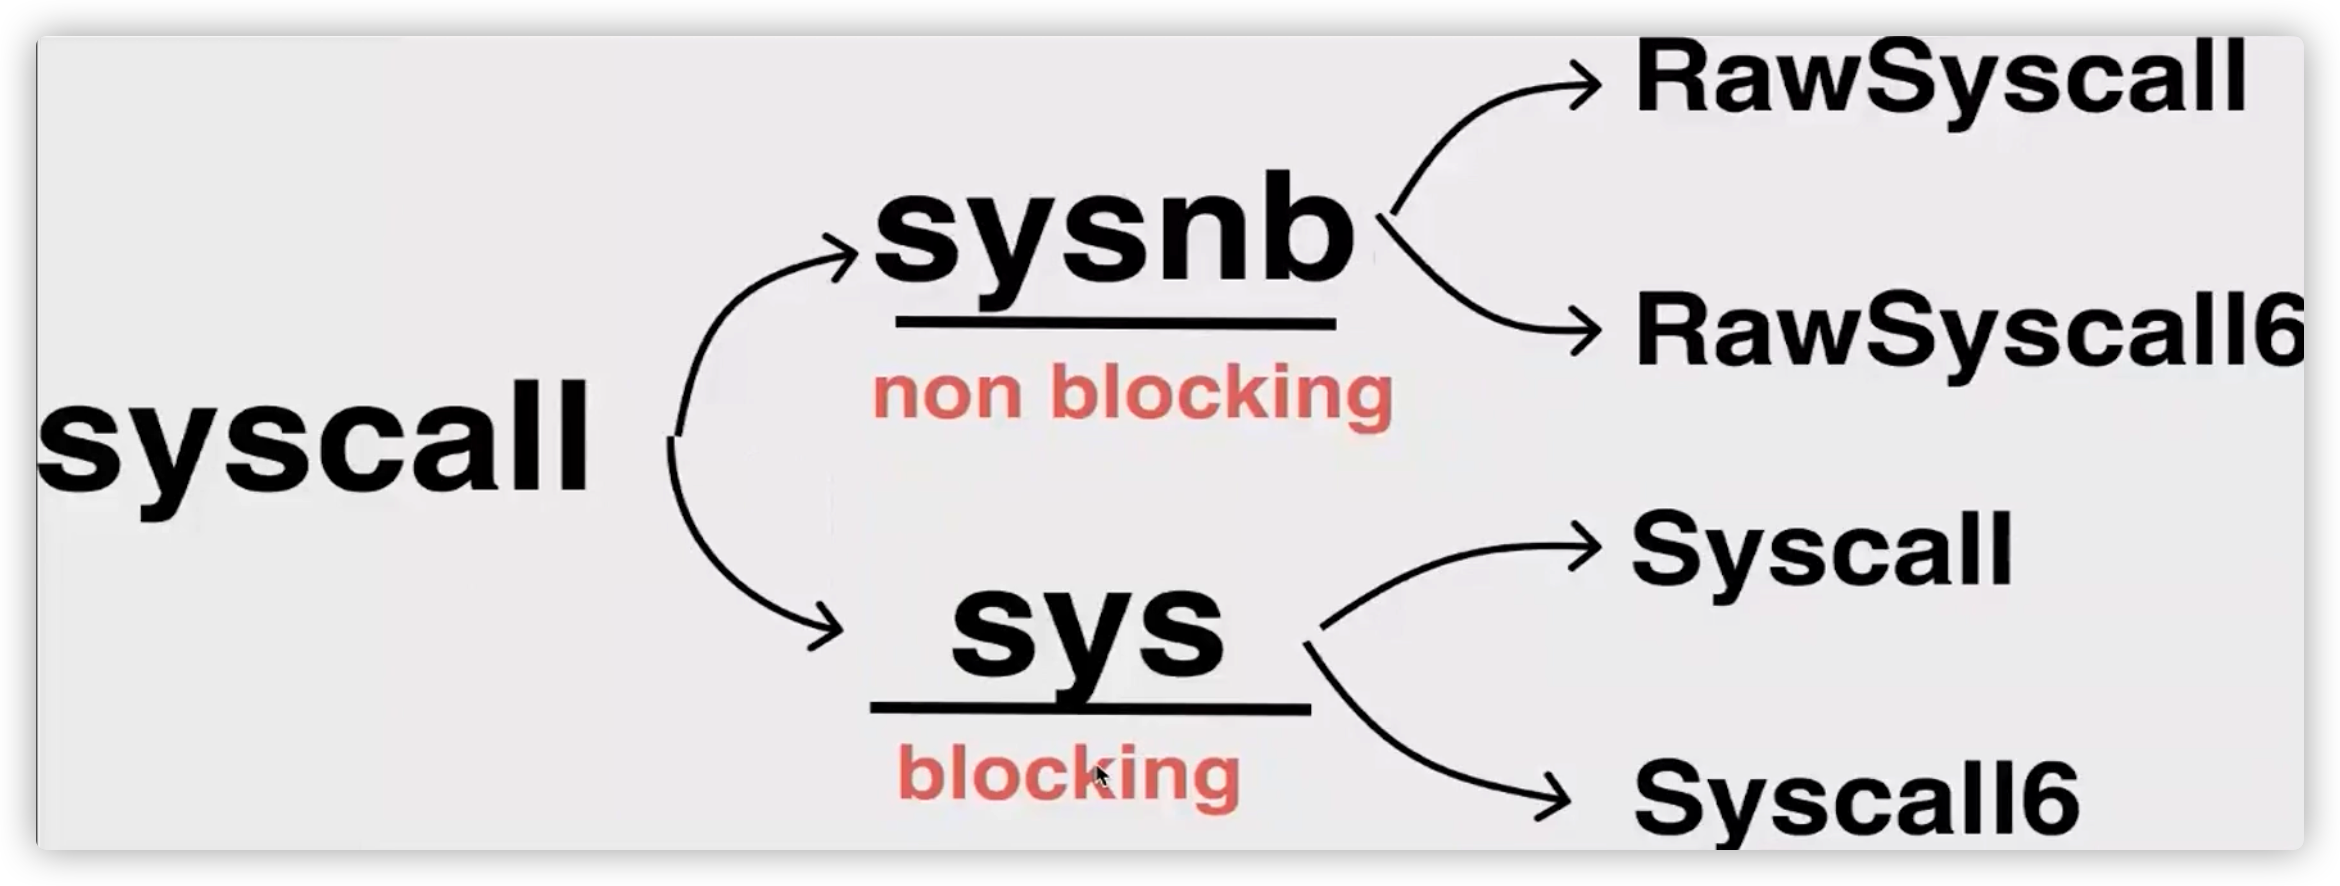
1
2
|
//sysnb: syscall nonblocking
//sys: syscall blocking
|
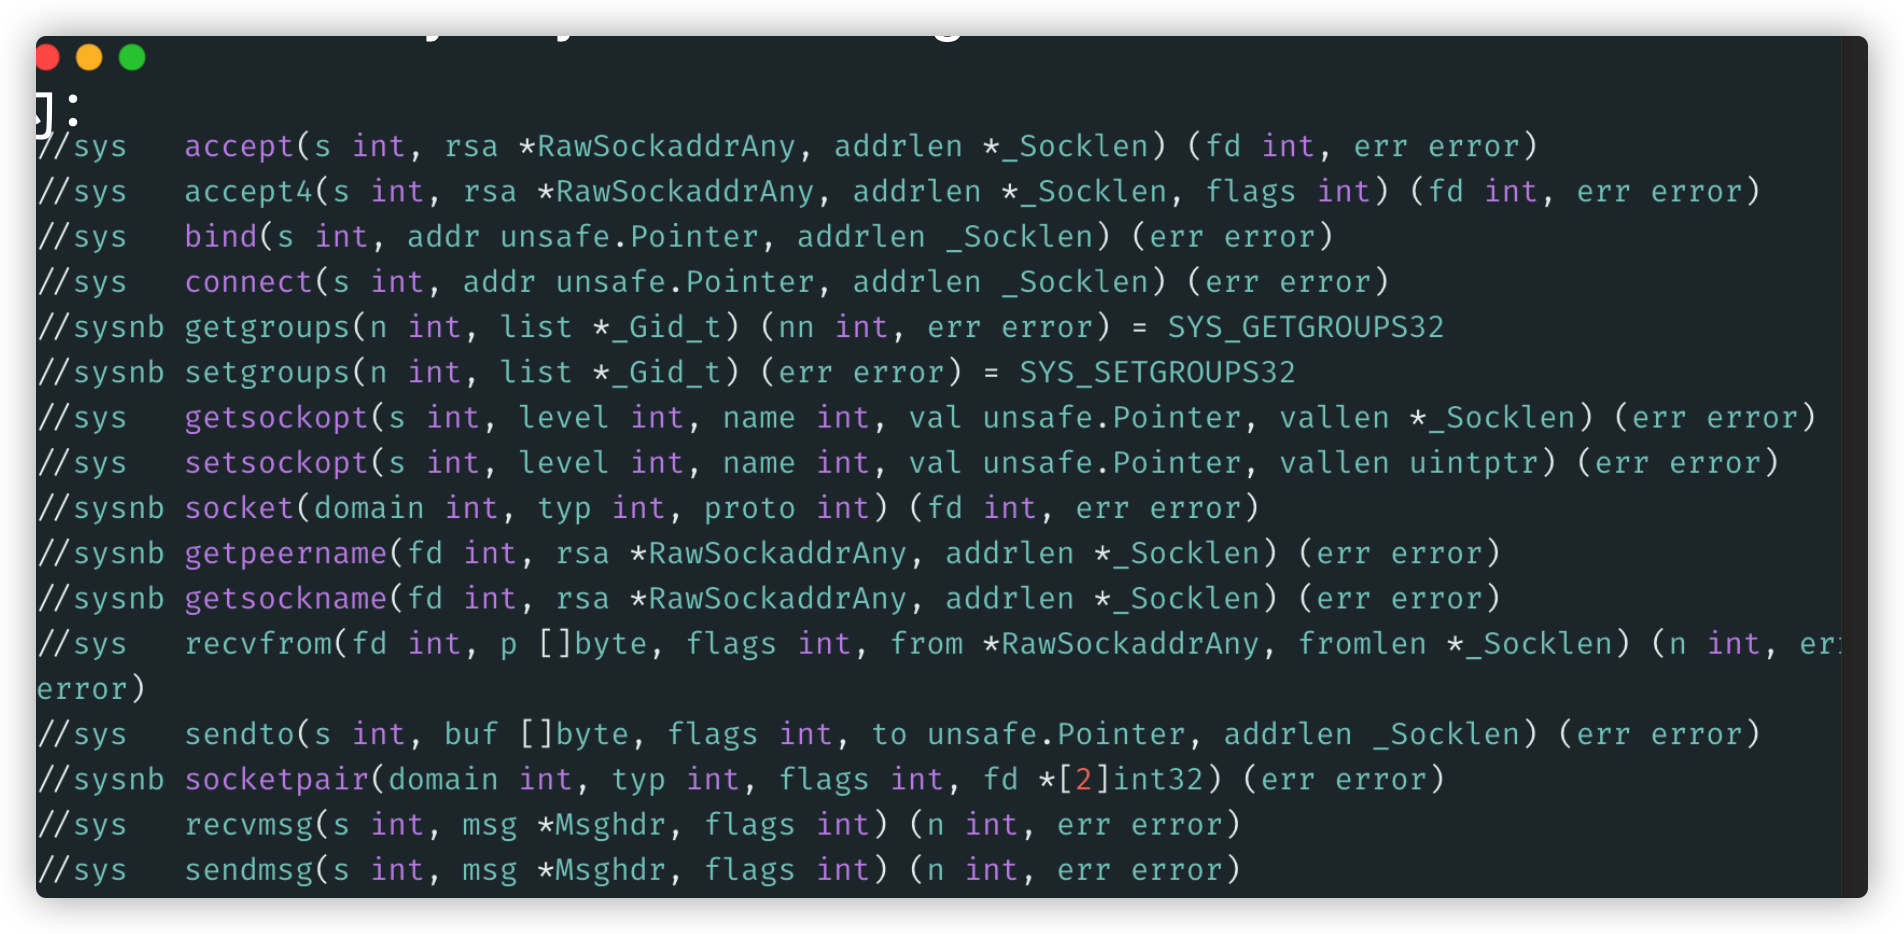
当OS有能力去处理异步的系统调用时候,使用网络轮询器(network poller)去处理系统调用会更加高效。不同的操作系统分别使用了kqueue (MacOS)、epoll (Linux) 、 iocp (Windows) 对此作了实现。
今天许多操作系统都能处理基于网络(Networking-based)的系统调用。这也是网络轮询器(network poller)这一名字的由来,因为它的主要用途就是处理网络操作。网络系统上通过使用network poller,调度器可以防止Goroutines在系统调用的时候阻塞M。这可以让M能够去执行P的本地G队列上面的其他Goroutines,而不是再去新建一个M。这可以减少OS上的调度加载。
最好的方式就是给一个例子看看这些东西是如何工作的。
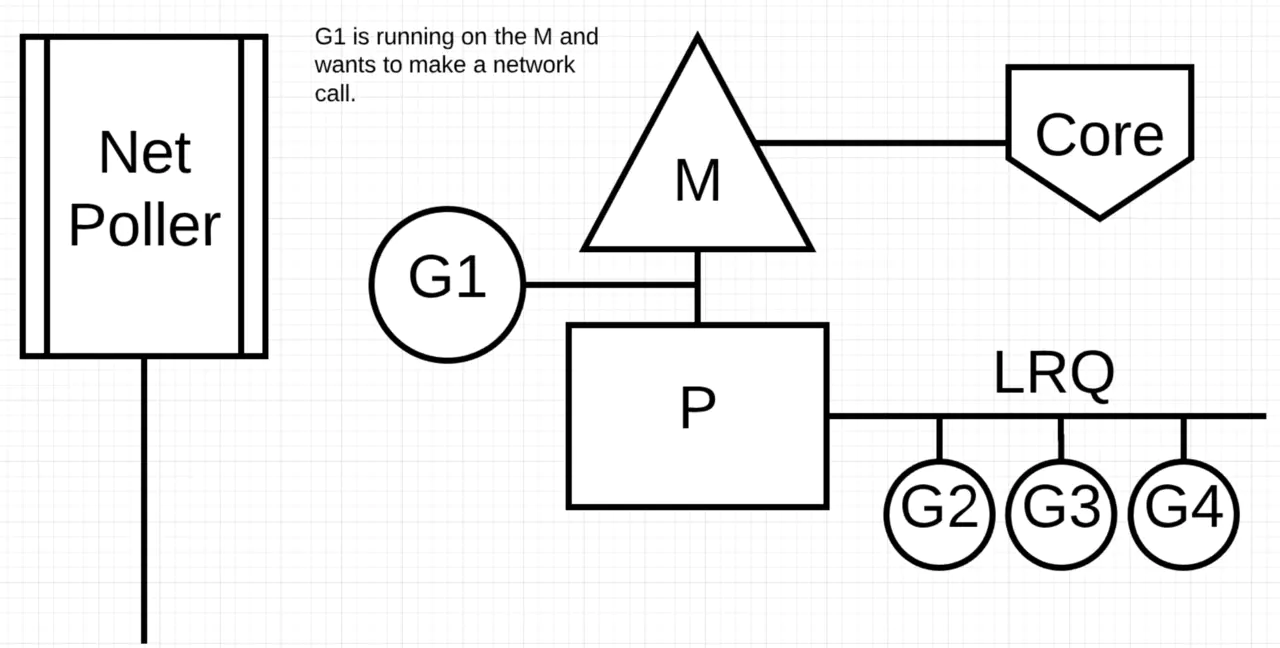
图展示了基本的调用图例。Goroutine-1正在M上面执行并且有3个Goroutine在本地G队列上等待想要获取M的时间片。network poller此时空闲没事做。
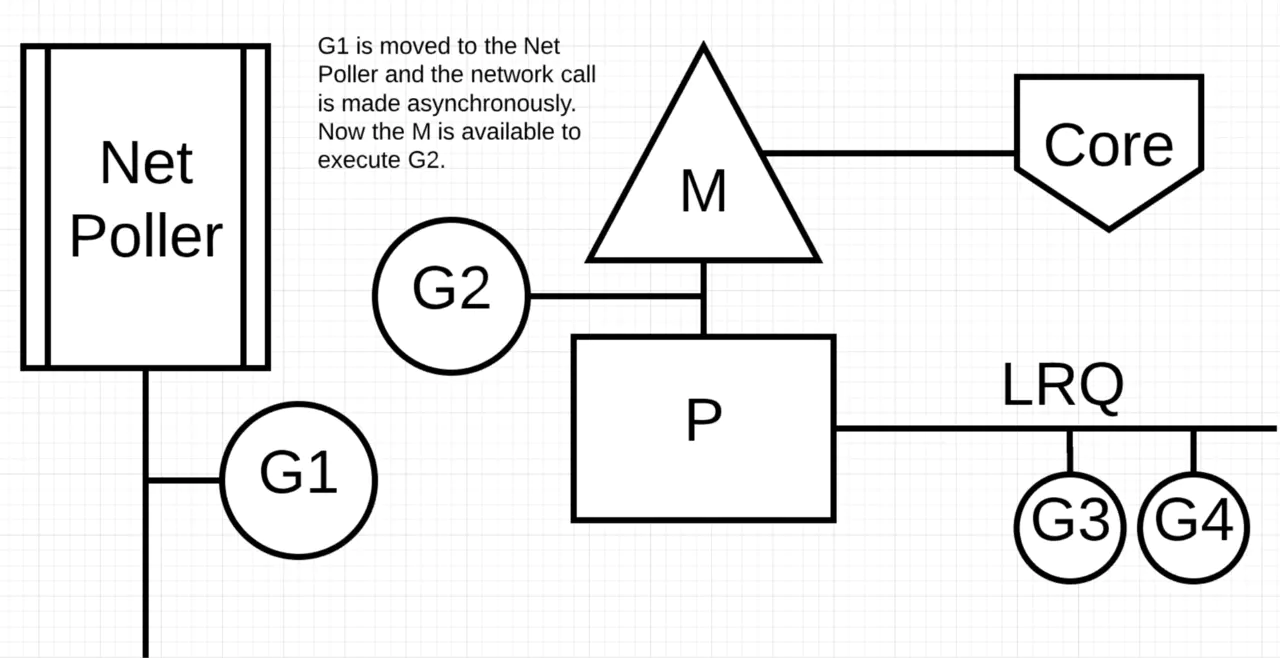
图中 Goroutine-1想要进行network system调用,因此Goroutine-1移到了network poller上面然后处理异步调用,一旦Goroutine-1从M上移到network poller,M便可以去执行其他本地G队列上的Goroutine。此时 Goroutine-2切换到了M上面。
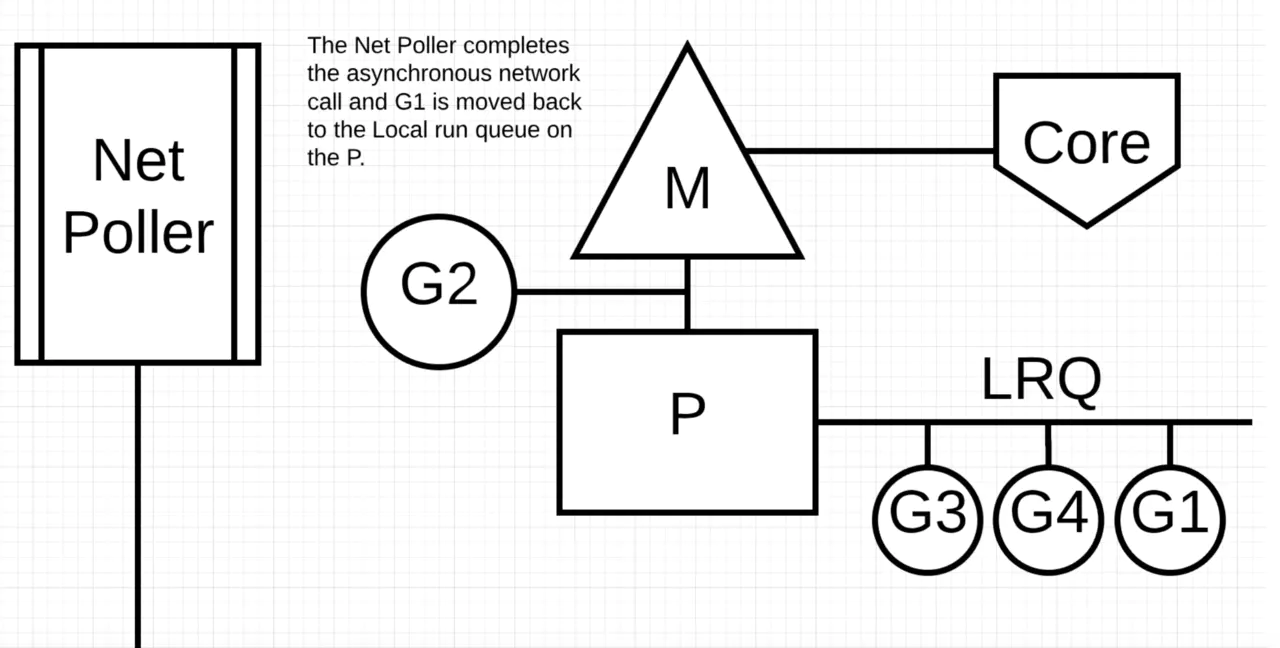
图中,network poller的异步网络调用完成并且Goroutine-1回到了P的本地G队列上面。一旦Goroutine-1能够切换回M上,Go的相关代码便能够再次执行。很大好处是,在执行network system调用时候,我们不需要其他额外的M。network poller有一个OS线程能够有效的处理事件循环。
当Goroutine想进行系统调用无法异步进行该怎么办呢?这种情况下,无法使用 network poller并且Goroutine产生的系统调用会阻塞M。很不幸但是我们无法阻止这种情况发生。一个例子就是基于文件的系统调用。如果你使用CGO,当你调用C函数的时候也会有其他情况发生会阻塞M。
注意:Windows操作系统确实有能力去异步进行基于文件的系统调用。从技术上讲,在Windows上运行时可以使用network poller。
我们看一下同步系统调用(比如file I/O)阻塞M的时候会发生什么。
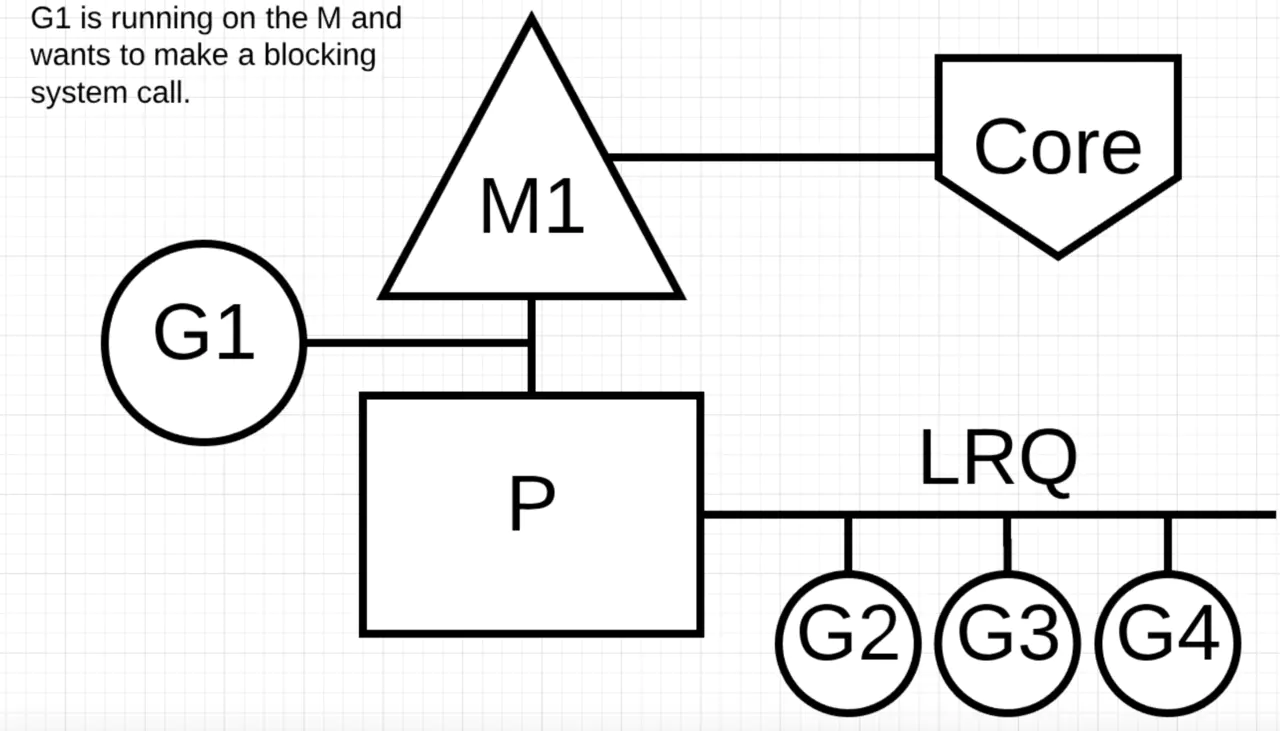
图又一次展示了我们的基本调度图例。但是这一次Goroutine-1的同步系统调用会阻塞M1
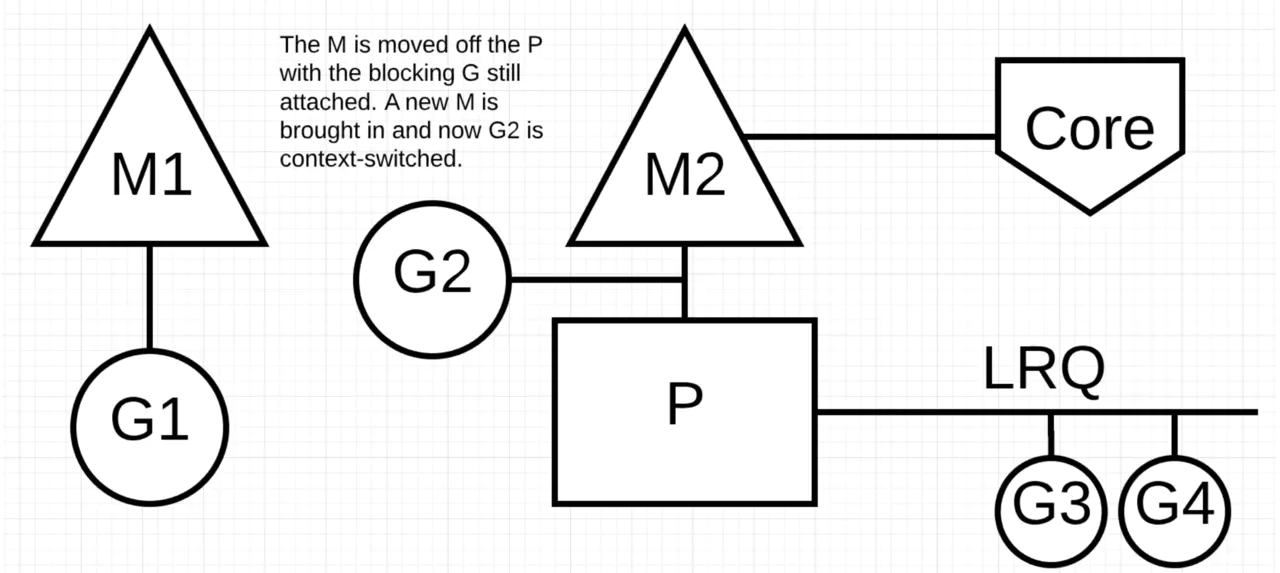
图中,调度器能够确定Goroutine-1已经阻塞了M。这时,调度器会从P上拿下来M1,Goroutine-1依旧在M1上。然后调度器会拿来一个新的M2去服务P。此时本地G队列上的Goroutine-2会上下文切换到M2上。如果已经有一个可用的M了,那么直接用它会比新建一个M要更快。
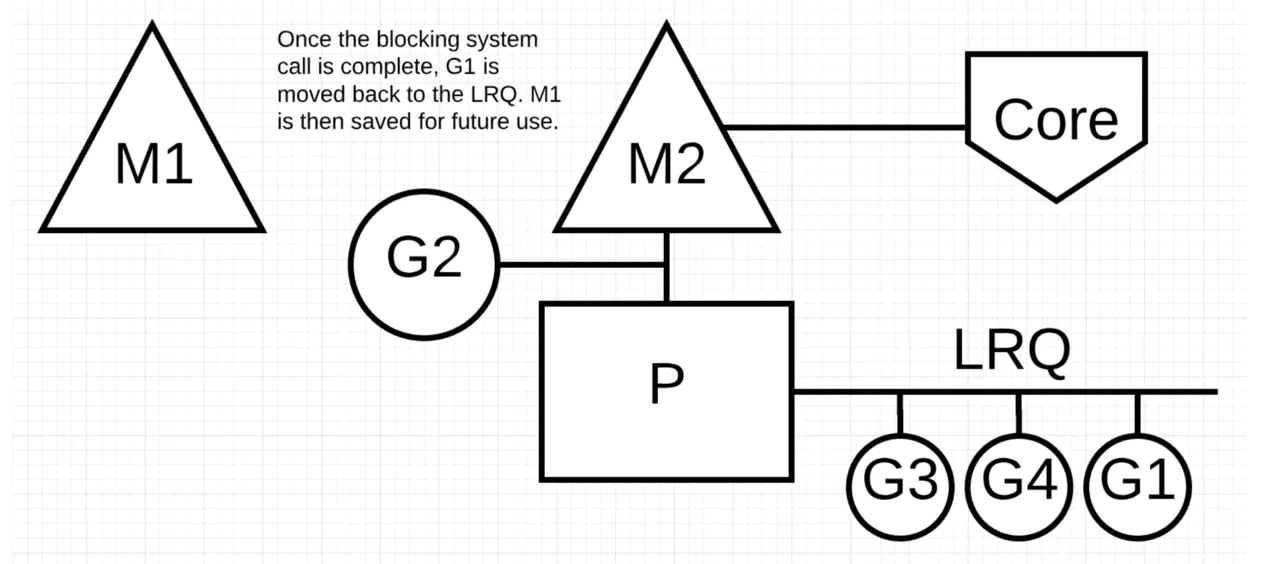
图中,Goroutine-1的阻塞系统调用结束了。此时Goroutine-1能够回到本地G队列的后面并且能够重新被P执行。M1之后会被放置一边供未来类似的情况使用。
系统调用函数
当 G 在 M 上执行系统调用后,它会阻塞,并将状态设置为 syscall 状态。M 也会进行阻塞。G 所绑定的 P 会和当前 G 和 M 解绑,寻找空闲 M,或创建新的 M,继续运行它队列中的其他 G .
当 M 执行完系统调用后,G 会重新寻找一个空闲的 P,进行运行,如果没有空闲的 P,那么它就会进入 全局g队列。
同步系统调用也会触发运行时调度器的调度,为了处理特殊的系统调用,我们甚至在 Goroutine 中加入了 _Gsyscall 状态,Go 语言通过 syscall.Syscall 和 syscall.RawSyscall 等使用汇编语言编写的方法封装了操作系统提供的所有系统调用.
为支持并发调度,Go专门对syscall,cgo进行了包装,以便在长时间阻塞时能切换执行其他任务.在标准库syscall包里,将系统调用函数分为Syscall和RawSyscall两类.
前者和后者的区别是前者会在系统调用前后分别调用entersyscall和exitsyscall(位于src/runtime/proc.go),做一些现场保存和恢复操作,这样才能使P安全地与M解绑,并在其它M上继续执行其它G。
 1
 2
 3
 4
 5
 6
 7
 8
 9
10
11
12
13
|
#define INVOKE_SYSCALL	INT	$0x80

TEXT ·Syscall(SB),NOSPLIT,$0-28
	CALL	runtime·entersyscall(SB)
	...
	INVOKE_SYSCALL
	...
	CALL	runtime·exitsyscall(SB)
	RET
ok:
	...
	CALL	runtime·exitsyscall(SB)
	RET
|
在通过汇编指令 INVOKE_SYSCALL 执行系统调用前后,上述函数会调用运行时的 runtime.entersyscall 和 runtime.exitsyscall,正是这一层包装能够让我们在陷入系统调用前触发运行时的准备和清理工作。
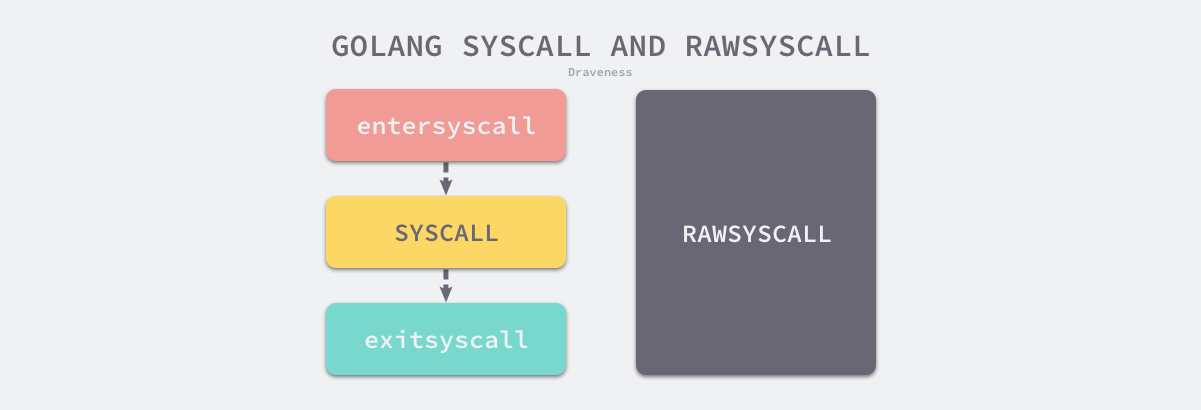
不过出于性能的考虑,如果这次系统调用不需要运行时参与,就会使用 syscall.RawSyscall 简化这一过程,不再调用运行时函数。这里包含 Go 语言对 Linux 386 架构上不同系统调用的分类,我们会按需决定是否需要运行时的参与:
| 系统调用 |
类型 |
| SYS_TIME |
RawSyscall |
| SYS_GETTIMEOFDAY |
RawSyscall |
| SYS_SETRLIMIT |
RawSyscall |
| SYS_GETRLIMIT |
RawSyscall |
| SYS_EPOLL_WAIT |
Syscall |
| … |
… |
由于直接进行系统调用会阻塞当前的线程,所以只有可以立刻返回的系统调用才可能会被设置成 RawSyscall 类型,例如:SYS_EPOLL_CREATE、SYS_EPOLL_WAIT(超时时间为 0)、SYS_TIME 等。
正常的系统调用过程相比之下比较复杂,接下来我们将分别介绍进入系统调用前的准备工作和系统调用结束后的收尾工作。
entersyscall
runtime.entersyscall 函数会在获取当前程序计数器和栈位置之后调用 runtime.reentersyscall,它会完成 Goroutine 进入系统调用前的准备工作:
  1
  2
  3
  4
  5
  6
  7
  8
  9
 10
 11
 12
 13
 14
 15
 16
 17
 18
 19
 20
 21
 22
 23
 24
 25
 26
 27
 28
 29
 30
 31
 32
 33
 34
 35
 36
 37
 38
 39
 40
 41
 42
 43
 44
 45
 46
 47
 48
 49
 50
 51
 52
 53
 54
 55
 56
 57
 58
 59
 60
 61
 62
 63
 64
 65
 66
 67
 68
 69
 70
 71
 72
 73
 74
 75
 76
 77
 78
 79
 80
 81
 82
 83
 84
 85
 86
 87
 88
 89
 90
 91
 92
 93
 94
 95
 96
 97
 98
 99
100
101
102
103
104
105
106
107
108
109
110
111
112
113
114
|
// Standard syscall entry used by the go syscall library and normal cgo calls.
//go:nosplit
func entersyscall() {
	reentersyscall(getcallerpc(), getcallersp())
}

// The goroutine g is about to enter a system call.
// Record that it's not using the cpu anymore.
// This is called only from the go syscall library and cgocall,
// not from the low-level system calls used by the runtime.
//
// Entersyscall cannot split the stack: the gosave must
// make g->sched refer to the caller's stack segment, because
// entersyscall is going to return immediately after.
//
// Nothing entersyscall calls can split the stack either.
// We cannot safely move the stack during an active call to syscall,
// because we do not know which of the uintptr arguments are
// really pointers (back into the stack).
// In practice, this means that we make the fast path run through
// entersyscall doing no-split things, and the slow path has to use systemstack
// to run bigger things on the system stack.
//
// reentersyscall is the entry point used by cgo callbacks, where explicitly
// saved SP and PC are restored. This is needed when exitsyscall will be called
// from a function further up in the call stack than the parent, as g->syscallsp
// must always point to a valid stack frame. entersyscall below is the normal
// entry point for syscalls, which obtains the SP and PC from the caller.
//
// Syscall tracing:
// At the start of a syscall we emit traceGoSysCall to capture the stack trace.
// If the syscall does not block, that is it, we do not emit any other events.
// If the syscall blocks (that is, P is retaken), retaker emits traceGoSysBlock;
// when syscall returns we emit traceGoSysExit and when the goroutine starts running
// (potentially instantly, if exitsyscallfast returns true) we emit traceGoStart.
// To ensure that traceGoSysExit is emitted strictly after traceGoSysBlock,
// we remember current value of syscalltick in m (_g_.m.syscalltick = _g_.m.p.ptr().syscalltick),
// whoever emits traceGoSysBlock increments p.syscalltick afterwards;
// and we wait for the increment before emitting traceGoSysExit.
// Note that the increment is done even if tracing is not enabled,
// because tracing can be enabled in the middle of syscall. We don't want the wait to hang.
//
//go:nosplit
func reentersyscall(pc, sp uintptr) {
	_g_ := getg()

	// Disable preemption because during this function g is in Gsyscall status,
	// but can have inconsistent g->sched, do not let GC observe it.
	_g_.m.locks++

	// Entersyscall must not call any function that might split/grow the stack.
	// (See details in comment above.)
	// Catch calls that might, by replacing the stack guard with something that
	// will trip any stack check and leaving a flag to tell newstack to die.
	_g_.stackguard0 = stackPreempt
	_g_.throwsplit = true

	// Leave SP around for GC and traceback.
	//保存执行现场
	save(pc, sp)
	_g_.syscallsp = sp
	_g_.syscallpc = pc
	casgstatus(_g_, _Grunning, _Gsyscall)
	//确保sysmon运行
	if _g_.syscallsp < _g_.stack.lo || _g_.stack.hi < _g_.syscallsp {
		systemstack(func() {
			print("entersyscall inconsistent ", hex(_g_.syscallsp), " [", hex(_g_.stack.lo), ",", hex(_g_.stack.hi), "]\n")
			throw("entersyscall")
		})
	}

	if trace.enabled {
		systemstack(traceGoSysCall)
		// systemstack itself clobbers g.sched.{pc,sp} and we might
		// need them later when the G is genuinely blocked in a
		// syscall
		save(pc, sp)
	}

	if atomic.Load(&sched.sysmonwait) != 0 {
		systemstack(entersyscall_sysmon)
		save(pc, sp)
	}

	if _g_.m.p.ptr().runSafePointFn != 0 {
		// runSafePointFn may stack split if run on this stack
		systemstack(runSafePointFn)
		save(pc, sp)
	}
	//设置相关状态
	_g_.m.syscalltick = _g_.m.p.ptr().syscalltick
	_g_.sysblocktraced = true
	_g_.m.mcache = nil
	pp := _g_.m.p.ptr()
	pp.m = 0
	_g_.m.oldp.set(pp)
	_g_.m.p = 0
	atomic.Store(&pp.status, _Psyscall)
	if sched.gcwaiting != 0 {
		systemstack(entersyscall_gcwait)
		save(pc, sp)
	}

	_g_.m.locks--
}

func entersyscall_sysmon() {
	lock(&sched.lock)
	if atomic.Load(&sched.sysmonwait) != 0 {
		atomic.Store(&sched.sysmonwait, 0)
		notewakeup(&sched.sysmonnote)
	}
	unlock(&sched.lock)
}
|
- 禁止线程上发生的抢占,防止出现内存不一致的问题;
- 保证当前函数不会触发栈分裂或者增长;
- 保存当前的程序计数器 PC 和栈指针 SP 中的内容;
- 将 Goroutine 的状态更新至 _Gsyscall;
- 将 Goroutine 的处理器和线程暂时分离并更新处理器的状态到 _Psyscall;
- 释放当前线程上的锁;
需要注意的是 runtime.reentersyscall 方法会使处理器和线程的分离,当前线程会陷入系统调用等待返回,当前线程上的锁被释放后,会有其他 Goroutine 抢占处理器资源。
监控线程sysmon对syscall非常重要,因为它负责将因系统调用而长时间阻塞的P抢回,判断是否需要handoffp,用于执行其他任务.否则,整体性能会严重下降,甚至整个进程都会被冻结.
某些系统调用本身就可以确定长时间阻塞(比如锁),那么它会选择执行entersyscallblock主动交出所关联的P
1
2
3
4
5
6
7
8
9
10
11
12
13
14
15
16
17
18
19
20
21
22
23
24
25
26
27
28
29
30
31
32
33
34
35
36
37
38
39
40
41
42
43
44
45
46
47
48
49
50
51
|
// The same as entersyscall(), but with a hint that the syscall is blocking.
//go:nosplit
func entersyscallblock() {
_g_ := getg()
_g_.m.locks++ // see comment in entersyscall
_g_.throwsplit = true
_g_.stackguard0 = stackPreempt // see comment in entersyscall
_g_.m.syscalltick = _g_.m.p.ptr().syscalltick
_g_.sysblocktraced = true
_g_.m.p.ptr().syscalltick++
// Leave SP around for GC and traceback.
pc := getcallerpc()
sp := getcallersp()
save(pc, sp)
_g_.syscallsp = _g_.sched.sp
_g_.syscallpc = _g_.sched.pc
if _g_.syscallsp < _g_.stack.lo || _g_.stack.hi < _g_.syscallsp {
sp1 := sp
sp2 := _g_.sched.sp
sp3 := _g_.syscallsp
systemstack(func() {
print("entersyscallblock inconsistent ", hex(sp1), " ", hex(sp2), " ", hex(sp3), " [", hex(_g_.stack.lo), ",", hex(_g_.stack.hi), "]\n")
throw("entersyscallblock")
})
}
casgstatus(_g_, _Grunning, _Gsyscall)
if _g_.syscallsp < _g_.stack.lo || _g_.stack.hi < _g_.syscallsp {
systemstack(func() {
print("entersyscallblock inconsistent ", hex(sp), " ", hex(_g_.sched.sp), " ", hex(_g_.syscallsp), " [", hex(_g_.stack.lo), ",", hex(_g_.stack.hi), "]\n")
throw("entersyscallblock")
})
}
systemstack(entersyscallblock_handoff)
// Resave for traceback during blocked call.
save(getcallerpc(), getcallersp())
_g_.m.locks--
}
func entersyscallblock_handoff() {
if trace.enabled {
traceGoSysCall()
traceGoSysBlock(getg().m.p.ptr())
}
//释放P,让他去执行其他任务
handoffp(releasep())
}
|
exitsyscall
当系统调用结束后,会调用退出系统调用的函数 runtime.exitsyscall 为当前 Goroutine 重新分配资源,该函数有两个不同的执行路径:
- 调用 exitsyscallfast 函数;
- 切换至调度器的 Goroutine 并调用 exitsyscall0 函数:
这两种不同的路径会分别通过不同的方法查找一个用于执行当前 Goroutine 处理器 P
快速路径 exitsyscallfast 中包含两个不同的分支:
- 如果 Goroutine 的原处理器处于 _Psyscall 状态,就会直接调用 wirep 将 Goroutine 与处理器进行关联;
- 如果调度器中存在闲置的处理器,就会调用 acquirep 函数使用闲置的处理器处理当前 Goroutine;
另一个相对较慢的路径 exitsyscall0 就会将当前 Goroutine 切换至 _Grunnable 状态,并移除线程 M 和当前 Goroutine 的关联:
- 当我们通过 pidleget 获取到闲置的处理器时就会在该处理器上执行 Goroutine;
- 在其它情况下,我们会将当前 Goroutine 放到全局的运行队列中,等待调度器的调度;
无论哪种情况,我们在这个函数中都会调用 schedule 函数触发调度器的调度.
从系统调用返回时,必须检查P是否依然可用,因为可能已被sysmon抢走
1
2
3
4
5
6
7
8
9
10
11
12
13
14
15
16
17
18
19
20
21
22
23
24
25
26
27
28
29
30
31
32
33
34
35
36
37
38
39
40
41
42
43
44
45
46
47
48
49
50
51
52
53
54
55
56
57
58
59
60
61
62
63
64
65
66
67
68
69
70
71
72
73
74
75
76
77
78
79
80
81
82
83
84
85
86
87
88
|
// The goroutine g exited its system call.
// Arrange for it to run on a cpu again.
// This is called only from the go syscall library, not
// from the low-level system calls used by the runtime.
//
// Write barriers are not allowed because our P may have been stolen.
//
//go:nosplit
//go:nowritebarrierrec
func exitsyscall() {
_g_ := getg()
_g_.m.locks++ // see comment in entersyscall
if getcallersp() > _g_.syscallsp {
throw("exitsyscall: syscall frame is no longer valid")
}
_g_.waitsince = 0
oldp := _g_.m.oldp.ptr()
_g_.m.oldp = 0
if exitsyscallfast(oldp) {
if _g_.m.mcache == nil {
throw("lost mcache")
}
if trace.enabled {
if oldp != _g_.m.p.ptr() || _g_.m.syscalltick != _g_.m.p.ptr().syscalltick {
systemstack(traceGoStart)
}
}
// There's a cpu for us, so we can run.
_g_.m.p.ptr().syscalltick++
// We need to cas the status and scan before resuming...
casgstatus(_g_, _Gsyscall, _Grunning)
// Garbage collector isn't running (since we are),
// so okay to clear syscallsp.
_g_.syscallsp = 0
_g_.m.locks--
if _g_.preempt {
// restore the preemption request in case we've cleared it in newstack
_g_.stackguard0 = stackPreempt
} else {
// otherwise restore the real _StackGuard, we've spoiled it in entersyscall/entersyscallblock
_g_.stackguard0 = _g_.stack.lo + _StackGuard
}
_g_.throwsplit = false
if sched.disable.user && !schedEnabled(_g_) {
// Scheduling of this goroutine is disabled.
Gosched()
}
return
}
_g_.sysexitticks = 0
if trace.enabled {
// Wait till traceGoSysBlock event is emitted.
// This ensures consistency of the trace (the goroutine is started after it is blocked).
for oldp != nil && oldp.syscalltick == _g_.m.syscalltick {
osyield()
}
// We can't trace syscall exit right now because we don't have a P.
// Tracing code can invoke write barriers that cannot run without a P.
// So instead we remember the syscall exit time and emit the event
// in execute when we have a P.
_g_.sysexitticks = cputicks()
}
_g_.m.locks--
// Call the scheduler.
mcall(exitsyscall0)
if _g_.m.mcache == nil {
throw("lost mcache")
}
// Scheduler returned, so we're allowed to run now.
// Delete the syscallsp information that we left for
// the garbage collector during the system call.
// Must wait until now because until gosched returns
// we don't know for sure that the garbage collector
// is not running.
_g_.syscallsp = 0
_g_.m.p.ptr().syscalltick++
_g_.throwsplit = false
}
|
快速退出exitsyscallfast是指能重新绑定原有或空闲的P,以继续当前G任务的执行.
1
2
3
4
5
6
7
8
9
10
11
12
13
14
15
16
17
18
19
20
21
22
23
24
25
26
27
28
29
30
31
32
33
34
35
36
37
38
39
40
41
42
43
44
45
46
47
48
49
50
51
52
53
54
55
56
57
58
59
60
|
//go:nosplit
func exitsyscallfast(oldp *p) bool {
_g_ := getg()
// Freezetheworld sets stopwait but does not retake P's.
//STW状态,就不要继续了
if sched.stopwait == freezeStopWait {
return false
}
// Try to re-acquire the last P.
//尝试关联原本的P
if oldp != nil && oldp.status == _Psyscall && atomic.Cas(&oldp.status, _Psyscall, _Pidle) {
// There's a cpu for us, so we can run.
wirep(oldp)
exitsyscallfast_reacquired()
return true
}
// Try to get any other idle P.
//获取其他空闲P
if sched.pidle != 0 {
var ok bool
systemstack(func() {
ok = exitsyscallfast_pidle()
if ok && trace.enabled {
if oldp != nil {
// Wait till traceGoSysBlock event is emitted.
// This ensures consistency of the trace (the goroutine is started after it is blocked).
for oldp.syscalltick == _g_.m.syscalltick {
osyield()
}
}
traceGoSysExit(0)
}
})
if ok {
return true
}
}
return false
}
func exitsyscallfast_pidle() bool {
lock(&sched.lock)
_p_ := pidleget()
//唤醒sysmon
if _p_ != nil && atomic.Load(&sched.sysmonwait) != 0 {
atomic.Store(&sched.sysmonwait, 0)
notewakeup(&sched.sysmonnote)
}
unlock(&sched.lock)
//重新关联
if _p_ != nil {
acquirep(_p_)
return true
}
return false
}
|
如果多次尝试绑定P却失败,那么只能将当前任务放入待运行队列.
1
2
3
4
5
6
7
8
9
10
11
12
13
14
15
16
17
18
19
20
21
22
23
24
25
26
27
28
29
30
31
32
33
34
35
36
37
38
|
// exitsyscall slow path on g0.
// Failed to acquire P, enqueue gp as runnable.
//
//go:nowritebarrierrec
func exitsyscall0(gp *g) {
_g_ := getg()
//修改状态,解除和M的关联
casgstatus(gp, _Gsyscall, _Grunnable)
dropg()
lock(&sched.lock)
//再次获取空闲P
var _p_ *p
if schedEnabled(_g_) {
_p_ = pidleget()
}
if _p_ == nil {
//获取失败,放回全局任务队列
globrunqput(gp)
} else if atomic.Load(&sched.sysmonwait) != 0 {
atomic.Store(&sched.sysmonwait, 0)
notewakeup(&sched.sysmonnote)
}
unlock(&sched.lock)
//再次检查P,以便执行当前任务
if _p_ != nil {
acquirep(_p_)
execute(gp, false) // Never returns.
}
if _g_.m.lockedg != 0 {
// Wait until another thread schedules gp and so m again.
stoplockedm()
execute(gp, false) // Never returns.
}
//关联P失败,休眠当前M
stopm()
schedule() // Never returns.
}
|
重新调度
当调度函数schedule检查到locked属性时,会适时移交,让正确的M去完成任务.
简单地说,就是lockedm会休眠,直到某人将lockedg交给它.而不幸拿到lockedg的M,则要将lockedg连同P一起传递给lockedm,还负责将其唤醒.至于它自己,则因失去P而被迫休眠,直到wakep带着新的P唤醒它
-
调度时发现当前M被某个g锁定了。调度器就会调用stoplockedm函数停止当前M。stoplockedm函数会先解除当前M与本地P的关联,并通过handoffp函数将这个P转手给其他M。hanfoffp函数会判断这个P是否有继续工作的必要,如果有,就调用startm函数唤醒一个M与该P关联,如无必要,就直接将该P放入空闲P列表。一旦P被转手,stoplockedm函数就会停止当前M的执行,并等待被唤醒。
-
当调度器为当前M找到一个可运行的G,但发现该G已经被某个M锁定了,就会调用startlockedm函数并将这个G作为参数传入。startlockedm函数会通过参数gp找到与这个G锁定的M,并强行把当前M的本地P转手给与该G锁定的M。这里的转手并不是调用handoffp函数,而是直接先解除当前M与本地P的关联,然后把这个P付给与该G锁定的M的nextp字段,将它们预联。之后startlockedm函数会调用notewakeup函数唤醒锁定的M,一旦M被唤醒,之前的预联就会变成关联,那么G也会被执行。最后,startlockedm函数还会调用stopm函数停止当前M。
1
2
3
4
5
6
7
8
9
10
11
12
13
14
15
16
17
18
19
20
21
22
23
24
25
26
27
28
29
30
31
32
33
34
35
36
37
38
|
// One round of scheduler: find a runnable goroutine and execute it.
// Never returns.
// 执行一轮调度器的工作:找到一个 runnable 的 goroutine,并且执行它
// 永不返回
func schedule() {
_g_ := getg()
if _g_.m.locks != 0 {
throw("schedule: holding locks")
}
//如果当前M是lockedm,那么休眠
//没有立即execute(lockedg),是因为该lockedg此时可能被其他M获取
//兴许是中途用gosched暂时让出P,进入待运行队列
// 在调度开始,判断当前M是否已被锁定。如果当前M已和某个G锁定,立即停止调度,并停止当前M
//(让它阻塞),直到与它锁定的G处于可运行状态时,才会被唤醒并继续运行锁定的G。停止当前M
// 后,相关内核线程就不能再做其他事了,调度器也不再为这个M寻找可运行的G。
if _g_.m.lockedg != 0 {
stoplockedm()
execute(_g_.m.lockedg.ptr(), false) // Never returns.
}
...
//如果获取到的G是lockedg,那么将其连同P交给lockedm去执行
//休眠,等待唤醒后重新获取可用G
//找到的可运行G与某个M锁定。唤醒锁定的M来运行该G,然后继续为当前M寻找可运行G。
//goto top会回到第3步继续执行。
if gp.lockedm != 0 {
// Hands off own p to the locked m,
// then blocks waiting for a new p.
startlockedm(gp)//唤醒与gp锁定的M来执行gp
goto top
}
// 执行 goroutine 任务函数
// 当前运行的是 runtime 的代码,函数调用栈使用的是 g0 的栈空间
// 调用 execute 切换到 gp 的代码和栈空间去运行
execute(gp, inheritTime)
}
|
1
2
3
4
5
6
7
8
9
10
11
12
13
14
15
16
17
18
19
20
21
22
23
24
25
26
|
// 停止当前正在执行锁住的 g 的 m 的执行,直到 g 重新变为 runnable。
// 返回获得的 P
func stoplockedm() {
_g_ := getg()
if _g_.m.lockedg == 0 || _g_.m.lockedg.ptr().lockedm.ptr() != _g_.m {
throw("stoplockedm: inconsistent locking")
}
if _g_.m.p != 0 {
// 调度其他 M 来运行此 P
_p_ := releasep()
handoffp(_p_)
}
incidlelocked(1)
// 等待直到其他线程可以再次调度 lockedg
notesleep(&_g_.m.park)
noteclear(&_g_.m.park)
status := readgstatus(_g_.m.lockedg.ptr())
if status&^_Gscan != _Grunnable {
print("runtime:stoplockedm: g is not Grunnable or Gscanrunnable\n")
dumpgstatus(_g_)
throw("stoplockedm: not runnable")
}
acquirep(_g_.m.nextp.ptr())
_g_.m.nextp = 0
}
|
1
2
3
4
5
6
7
8
9
10
11
12
13
14
15
16
17
18
19
20
|
// Schedules the locked m to run the locked gp.
// May run during STW, so write barriers are not allowed.
//go:nowritebarrierrec
func startlockedm(gp *g) {
_g_ := getg()
mp := gp.lockedm.ptr()
if mp == _g_.m {
throw("startlockedm: locked to me")
}
if mp.nextp != 0 {
throw("startlockedm: m has p")
}
// directly handoff current P to the locked m
incidlelocked(-1)
_p_ := releasep()
mp.nextp.set(_p_)
notewakeup(&mp.park)
stopm()
}
|
从中可以看出,除lockedg只能由lockedm执行外,lockedm在完成任务或主动解除锁定前也不会执行其他任务.
触发时机
同步系统调用
提供给用户使用的系统调用,基本都会通知 runtime,以 entersyscall,exitsyscall 的形式来告诉 runtime,在这个 syscall 阻塞的时候,由 runtime 判断是否把 P 腾出来给其它的 M 用。解绑定指的是把 M 和 P 之间解绑,如果绑定被解除,在 syscall 返回时,这个 g 会被放入执行队列 runq 中。
同时 runtime 又保留了自己的特权,在执行自己的逻辑的时候,我的 P 不会被调走,这样保证了在 Go 自己“底层”使用的这些 syscall 返回之后都能被立刻处理。
所以同样是 epollwait,runtime 用的是不能被别人打断的,你用的 syscall.EpollWait 那显然是没有这种特权的。
CGO
CGO也会触发系统态的阻塞
抢占式调度
如果某个 G 执行时间过长,其他的 G 如何才能被正常的调度?我们需要进行抢占式调度.
我们知道现代操作系统的调度器多为抢占式调度,其实现方式通过硬件中断来支持线程的切换, 进而能安全的保存运行上下文。在 Go 运行时实现抢占式调度同样也可以使用类似的方式,通过 向线程发送系统信号的方式来中断 M 的执行,进而达到抢占的目的。 但与操作系统的不同之处在于,由于运行时诸多机制的存在(例如垃圾回收器),还必须能够在 Goroutine 被停止时,保存充足的上下文信息。 这就给中断信号带来了麻烦,如果中断信号恰好发生在一些关键阶段(例如写屏障期间), 则无法保证程序的正确性。这也就要求我们需要严格考虑触发异步抢占的时机。
异步抢占式调度的一种方式就与运行时系统监控有关,监控循环会将发生阻塞的 Goroutine 抢占, 解绑 P 与 M,从而让其他的线程能够获得 P 继续执行其他的 Goroutine。 这得益于 sysmon 中调用的 retake 方法。这个方法处理了两种抢占情况, 一是抢占阻塞在系统调用上的 P,二是抢占运行时间过长的 G。 其中抢占运行时间过长的 G 这一方式还会出现在垃圾回收需要进入 STW 时。
协作式抢占调度
协作式抢占调度的工作原理:
- 编译器会在调用函数前插入 runtime.morestack;
- Go 语言运行时会在垃圾回收暂停程序、系统监控发现 Goroutine 运行超过 10ms 时发出抢占请求 StackPreempt;
- 当发生函数调用时,可能会执行编译器插入的 runtime.morestack 函数,它调用的 runtime.newstack 会检查 Goroutine 的 stackguard0 字段是否为 StackPreempt;
- 如果 stackguard0 是 StackPreempt,就会触发抢占让出当前线程;
这种实现方式虽然增加了运行时的复杂度,但是实现相对简单,也没有带来过多的额外开销,总体来看还是比较成功的实现,也在 Go 语言中使用了 10 几个版本。因为这里的抢占是通过编译器插入函数实现的,还是需要函数调用作为入口才能触发抢占,所以这是一种协作式的抢占式调度。
preemptone
preemptone 本质是将正在 P 上执行的 M 的 curg 的标志位置为 true.这之后的流程需要正在运行的 goroutine 来配合.
调用preemptone函数抢占该P,这也是go抢占式调度的体现。不过该函数只能告知在这个P上运行的G应该停止了。首先它不一定能正确的告知正确的G,其次即使告知被正确传递给了正确的G,这个G也可能忽略掉这个告知。也就是说preemptone函数只能告诉你我尽力而为,既不能保证告知正确到达,也不能保证那个G做出相应。
1
2
3
4
5
6
7
8
9
10
11
12
13
14
15
16
17
18
19
20
21
22
23
24
25
26
27
28
29
30
31
32
33
34
35
36
37
38
39
40
41
42
43
|
// Tell the goroutine running on processor P to stop.
// This function is purely best-effort. It can incorrectly fail to inform the
// goroutine. It can send inform the wrong goroutine. Even if it informs the
// correct goroutine, that goroutine might ignore the request if it is
// simultaneously executing newstack.
// No lock needs to be held.
// Returns true if preemption request was issued.
// The actual preemption will happen at some point in the future
// and will be indicated by the gp->status no longer being
// Grunning
func preemptone(_p_ *p) bool {
// 检查 M 与 P 是否绑定
mp := _p_.m.ptr()
if mp == nil || mp == getg().m {
return false
}
gp := mp.curg
if gp == nil || gp == mp.g0 {
return false
}
// 将 G 标记为抢占
gp.preempt = true
// Every call in a go routine checks for stack overflow by
// comparing the current stack pointer to gp->stackguard0.
// Setting gp->stackguard0 to StackPreempt folds
// preemption into the normal stack overflow check.
// 一个 Goroutine 中的每个调用都会通过比较当前栈指针和 gp.stackgard0
// 来检查栈是否溢出。
// 设置 gp.stackgard0 为 StackPreempt 来将抢占转换为正常的栈溢出检查。
// 在 goroutine 内部的每次调用都会比较栈顶指针和 g.stackguard0,
// 来判断是否发生了栈溢出。stackPreempt 非常大的一个数,比任何栈都大
gp.stackguard0 = stackPreempt
// Request an async preemption of this P.
// 请求该 P 的异步抢占
if preemptMSupported && debug.asyncpreemptoff == 0 {
_p_.preempt = true
preemptM(mp)
}
return true
}
|
有两个标志,实际起作用的是G.stackguard0. G.preempt只是后备,以便在stackguard()做回溢出检查标志时,依然可用preempt恢复抢占状态.
morestack
当morestack调用newstack扩容时会检查抢占标志,并决定是否暂停当前任务,当然这发生在实际扩容之前.
go程序在执行G的每次函数调用时,都会通过比较当前堆栈指针和G的stackguard0字段来判断栈溢出。这里将当前G的stackguard0字段赋值为stackPreempt就会该G在下一次函数调用时栈空间检查失败,接下来就是一些列的函数调用,最终将这个G调度出去。
在讲述这一些列函数调用之前,我们先来认识一下stackPreempt。
它是在stack.go中定义的一个常量。在64位机器上,stackPreempt的值是0xfffffffffffffade,在32位机器上它的值是0xfffffade。表示的是栈指针sp的最大值,所以现在你知道为什么将stackguard0的值设置成它就能导致栈溢出了吧。它的计算出来需要用到uintptrMask,它是一个指针掩码,也就是一个所有位全为1的指针,32位机器上是0xffffffff,64位机器上是0xffffffffffffffff。在计算uintptrMask时用到的sys.PtrSize在sys包中的stubs.go文件中定义。^uintptr(0)得到的是一个各位都为1的值,32位机器上就是32个1,64位机器上就是64个1。左移63位后,如果是32位机器,结果就是0,接下来4右移0位还是4;64位机器结果是1,4右移1位后结果是8。所以PtrSize表示的就是一个指针长度的字节数。而一个字节的长度是8,所以在计算uintptrMask时用8乘以sys.PtrSize得到的就是一个指针的位数。
1
2
3
4
5
6
7
8
9
10
11
12
|
/* stack.go */
// Goroutine 抢占请求
// 存储到 g.stackguard0 来导致栈分段检查失败
// 必须比任何实际的 SP 都要大
// 十六进制为:0xfffffade
const (
uintptrMask = 1<<(8*sys.PtrSize) - 1
stackPreempt = uintptrMask & -1314
)
/* package sys */
const PtrSize = 4 << (^uintptr(0) >> 63)
|
举一个简单的例子:
1
2
3
4
5
6
7
|
package main
import "fmt"
func main() {
fmt.Println("hello")
}
|
执行命令:
1
|
go tool compile -S main.go
|
得到汇编代码:
1
2
3
4
5
6
7
8
9
10
11
12
13
14
15
16
17
18
19
20
21
22
23
24
25
26
27
28
29
|
"".main STEXT size=120 args=0x0 locals=0x48
0x0000 00000 (test26.go:5) TEXT "".main(SB), $72-0
0x0000 00000 (test26.go:5) MOVQ (TLS), CX
0x0009 00009 (test26.go:5) CMPQ SP, 16(CX)
0x000d 00013 (test26.go:5) JLS 113
0x000f 00015 (test26.go:5) SUBQ $72, SP
0x0013 00019 (test26.go:5) MOVQ BP, 64(SP)
0x0018 00024 (test26.go:5) LEAQ 64(SP), BP
0x001d 00029 (test26.go:5) FUNCDATA $0, gclocals·69c1753bd5f81501d95132d08af04464(SB)
0x001d 00029 (test26.go:5) FUNCDATA $1, gclocals·e226d4ae4a7cad8835311c6a4683c14f(SB)
0x001d 00029 (test26.go:6) MOVQ $0, ""..autotmp_0+48(SP)
0x0026 00038 (test26.go:6) MOVQ $0, ""..autotmp_0+56(SP)
0x002f 00047 (test26.go:6) LEAQ type.string(SB), AX
0x0036 00054 (test26.go:6) MOVQ AX, ""..autotmp_0+48(SP)
0x003b 00059 (test26.go:6) LEAQ "".statictmp_0(SB), AX
0x0042 00066 (test26.go:6) MOVQ AX, ""..autotmp_0+56(SP)
0x0047 00071 (test26.go:6) LEAQ ""..autotmp_0+48(SP), AX
0x004c 00076 (test26.go:6) MOVQ AX, (SP)
0x0050 00080 (test26.go:6) MOVQ $1, 8(SP)
0x0059 00089 (test26.go:6) MOVQ $1, 16(SP)
0x0062 00098 (test26.go:6) PCDATA $0, $1
0x0062 00098 (test26.go:6) CALL fmt.Println(SB)
0x0067 00103 (test26.go:7) MOVQ 64(SP), BP
0x006c 00108 (test26.go:7) ADDQ $72, SP
0x0070 00112 (test26.go:7) RET
0x0071 00113 (test26.go:7) NOP
0x0071 00113 (test26.go:5) PCDATA $0, $-1
0x0071 00113 (test26.go:5) CALL runtime.morestack_noctxt(SB)
0x0076 00118 (test26.go:5) JMP 0
|
1
|
0x0000 00000 (test26.go:5) MOVQ (TLS), CX
|
将本地存储 tls 保存到 CX 寄存器中,(TLS)表示它所关联的 g,这里就是前面所讲到的 main gouroutine。
1
|
0x0009 00009 (test26.go:5) CMPQ SP, 16(CX)
|
比较 SP 寄存器(代表当前 main goroutine 的栈顶寄存器)和 16(CX),我们看下 g 结构体:
1
2
3
4
5
6
7
|
type g struct {
// goroutine 使用的栈
stack stack // offset known to runtime/cgo
// 用于栈的扩张和收缩检查
stackguard0 uintptr // offset known to liblink
// ……………………
}
|
对象 g 的第一个字段是 stack 结构体:
1
2
3
4
|
type stack struct {
lo uintptr
hi uintptr
}
|
共 16 字节。而 16(CX) 表示 g 对象的第 16 个字节,跳过了 g 的第一个字段,也就是 g.stackguard0 字段。
如果 SP 小于 g.stackguard0,这是必然的,因为前面已经把 g.stackguard0 设置成了一个非常大的值,因此跳转到了 113 行。
1
2
3
4
|
0x0071 00113 (test26.go:7) NOP
0x0071 00113 (test26.go:5) PCDATA $0, $-1
0x0071 00113 (test26.go:5) CALL runtime.morestack_noctxt(SB)
0x0076 00118 (test26.go:5) JMP 0
|
调用 runtime.morestack_noctxt 函数:
1
2
3
4
|
// src/runtime/asm_amd64.s
TEXT runtime·morestack_noctxt(SB),NOSPLIT,$0
MOVL $0, DX
JMP runtime·morestack(SB)
|
直接跳转到 morestack 函数:
1
2
3
4
5
6
7
8
9
10
11
12
13
14
15
16
17
18
19
20
21
22
23
24
25
26
27
28
29
30
31
32
33
34
35
36
37
38
39
40
41
42
43
44
45
46
|
TEXT runtime·morestack(SB),NOSPLIT,$0-0
// Cannot grow scheduler stack (m->g0).
get_tls(CX)
// BX = g,g 表示 main goroutine
MOVQ g(CX), BX
// BX = g.m
MOVQ g_m(BX), BX
// SI = g.m.g0
MOVQ m_g0(BX), SI
CMPQ g(CX), SI
JNE 3(PC)
CALL runtime·badmorestackg0(SB)
INT $3
// ……………………
// Set g->sched to context in f.
// 将函数的返回地址保存到 AX 寄存器
MOVQ 0(SP), AX // f's PC
// 将函数的返回地址保存到 g.sched.pc
MOVQ AX, (g_sched+gobuf_pc)(SI)
// g.sched.g = g
MOVQ SI, (g_sched+gobuf_g)(SI)
// 取地址操作符,调用 morestack_noctxt 之前的 rsp
LEAQ 8(SP), AX // f's SP
// 将 main 函数的栈顶地址保存到 g.sched.sp
MOVQ AX, (g_sched+gobuf_sp)(SI)
// 将 BP 寄存器保存到 g.sched.bp
MOVQ BP, (g_sched+gobuf_bp)(SI)
// newstack will fill gobuf.ctxt.
// Call newstack on m->g0's stack.
// BX = g.m.g0
MOVQ m_g0(BX), BX
// 将 g0 保存到本地存储 tls
MOVQ BX, g(CX)
// 把 g0 栈的栈顶寄存器的值恢复到 CPU 的寄存器 SP,达到切换栈的目的,下面这一条指令执行之前,
// CPU 还是使用的调用此函数的 g 的栈,执行之后 CPU 就开始使用 g0 的栈了
MOVQ (g_sched+gobuf_sp)(BX), SP
// 准备参数
PUSHQ DX // ctxt argument
// 不返回
CALL runtime·newstack(SB)
MOVQ $0, 0x1003 // crash if newstack returns
POPQ DX // keep balance check happy
RET
|
主要做的工作就是将当前 goroutine,也就是 main goroutine 的和调度相关的信息保存到 g.sched 中,以便在调度到它执行时,可以恢复。
最后,将 g0 的地址保存到 tls 本地存储,并且切到 g0 栈执行之后的代码。继续调用 newstack 函数:
1
2
3
4
5
6
7
8
9
10
11
12
13
14
15
16
17
18
19
20
21
22
23
24
25
26
27
28
29
30
31
32
33
34
35
36
37
38
39
40
41
42
43
44
45
46
47
48
49
50
51
52
53
54
55
56
57
58
59
60
61
62
63
|
func newstack() {
...
// NOTE: stackguard0 may change underfoot, if another thread
// is about to try to preempt gp. Read it just once and use that same
// value now and below.
// 如果是发起的抢占请求而非真正的栈分段
preempt := atomic.Loaduintptr(&gp.stackguard0) == stackPreempt
// Be conservative about where we preempt.
// We are interested in preempting user Go code, not runtime code.
// If we're holding locks, mallocing, or preemption is disabled, don't
// preempt.
// This check is very early in newstack so that even the status change
// from Grunning to Gwaiting and back doesn't happen in this case.
// That status change by itself can be viewed as a small preemption,
// because the GC might change Gwaiting to Gscanwaiting, and then
// this goroutine has to wait for the GC to finish before continuing.
// If the GC is in some way dependent on this goroutine (for example,
// it needs a lock held by the goroutine), that small preemption turns
// into a real deadlock.
// 保守的对用户态代码进行抢占,而非抢占运行时代码
// 如果正持有锁、分配内存或抢占被禁用,则不发生抢占
// gopreempt_m 将当前的 goroutine 放进了全局队列
if preempt {
if !canPreemptM(thisg.m) {
// Let the goroutine keep running for now.
// gp->preempt is set, so it will be preempted next time.
//stackguard0恢复溢出检查用途,下次用G.preempt恢复
// 还原 stackguard0 为正常值,表示我们已经处理过抢占请求了
gp.stackguard0 = gp.stack.lo + _StackGuard
// 不抢占,调用 gogo 继续运行当前这个 g,不需要调用 schedule 函数去挑选另一个 goroutine
gogo(&gp.sched) // never return
}
}
...
// 如果需要对栈进行调整
if preempt {
//垃圾回收本身也算一次抢占,忽略本次抢占调度
if gp == thisg.m.g0 {
throw("runtime: preempt g0")
}
if thisg.m.p == 0 && thisg.m.locks == 0 {
throw("runtime: g is running but p is not")
}
if gp.preemptShrink {
// 我们正在一个同步安全点,因此等待栈收缩
// We're at a synchronous safe point now, so
// do the pending stack shrink.
gp.preemptShrink = false
shrinkstack(gp)
}
if gp.preemptStop {
preemptPark(gp) // never returns
}
// 调用 gopreempt_m 把 gp 切换出去
// Act like goroutine called runtime.Gosched.
// 表现得像是调用了 runtime.Gosched,主动让权
gopreempt_m(gp) // never return
}
...
}
|
canPreemptM
canPreemptM 验证了可以被抢占的条件:
- 运行时没有禁止抢占(m.locks == 0)
- 运行时没有在执行内存分配(m.mallocing == 0)
- 运行时没有关闭抢占机制(m.preemptoff == “")
- M 与 P 绑定且没有进入系统调用(p.status == _Prunning)
1
2
3
4
5
6
|
// canPreemptM 报告 mp 是否处于可抢占的安全状态。
//go:nosplit
func canPreemptM(mp *m) bool {
//如果M持有锁,或者正在进行内存分配,垃圾回收等操作,不抢占,留待下次
return mp.locks == 0 && mp.mallocing == 0 && mp.preemptoff == "" && mp.p.ptr().status == _Prunning
}
|
第一次判断 preempt 标志是 true 时,检查了 g 的状态,发现不能抢占,例如它所绑定的 P 的状态不是 _Prunning,那就恢复它的 stackguard0 字段,下次就不会走这一套流程了。然后,调用 gogo(&gp.sched) 继续执行当前的 goroutine。
中间又处理了很多判断流程,再次判断 preempt 标志是 true 时,调用 gopreempt_m(gp) 将 gp 切换出去。
gopreempt_m
gopreempt_m函数在proc.go中定义,它的参数是需要停止的G。它就干了一件事,调用goschedImpl函数。
1
2
3
4
5
6
|
func gopreempt_m(gp *g) {
if trace.enabled {
traceGoPreempt()
}
goschedImpl(gp)
}
|
preemptPark
GC走的是preemptPark分支,M和G解除绑定,G暂停执行,M继续调度其他G.
1
2
3
4
5
6
7
8
9
10
11
12
13
14
15
16
17
18
19
20
21
22
23
24
|
// preemptPark parks gp and puts it in _Gpreempted.
//
//go:systemstack
func preemptPark(gp *g) {
if trace.enabled {
traceGoPark(traceEvGoBlock, 0)
}
status := readgstatus(gp)
if status&^_Gscan != _Grunning {
dumpgstatus(gp)
throw("bad g status")
}
gp.waitreason = waitReasonPreempted
// Transition from _Grunning to _Gscan|_Gpreempted. We can't
// be in _Grunning when we dropg because then we'd be running
// without an M, but the moment we're in _Gpreempted,
// something could claim this G before we've fully cleaned it
// up. Hence, we set the scan bit to lock down further
// transitions until we can dropg.
casGToPreemptScan(gp, _Grunning, _Gscan|_Gpreempted)
dropg()
casfrom_Gscanstatus(gp, _Gscan|_Gpreempted, _Gpreempted)
schedule()
}
|
goschedImpl
goschedImpl函数也在proc.go文件中,参数是要停止的G。该函数首先把这个G从Grunning状态转到Grunnable状态。然后调用dropg函数解除这个G与当前M的关联。再把这个G放入调度器的可运行G队列,最后调用schedule函数进行一轮调度,为当前P找一个新的可运行G来运行。至此抢占结束。
1
2
3
4
5
6
7
8
9
10
11
12
13
14
15
16
17
|
func goschedImpl(gp *g) {
status := readgstatus(gp)
if status&^_Gscan != _Grunning {
dumpgstatus(gp)
throw("bad g status")
}
// 更改 gp 的状态
casgstatus(gp, _Grunning, _Grunnable)
// 解除 m 和 g 的关系
dropg()
lock(&sched.lock)
// 将 gp 放入全局可运行队列
globrunqput(gp)
unlock(&sched.lock)
// 进入新一轮的调度循环
schedule()
}
|
将 gp 的状态改为 _Grunnable,放入全局可运行队列,等待下次有 m 来全局队列找工作时才能继续运行,毕竟你已经运行这么长时间了,给别人一点机会嘛。
最后,调用 schedule() 函数进入新一轮的调度循环,会找出一个 goroutine 来运行,永不返回。
从可被抢占的条件来看,能够对一个 G 进行抢占其实是呈保守状态的。 这一保守体现在抢占对很多运行时所需的条件进行了判断,这也理所当然是因为 运行时优先级更高,不应该轻易发生抢占, 但与此同时由于又需要对用户态代码进行抢占,于是先作出一次不需要抢占的判断(快速路径), 确定不能抢占时返回并继续调度,如果真的需要进行抢占,则转入调用 gopreempt_m, 放弃当前 G 的执行权,将其加入全局队列,重新进入调度循环。
什么时候会给 stackguard0 设置抢占标记 stackPreempt 呢? 一共有以下几种情况:
- 进入系统调用时(runtime.reentersyscall,注意这种情况是为了保证不会发生栈分裂, 真正的抢占是异步的通过系统监控进行的)
- 任何运行时不再持有锁的时候(m.locks == 0)
- 当垃圾回收器需要停止所有用户 Goroutine 时
信号式抢占调度
从上面提到的调度逻辑我们可以看出,这种需要用户代码来主动配合的调度方式存在 一些致命的缺陷:一个没有主动放弃执行权、且不参与任何函数调用的函数,直到执行完毕之前, 是不会被抢占的。那么这种不会被抢占的函数会导致什么严重的问题呢?回答是,由于运行时无法 停止该用户代码,则当需要进行垃圾回收时,无法及时进行;对于一些实时性要求较高的用户态 Goroutine 而言,也久久得不到调度。我们直接来看一个非常简单的例子:
1
2
3
4
5
6
7
8
9
10
11
12
13
14
15
|
// 此程序在 Go 1.14 之前的版本不会输出 OK
package main
import (
"runtime"
"time"
)
func main() {
runtime.GOMAXPROCS(1)
go func() {
for {
}
}()
time.Sleep(time.Millisecond)
println("OK")
}
|
这段代码中处于死循环的 Goroutine 永远无法被抢占,其中创建的 Goroutine 会执行一个不产生任何调用、不主动放弃执行权的死循环。由于主 Goroutine 优先调用了 休眠,此时唯一的 P 会转去执行 for 循环所创建的 Goroutine。进而主 Goroutine 永远不会再被调度,进而程序彻底阻塞在了这四个 Goroutine 上,永远无法退出.如果有多个P并发执行,此时一个P死循环,因为垃圾回收触发时无法抢占该Goroutine,垃圾回收在STW阶段会一直卡住,最终导致进程假死。这样的例子 非常多,但追根溯源,均为此问题导致
1
2
3
4
5
6
7
8
9
10
11
12
13
14
15
16
17
|
func stopTheWorldWithSema() {
...
// 如果仍有需要停止的P, 则等待它们停止
// wait for remaining P's to stop voluntarily
if wait {
for {
// wait for 100us, then try to re-preempt in case of any races
// 循环等待 + 抢占所有运行中的G
//notetsleep函数内部每隔一段时间就会返回:
if notetsleep(&sched.stopnote, 100*1000) {
noteclear(&sched.stopnote)
break
}
preemptall()
}
}
}
|
Go 语言在 1.14 版本中实现了非协作的抢占式调度,在unix和其他部分环境下可以使用.我们可以梳理一下抢占式调度过程:
- 程序启动时,在 runtime.sighandler 函数中注册 SIGURG 信号的处理函数 runtime.doSigPreempt;
- 在触发垃圾回收的栈扫描时会调用 runtime.suspendG 挂起 Goroutine,该函数会执行下面的逻辑:
- 将 _Grunning 状态的 Goroutine 标记成可以被抢占,即将 preemptStop 设置成 true;
- 调用 runtime.preemptM 触发抢占;
- runtime.preemptM 会调用 runtime.signalM 向线程发送信号 SIGURG;
- 操作系统会中断正在运行的线程并执行预先注册的信号处理函数 runtime.doSigPreempt;
- runtime.doSigPreempt 函数会处理抢占信号,获取当前的 SP 和 PC 寄存器并调用 runtime.sigctxt.pushCall;
- runtime.sigctxt.pushCall 会修改寄存器并在程序回到用户态时执行 runtime.asyncPreempt;
- 汇编指令 runtime.asyncPreempt 会调用运行时函数 runtime.asyncPreempt2;
- runtime.asyncPreempt2 会调用 runtime.preemptPark;
- runtime.preemptPark 会修改当前 Goroutine 的状态到_Gpreempted 并调用 runtime.schedule 让当前函数陷入休眠并让出线程,调度器会选择其它的 Goroutine 继续执行;
1
2
3
4
5
6
7
8
9
10
11
12
13
14
15
16
17
18
19
20
21
22
|
// unix环境下为true
const preemptMSupported = true
// Tell the goroutine running on processor P to stop.
// This function is purely best-effort. It can incorrectly fail to inform the
// goroutine. It can send inform the wrong goroutine. Even if it informs the
// correct goroutine, that goroutine might ignore the request if it is
// simultaneously executing newstack.
// No lock needs to be held.
// Returns true if preemption request was issued.
// The actual preemption will happen at some point in the future
// and will be indicated by the gp->status no longer being
// Grunning
func preemptone(_p_ *p) bool {
...
// Request an async preemption of this P.
// 请求该 P 的异步抢占
if preemptMSupported && debug.asyncpreemptoff == 0 {
_p_.preempt = true
preemptM(mp)
}
return true
}
|
SIGURG
除了分析抢占的过程之外,我们还需要讨论一下抢占信号的选择,提案根据以下的四个原因选择 SIGURG 作为触发异步抢占的信号;
- 该信号需要被调试器透传;
- 该信号不会被内部的 libc 库使用并拦截;
- 该信号可以随意出现并且不触发任何后果;
- 我们需要处理多个平台上的不同信号;
preemptM 完成了信号的发送,其实现也非常直接,直接向需要进行抢占的 M 发送 SIGURG 信号 即可。但是真正的重要的问题是,为什么是 SIGURG 信号而不是其他的信号?如何才能保证该信号 不与用户态产生的信号产生冲突?这里面有几个原因:
- 默认情况下,SIGURG 已经用于调试器传递信号。
- SIGURG 可以不加选择地虚假发生的信号。例如,我们不能选择 SIGALRM,因为 信号处理程序无法分辨它是否是由实际过程引起的(可以说这意味着信号已损坏)。 而常见的用户自定义信号 SIGUSR1 和 SIGUSR2 也不够好,因为用户态代码可能会将其进行使用
- 需要处理没有实时信号的平台(例如 macOS)
考虑以上的观点,SIGURG 其实是一个很好的、满足所有这些条件、且极不可能因被用户态代码 进行使用的一种信号。
preemptM
1
2
3
4
5
6
7
8
9
10
11
12
13
14
15
16
17
18
19
20
21
22
23
24
25
26
27
28
29
30
31
32
33
34
35
36
37
38
|
const sigPreempt = _SIGURG
// preemptM 向 mp 发送抢占请求。该请求可以异步处理,也可以与对 M 的其他请求合并。
// 接收到该请求后,如果正在运行的 G 或 P 被标记为抢占,并且 Goroutine 处于异步安全点,
// 它将抢占 Goroutine。在处理抢占请求后,它始终以原子方式递增 mp.preemptGen。
// preemptM sends a preemption request to mp. This request may be
// handled asynchronously and may be coalesced with other requests to
// the M. When the request is received, if the running G or P are
// marked for preemption and the goroutine is at an asynchronous
// safe-point, it will preempt the goroutine. It always atomically
// increments mp.preemptGen after handling a preemption request.
func preemptM(mp *m) {
// On Darwin, don't try to preempt threads during exec.
// Issue #41702.
if GOOS == "darwin" || GOOS == "ios" {
execLock.rlock()
}
if atomic.Cas(&mp.signalPending, 0, 1) {
if GOOS == "darwin" || GOOS == "ios" {
atomic.Xadd(&pendingPreemptSignals, 1)
}
// If multiple threads are preempting the same M, it may send many
// signals to the same M such that it hardly make progress, causing
// live-lock problem. Apparently this could happen on darwin. See
// issue #37741.
// Only send a signal if there isn't already one pending.
signalM(mp, sigPreempt)
}
if GOOS == "darwin" || GOOS == "ios" {
execLock.runlock()
}
}
func signalM(mp *m, sig int) {
tgkill(getpid(), int(mp.procid), sig)
}
|
通过系统调用 tgkill,给特定的线程发信号
doSigPreempt
Go 运行时进行信号处理的基本做法,其核心是注册 sighandler 函数,并在信号到达后, 由操作系统中断转入内核空间,而后将所中断线程的执行上下文参数(例如寄存器 rip, rep 等) 传递给处理函数。如果在 sighandler 中修改了这个上下文参数,操作系统则会根据修改后的 上下文信息恢复执行,这也就为抢占提供了机会。
1
2
3
4
5
6
7
8
9
10
11
12
13
|
//go:nowritebarrierrec
func sighandler(sig uint32, info *siginfo, ctxt unsafe.Pointer, gp *g) {
...
c := &sigctxt{info, ctxt}
...
if sig == sigPreempt {
// 可能是一个抢占信号
doSigPreempt(gp, c)
// 即便这是一个抢占信号,它也可能与其他信号进行混合,因此我们
// 继续进行处理。
}
...
}
|
1
2
3
4
5
6
7
8
9
10
11
12
13
14
15
16
17
18
19
20
21
22
|
// doSigPreempt handles a preemption signal on gp.
// doSigPreempt 处理了 gp 上的抢占信号
func doSigPreempt(gp *g, ctxt *sigctxt) {
// Check if this G wants to be preempted and is safe to
// preempt.
// 检查 G 是否需要被抢占、抢占是否安全
if wantAsyncPreempt(gp) {
if ok, newpc := isAsyncSafePoint(gp, ctxt.sigpc(), ctxt.sigsp(), ctxt.siglr()); ok {
// Adjust the PC and inject a call to asyncPreempt.
// 插入抢占调用
ctxt.pushCall(funcPC(asyncPreempt), newpc)
}
}
// Acknowledge the preemption.
atomic.Xadd(&gp.m.preemptGen, 1)
atomic.Store(&gp.m.signalPending, 0)
// 记录抢占
if GOOS == "darwin" {
atomic.Xadd(&pendingPreemptSignals, -1)
}
}
|
在 ctxt.pushCall 之前, ctxt.rip() 和 ctxt.rep() 都保存了被中断的 Goroutine 所在的位置, 但是 pushCall 直接修改了这些寄存器,进而当从 sighandler 返回用户态 Goroutine 时, 能够从注入的 asyncPreempt 开始执行:
1
2
3
4
5
6
7
8
|
func (c *sigctxt) pushCall(targetPC uintptr) {
pc := uintptr(c.rip())
sp := uintptr(c.rsp())
sp -= sys.PtrSize
*(*uintptr)(unsafe.Pointer(sp)) = pc
c.set_rsp(uint64(sp))
c.set_rip(uint64(targetPC))
}
|
asyncPreempt
完成 sighandler 之后,我们成功恢复到 asyncPreempt 调用:
1
2
3
4
|
// asyncPreempt 保存了所有用户寄存器,并调用 asyncPreempt2
//
// 当栈扫描遭遇 asyncPreempt 栈帧时,将会保守的扫描调用方栈帧
func asyncPreempt()
|
该函数的主要目的是保存用户态寄存器,并且在调用完毕前恢复所有的寄存器上下文, 就好像什么事情都没有发生过一样:
1
2
3
4
5
6
7
8
9
10
11
|
TEXT ·asyncPreempt(SB),NOSPLIT|NOFRAME,$0-0
...
MOVQ AX, 0(SP)
...
MOVUPS X15, 352(SP)
CALL ·asyncPreempt2(SB)
MOVUPS 352(SP), X15
...
MOVQ 0(SP), AX
...
RET
|
当调用 asyncPreempt2 时,会根据 preemptPark 或者 gopreempt_m 重新切换回调度循环,从而打断密集循环的继续执行。
1
2
3
4
5
6
7
8
9
10
11
12
|
//go:nosplit
func asyncPreempt2() {
gp := getg()
gp.asyncSafePoint = true
if gp.preemptStop {
mcall(preemptPark)
} else {
mcall(gopreempt_m)
}
// 异步抢占过程结束
gp.asyncSafePoint = false
}
|
至此,异步抢占过程结束。我们总结一下抢占调用的整体逻辑:
- M1 发送中断信号(signalM(mp, sigPreempt))
- M2 收到信号,操作系统中断其执行代码,并切换到信号处理函数(sighandler(signum, info, ctxt, gp))
- M2 修改执行的上下文,并恢复到修改后的位置(asyncPreempt)
- 重新进入调度循环进而调度其他 Goroutine(preemptPark 和 gopreempt_m)
触发时机
系统监控(抢占G/GM)
Go程序启动时,runtime会去启动一个名为sysmon的m(一般称为监控线程),它自身通过 newm 在一个 M 上独立运行, 自身永远保持在一个循环内直到应用结束。
系统监控在循环中调用 runtime.retake 函数抢占处于运行或者系统调用中的处理器,该函数会遍历运行时的全局处理器,P长时间运行或进行系统调用,系统监控会将 P 从 M 上抢夺并分配给其他的 M 来执行其他的 G,而位于被抢夺 P 的 M 本地调度队列中 的 G 则可能会被偷取到其他 M 中。
runtime.retake 中的循环包含了两种不同的抢占逻辑:
- 当处理器处于 _Prunning 状态时,如果上一次触发调度的时间已经过去了 10ms,我们就会通过 runtime.preemptone 抢占当前处理器,这种情况抢占M.
- 当处理器处于 _Psyscall 状态时,在满足以下两种情况下会调用 runtime.handoffp 让出处理器的使用权:这种情况抢占P.
- 当处理器的运行队列不为空或者不存在空闲处理器时;
- 当系统调用时间超过了 10ms 时;
sysmon 抢占流程:
sysmon -> retake -> preemptone -> asyncPreempt -> globalrunqput
sysmon抢占后会把g放到全局队列中.
GC-STW抢占
当需要进行垃圾回收时,为了保证不具备主动抢占处理的函数执行时间过长,导致垃圾回收迟迟不得执行而导致的高延迟,而强制停止 G 并转为执行垃圾回收,该抢占在第一次STW时进行.
这种情况抢占M.
GC 抢占流程:
markroot -> allgs[i] -> g -> suspendG(g) -> scan g stack -> resumeG
resumeG会执行runqput,当g被其他线程调度到时,从asyncPreempt的下半部分继续执行.
退出被锁定M
mexit
我们已经多次提到过 m 当且仅当它所运行的 Goroutine 被锁定在该 m 且 Goroutine 退出后, m 才会退出。我们来看一看它的原因。
首先,我们已经知道调度循环会一直进行下去永远不会返回了:
1
2
3
4
5
6
|
func mstart() {
(...)
mstart1() // 永不返回
(...)
mexit(osStack)
}
|
那 mexit 究竟什么时候会被执行? 事实上,在 mstart1 中:
1
2
3
4
5
6
7
|
func mstart1() {
(...)
// 为了在 mcall 的栈顶使用调用方来结束当前线程,做记录
// 当进入 schedule 之后,我们再也不会回到 mstart1,所以其他调用可以复用当前帧。
save(getcallerpc(), getcallersp())
(...)
}
|
save 记录了调用方的 pc 和 sp,而对于 save:
1
2
3
4
5
6
7
8
9
10
11
12
13
14
15
16
17
18
19
20
21
22
23
24
25
26
27
28
29
30
31
32
33
34
35
36
37
38
39
40
41
42
43
44
45
46
47
48
49
50
|
// getcallerpc 返回它调用方的调用方程序计数器 PC program conter
// getcallersp 返回它调用方的调用方的栈指针 SP stack pointer
// 实现由编译器内建,在任何平台上都没有实现它的代码
//
// 例如:
//
// func f(arg1, arg2, arg3 int) {
// pc := getcallerpc()
// sp := getcallersp()
// }
//
// 这两行会寻找调用 f 的 PC 和 SP
//
// 调用 getcallerpc 和 getcallersp 必须被询问的帧中完成
//
// getcallersp 的结果在返回时是正确的,但是它可能会被任何随后调用的函数无效,
// 因为它可能会重新定位堆栈,以使其增长或缩小。一般规则是,getcallersp 的结果
// 应该立即使用,并且只能传递给 nosplit 函数。
//go:noescape
func getcallerpc() uintptr
//go:noescape
func getcallersp() uintptr // implemented as an intrinsic on all platforms
// save 更新了 getg().sched 的 pc 和 sp 的指向,并允许 gogo 能够恢复到 pc 和 sp
//
// save 不允许 write barrier 因为 write barrier 会破坏 getg().sched
//
//go:nosplit
//go:nowritebarrierrec
func save(pc, sp uintptr) {
_g_ := getg()
// 保存当前运行现场
_g_.sched.pc = pc
_g_.sched.sp = sp
_g_.sched.lr = 0
_g_.sched.ret = 0
// 保存 g
_g_.sched.g = guintptr(unsafe.Pointer(_g_))
// 我们必须确保 ctxt 为零,但这里不允许 write barrier。
// 所以这里只是做一个断言
if _g_.sched.ctxt != nil {
badctxt()
}
}
|
由于 mstart/mstart1 是运行在 g0 上的,因此 save 将保存 mstart 的运行现场保存到 g0.sched 中。 当调度循环执行到 goexit0 时,会检查 m 与 g 之间是否被锁住:
1
2
3
4
5
6
7
8
9
10
11
12
13
14
15
16
17
18
19
20
21
22
23
24
25
26
27
28
29
30
31
32
33
34
35
36
37
38
39
40
41
42
43
44
45
46
47
48
49
50
51
52
53
54
55
56
57
58
59
60
61
|
// goexit continuation on g0.
func goexit0(gp *g) {
_g_ := getg()
casgstatus(gp, _Grunning, _Gdead)
if isSystemGoroutine(gp, false) {
atomic.Xadd(&sched.ngsys, -1)
}
gp.m = nil
locked := gp.lockedm != 0
gp.lockedm = 0
_g_.m.lockedg = 0
gp.preemptStop = false
gp.paniconfault = false
gp._defer = nil // should be true already but just in case.
gp._panic = nil // non-nil for Goexit during panic. points at stack-allocated data.
gp.writebuf = nil
gp.waitreason = 0
gp.param = nil
gp.labels = nil
gp.timer = nil
if gcBlackenEnabled != 0 && gp.gcAssistBytes > 0 {
// Flush assist credit to the global pool. This gives
// better information to pacing if the application is
// rapidly creating an exiting goroutines.
assistWorkPerByte := float64frombits(atomic.Load64(&gcController.assistWorkPerByte))
scanCredit := int64(assistWorkPerByte * float64(gp.gcAssistBytes))
atomic.Xaddint64(&gcController.bgScanCredit, scanCredit)
gp.gcAssistBytes = 0
}
dropg()
if GOARCH == "wasm" { // no threads yet on wasm
gfput(_g_.m.p.ptr(), gp)
schedule() // never returns
}
if _g_.m.lockedInt != 0 {
print("invalid m->lockedInt = ", _g_.m.lockedInt, "\n")
throw("internal lockOSThread error")
}
gfput(_g_.m.p.ptr(), gp)
if locked {
// The goroutine may have locked this thread because
// it put it in an unusual kernel state. Kill it
// rather than returning it to the thread pool.
// Return to mstart, which will release the P and exit
// the thread.
if GOOS != "plan9" { // See golang.org/issue/22227.
gogo(&_g_.m.g0.sched)
} else {
// Clear lockedExt on plan9 since we may end up re-using
// this thread.
_g_.m.lockedExt = 0
}
}
schedule()
}
|
如果 g 锁在当前 m 上,则调用 gogo 恢复到 g0.sched 的执行现场,从而恢复到 mexit 调用。
最后来看 mexit:
1
2
3
4
5
6
7
8
9
10
11
12
13
14
15
16
17
18
19
20
21
22
23
24
25
26
27
28
29
30
31
32
33
34
35
36
37
38
39
40
41
42
43
44
45
46
47
48
49
50
51
52
53
54
55
56
57
58
59
60
61
62
63
64
65
66
67
68
69
70
71
72
73
74
75
76
77
78
79
80
81
82
83
84
85
86
87
88
89
90
|
// mexit 销毁并退出当前线程
//
// 请不要直接调用来退出线程,因为它必须在线程栈顶上运行。
// 相反,请使用 gogo(&_g_.m.g0.sched) 来解除栈并退出线程。
//
// 当调用时,m.p != nil。因此可以使用 write barrier。
// 在退出前它会释放当前绑定的 P。
//
//go:yeswritebarrierrec
func mexit(osStack bool) {
g := getg()
m := g.m
if m == &m0 {
// 主线程
//
// 在 linux 中,退出主线程会导致进程变为僵尸进程。
// 在 plan 9 中,退出主线程将取消阻塞等待,即使其他线程仍在运行。
// 在 Solaris 中我们既不能 exitThread 也不能返回到 mstart 中。
// 其他系统上可能发生别的糟糕的事情。
//
// 我们可以尝试退出之前清理当前 M ,但信号处理非常复杂
handoffp(releasep()) // 让出 P
lock(&sched.lock) // 锁住调度器
sched.nmfreed++
checkdead()
unlock(&sched.lock)
notesleep(&m.park) // 暂止主线程,在此阻塞
throw("locked m0 woke up")
}
sigblock()
unminit()
// 释放 gsignal 栈
if m.gsignal != nil {
stackfree(m.gsignal.stack)
}
// 将 m 从 allm 中移除
lock(&sched.lock)
for pprev := &allm; *pprev != nil; pprev = &(*pprev).alllink {
if *pprev == m {
*pprev = m.alllink
goto found
}
}
// 如果没找到则是异常状态,说明 allm 管理出错
throw("m not found in allm")
found:
if !osStack {
// Delay reaping m until it's done with the stack.
//
// If this is using an OS stack, the OS will free it
// so there's no need for reaping.
atomic.Store(&m.freeWait, 1)
// Put m on the free list, though it will not be reaped until
// freeWait is 0. Note that the free list must not be linked
// through alllink because some functions walk allm without
// locking, so may be using alllink.
m.freelink = sched.freem
sched.freem = m
}
unlock(&sched.lock)
// Release the P.
handoffp(releasep())
// After this point we must not have write barriers.
// Invoke the deadlock detector. This must happen after
// handoffp because it may have started a new M to take our
// P's work.
lock(&sched.lock)
sched.nmfreed++
checkdead()
unlock(&sched.lock)
if osStack {
// Return from mstart and let the system thread
// library free the g0 stack and terminate the thread.
return
}
// mstart is the thread's entry point, so there's nothing to
// return to. Exit the thread directly. exitThread will clear
// m.freeWait when it's done with the stack and the m can be
// reaped.
exitThread(&m.freeWait)
}
|
可惜 exitThread 在 darwin 上还是没有定义:
1
2
3
|
// 未在 darwin 上使用,但必须定义
func exitThread(wait *uint32) {
}
|
在 Linux amd64 上:
1
2
3
4
5
6
7
8
9
10
11
|
// func exitThread(wait *uint32)
TEXT runtime·exitThread(SB),NOSPLIT,$0-8
MOVQ wait+0(FP), AX
// 栈使用完毕
MOVL $0, (AX)
MOVL $0, DI // exit code
MOVL $SYS_exit, AX
SYSCALL
// 甚至连栈都没有了
INT $3
JMP 0(PC)
|
从实现上可以看出,只有 linux 中才可能正常的退出一个栈,而 darwin 只能保持暂止了。 而如果是主线程,则会始终保持 park。
LockOSThread
Go 语言既然专门将线程进一步抽象为 Goroutine,自然也就不希望我们对线程做过多的操作,事实也是如此, 大部分的用户代码并不需要线程级的操作。
但某些情况下,当需要 使用 cgo 调用 C 端图形库(如 GLib)时,甚至需要将某个 Goroutine 用户态代码一直在主线程上执行。 我们已经知道了 runtime.LockOSThread 会将当前 Goroutine 锁在一个固定的 OS 线程上执行, 但是一旦开放了锁住某个 OS 线程后,会连带产生一些副作用。
比如当系统级的编程实践总是需要对线程进行操作, 尤其是当用户态代码通过系统调用将 OS 线程所在的 Linux namespace 进行修改、把线程私有化时(系统调用 unshare 和标志位 CLONE_NEWNS), 其他 Goroutine 已经不再适合在此 OS 线程上执行。
这时候不得不将 M 永久的从运行时中移出,我们知道 LockOSThread/UnlockOSThread 也是目前唯一一个能够让 M 退出的做法(将 Goroutine 锁在 OS 线程上,且在 Goroutine 死亡退出时不调用 Unlock 方法)。
runtime包也提供了runtime.LockOSThread函数把当前G与某个M锁定,以及runtime.UnlockOSThread函数解除当前G与某个M的锁定。让我们有能力绑定 Goroutine 和线程完成一些比较特殊的操作。一个M只能与一个G锁定,反之亦然。多次调用runtime.LockOSThread只有最后一次调用有效。即便当前G没有与任何M锁定,调用runtime.UnlockOSThread函数也不会有任何副作用,它会直接返回。
LockOSThread 和 UnlockOSThread 在运行时包中分别提供了私有和公开的方法。 运行时私有的 lockOSThread 非常简单:
1
2
3
4
5
|
//go:nosplit
func lockOSThread() {
getg().m.lockedInt++
dolockOSThread()
}
|
而用户态的公开方法则不同,还额外增加了一个模板线程的处理,这也解释了运行时其实并不希望 模板线程的存在,只有当需要时才会懒加载:
1
2
3
4
5
6
7
8
9
10
11
12
13
14
|
func LockOSThread() {
if atomic.Load(&newmHandoff.haveTemplateThread) == 0 && GOOS != "plan9" {
// 如果我们需要从锁定的线程启动一个新线程,我们需要模板线程。
// 当我们处于一个已知良好的状态时,立即启动它。
startTemplateThread()
}
_g_ := getg()
_g_.m.lockedExt++
if _g_.m.lockedExt == 0 {
_g_.m.lockedExt--
panic("LockOSThread nesting overflow")
}
dolockOSThread()
}
|
因为整个运行时只有在 runtime.main 调用 main.init 、和 cgo 的 C 调用 Go 时候才会使用, 其中 main.init 其实也是为了 cgo 里 Go 调用某些 C 图形库时需要主线程支持才使用的。 因此不需要做过多复杂的处理,直接在 m 上进行计数 (计数的原因在于安全性和时钟上的一些处理,防止用户态代码误用, 例如只调用了 Unlock 而没有先调用 Lock), 而后调用 dolockOSThread 将 g 与 m 互相锁定:
1
2
3
4
5
6
7
8
9
10
11
|
// dolockOSThread 在修改 m.locked 后由 LockOSThread 和 lockOSThread 调用。
// 在此调用期间不允许抢占,否则此函数中的 m 可能与调用者中的 m 不同。
//go:nosplit
func dolockOSThread() {
if GOARCH == "wasm" {
return // no threads on wasm yet
}
_g_ := getg()
_g_.m.lockedg.set(_g_)
_g_.lockedm.set(_g_.m)
}
|
runtime.dolockOSThread 会分别设置线程的 lockedg 字段和 Goroutine 的 lockedm 字段,这两行代码会绑定线程和 Goroutine。
UnlockOSThread
当 Goroutine 完成了特定的操作之后,就会调用以下函数 runtime.UnlockOSThread 分离 Goroutine 和线程:
Unlock 的部分非常简单,减少计数,再实际 dounlock:
1
2
3
4
5
6
7
8
9
10
11
12
13
14
15
16
17
18
19
20
|
// UnlockOSThread undoes an earlier call to LockOSThread.
// If this drops the number of active LockOSThread calls on the
// calling goroutine to zero, it unwires the calling goroutine from
// its fixed operating system thread.
// If there are no active LockOSThread calls, this is a no-op.
//
// Before calling UnlockOSThread, the caller must ensure that the OS
// thread is suitable for running other goroutines. If the caller made
// any permanent changes to the state of the thread that would affect
// other goroutines, it should not call this function and thus leave
// the goroutine locked to the OS thread until the goroutine (and
// hence the thread) exits.
func UnlockOSThread() {
_g_ := getg()
if _g_.m.lockedExt == 0 {
return
}
_g_.m.lockedExt--
dounlockOSThread()
}
|
而且并无特殊处理,只是简单的将 lockedg 和 lockedm 两个字段清零:
1
2
3
4
5
6
7
8
9
10
11
12
13
14
15
16
17
|
// dounlockOSThread is called by UnlockOSThread and unlockOSThread below
// after they update m->locked. Do not allow preemption during this call,
// or else the m might be in different in this function than in the caller.
// dounlockOSThread 在更新 m->locked 后由 UnlockOSThread 和 unlockOSThread 调用。
// 在此调用期间不允许抢占,否则此函数中的 m 可能与调用者中的 m 不同。
//go:nosplit
func dounlockOSThread() {
if GOARCH == "wasm" {
return // no threads on wasm yet
}
_g_ := getg()
if _g_.m.lockedInt != 0 || _g_.m.lockedExt != 0 {
return
}
_g_.m.lockedg = 0
_g_.lockedm = 0
}
|
函数执行的过程与 runtime.LockOSThread 正好相反。在多数的服务中,我们都用不到这一对函数,不过使用 CGO 或者经常与操作系统打交道的读者可能会见到它们的身影。
模板线程
前面已经提到过,锁住系统线程带来的隐患就是某个线程的状态可能被用户态代码过分的修改, 从而不再具有产出新线程的能力,模板线程就提供了一个备用线程,不会执行 g,只用于创建安全的 m。
模板线程会在第一次调用 LockOSThread 的时候被创建,并将 haveTemplateThread 标记为已经存在模板线程:
1
2
3
4
5
6
7
8
9
10
11
12
|
// 如果模板线程尚未运行,则startTemplateThread将启动它。
//
// 调用线程本身必须处于已知良好状态。
func startTemplateThread() {
if GOARCH == "wasm" { // no threads on wasm yet
return
}
if !atomic.Cas(&newmHandoff.haveTemplateThread, 0, 1) {
return
}
newm(templateThread, nil)
}
|
tempalteThread 这个函数会在 m 正式启动时被调用:
1
2
3
4
5
6
7
8
9
10
11
12
13
14
15
16
17
18
19
20
21
22
23
24
25
26
27
28
|
// 创建一个新的 m. 它会启动并调用 fn 或调度器
// fn 必须是静态、非堆上分配的闭包
// 它可能在 m.p==nil 时运行,因此不允许 write barrier
//go:nowritebarrierrec
func newm(fn func(), _p_ *p) {
// 分配一个 m
mp := allocm(_p_, fn)
...
}
//go:yeswritebarrierrec
func allocm(_p_ *p, fn func()) *m {
...
mp := new(m)
mp.mstartfn = fn
...
}
func mstart1() {
...
// 执行启动函数
if fn := _g_.m.mstartfn; fn != nil {
fn()
}
...
}
|
这个 newmHandoff 负责并串联了所有新创建的 m:
1
2
3
4
5
6
7
8
9
10
11
12
13
14
15
|
// newmHandoff 包含需要新 OS 线程的 m 的列表。
// 在 newm 本身无法安全启动 OS 线程的情况下,newm 会使用它。
var newmHandoff struct {
lock mutex
// newm 指向需要新 OS 线程的M结构列表。 该列表通过 m.schedlink 链接。
newm muintptr
// waiting 表示当 m 列入列表时需要通知唤醒。
waiting bool
wake note
// haveTemplateThread 表示 templateThread 已经启动。没有锁保护,使用 cas 设置为 1。
haveTemplateThread uint32
}
|
而模板线程本身不会退出,只会在需要的时,创建 m:
1
2
3
4
5
6
7
8
9
10
11
12
13
14
15
16
17
18
19
20
21
22
23
24
25
26
27
28
29
30
31
32
33
34
35
36
37
|
// templateThread是处于已知良好状态的线程,仅当调用线程可能不是良好状态时,
// 该线程仅用于在已知良好状态下启动新线程。
//
// 许多程序不需要这个,所以当我们第一次进入可能导致在未知状态的线程上运行的状态时,
// templateThread会懒启动。
//
// templateThread 在没有 P 的 M 上运行,因此它必须没有写障碍。
//
//go:nowritebarrierrec
func templateThread() {
lock(&sched.lock)
sched.nmsys++
checkdead()
unlock(&sched.lock)
for {
lock(&newmHandoff.lock)
for newmHandoff.newm != 0 {
newm := newmHandoff.newm.ptr()
newmHandoff.newm = 0
unlock(&newmHandoff.lock)
for newm != nil {
next := newm.schedlink.ptr()
newm.schedlink = 0
newm1(newm)
newm = next
}
lock(&newmHandoff.lock)
}
// 等待新的创建请求
newmHandoff.waiting = true
noteclear(&newmHandoff.wake)
unlock(&newmHandoff.lock)
notesleep(&newmHandoff.wake)
}
}
|
当创建好 m 后,模板线程会休眠,直到创建新的 m 时候会被唤醒,这个我们在分析调度循环的时候已经看到过了:
1
2
3
4
5
6
7
8
9
10
11
12
13
14
15
16
17
18
19
20
21
22
23
24
25
26
27
28
29
30
31
|
// 创建一个新的 m. 它会启动并调用 fn 或调度器
// fn 必须是静态、非堆上分配的闭包
// 它可能在 m.p==nil 时运行,因此不允许 write barrier
//go:nowritebarrierrec
func newm(fn func(), _p_ *p) {
...
if gp := getg(); gp != nil && gp.m != nil && (gp.m.lockedExt != 0 || gp.m.incgo) && GOOS != "plan9" {
// 我们处于一个锁定的 M 或可能由 C 启动的线程。这个线程的内核状态可能
// 很奇怪(用户可能已将其锁定)。我们不想将其克隆到另一个线程。
// 相反,请求一个已知状态良好的线程来创建给我们的线程。
//
// 在 plan9 上禁用,见 golang.org/issue/22227
//
// TODO: This may be unnecessary on Windows, which
// doesn't model thread creation off fork.
lock(&newmHandoff.lock)
if newmHandoff.haveTemplateThread == 0 {
throw("on a locked thread with no template thread")
}
mp.schedlink = newmHandoff.newm
newmHandoff.newm.set(mp)
if newmHandoff.waiting {
newmHandoff.waiting = false
// 唤醒 m, spinning -> non-spinning
notewakeup(&newmHandoff.wake)
}
unlock(&newmHandoff.lock)
return
}
newm1(mp)
}
|
GOMAXPROCS
我们知道在大部分的时间里,P 的数量是不会被动态调整的。 而 runtime.GOMAXPROCS 能够在运行时动态调整 P 的数量,我们就来看看这个调用会做什么事情。
对runtime.GOMAXPROCS函数的调用会会暂时让所有P都脱离运行状态,并试图阻止任何用户G的运行。新的P最大数量设置完毕后,运行时系统才开始陆续恢复它们。这对程序性能是非常大的损耗。因此最好不要去调用它,万不得已的时候也也该尽量在main函数的最前面去调用。
它的代码非常简单:
1
2
3
4
5
6
7
8
9
10
11
12
13
14
15
16
17
18
19
20
21
22
23
24
25
26
27
28
|
// GOMAXPROCS 设置能够同时执行线程的最大 CPU 数,并返回原先的设定。
// 如果 n < 1,则他不会进行任何修改。
// 机器上的逻辑 CPU 的个数可以从 NumCPU 调用上获取。
// 该调用会在调度器进行改进后被移除。
func GOMAXPROCS(n int) int {
...
// 当调整 P 的数量时,调度器会被锁住
lock(&sched.lock)
ret := int(gomaxprocs)
unlock(&sched.lock)
// 返回原有设置
if n <= 0 || n == ret {
return ret
}
// 停止一切事物,将 STW 的原因设置为 P 被调整
stopTheWorld("GOMAXPROCS")
// STW 后,修改 P 的数量
newprocs = int32(n)
// 重新恢复
// 在这个过程中,startTheWorld 会调用 procresize 进而动态的调整 P 的数量
startTheWorld()
return ret
}
|
可以看到,GOMAXPROCS 从一出生似乎就被判了死刑,官方的注释已经明确的说明了这个调用 在后续改进调度器后会被移除。
它的过程也非常简单粗暴,调用他必须付出 STW 这种极大的代价。 当 P 被调整为小于 1 或与原有值相同时候,不会产生任何效果,例如:
1
|
runtime.GOMAXPROCS(runtime.GOMAXPROCS(0))
|
SetMaxThreads
Go 对运行时创建的线程数量有一个限制,默认是 10000 个线程。如果超过一万个 G (挂载于 M 上)阻塞于系统调用,那么程序就会被挂掉。
线程数限制的问题,在官方 issues#4056: “runtime: limit number of operating system threads” 中,有过讨论,并最终将线程限制数值确定为 10000。
这个值存在的主要目的是限制可以创建无限数量线程的 Go 程序:在程序把操作系统干爆之前,干掉程序。
当然,Go 也暴露了 debug.SetMaxThreads() 方法可以让我们修改最大线程数值。
如程序所示,我们将最大线程数设置为 10,然后通过执行 shell 命令 sleep 3 来模拟同步系统调用过程。那么,执行 sleep 操作的 G 和 M 都会阻塞.
1
2
3
4
5
6
7
8
9
10
11
12
13
14
15
16
17
|
// SetMaxThreads sets the maximum number of operating system
// threads that the Go program can use. If it attempts to use more than
// this many, the program crashes.
// SetMaxThreads returns the previous setting.
// The initial setting is 10,000 threads.
//
// The limit controls the number of operating system threads, not the number
// of goroutines. A Go program creates a new thread only when a goroutine
// is ready to run but all the existing threads are blocked in system calls, cgo calls,
// or are locked to other goroutines due to use of runtime.LockOSThread.
//
// SetMaxThreads is useful mainly for limiting the damage done by
// programs that create an unbounded number of threads. The idea is
// to take down the program before it takes down the operating system.
func SetMaxThreads(threads int) int {
return setMaxThreads(threads)
}
|
1
2
3
4
5
6
7
8
9
10
11
12
13
14
15
16
17
18
19
20
|
package main
import (
"os/exec"
"runtime/debug"
"time"
)
func main() {
debug.SetMaxThreads(10)
for i := 0; i < 20; i++ {
go func() {
_, err := exec.Command("bash", "-c", "sleep 3").Output()
if err != nil {
panic(err)
}
}()
}
time.Sleep(time.Second * 5)
}
|
当程序启动的线程 M 超过 10 个时,会得到以下报错。
1
2
3
|
runtime: program exceeds 10-thread limit
fatal error: thread exhaustion
***
|
GPM的缺陷
创建G无法回收
某团圆节日公司服务到达历史峰值 10w+ QPS,而之前没有预料到营销系统又在峰值期间搞事情,雪上加霜,流量增长到 11w+ QPS,本组服务差点被打挂.
事后回顾现场,发现服务恢复之后整体的 CPU idle 和正常情况下比多消耗了几个百分点,感觉十分惊诧。恰好又祸不单行,工作日午后碰到下游系统抖动,虽然短时间恢复,我们的系统相比恢复前还是多消耗了两个百分点。如下图:
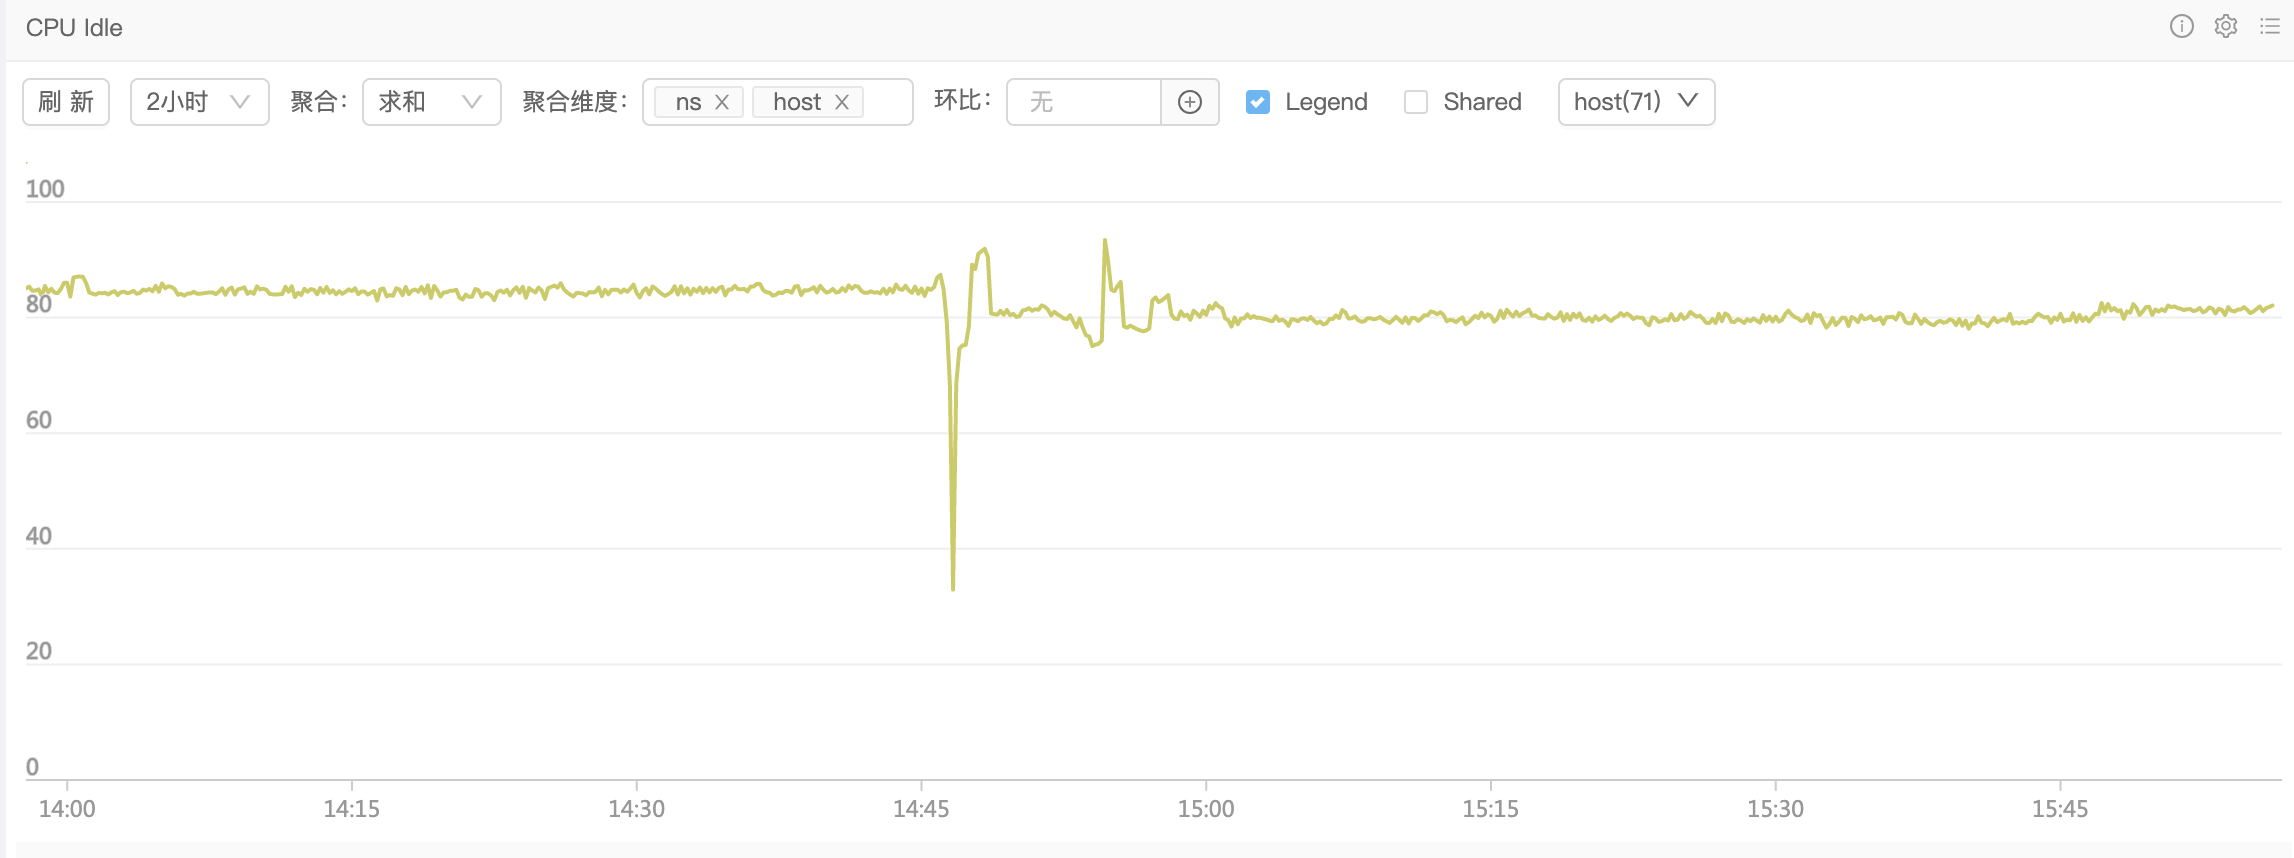
确实不太符合直觉,cpu 的使用率上会发现 GC 的各个函数都比平常用的 cpu 多了那么一点点,那我们只能看看 inuse 是不是有什么变化了,一看倒是吓了一跳:
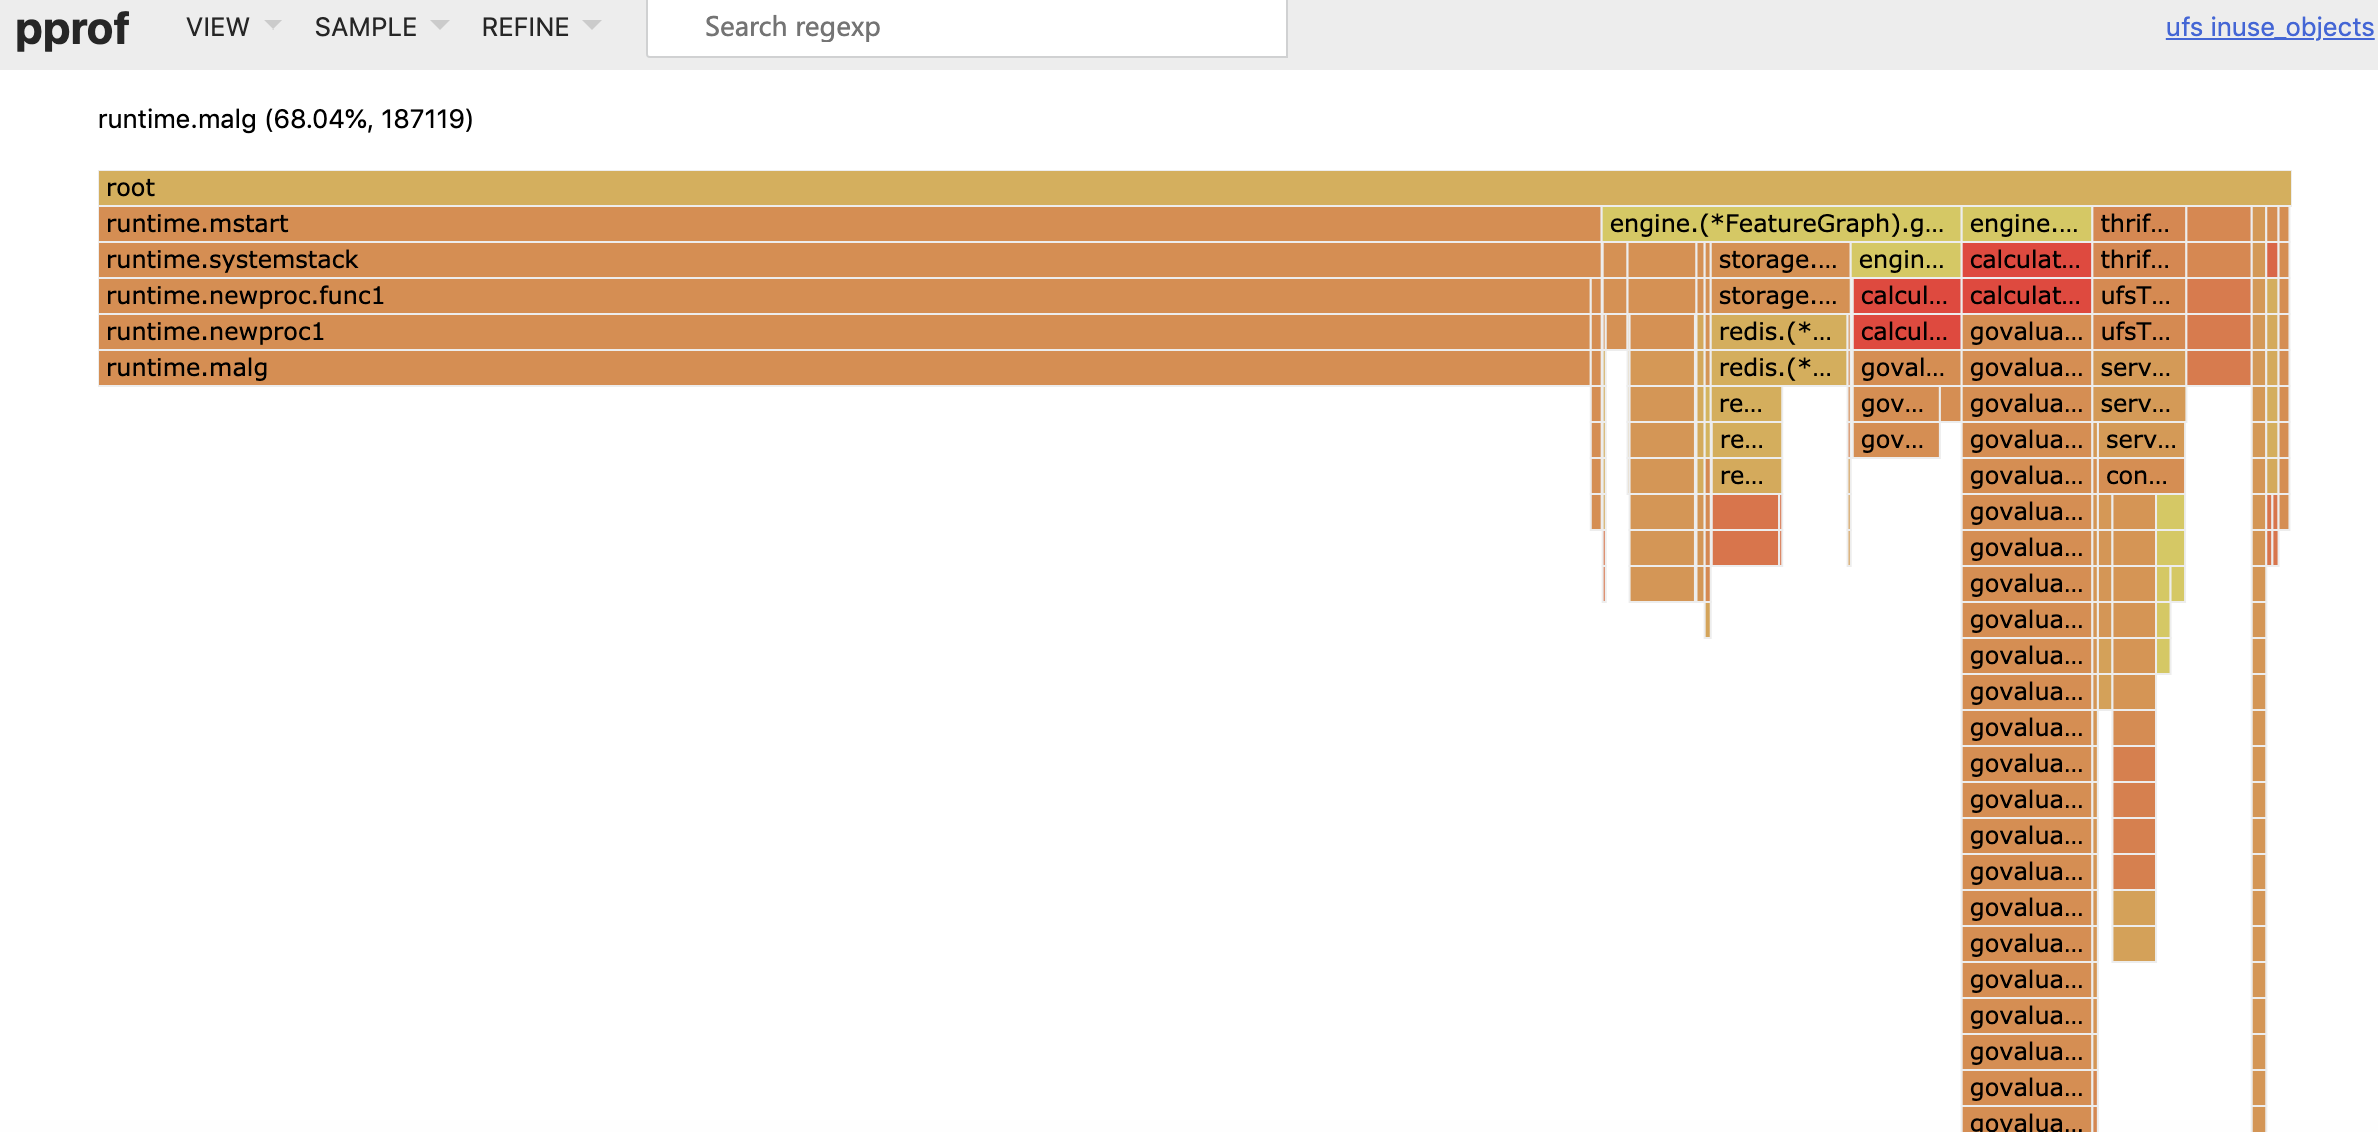
这个 mstart -> systemstack -> newproc -> malg 显然是 go func 的时候的函数调用链,按道理来说,创建 goroutine 结构体时,如果可用的 g 和 sudog 结构体能够复用,会优先进行复用,怎么会出来这么多 malg 呢?再来看看创建 g 的代码:
1
2
3
4
5
6
7
8
9
10
11
12
13
|
func newproc1(fn *funcval, argp *uint8, narg int32, callergp *g, callerpc uintptr) {
_g_ := getg()
// .... 省略无关代码
_p_ := _g_.m.p.ptr()
newg := gfget(_p_)
if newg == nil {
newg = malg(_StackMin)
casgstatus(newg, _Gidle, _Gdead)
allgadd(newg) // 重点在这里
}
}
|
一旦在 当前 p 的 gFree 和全局的 gFree 找不到可用的 g,就会创建一个新的 g 结构体,该 g 结构体会被 append 到全局的 allgs 数组中:
1
2
3
4
|
var (
allgs []*g
allglock mutex
)
|
这个 allgs 在什么地方会用到呢:
GC 的时候:
1
2
3
4
5
6
7
8
|
func gcResetMarkState() {
lock(&allglock)
for _, gp := range allgs {
gp.gcscandone = false // set to true in gcphasework
gp.gcscanvalid = false // stack has not been scanned
gp.gcAssistBytes = 0
}
}
|
检查死锁的时候:
1
2
3
4
5
6
7
8
9
10
11
|
func checkdead() {
// ....
grunning := 0
lock(&allglock)
for i := 0; i < len(allgs); i++ {
gp := allgs[i]
if isSystemGoroutine(gp, false) {
continue
}
}
}
|
检查死锁这个操作在每次 sysmon、创建 templateThread、线程进 idle 队列的时候都会调用,调用频率也不能说特别低。
翻阅了所有 allgs 的引用代码,发现该数组创建之后,并不会收缩。
我们可以根据上面看到的所有代码,来还原这种抖动情况下整个系统的情况了:
- 下游系统超时,很多 g 都被阻塞了,挂在 gopark 上,相当于提高了系统的并发
- 因为 gFree 没法复用,导致创建了比平时更多的 goroutine(具体有多少,就看你超时设置了多少
- 抖动时创建的 goroutine 会进入全局 allgs 数组,该数组不会进行收缩,且每次 gc、sysmon、死锁检查期间都会进行全局扫描
- 上述全局扫描导致我们的系统在下游系统抖动恢复之后,依然要去扫描这些抖动时创建的 g 对象,使 cpu 占用升高,idle 降低。
- 只能重启
看起来并没有什么解决办法,如果想要复现这个问题的读者,可以试一下下面这个程序:
1
2
3
4
5
6
7
8
9
10
11
12
13
14
15
16
17
18
19
20
21
22
23
|
package main
import (
"log"
"net/http"
_ "net/http/pprof"
"time"
)
func sayhello(wr http.ResponseWriter, r *http.Request) {}
func main() {
for i := 0; i < 1000000; i++ {
go func() {
time.Sleep(time.Second * 10)
}()
}
http.HandleFunc("/", sayhello)
err := http.ListenAndServe(":9090", nil)
if err != nil {
log.Fatal("ListenAndServe:", err)
}
}
|
启动后等待 10s,待所有 goroutine 都散过后,pprof 的 inuse 的 malg 依然有百万之巨。
补充一下 http://xiaorui.cc/ 小哥提供的验证过程,比我上面的更科学一些。
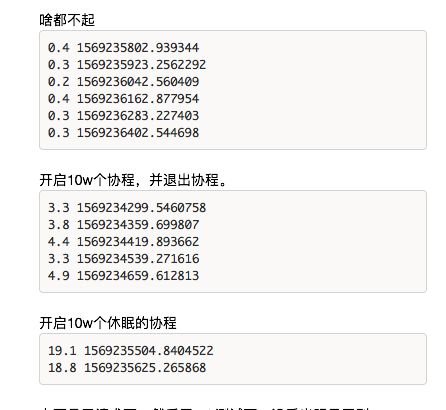
循环查看单个进程的 cpu 消耗:
1
2
3
4
5
6
7
8
9
10
|
import psutil
import time
p = psutil.Process(1) # 改成你自己的 pid 就行了
while 1:
v = str(p.cpu_percent())
if "0.0" != v:
print(v, time.time())
time.sleep(1)
|
创建M无法回收
稍微入门Go语言的程序员都知道,GOMAXPROCS变量可以限制并发运行用户态Go代码操作系统的最大线程数,你甚至可以通过调用函数func GOMAXPROCS(n int) int在程序运行时改变最大线程数的大小,但是当你进一步阅读文档,或者更深入的应用Go语言开发的时候,你就会发现,实际线程数要比你设置的这个数要大,有时候甚至远远大于你设置的数值,更悲剧的是,即使你的并发任务回退到没有几个的时候,这些线程数还没有降下来,白白浪费内存空间和CPU的调度。
当然,这个问题很多人都遇到了,甚至一些开发者都写了文章专门分析,比如:
Go的文档也说明了实际的Thread可能不受GOMAXPROCS限制,如下面的文档所说,Go代码进行系统调用的时候被block的线程数不受这个变量限制:
The GOMAXPROCS variable limits the number of operating system threads that can execute user-level Go code simultaneously. There is no limit to the number of threads that can be blocked in system calls on behalf of Go code; those do not count against the GOMAXPROCS limit. This package’s GOMAXPROCS function queries and changes the limit.
如果并发的blocking的系统调用很多,Go就会创建大量的线程,但是当系统调用完成后,这些线程因为Go运行时的设计,却不会被回收掉。具体讨论见go issue #14592。这个issue已经是2016的issue了,都4年多了,从Go 1.6推到现在,依然没有人动手尝试修复或者改进它。很显然,这并不是一个很容易修复的工作。
我重新整理一下,加深一下自己对这个知识点的理解。读者看到这篇文章后也多看看文中提到的链接,看看大家遇到的情况和解决办法。
我来举一个简单的例子,你就可以看到大量的线程产生了。
1
2
3
4
5
6
7
8
9
10
11
12
13
14
15
16
17
18
19
20
21
22
23
24
25
|
package main
import (
"fmt"
"net"
"runtime/pprof"
"sync"
)
var threadProfile = pprof.Lookup("threadcreate")
func main() {
// 开始前的线程数
fmt.Printf(("threads in starting: %d\n"), threadProfile.Count())
var wg sync.WaitGroup
wg.Add(100)
for i := 0; i < 100; i++ {
go func() {
defer wg.Done()
for j := 0; j < 100; j++ {
net.LookupHost("www.google.com")
}
}()
}
wg.Wait()
// goroutine执行完后的线程数
fmt.Printf(("threads after LookupHost: %d\n"), threadProfile.Count())
}
|
Go提供了两种查询域名的方式,CGO方式或者纯Go方式,比如net库中的Dial、LookupHost、LookupAddr这些函数都会间接或者直接的与域名程序相关,比如上面的例子中使用LookupHost,采用不同的方式并发情况下产生的线程会不同。
比如采用纯Go的方式,程序在退出的时候会有10个线程:
1
2
3
|
$ GODEBUG=netdns=go go run main.go
threads in starting: 7
threads after LookupHost: 10
|
而采用cgo的方式,程序在退出的时候会有几十个甚至上百线程:
1
2
3
|
$ GODEBUG=netdns=cgo go run main.go
threads in starting: 7
threads after LookupHost: 109
|
Go运行时不会回收线程,而是会在需要的时候重用它们。但是你如果创建大量的线程,根本就是不需要的,理论上值保留一小部分线程重用就可以了。
如果程序设计的不合理,就会导致大量的空闲线程。如果你在http的处理程序中调用了类似的blocking系统调用或者CGO代码,或者微服务服务端调用了类似的代码,都有可能在客户端高并发访问时产生“线程泄露”的情况。
但是,系统的线程也不是无限创建,一来每个线程都会占用一定的内存资源,大量的线程导致内存枯竭,而来Go运行时其实对运行时创建的线程的数量还是有一个显示的,默认是10000个线程。
官方issue中也有人提供使用LockOSThread杀掉线程的方法:
1
2
3
4
5
6
7
8
9
10
11
|
// KillOne kills a thread
func KillOne() {
var wg sync.WaitGroup
wg.Add(1)
go func() {
defer wg.Done()
runtime.LockOSThread()
return
}()
wg.Wait()
}
|
LockOSThread函数会把当前goroutine绑定在当前的系统线程上,这个goroutine总是在这个线程中执行,而且也不会有其它goroutine在这个线程中执行。只有这个goroutine调用了相同次数的UnlockOSThread函数之后,才会进行解绑。
如果goroutine在退出的时候没有unlock这个线程,那么这个线程会被终止。我们正好可以利用这个特性将线程杀掉。我们可以启动一个goroutine,调用LockOSThread占住一个线程,既然当前有很多空闲的线程,所以正好可以重用一个,goroutine退出的时候不调用UnlockOSThread,也就导致这个线程被终止了。
那么,我们可以利用第三个特性,在启动 G 时,调用 LockOSThread 来独占一个 M。当 G 退出时,而不调用 UnlockOSThread,那这个 M 将不会被闲置,就被终止了。
下面,我们来看一个例子
1
2
3
4
5
6
7
8
9
10
11
12
13
14
15
16
17
18
19
20
21
22
23
24
|
package main
import (
"fmt"
"os/exec"
"runtime/pprof"
"time"
)
func main() {
threadProfile := pprof.Lookup("threadcreate")
fmt.Printf(" init threads counts: %d\n", threadProfile.Count())
for i := 0; i < 20; i++ {
go func() {
_, err := exec.Command("bash", "-c", "sleep 3").Output()
if err != nil {
panic(err)
}
}()
}
time.Sleep(time.Second * 5)
fmt.Printf(" end threads counts: %d\n", threadProfile.Count())
}
|
通过 threadProfile.Count() 我们可以实时获取当前线程数目,那么在发生了阻塞式系统调用后,该程序的线程数目是多少呢?
1
2
|
init threads counts: 5
end threads counts: 25
|
根据结果可以看到,G 执行完毕后,闲置线程并没有被释放。
在程序中添加一行代码 runtime.LockOSThread() 代码
1
2
3
4
5
6
7
|
go func() {
runtime.LockOSThread() // 增加的一行代码
_, err := exec.Command("bash", "-c", "sleep 3").Output()
if err != nil {
panic(err)
}
}()
|
此时,程序的执行结果如下
1
2
|
init threads counts: 5
end threads counts: 11
|
可以看到,由于调用了 LockOSThread 函数的 G 没有执行 UnlockOSThread 函数,在 G 执行完毕后,M 也被终止了。
你可以扩展这个方法,提供Kill(n int)可以终止多个线程的方法,当然原理都是类似的。
从实践上上来看,你可以启动一个值守goroutine,检查到线程数超过某个阈值后就回收一部分线程,或者提供一个接口,可以手工调用某个API终止一部分线程,在官方还没有解决这个问题之前也不失是一种可用的方法。
当然,这个方法也存在隐患。例如在 issues#14592 有人提到:当子进程由一个带有 PdeathSignal: SIGKILL 的 A 线程创建,A 变为空闲时,如果 A 退出,那么子进程将会收到 KILL 信号,从而引起其他问题。
参考
也谈goroutine调度器
Go 调度模型
Go 1.5 源码剖析 (书签版)
6.5 调度器
描述 scheduler 的初始化过程
理解golang调度之二 :Go调度器
6.5 线程管理
Go调度器系列(2)宏观看调度器
6.5 调度器
地鼠宝宝的轶事奇闻之线程模型
goroutine和线程的区别
Go 的调度模型学习笔记
为什么 Go 模块在下游服务抖动恢复后,CPU 占用无法恢复
Go 运行程序中的线程数
6.8 协作与抢占
如何有效控制 Go 线程数?