swagger
Swagger是一个简单但功能强大的API表达工具。它具有地球上最大的API工具生态系统,数以千计的开发人员,使用几乎所有的现代编程语言,都在支持和使用Swagger。使用Swagger生成API,我们可以得到交互式文档,自动生成代码的SDK以及API的发现特性等。
swagger文档示例:
 1
 2
 3
 4
 5
 6
 7
 8
 9
10
|
swagger: "2.0"
info:
  version: 1.0.0
  title: Simple API
  description: A simple API to learn how to write OpenAPI Specification
schemes:
  - https
host: simple.api
basePath: /openapi101
paths: {}
|
swag与go-swagger
两种用于生成规范的工具的比较
在撰写本文时,用于从go源代码生成Swagger规范的两个主要库是Swag和go-swagger。在这里,我将讨论每种方案的优缺点,并说明为什么选择第二种方案。
- swag胜:方便。swag简单。您只需要为您的处理程序添加一些注释,一切就可以使用。为了使规格生成,您需要做些什么。
- go-swagger胜:灵活。go-swagger为您提供了更多的功能和灵活性来描述您的API。它使您可以更好地控制生成的内容。
- go-swagger胜:代码的可读性。使用Swag,您的每个API都有一些非常冗长的注释,在它们前面有很多注释。注释有时甚至比代码本身还要长!但是,通过go-swagger,您可以将这些注释与代码隔离。这样,代码中的注释可以集中于实际开发它的人员,并且从中生成标准规范的注释将保留在其自己的特定程序包中。如果您没有与go-swagger相关的注释的隔离,这就是代码发生的事情:
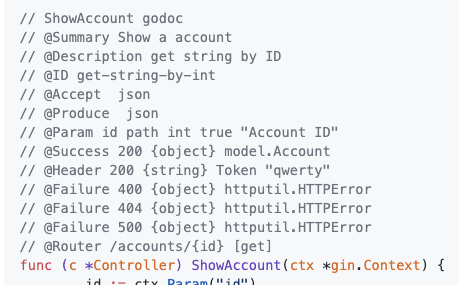
使用Swag,每个端点的外观如何
- go-swagger胜:流行:在撰写本文时,go-swagger的星数几乎是Swag的四倍。它似乎也得到了更好的维护,并且似乎错误更少。例如,go-swagger支持在请求/响应主体中表示2D数组,而Swag不支持。(在撰写本文时)
go-swagger
安装
安装有多种方式, 介绍两个稍微常用的安装方式:
1
2
3
4
5
|
# brew
brew tap go-swagger/go-swagger
brew install go-swagger
# go get
go get -u github.com/go-swagger/go-swagger/cmd/swagger
|
生成
下面我们讲解一下如何使用go-swagger,在使用之前你或许需要了解一下openAPI是做什么的,我们现在所做的认为你对openAPI有所了解。
因为我们所做的是依靠源码生成我们要的swagger文档,所以你现在要记住一个这样的命令:
1
2
3
4
|
# 根源源码生成一个swagger文档,他的类型可以是json或者是yaml,根据你的后缀名
swagger generate spec -o ./swagger.json/yaml
# 测试这个swagger文档是否有效
swagger validate ./swagger.json/yaml
|
如出现这样一段话,则表示你生成的yaml或json文件没有问题:
1
|
The swagger spec at "swagger.json/yaml" is valid against swagger specification 2.0
|
现在我们知道了这样的两个命令,我们就要知道如何才能生成一个合格的swagger文档呢,这时候我们就需要了解一下在源码中如何写注释,从而可以获取这些文档。
使用
我们来看一下都有哪些形态的注释:
- Swagger:meta
- Swagger:route
- Swagger:params
- Swagger:operation
- Swagger:response
- Swagger:model
- Swagger:allOf
- Swagger:strfmt
- Swagger:discriminated
- Swagger:ignore
接下来我们会一一讲解这些具体怎么做:
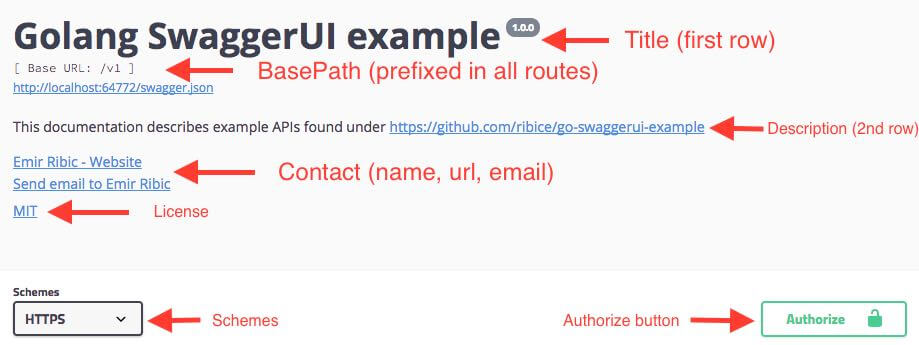
这是你应该添加到项目中的第一个注释。它被用来描述你的项目名称,描述,联系电子邮件,网站,许可证等等信息。
如果你的 API 仅提供在 HTTP 或 HTTPS 上,且只生成 JSON ,您应在此处添加它 - 允许你从每个路由中删除该注释。
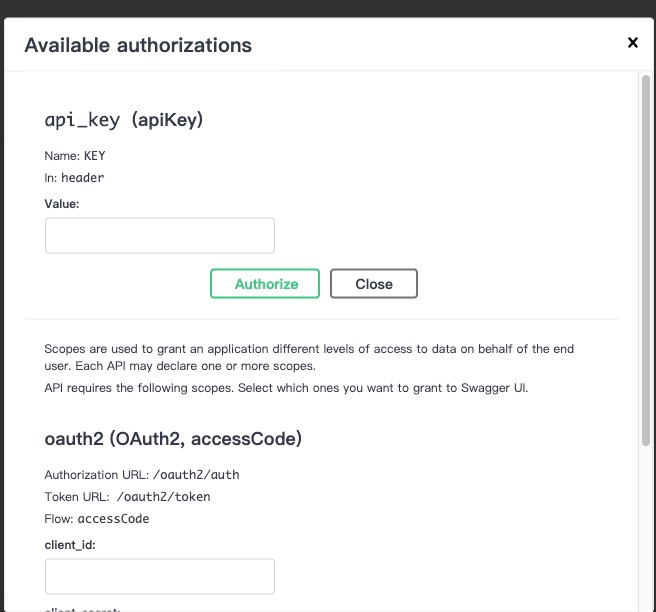
安全也被添加在 swagger:meta 中,在 SwaggerUI 上添加一个授权按钮。为了实现JWT,我使用安全类型承载进行命名并将其定义:
 1
 2
 3
 4
 5
 6
 7
 8
 9
10
11
12
13
14
15
16
17
18
19
20
21
22
23
24
25
26
27
28
29
30
31
32
33
34
35
36
37
38
39
40
41
42
43
44
45
46
47
48
49
50
51
52
53
54
55
|
// Package classification Petstore API.
//
// the purpose of this application is to provide an application
// that is using plain go code to define an API
//
// This should demonstrate all the possible comment annotations
// that are available to turn go code into a fully compliant swagger 2.0 spec
//
// Terms Of Service:
//
// there are no TOS at this moment, use at your own risk we take no responsibility
//
//     Schemes: http, https
//     Host: localhost
//     BasePath: /v2
//     Version: 0.0.1
//     License: MIT http://opensource.org/licenses/MIT
//     Contact: John Doe<john.doe@example.com> http://john.doe.com
//
//     Consumes:
//     - application/json
//     - application/xml
//
//     Produces:
//     - application/json
//     - application/xml
//
//     Security:
//     - api_key:
//
//     SecurityDefinitions:
//     api_key:
//          type: apiKey
//          name: KEY
//          in: header
//     oauth2:
//         type: oauth2
//         authorizationUrl: /oauth2/auth
//         tokenUrl: /oauth2/token
//         in: header
//         scopes:
//           bar: foo
//         flow: accessCode
//
//     Extensions:
//     x-meta-value: value
//     x-meta-array:
//       - value1
//       - value2
//     x-meta-array-obj:
//       - name: obj
//         value: field
//
// swagger:meta
package classification
|
我们来讲一下这里面的一些参数的设定:
| 参数 |
介绍 |
| Terms Of Service |
描述API的一些基本信息,和一些请求的基本信息 |
| Consumes |
API从客户端接收的内容的默认(全局)mime类型值列表,每行一个。 |
| Produces |
API发送给客户端的内容的默认(全局)mime类型值列表,每行一个。 |
| Schemes |
http、https |
| Version |
版本号 |
| Host |
主机的地址 |
| BasePath |
API的基础路径 |
| License |
许可证明 |
| Contact |
联系人等信息 |
| Security |
api-key |
| SecurityDefinitions |
一些授权的信息,比如JWT |
| Extensions |
一些扩展行的信息 |
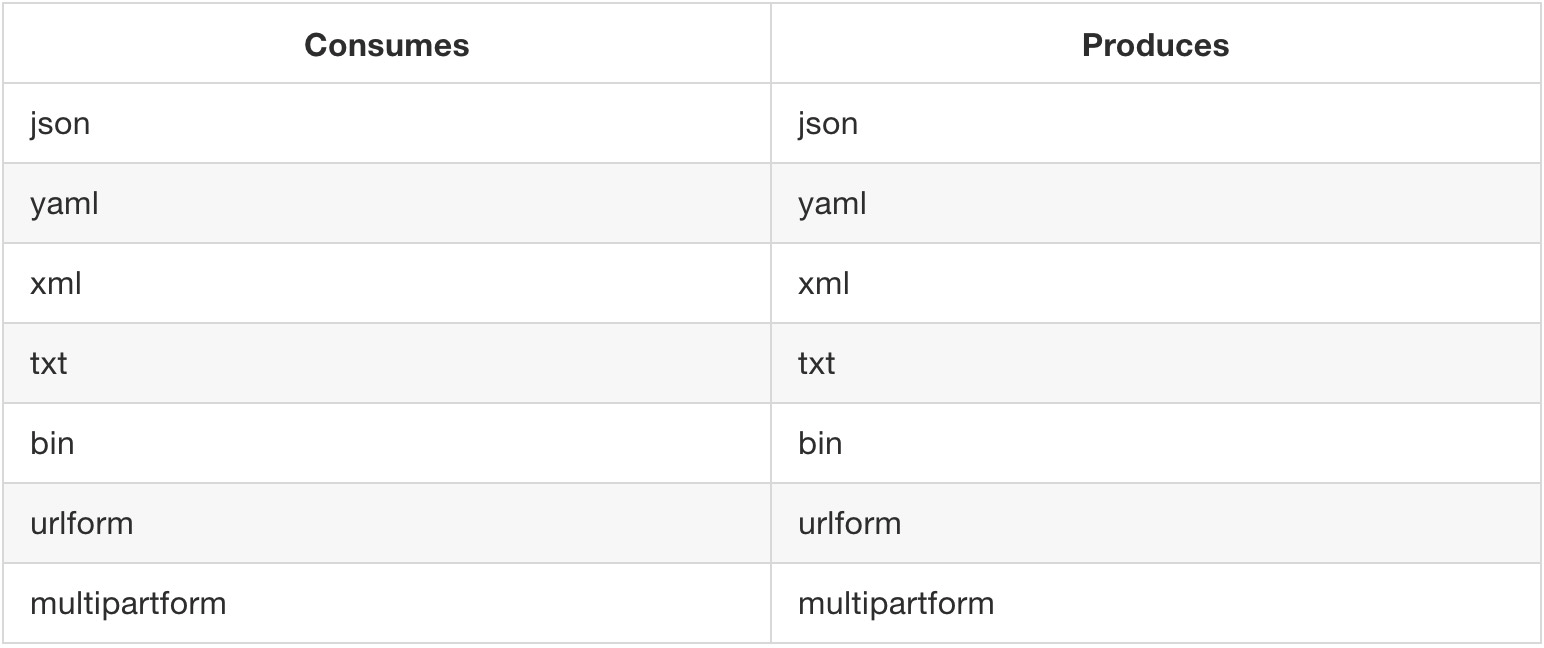
支持的MIME类型如下:
当你执行生成文档的命令时,会生成一个yaml/json文件,你应该可以看到这样的信息:
 1
 2
 3
 4
 5
 6
 7
 8
 9
10
11
12
13
14
15
16
17
18
19
20
21
22
23
24
25
26
27
|
---
swagger: '2.0'
consumes:
  - application/json
  - application/xml
produces:
  - application/json
  - application/xml
schemes:
  - http
  - https
info:
  description: "the purpose of this application is to provide an application\nthat is using plain go code to define an API\n\nThis should demonstrate all the possible comment annotations\nthat are available to turn go code into a fully compliant swagger 2.0 spec"
  title: 'Petstore API.'
  termsOfService: 'there are no TOS at this moment, use at your own risk we take no responsibility'
  contact: {name: 'John Doe', url: 'http://john.doe.com', email: john.doe@example.com}
  license: {name: MIT, url: 'http://opensource.org/licenses/MIT'}
  version: 0.0.1
host: localhost
basePath: /v2
x-meta-value: value
x-meta-array:
  - value1
  - value2
x-meta-array-obj:
  - name: obj
    value: field
|
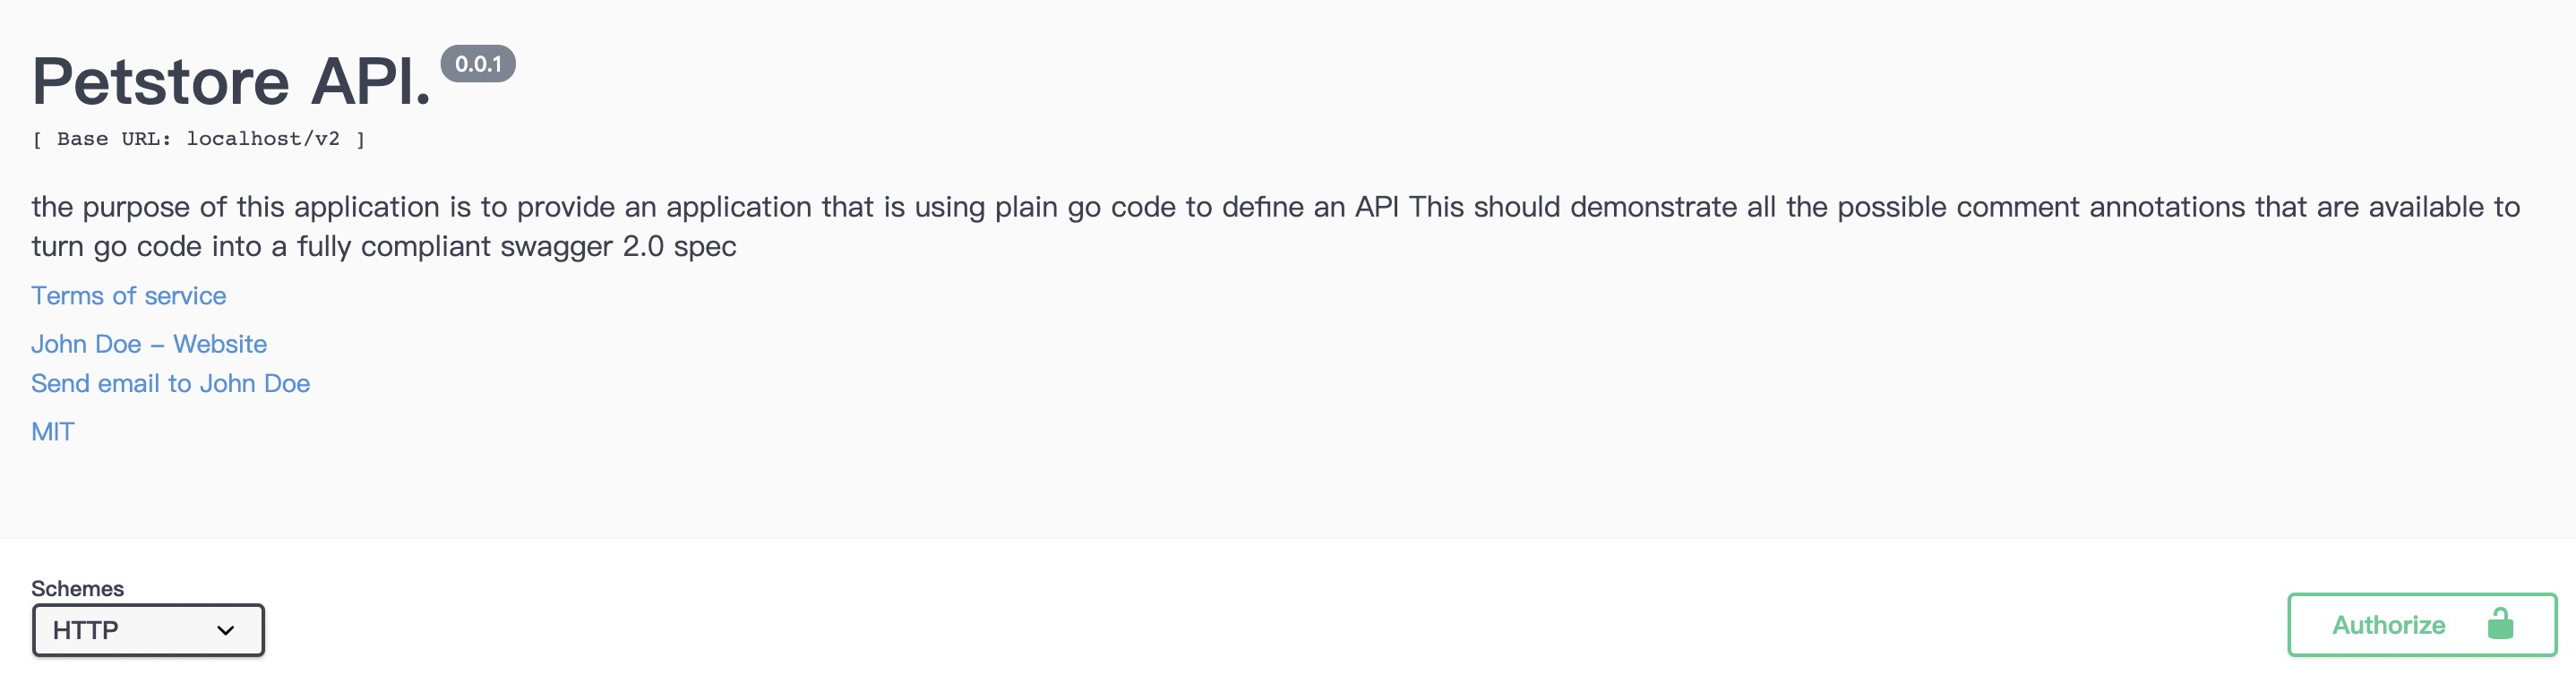
生成结果如下图所示:
Swagger:route
有两种方式注释你的路由,swagger:operation 和swagger:route。两者看起来都很相似,那么主要区别是什么?
把 swagger:route 看作简单 API 的短注释,它适用于没有输入参数(路径/查询参数)的 API 。那些(带有参数)的例子是 /repos/{owner} , /user/{id} 或者 /users/search?name=ribice。
如果你有一个那种类型,那么你就必须使用 swagger:operation ,除此之外,如 /user 或 /version 之类的 APIs 都可以用 swagger:route 来注释。
 1
 2
 3
 4
 5
 6
 7
 8
 9
10
11
12
13
|
// ServeAPI serves the API for this record store
func TestSwagger(c *gin.Context) {
    // swagger:route GET /pets PetsUsers listPets
    //
    // Lists pets filtered by some parameters.
    //
    // This will show all available pets by default.
    // You can get the pets that are out of stock
    //
    //     Responses:
    //       default: genericError
    //       200: someResponse
    //       400: validationError
|
我们来解释一下swagger:route 后面的参数都是干什么的:
| 参数 |
介绍 |
| swagger:route |
注解 |
| GET |
get请求 |
| /pets |
匹配的url地址 |
| PetsUsers |
路由所在的空间分割标签 |
| listPets |
用于此端点的请求 |
| Lists pets.. |
摘要(标题)。对于swager:route注释,在第一个句号(.)前面的是标题。如果没有句号,就会没有标题并且这些文字会被用于描述。 |
| This will… |
描述。对于swager:route类型注释,在第一个句号(.)后面的是描述。 |
| responses |
这个端点的响应 |
| default |
默认返回的错误,包含genericError(用 swagger:response 注释的模型) |
| 200 |
一个(成功的)响应HTTP状态 200,包含 repoResp(用 swagger:response 注释的模型) |
| 400 |
此端点的错误响应,包含 validationError(用 swagger:response 注释的模型) |
当你执行生成文档的命令时,会生成一个yaml/json文件,你应该可以看到这样的信息:
 1
 2
 3
 4
 5
 6
 7
 8
 9
10
11
12
13
14
15
16
|
---
paths:
  "/pets":
    get:
      operationId: listPets
      summary: Lists pets filtered by some parameters.
      description: "This will show all available pets by default.\nYou can get the pets that are out of stock"
      tags:
      - PetsUsers
      responses:
        default:
          $ref: "#/responses/genericError"
        200:
          $ref: "#/responses/someResponse"
        422:
          $ref: "#/responses/validationError"
|
请记住,您还可能需要使用其他注释,具体取决于您的 API 。由于我将我的项目定义为仅使用单一模式( https ),并且我的所有 API 都使用 https ,所以我不需要单独注释方案。如果您为端点使用多个模式,则需要以下注释:
1
|
// Schemes: http, https, ws, wss
|
同样适用于 消费者/生产者 媒体类型。我所有的 API 都只消费/生成 application/json 。如果您的 API 正在 消费/生成 其他类型,则需要使用该媒体类型对其进行注释。例如:
1
2
3
4
5
6
7
|
// consumes:
// - application/json
// - application/x-protobuf
//
// produces:
// - application/json
// - application/x-protobuf
|
安全性:
 1
 2
 3
 4
 5
 6
 7
 8
 9
10
11
12
13
|
// security:
//   api_key:
//   oauth: read, write
//   basicAuth:
//      type: basic
//   token:
//      type: apiKey
//      name: token
//      in: query
//   accessToken:
//      type: apiKey
//      name: access_token
//      in: query
|
另一方面,swagger:operation 用于更复杂的端点。三个破折号(-)下的部分被解析为 YAML ,允许更复杂的注释。确保您的缩进是一致的和正确的,否则将无法正确解析。
Swagger:operation
使用 Swagger:operation 可以让你使用所有OpenAPI规范,你可以描述你的复杂的端点, 如果你对细节感兴趣,你可以阅读openAPI的规范文档。
 1
 2
 3
 4
 5
 6
 7
 8
 9
10
11
12
13
14
15
16
17
|
// ServeAPI serves the API for this record store
func TestSwagger(c *gin.Context) {
    // swagger:operation GET /repo/{author} repos repoList
    // ---
    // summary: List the repositories owned by the given author.
    // description: If author length is between 6 and 8, Error Not Found (404) will be returned.
    // parameters:
    // - name: author
    //   in: path
    //   description: username of author
    //   type: string
    //   required: true
    // responses:
    //   "200":
    //     "$ref": "#/responses/reposResp"
    //   "404":
    //     "$ref": "#/responses/notFound"
|
我们可以看到这和我们平常写的openAPI的文档格式一样,我们来解释一下各个参数吧:
| 参数 |
介绍 |
| GET |
get请求 |
| /repo/{author} |
匹配的url地址 |
| repos |
路由所在的空间分割标签 |
| repoList |
用于此端点的请求,这个不存在(没有定义),但参数是强制性的,所以你可以用任何东西来替换repoList(noReq,emptyReq等) |
| “—” |
这个部分下面是YAML格式的swagger规范。确保您的缩进是一致的和正确的,否则将无法正确解析。注意,如果你在YAML中定义了标签,摘要,描述或操作标签,将覆盖上述常规swagger语法中的摘要,描述,标记或操作标签。 |
| summary |
标题 |
| description |
描述 |
| parameters |
URL参数(在这个例子中是{author})。字符串格式,强制性的(Swagger不会让你调用端点而不输入),位于路径(/{author})中。另一种选择是参数内嵌的请求 (?name="") |
Swagger:parameters
根据您的应用程序模型,您的 HTTP 请求可能会有所不同(简单,复杂,封装等)。要生成 Swagger 规范,您需要为每个不同的请求创建一个结构,甚至包含仅包含数字(例如id)或字符串(名称)的简单请求。所有的参数必须在结构体中存在.如果不想这样,可以使用Swagger:operation.
一旦你有这样的结构(例如一个包含一个字符串和一个布尔值的结构),在你的Swagger包中定义如下:
生成的swagger规范中的参数:
 1
 2
 3
 4
 5
 6
 7
 8
 9
10
11
12
|
// Request containing string
// swagger:parameters test_demo
type BarSliceParam struct {
    // a BarSlice has bars which are strings
    //
    // min items: 3
    // max items: 10
    // unique: true
    // Required: true
    // in: query
    Name string `json:"name"`
}
|
此结构的字段可以使用许多注释进行修饰。对于字段名称,它使用struct字段名称,它尊重json struct字段标记以自定义名称。
我们来解释一下swagger:parameters 后面的参数都是干什么的:
| 参数 |
介绍 |
| Request containi.. |
包含一个在 SwaggerUI 上可见的注释 |
| test_demo |
operationID, go-swagger会以此来寻找你的关联的方法 |
| a BarSlice… |
这个就是你参数的描述 |
| minLength |
参数最短长度 |
| maxLength |
参数最大长度 |
| in |
参数放在什么位置,如:body,query,path |
| unique |
参数是否是唯一的 |
| Required |
是否必传 |
当你执行生成文档的命令时,会生成一个yaml/json文件,你应该可以看到这样的信息:
 1
 2
 3
 4
 5
 6
 7
 8
 9
10
11
12
|
---
operations:
  "/":
    get:
      operationId: test_demo
      parameters:
        - name: name
          in: query
          maxLength: 10
          minLength: 3
          unique: true
          Required: true
|
入参如果要传json,可以用结构体包一层:
 1
 2
 3
 4
 5
 6
 7
 8
 9
10
11
|
//  swagger:parameters userBind
type userLoginWrapper struct {
	// in: body
	Body UserBindRequest
}
type UserLoginRequest struct {
	//  用户名
	UserName string `json:"user_name"`
	//  id
	Id string `json:"id"`
}
|
然后consume加上json:
1
2
|
// consumes:
//   - application/json
|
Swagger:response
响应注释与参数注释非常相似。主要的区别在于,经常将响应包裹到更复杂的结构中。
一般的响应会是这样的:
1
2
3
4
5
|
{
     "msg": "OK"
     "code":200, // Code containing HTTP status CODE
     "data":{} // Data containing actual response data
}
|
要使用常规响应,像上面错误响应那样的,我们需要在代码中新建一个reponse.go这种类似的文件,下面的响应用于 OK 响应(不返回任何数据):
 1
 2
 3
 4
 5
 6
 7
 8
 9
10
11
12
13
14
|
// A ValidationError is an error that is used when the required input fails validation.
// swagger:response validationError
type ValidationError struct {
    // The error message
    // in: body
    Body struct {
        // The validation message
        //
        // Required: true
        Message string
        // An optional field name to which this validation applies
        FieldName string
    }
}
|
或者是这样的形式:
 1
 2
 3
 4
 5
 6
 7
 8
 9
10
11
12
13
14
15
|
// 成功或失败返回的数据格式
// swagger:response SwaggerResponse
type SwaggerWapper struct {
    // The error message
    // in: body
    Body ResponseMessage
}

type ResponseMessage struct {
    // 返回的code码
    // Required: true
    Code int         `json:"code"`
    Msg  string      `json:"msg"`
    Data interface{} `json:"data"`
}
|
只是生成出来的效果不一样,第一个展现的json/yaml格式会被展开:
 1
 2
 3
 4
 5
 6
 7
 8
 9
10
11
12
13
14
15
16
17
|
---
responses:
  validationError:
    description: A ValidationError is an error that is used when the required input fails validation.
    schema:
      type: object
      description: The error message
      required:
      - Message
      properties:
        Message:
          type: string
          description: The validation message
          example: Expected type int
        FieldName:
          type: string
          description: an optional field name to which this validation applies
|
而第二种形式的则会被折叠起来,如这样:
 1
 2
 3
 4
 5
 6
 7
 8
 9
10
11
12
13
14
15
16
17
18
|
responses:
  SwaggerResponse:
    description: 成功或失败返回的数据格式
    schema:
      $ref: '#/definitions/ResponseMessage'
definitions:
  ResponseMessage:
    properties:
      code:
        description: 返回的code码
        type: integer
      data:
        type: object
      msg:
        type: string
    required:
    - code
    type: object
|
第二种形式更加通用,复用性很好.
实战
假设有一个user.server,提供一些REST API,用于对用户数据的增删改查。
比如这里有一个getOneUser接口,是查询用户信息的:
 1
 2
 3
 4
 5
 6
 7
 8
 9
10
11
12
13
14
15
16
17
18
19
20
21
22
23
24
25
26
27
28
29
30
31
32
33
34
35
36
37
|
package service
import (
"encoding/json"
"fmt"
"net/http"
"strconv"
"user.server/models"
"crypto/md5"
"errors"
"github.com/Sirupsen/logrus"
"github.com/gorilla/mux"
)
type GetUserParam struct {
Id int `json:"id"`
}
func GetOneUser(w http.ResponseWriter, r *http.Request) {
defer r.Body.Close()
decoder := json.NewDecoder(r.Body)
var param GetUserParam
err := decoder.Decode(¶m)
if err != nil {
WriteResponse(w, ErrorResponseCode, "request param is invalid, please check!", nil)
return
}
// get user from db
user, err := models.GetOne(strconv.Itoa(param.Id))
if err != nil {
logrus.Warn(err)
WriteResponse(w, ErrorResponseCode, "failed", nil)
return
}
WriteResponse(w, SuccessResponseCode, "success", user)
}
|
根据swagger文档规范,一个swagger文档首先要有swagger的版本和info信息。利用go-swagger只需要在声明package之前加上如下注释即可:
 1
 2
 3
 4
 5
 6
 7
 8
 9
10
|
// Package classification User API.
//
// The purpose of this service is to provide an application
// that is using plain go code to define an API
//
//      Host: localhost
//      Version: 0.0.1
//
// swagger:meta
package service
|
然后在项目根目录下使用swagger generate spec -o ./swagger.json命令生成swagger.json文件:
此命令会找到main.go入口文件,然后遍历所有源码文件,解析然后生成swagger.json文件
 1
 2
 3
 4
 5
 6
 7
 8
 9
10
|
{
  "swagger": "2.0",
  "info": {
    "description": "The purpose of this service is to provide an application\nthat is using plain go code to define an API",
    "title": "User API.",
    "version": "0.0.1"
  },
  "host": "localhost",
  "paths": {}
}
|
基本信息有了,然后就要有路由,请求,响应等,下面针对getOneUser接口编写swagger注释:
 1
 2
 3
 4
 5
 6
 7
 8
 9
10
11
12
13
14
15
16
17
18
19
20
21
22
23
24
25
26
27
28
29
30
31
32
33
34
35
|
// swagger:parameters getSingleUser
type GetUserParam struct {
// an id of user info
//
// Required: true
// in: path
Id int `json:"id"`
}
func GetOneUser(w http.ResponseWriter, r *http.Request) {
// swagger:route GET /users/{id} users getSingleUser
//
// get a user by userID
//
// This will show a user info
//
// Responses:
// 200: UserResponse
decoder := json.NewDecoder(r.Body)
var param GetUserParam
err := decoder.Decode(¶m)
if err != nil {
WriteResponse(w, ErrorResponseCode, "request param is invalid, please check!", nil)
return
}
// get user from db
user, err := models.GetOne(strconv.Itoa(param.Id))
if err != nil {
logrus.Warn(err)
WriteResponse(w, ErrorResponseCode, "failed", nil)
return
}
WriteResponse(w, SuccessResponseCode, "success", user)
}
|
可以看到在GetUserParam结构体上面加了一行swagger:parameters getSingleUser的注释信息,这是声明接口的入参注释,结构体内部的几行注释指明了id这个参数必填,并且查询参数id是在url path中。
在GetOneUser函数中:
- swagger:route指明使用的http method,路由,以及标签和operation id
- Responses指明了返回值的code以及类型
如果入参中有多个参数,可以按照如下写法:
 1
 2
 3
 4
 5
 6
 7
 8
 9
10
11
12
13
14
|
// swagger:parameters getSingleUser
// 定义一个 Person 结构体,用来绑定 url query
type Person struct {
	// an id of user info
	//
	// Required: true
	// in: query
	Name string `form:"name" json:"name"` // 使用成员变量标签定义对应的参数名
	// an address of user info
	//
	// Required: true
	// in: query
	Address string `form:"address" json:"address"`
}
|
然后再声明响应:
 1
 2
 3
 4
 5
 6
 7
 8
 9
10
11
12
13
|
// User Info
//
// swagger:response UserResponse
type UserWapper struct {
    // in: body
    Body ResponseMessage
}

type ResponseMessage struct {
    Code    int         `json:"code"`
    Message string      `json:"message"`
    Data    interface{} `json:"data"`
}
|
使用swagger:response语法声明返回值,其上两行是返回值的描述
然后浏览器访问localhost,查看swagger-editor界面,点击工具栏中的File->Impoprt File上传刚才生成的 swagger.json文件,就可以看到界面:
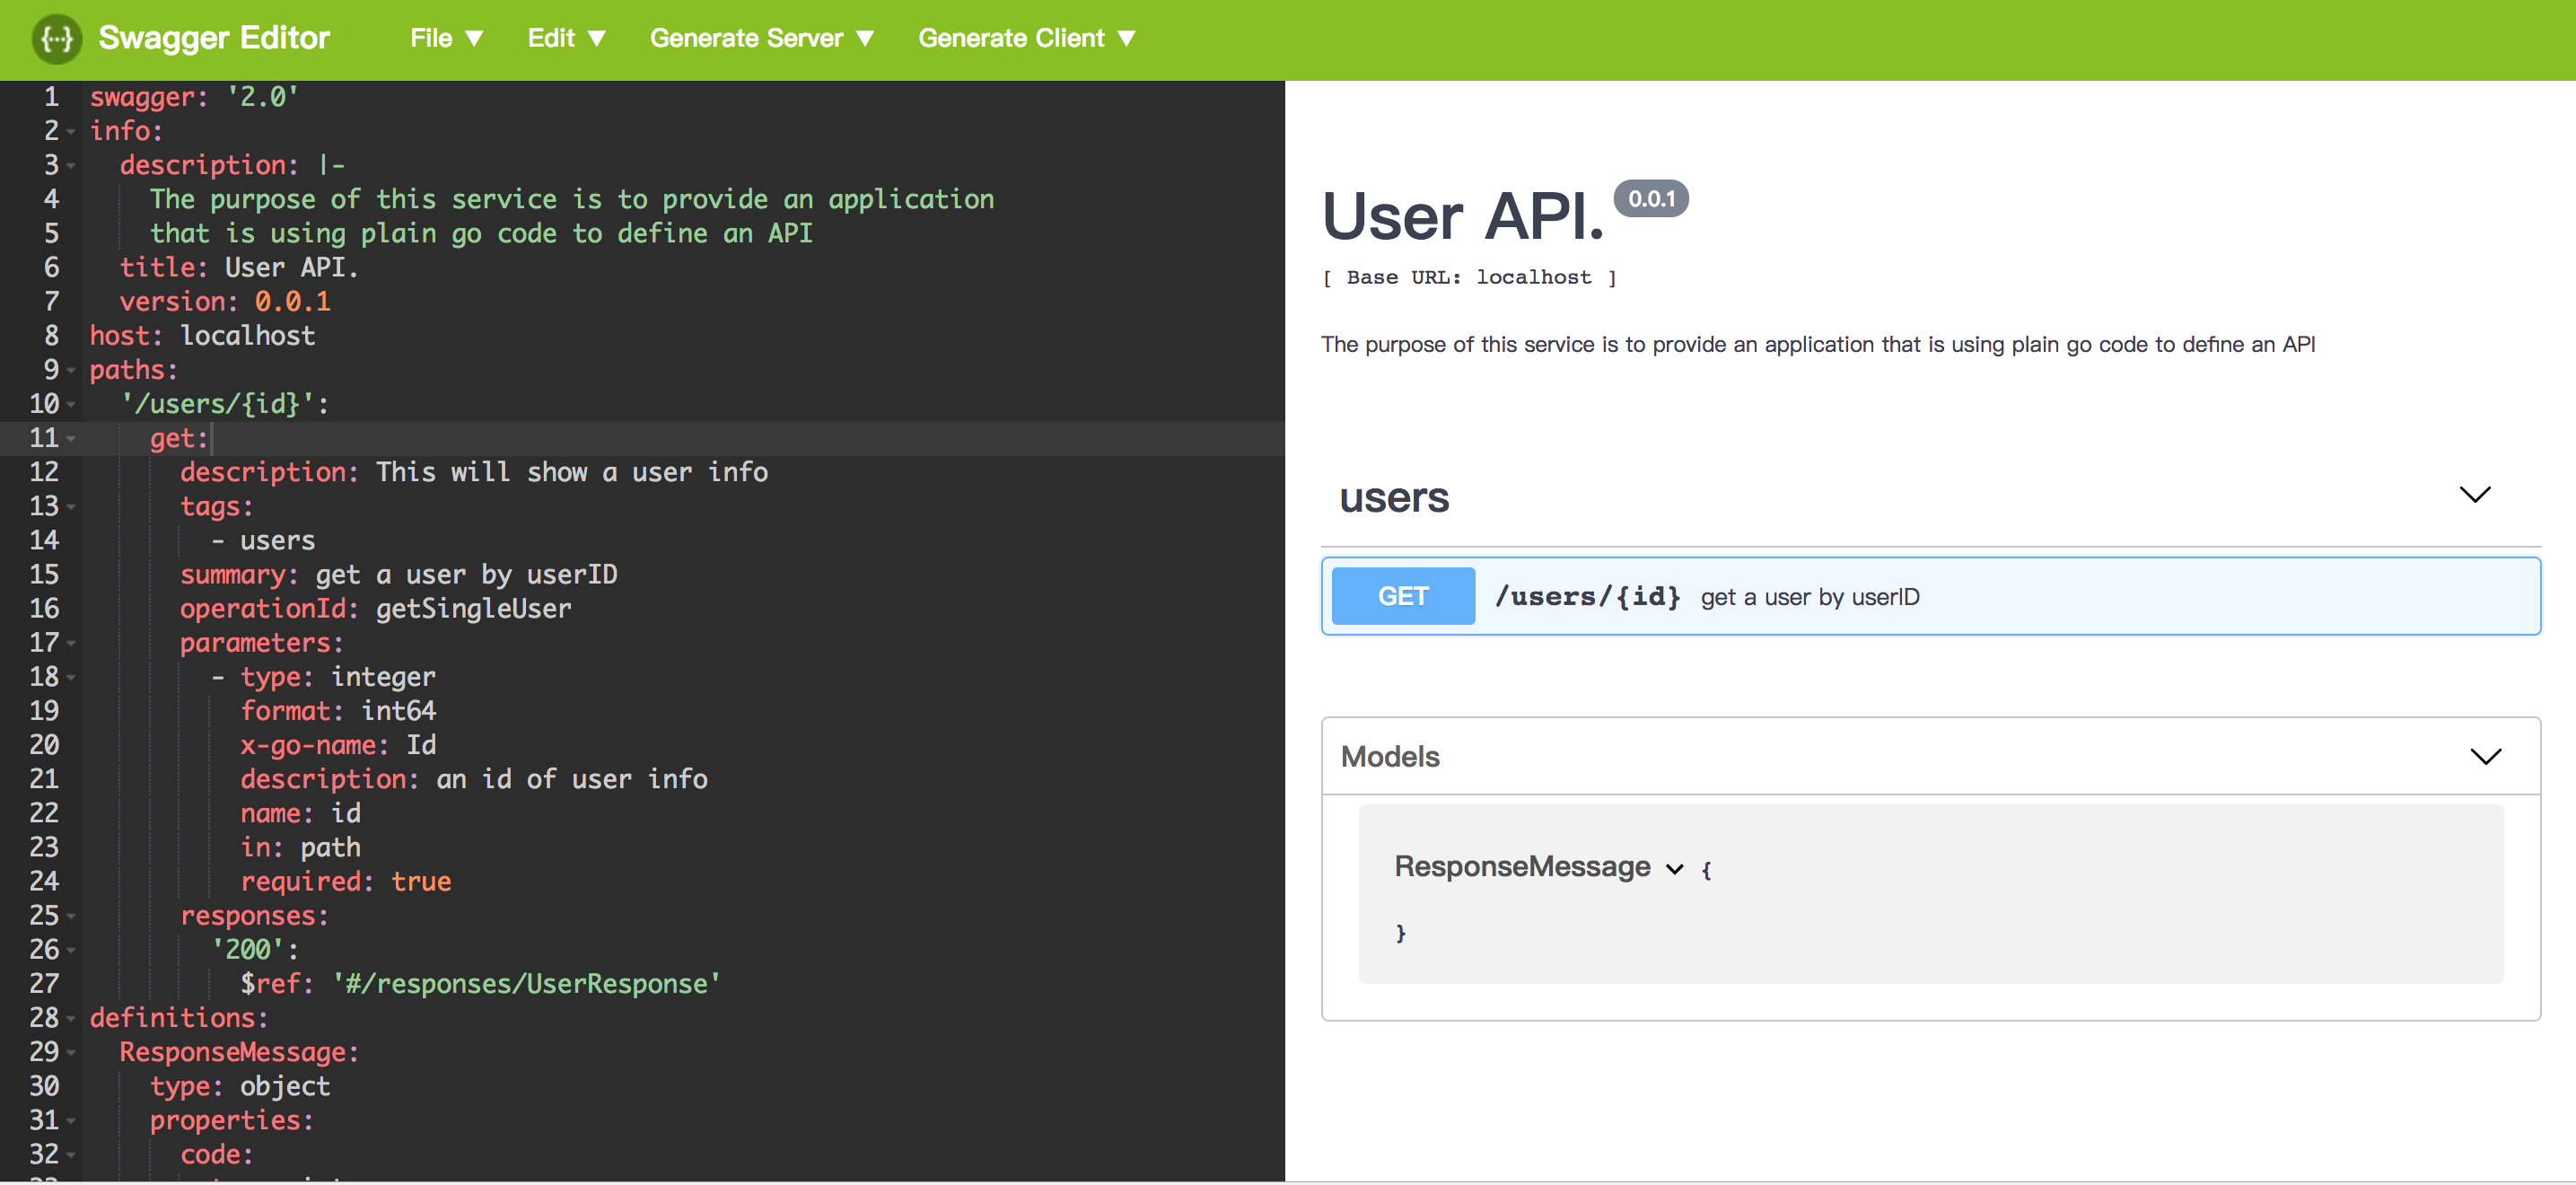
这样一个简单的api文档就生成了
3.怎么样?是不是很简单?可是又感觉那里不对,嗯,注释都写在代码里了,很不美观,而且不易维护。想一下go-swagger的原理是扫描目录下的所有go文件,解析注释信息。那么是不是可以把api注释都集中写在单个文件内,统一管理,免得分散在各个源码文件内。
新建一个doc.go文件,这里还有一个接口是UpdateUser,那么我们在doc.go文件中声明此接口的api注释。先看一下UpdateUser接口的代码:
 1
 2
 3
 4
 5
 6
 7
 8
 9
10
11
12
13
14
15
16
17
18
19
20
21
22
23
24
25
26
27
28
29
30
31
|
func UpdateUser(w http.ResponseWriter, r *http.Request) {
    defer r.Body.Close()
    // decode body data into user struct
    decoder := json.NewDecoder(r.Body)
    user := models.User{}
    err := decoder.Decode(&user)
    if err != nil {
        WriteResponse(w, ErrorResponseCode, "user data is invalid, please check!", nil)
        return
    }

    // check if user exists
    data, err := models.GetUserById(user.Id)
    if err != nil {
        logrus.Warn(err)
        WriteResponse(w, ErrorResponseCode, "query user failed", nil)
        return
    }
    if data.Id == 0 {
        WriteResponse(w, ErrorResponseCode, "user not exists, no need to update", nil)
        return
    }

    // update
    _, err = models.Update(user)
    if err != nil {
        WriteResponse(w, ErrorResponseCode, "update user data failed, please try again!", nil)
        return
    }
    WriteResponse(w, SuccessResponseCode, "update user data success!", nil)
}
|
然后再doc.go文件中编写如下声明:
 1
 2
 3
 4
 5
 6
 7
 8
 9
10
11
12
13
14
15
16
17
18
19
20
21
22
23
24
25
26
|
package service

import "user.server/models"

// swagger:parameters UpdateUserResponseWrapper
type UpdateUserRequest struct {
    // in: body
    Body models.User
}

// Update User Info
//
// swagger:response UpdateUserResponseWrapper
type UpdateUserResponseWrapper struct {
    // in: body
    Body ResponseMessage
}

// swagger:route POST /users users UpdateUserResponseWrapper
//
// Update User
//
// This will update user info
//
//     Responses:
//       200: UpdateUserResponseWrapper
|
这样就把api声明注释给抽离出来了,然后使用命令swagger generate spec -o ./swagger.json生成json文件,就可以看到这样的结果:
很简单吧,参照文档编写几行注释,然后一个命令生成API文档。
优化
因为go-swagger没办法解析interface中包含的结构体,所以swagger没办法看到response的具体内容,有很大的缺陷.我们可以结合手写yaml来做优化
main.go
 1
 2
 3
 4
 5
 6
 7
 8
 9
10
11
12
13
14
15
16
17
18
19
20
21
22
23
|
// 测试标题
//
// 测试介绍
//
// Host: localhost:8888
// Version: 1.0.0
//
// swagger:meta
package main

func main() {
	router := engine.InitGinEngine()
	router.GET("gettest", GetTest)
	router.Run(":" + Port)
}

func GetTest(c *gin.Context) {
	var req adapter.GetTestRequest
	// 将 url 查询参数和person绑定在一起
	_ = c.ShouldBindQuery(&req)
	res := adapter.GetTestResponse{}
	comm.SetResultMsg(c, 0, res, "")
}
|
adapter.go
 1
 2
 3
 4
 5
 6
 7
 8
 9
10
11
12
13
14
15
16
17
18
19
20
21
22
23
24
25
26
27
28
29
30
31
32
33
34
35
36
37
38
39
40
41
42
43
44
45
46
47
48
49
50
51
52
|
package adapter

// swagger:operation GET /gettest GetTest
// ---
// summary: 接口简介.
// description: 接口说明
// responses:
//   "200":
//     description: 返回值
//     schema:
//       properties:
//         code:
//           format: int64
//           type: integer
//           example: 0
//         data:
//           $ref: '#/definitions/GetTestResponse'
//         message:
//           type: string
//           example: "success"

// 结构体GetTestRequest介绍
//  swagger:parameters GetTest
type GetTestRequest struct {
	//  参数A介绍
	//  Required: true
	//  in: query
	Name string `form:"name" json:"name"`

	//  参数B介绍
	//  Required: true
	//  in: query
	Address string `form:"address" json:"address"`
}

// GetTestResWrapper介绍
// swagger:response GetTestResWrapper
type getTestResWrapper struct {
	// The error message
	// in: body
	Body GetTestResponse
}

// GetTestResult介绍
type GetTestResponse struct {
	// 学生姓名
	//example: 小明
	Name string `form:"name" json:"name"`
	//  学生住址
	//example: 北京
	Address string `form:"address" json:"address"`
}
|
因为手写yaml中的#/definitions/GetTestResponse,没有办法自动引进GetTestResponse,可以用一种取巧的办法来引进GetTestResponse,那就是创建swagger:response GetTestResWrapper.
生成yaml文件如下:
 1
 2
 3
 4
 5
 6
 7
 8
 9
10
11
12
13
14
15
16
17
18
19
20
21
22
23
24
25
26
27
28
29
30
31
32
33
34
35
36
37
38
39
40
41
42
43
44
45
46
47
48
49
50
51
52
53
54
55
56
57
58
59
60
|
definitions:
  GetTestResponse:
    description: GetTestResult介绍
    properties:
      address:
        description: 学生住址
        example: 北京
        type: string
        x-go-name: Address
      name:
        description: 学生姓名
        example: 小明
        type: string
        x-go-name: Name
    type: object
    x-go-package: suyang/example/go-swagger/adapter
host: localhost:8888
info:
  description: 测试介绍
  title: 测试标题
  version: 1.0.0
paths:
  /gettest:
    get:
      description: 接口说明
      operationId: GetTest
      parameters:
      - description: 参数A介绍
        in: query
        name: name
        required: true
        type: string
        x-go-name: Name
      - description: 参数B介绍
        in: query
        name: address
        required: true
        type: string
        x-go-name: Address
      responses:
        "200":
          description: 返回值
          schema:
            properties:
              code:
                example: 0
                format: int64
                type: integer
              data:
                $ref: '#/definitions/GetTestResponse'
              message:
                example: success
                type: string
      summary: 接口简介.
responses:
  GetTestResWrapper:
    description: GetTestResWrapper介绍
    schema:
      $ref: '#/definitions/GetTestResponse'
swagger: "2.0"
|
解决了上述问题.
参考:
https://www.zybuluo.com/daduizhang/note/1412629
https://studygolang.com/articles/12354
https://popwalker.github.io/article/6b03ec87/
https://medium.com/@pedram.esmaeeli/generate-swagger-specification-from-go-source-code-648615f7b9d9