CPU Affinity
熟系 Linux 后台开发的朋友都知道 CPU 亲和性(CPU Affinity)。CPU Affinity 是一种调度属性,它可以将单个进程绑定到一个或一组 CPU 上。
在 SMP(Symmetric Multi-Processing 对称多处理)架构下,Linux 调度器(Scheduler)会根据 CPU affinity 的设置让指定的进程运行在绑定的 CPU 上,而不会在别的 CPU 上运行。 CPU Affinity 就是进程要在某个给定的 CPU 上尽量长时间地运行而不被迁移到其他处理器的倾向性。Linux 内核进程调度器天生就具有被称为软 CPU Affinity 的特性,这意味着进程通常不会在处理器之间频繁迁移。合理的设置 CPU Affinity(进程独占 CPU Core)可以提高程序处理性能。
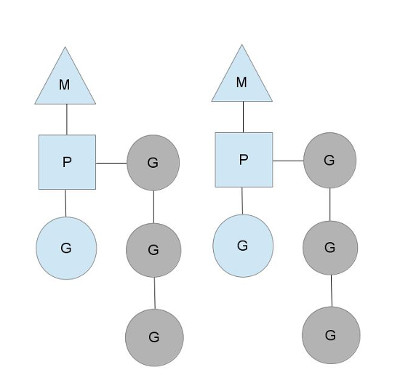
再看 M-P-G 模型
Golang 的调度器模型:经典的 M-P-G 模型,在 Go Scheduler 模型中:
- G 代表 goroutine,即用户创建的 goroutines
- P 代表 Logical processor,是类似于 CPU 核心的概念,其用来控制并发的 M 数量
- M 是操作系统线程。在绝大多数时候,P 的数量和 M 的数量是相等的。每创建一个 P, 就会创建一个对应的 M
当 M 需要执行 G 的时候,它需要寻找到一个空闲的 P,只有跟一个 P 绑定后,M 才能被执行。通过这样的方式,Go Scheduler 保证了在同一时间内,最多只有 P 个系统线程在真正地执行。P 的数量在默认情况下,会被设定为 CPU 的数量。而 M 虽然需要跟 P 绑定执行,但数量上并不与 P 相等。这是因为 M 会因为系统调用或者其他事情被阻塞,因此随着程序的执行,M 的数量可能增长,而 P 在没有用户干预的情况下,则会保持不变。
Golang 的 Runtime 包中获取和设置 GOMAXPROCS 的 代码如下,也就是 Go Scheduler 确定 P 数量的逻辑。在 Linux 上,它会利用系统调用 sched_getaffinity 来获得系统的 CPU 核数。
 1
 2
 3
 4
 5
 6
 7
 8
 9
10
11
12
13
14
15
16
17
18
19
20
21
22
23
24
25
26
27
28
29
30
31
32
33
34
35
36
37
38
39
40
41
42
43
44
45
46
47
48
49
50
51
52
|
// The bootstrap sequence is:
//
// call osinit
// call schedinit
// make & queue new G
// call runtime·mstart
//
// The new G calls runtime·main.
func schedinit() {
    //......
	procs := ncpu
	if n, ok := atoi32(gogetenv("GOMAXPROCS")); ok && n > 0 {
		procs = n
	}
	if procresize(procs) != nil {
		throw("unknown runnable goroutine during bootstrap")
    }
    //......
}

// runtime/os_linux.go
func osinit() {
	ncpu = getproccount()
}

// runtime/os_linux.go
func getproccount() int32 {
	// This buffer is huge (8 kB) but we are on the system stack
	// and there should be plenty of space (64 kB).
	// Also this is a leaf, so we're not holding up the memory for long.
	// See golang.org/issue/11823.
	// The suggested behavior here is to keep trying with ever-larger
	// buffers, but we don't have a dynamic memory allocator at the
	// moment, so that's a bit tricky and seems like overkill.
	const maxCPUs = 64 * 1024
	var buf [maxCPUs / 8]byte
	r := sched_getaffinity(0, unsafe.Sizeof(buf), &buf[0])
	if r < 0 {
		return 1
	}
	n := int32(0)
	for _, v := range buf[:r] {
		for v != 0 {
			n += int32(v & 1)
			v >>= 1
		}
	}
	if n == 0 {
		n = 1
	}
	return n
}
|
调多processor的影响
runtime processor多了会出现什么问题?
一个runtime findrunnable时产生的损耗,另一个是线程引起的上下文切换。
runtime的findrunnable方法是解决m找可用的协程的函数,当从绑定p本地runq上找不到可执行的goroutine后,尝试从全局链表中拿,再拿不到从netpoll和事件池里拿,最后会从别的p里偷任务。全局runq是有锁操作,其他偷任务使用了atomic原子操作来规避futex竞争下陷入切换等待问题,但lock free在竞争下也会有忙轮询的状态,比如不断的尝试。
 1
 2
 3
 4
 5
 6
 7
 8
 9
10
11
12
13
14
15
16
17
18
19
20
21
22
23
|
    // 全局 runq
    if sched.runqsize != 0 {
        lock(&sched.lock)
        gp := globrunqget(_p_, 0)
        unlock(&sched.lock)
        if gp != nil {
            return gp, false
        }
    }
...
    // 尝试4次从别的p偷任务
     for i := 0; i < 4; i++ {
        for enum := stealOrder.start(fastrand()); !enum.done(); enum.next() {
            if sched.gcwaiting != 0 {
                goto top
            }
            stealRunNextG := i > 2 // first look for ready queues with more than 1 g
            if gp := runqsteal(_p_, allp[enum.position()], stealRunNextG); gp != nil {
                return gp, false
            }
        }
    }
...
|
通过godebug可以看到全局队列及各个p的runq里等待调度的任务量。有不少p是空的,那么势必会引起steal偷任务。另外,runqueue的大小远超其他p的总和,说明大部分任务在全局里,全局又是把大锁。

随着调多runtime processor数量,相关的m线程自然也就跟着多了起来。linux内核为了保证可执行的线程在调度上雨露均沾,按照内核调度算法来切换就绪状态的线程,切换又引起上下文切换。上下文切换也是性能的一大杀手。findrunnable的某些锁竞争也会触发上下文切换。
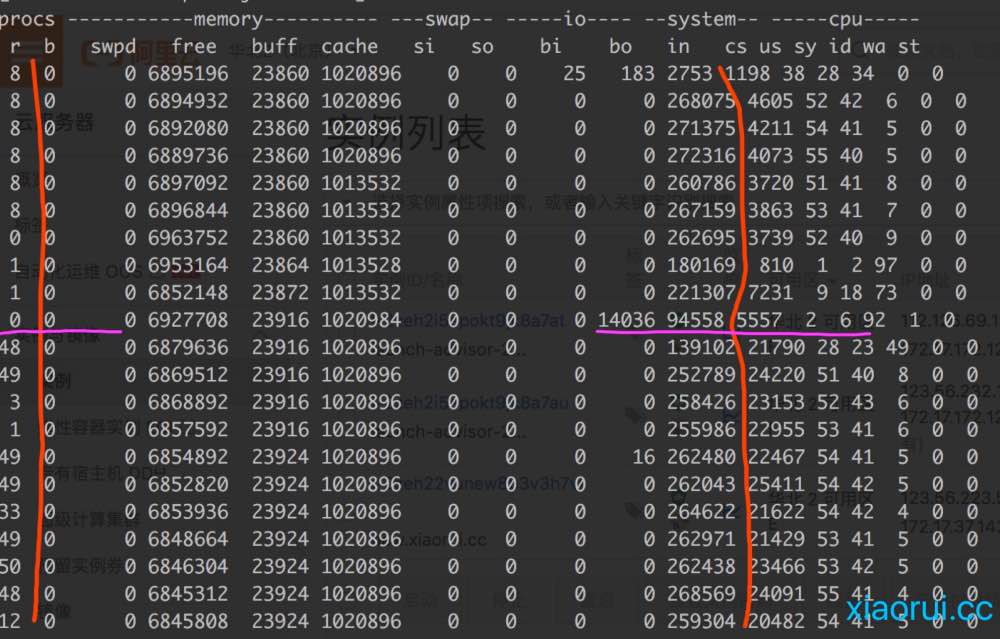
下面是我这边一个行情推送服务压测下的vmstat监控数据。首先把容器的的cpu core限制为8,再先后测试processor为8和48的情况。图的上面是processor为8的情况,下面为processor为48的情况。看图可以直观的发现当processor调大后,上下文切换明显多起来,另外等待调度的线程也多了。
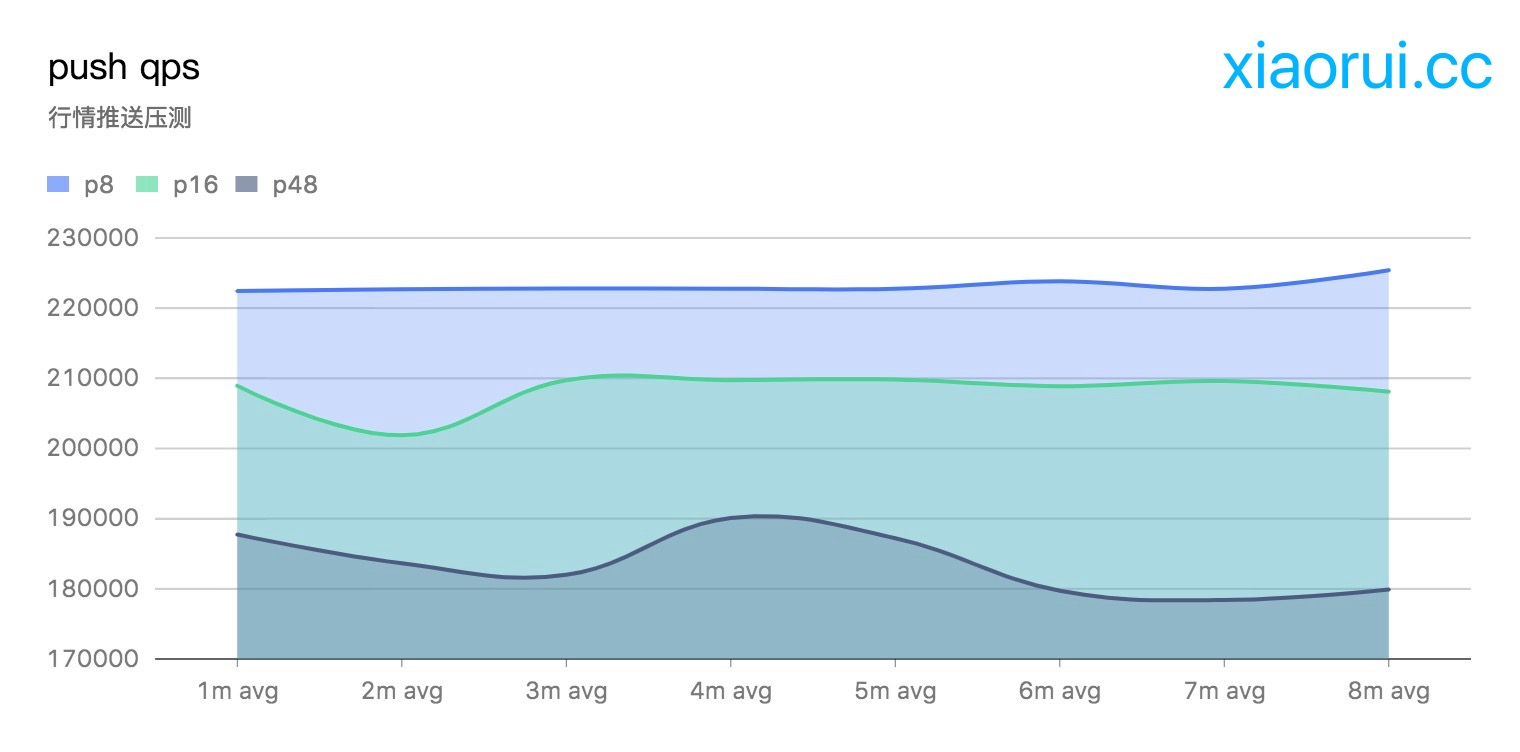
另外从qps的指标上也可以反映多processor带来的性能损耗。通过下图可以看到当runtime.GOMAXPROCS为固定的cpu core数时,性能最理想。后面随着processor数量的增长,qps指标有所下降。
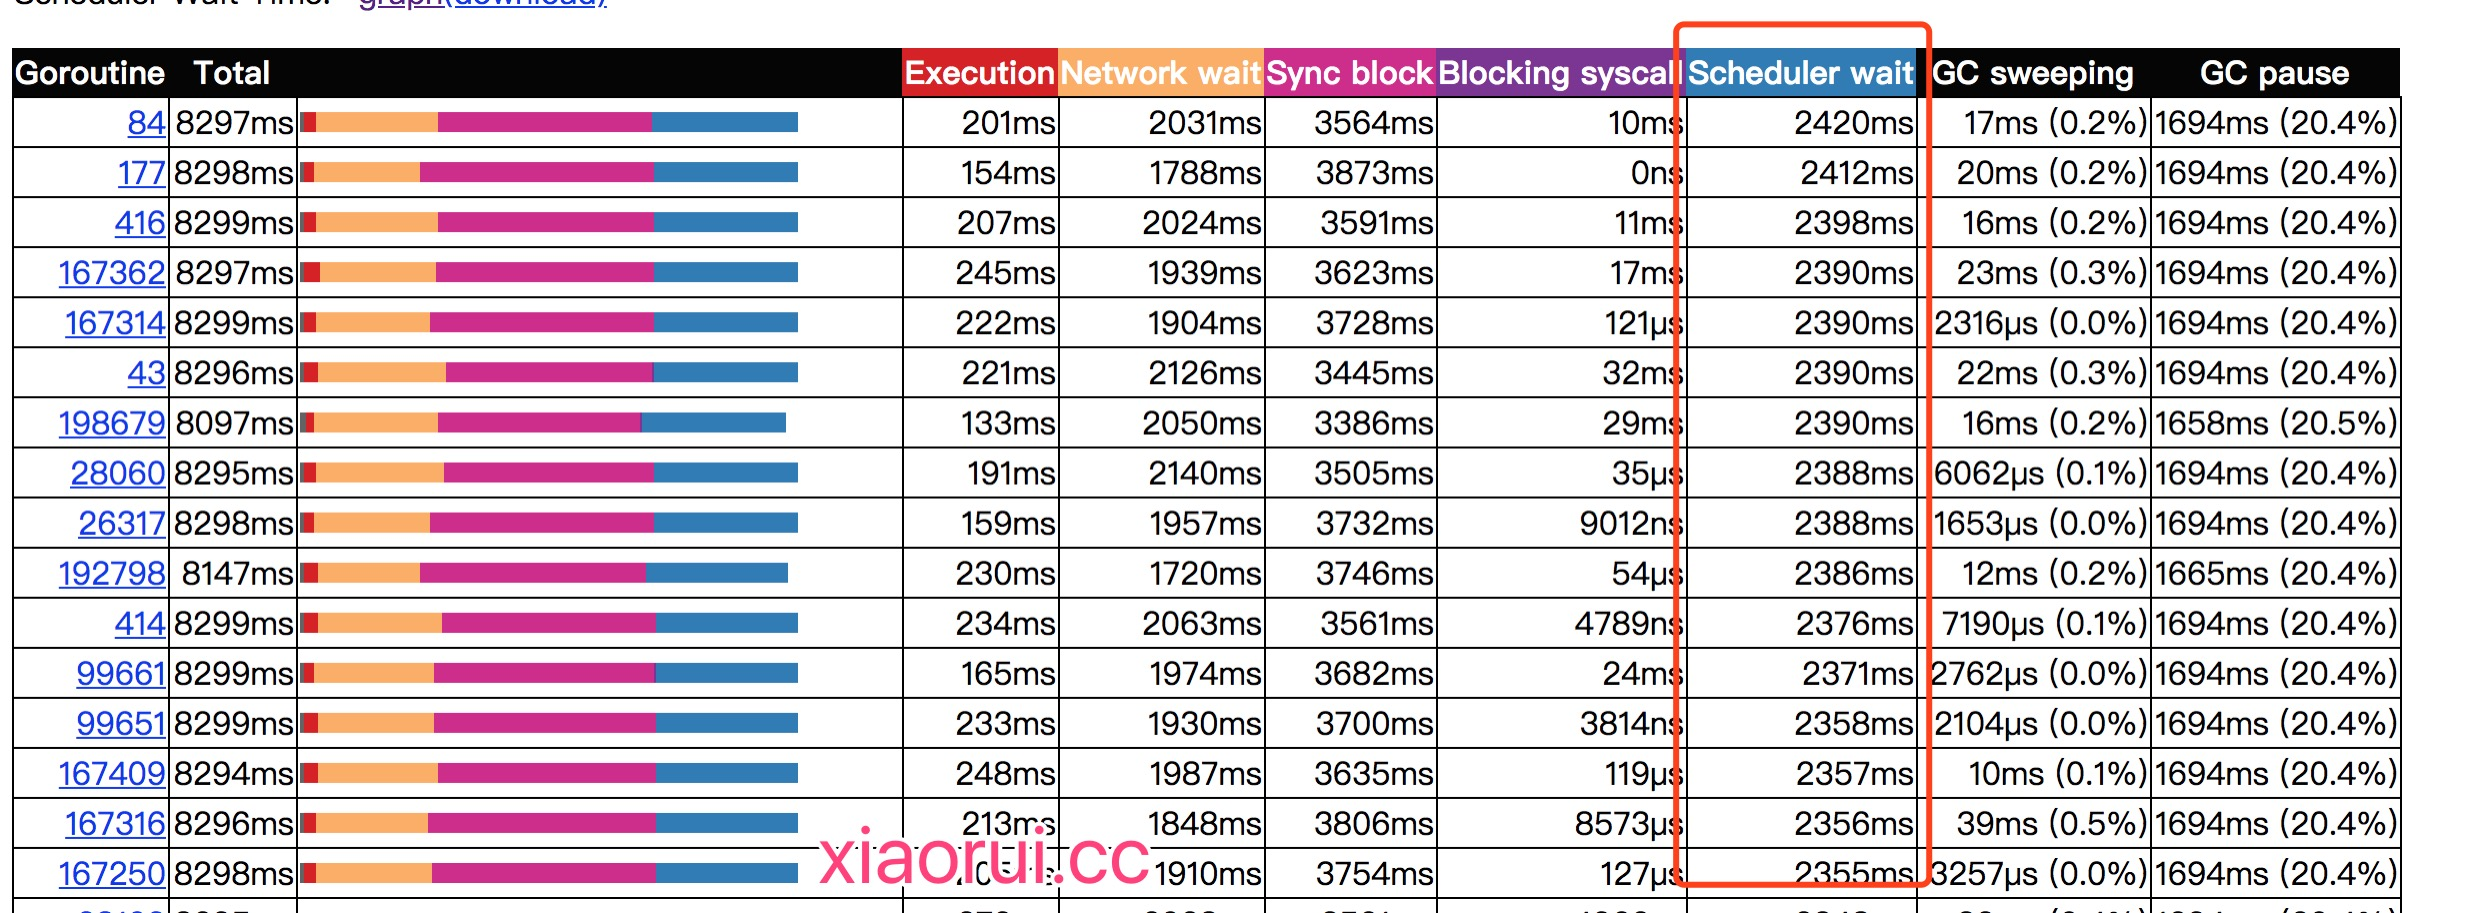
通过golang tool trace可以分析出协程调度等待时间越来越长了。
GOMAXPROCS 及取值
可以通过 runtime.GOMAXPROCS() 来设定 P 的值,当前 Go 版本的 GOMAXPROCS 默认值已经设置为 CPU 的(逻辑核)核数, 这允许我们的 Go 程序充分使用机器的每一个 CPU, 最大程度的提高我们程序的并发性能。不过从实践经验中来看,IO 密集型的应用,可以稍微调高 P 的个数;而本文讨论的 Affinity 设置更适合 CPU 密集型的应用。
物理机 && 虚拟机
在物理机及一般的 CVM 中,runtime.GOMAXPROCS() 的值就是 CPU 的逻辑核数。比如在笔者的机器上,runtime.GOMAXPROCS() 获取的值就是 8image
Docker-Container
docker 官方文档中指出:
By default, each container’s access to the host machine’s CPU cycles is unlimited. You can set various constraints to limit a given container’s access to the host machine’s CPU cycles. Most users use and configure the default CFS scheduler. In Docker 1.13 and higher, you can also configure the realtime scheduler.
小结下:
- 默认容器会使用宿主机 CPU 是不受限制的
- 要限制容器使用 CPU,可以通过参数设置 CPU 的使用,又细分为两种策略:
- 将容器设置为普通进程,通过完全公平调度算法(CFS,Completely Fair Scheduler)调度类实现对容器 CPU 的限制 – 默认方案
- 将容器设置为实时进程,通过实时调度类进行限制
我们这里仅考虑默认方案,即通过 CFS 调度类实现对容器 CPU 的限制。(我们下面的分析默认了进程只进行 CPU 操作,没有睡眠、IO 等操作,换句话说,进程的生命周期中一直在就绪队列中排队,要么在用 CPU,要么在等 CPU)
docker(docker run)配置 CPU 使用量的参数主要下面几个,这些参数主要是通过配置在容器对应 cgroup 中,由 cgroup 进行实际的 CPU 管控。其对应的路径可以从 cgroup 中查看到
1
2
3
4
|
  --cpu-shares                    CPU shares (relative weight)
  --cpu-period                    Limit CPU CFS (Completely Fair Scheduler) period
  --cpu-quota                     Limit CPU CFS (Completely Fair Scheduler) quota
  --cpuset-cpus                   CPUs in which to allow execution (0-3, 0,1)
|
在 Docker-container 中,runtime.GOMAXPROCS() 依赖/proc/cpuinfo信息,获取的是 宿主机的 CPU 核数 。P 值设置过大,导致生成线程过多,会增加上线文切换的负担,导致严重的上下文切换,浪费 CPU。 所以,在 Docker-container 中, Golang 设置的 GOMAXPROCS 并不准确。
Kubernetes
kubernetes 对容器可以设置两个关于 CPU 的值:limits 和 requests,即 spec.containers[].resources.limits.cpu 和 spec.containers[].resources.requests.cpu,对应了上面的配置选项,如下面的配置:
 1
 2
 3
 4
 5
 6
 7
 8
 9
10
11
12
13
14
15
|
image: ---------
        imagePullPolicy: IfNotPresent
        name: pandaychen-test-app1
        resources:
          limits:
            cpu: "2"
            memory: 4196Mi
          requests:
            cpu: "1"
            memory: 1Gi
        securityContext:
          privileged: false
          procMount: Default
        terminationMessagePath: /dev/termination-log
        terminationMessagePolicy: File
|
关于 limits 和 requests 则两个值:
Kubernetes Pod 中的结果同 Docker,在 Kubernetes 集群中,如果采用如此设置,会导致 Node(宿主机)中的线程数过多。在笔者的 Kubernetes 集群中,有 3 个 Node 节点,总核数约 36 核:
1
2
|
CPU: 8.95/35.97 核
内存: 18.56/63.95GB
|
创建的 Pod 参数中,限制 Pod 的 CPU 核数是 1(limits),采用了 GOMAXPROCS 设置后,发现 Pod 容器中的线程数量超过 36,集群中的线程总数也远超过预期。
1
2
3
4
5
6
7
|
resources:
	limits:
		cpu: "1"
		memory: 6Gi
	requests:
		cpu: 500m
		memory: 1Gi
|
小结下,在 Docker-container 和 Kubernetes 集群中,存在 GOMAXPROCS 会错误识别容器 cpu 核心数的问题。此外,在 Kubernetes 集群中,为每个应用 Pod 分配的 CPU 及 CPU limits 不一定相同,所以通过配置指定 GOMAXPROCS 线程数来匹配 CPU 核心个数的方法,不太靠谱,同时这种 Fixed 的方式也与 Kubernetes 的(自动)扩缩容理念不符。
解决
让我们回到 GOMAXPROCS 的问题,一般在部署容器应用时,通常会对 CPU 资源做限制,例如上面 yaml 文件的,上限是 2 个核。而实际应用的 pod 中,通过 lscpu 命令 ,我们仍然能看到宿主机的所有 CPU 核心,如下面是笔者的一个 Kubernetes 集群中的 Pod 信息:
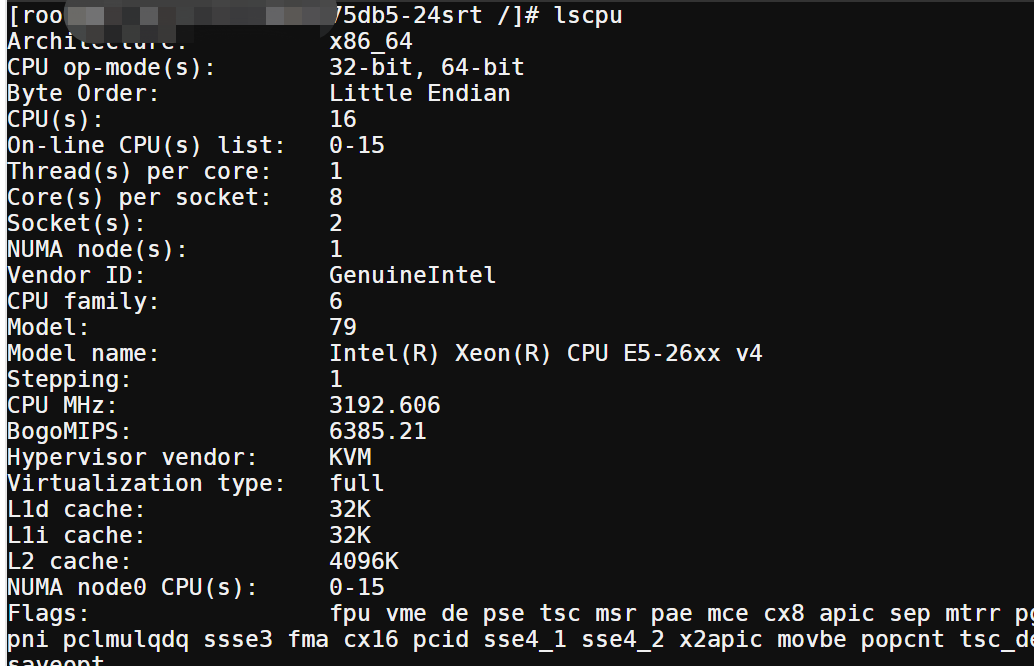
这会导致 Golang 服务默认会拿宿主机的 CPU 核心数来调用 runtime.GOMAXPROCS(),导致 P 数量远远大于可用的 CPU 核心,引起频繁上下文切换,影响高负载情况下的服务性能。而 Uber-Automaxprocs 这个库 能够正确识别容器允许使用的核心数,合理的设置 processor 数目,避免高并发下的切换问题。
它的使用方式也是非常简单:
1
2
3
4
5
|
import _ "go.uber.org/automaxprocs"

func main() {
  // Your application logic here
}
|
automaxprocs
我们知道,docker使用cgroup来限制容器CPU使用, 使用该容器配置的cpu.cfsquotaus/cpu.cfsperiodus即可获得CPU配额. 所以关键是找到容器的这两个值.
init
通过 Readme.md 中的 import 方式,
1
|
import _ "go.uber.org/automaxprocs"
|
大概可以猜到,该包的 init 方法 是 package 级别的。导入即生效。
init 方法:
1
2
3
4
|
func init() {
	// 入口,核心方法
	maxprocs.Set(maxprocs.Logger(log.Printf))
}
|
maxprocs.Set()
核心函数就是 maxpROCs.Set();这个函数会从当前的 cgroups 里获取设置的 CPU quota,然后转换为合适的 GOMAXPROCS。
 1
 2
 3
 4
 5
 6
 7
 8
 9
10
11
12
13
14
15
16
17
18
19
20
21
22
23
24
25
26
27
28
29
30
31
32
33
34
35
36
37
38
39
40
41
42
43
44
45
46
47
48
49
50
|
func Set(opts ...Option) (func(), error) {
	cfg := &config{
		procs:         iruntime.CPUQuotaToGOMAXPROCS,
		minGOMAXPROCS: 1,
	}
	for _, o := range opts {
		o.apply(cfg)
	}

	undoNoop := func() {
		cfg.log("maxprocs: No GOMAXPROCS change to reset")
	}

	// Honor the GOMAXPROCS environment variable if present. Otherwise, amend
	// `runtime.GOMAXPROCS()` with the current process' CPU quota if the OS is
	// Linux, and guarantee a minimum value of 1. The minimum guaranteed value
	// can be overriden using `maxprocs.Min()`.
	if max, exists := os.LookupEnv(_maxProcsKey); exists {
		cfg.log("maxprocs: Honoring GOMAXPROCS=%q as set in environment", max)
		return undoNoop, nil
	}

	// 核心函数,调用 iruntime.CPUQuotaToGOMAXPROCS 得到最终的 maxProcs
	maxProcs, status, err := cfg.procs(cfg.minGOMAXPROCS)
	if err != nil {
		return undoNoop, err
	}

	if status == iruntime.CPUQuotaUndefined {
		cfg.log("maxprocs: Leaving GOMAXPROCS=%v: CPU quota undefined", currentMaxProcs())
		return undoNoop, nil
	}

	prev := currentMaxProcs()
	undo := func() {
		cfg.log("maxprocs: Resetting GOMAXPROCS to %v", prev)
		runtime.GOMAXPROCS(prev)
	}

	switch status {
	case iruntime.CPUQuotaMinUsed:
		cfg.log("maxprocs: Updating GOMAXPROCS=%v: using minimum allowed GOMAXPROCS", maxProcs)
	case iruntime.CPUQuotaUsed:
		cfg.log("maxprocs: Updating GOMAXPROCS=%v: determined from CPU quota", maxProcs)
	}

	// 调用系统的 runtime 完成功能
	runtime.GOMAXPROCS(maxProcs)
	return undo, nil
}
|
可以看出主要的工作都在 iruntime.CPUQuotaToGOMAXPROCS() 里完成。
 1
 2
 3
 4
 5
 6
 7
 8
 9
10
11
12
13
14
15
16
17
18
19
20
|
// CPUQuotaToGOMAXPROCS converts the CPU quota applied to the calling process
// to a valid GOMAXPROCS value.
// minValue 避免外部 cpu quota 设置的过小。
func CPUQuotaToGOMAXPROCS(minValue int) (int, CPUQuotaStatus, error) {
	cgroups, err := cg.NewCGroupsForCurrentProcess()
	if err != nil {
		return -1, CPUQuotaUndefined, err
	}

	quota, defined, err := cgroups.CPUQuota()
	if !defined || err != nil {
		return -1, CPUQuotaUndefined, err
	}

	maxProcs := int(math.Floor(quota))
	if minValue > 0 && maxProcs < minValue {
		return minValue, CPUQuotaMinUsed, nil
	}
	return maxProcs, CPUQuotaUsed, nil
}
|
1
2
3
4
5
|
// NewCGroupsForCurrentProcess returns a new *CGroups instance for the current
// process.
func NewCGroupsForCurrentProcess() (CGroups, error) {
	return NewCGroups(_procPathMountInfo, _procPathCGroup)
}
|
 1
 2
 3
 4
 5
 6
 7
 8
 9
10
11
12
13
14
15
16
17
18
19
20
21
22
23
24
25
26
27
28
29
30
31
32
33
34
35
36
|
// NewCGroups returns a new *CGroups from given `mountinfo` and `cgroup` files
// under for some process under `/proc` file system (see also proc(5) for more
// information).
func NewCGroups(procPathMountInfo, procPathCGroup string) (CGroups, error) {
	cgroupSubsystems, err := parseCGroupSubsystems(procPathCGroup)
	if err != nil {
		return nil, err
	}

	cgroups := make(CGroups)
	newMountPoint := func(mp *MountPoint) error {
		if mp.FSType != _cgroupFSType {
			return nil
		}

		for _, opt := range mp.SuperOptions {
			subsys, exists := cgroupSubsystems[opt]
			if !exists {
				continue
			}

			cgroupPath, err := mp.Translate(subsys.Name)
			if err != nil {
				return err
			}
			cgroups[opt] = NewCGroup(cgroupPath)
		}

		return nil
	}

	if err := parseMountInfo(procPathMountInfo, newMountPoint); err != nil {
		return nil, err
	}
	return cgroups, nil
}
|
parseCGroupSubsystems
核心函数之一的 parseCGroupSubsystems() 可以通过解析 /pROC/$pid/cgroup 文件,返回这个进程的 cgroup subsystem table,对应的数据结构是:
1
2
3
4
5
6
7
|
// CGroupSubsys represents the data structure for entities in
// `/proc/$PID/cgroup`. See also proc(5) for more information.
type CGroupSubsys struct {
	ID         int
	Subsystems []string
	Name       string
}
|
 1
 2
 3
 4
 5
 6
 7
 8
 9
10
11
12
13
14
15
16
17
18
19
20
21
22
23
24
25
26
27
28
29
|
// parseCGroupSubsystems parses procPathCGroup (usually at `/proc/$PID/cgroup`)
// and returns a new map[string]*CGroupSubsys.
func parseCGroupSubsystems(procPathCGroup string) (map[string]*CGroupSubsys, error) {
	cgroupFile, err := os.Open(procPathCGroup)
	if err != nil {
		return nil, err
	}
	defer cgroupFile.Close()

	scanner := bufio.NewScanner(cgroupFile)
	subsystems := make(map[string]*CGroupSubsys)

	for scanner.Scan() {
		//解析文本
		cgroup, err := NewCGroupSubsysFromLine(scanner.Text())
		if err != nil {
			return nil, err
		}
		for _, subsys := range cgroup.Subsystems {
			subsystems[subsys] = cgroup
		}
	}

	if err := scanner.Err(); err != nil {
		return nil, err
	}

	return subsystems, nil
}
|
这里看一下 /pROC/$pid/cgroup 的样子
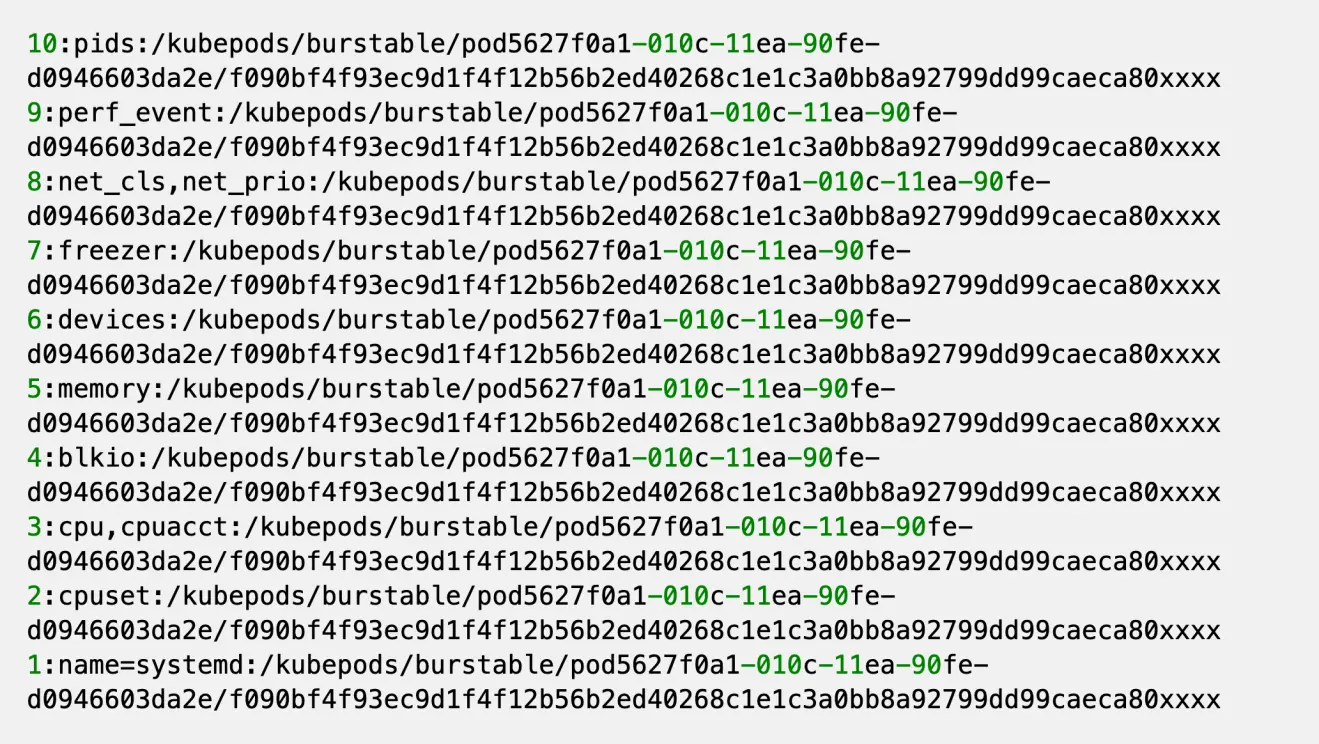
每行都是一条记录,记录的每个 field 之间用 : 分割,从左至右分别是:
- id
- subsystems,多个 subsystem 之间用 , 分隔
- pathname
这里的目标是包含 cpu 这个 subsystem 的这条记录;其他的记录其实无关紧要。
同时注意一下 pathname 这个字段,代表进程所属的 cgroup hierarchy 的路径,并且一个相对于 cgroup hierarchy 的 mount point 的一个相对路径。
这里能看到一条记录可能有多个 subsystem,所以前面的 table 最后会出现多个 subsystem key 指向的其实是同一个 CGroupSubsys 实例。
parseMountInfo
类似的,核心函数 parseMountInfo() 会打开进程的 mountinfo 文件,然后将每一行记录解析成对应的 MountInfo 结构
 1
 2
 3
 4
 5
 6
 7
 8
 9
10
11
12
13
14
|
// MountPoint is the data structure for the mount points in
// `/proc/$PID/mountinfo`. See also proc(5) for more information.
type MountPoint struct {
	MountID        int
	ParentID       int
	DeviceID       string
	Root           string
	MountPoint     string
	Options        []string
	OptionalFields []string
	FSType         string
	MountSource    string
	SuperOptions   []string
}
|
 1
 2
 3
 4
 5
 6
 7
 8
 9
10
11
12
13
14
15
16
17
18
19
20
21
22
23
|
// parseMountInfo parses procPathMountInfo (usually at `/proc/$PID/mountinfo`)
// and yields parsed *MountPoint into newMountPoint.
func parseMountInfo(procPathMountInfo string, newMountPoint func(*MountPoint) error) error {
	mountInfoFile, err := os.Open(procPathMountInfo)
	if err != nil {
		return err
	}
	defer mountInfoFile.Close()

	scanner := bufio.NewScanner(mountInfoFile)

	for scanner.Scan() {
		mountPoint, err := NewMountPointFromLine(scanner.Text())
		if err != nil {
			return err
		}
		if err := newMountPoint(mountPoint); err != nil {
			return err
		}
	}

	return scanner.Err()
}
|
看一下一个示例 mountinfo 文件内容
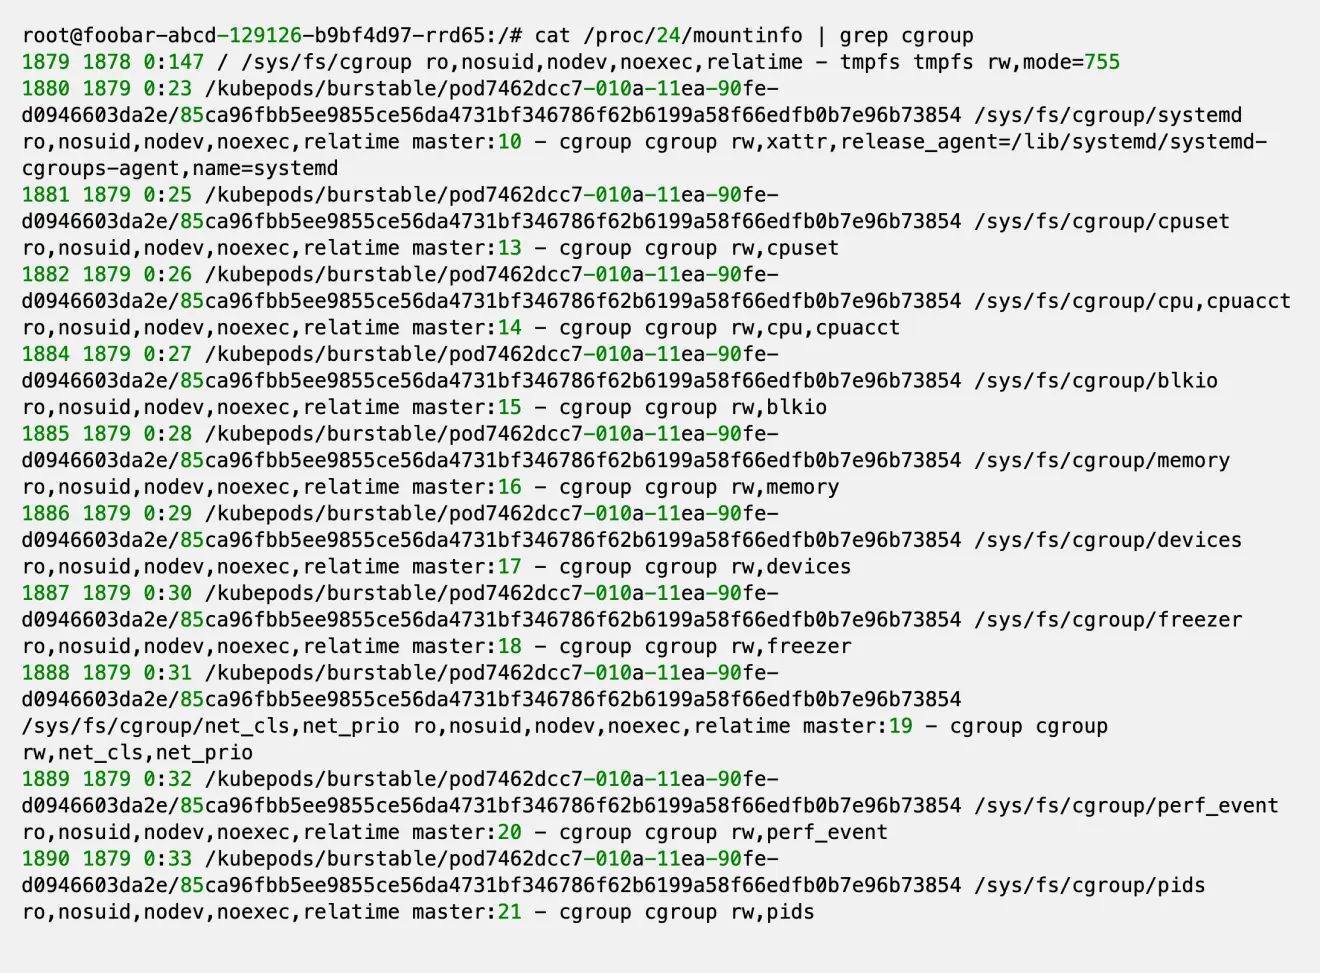
每条记录的字段用空格分隔,字段 - 表示后面都是 options
共有三个字段需要我们关心:
- 索引为3的字段;组成当前挂载点根路径的文件系统的路径,对应 MountInfo.Root
- 索引为4的字段;当前挂载点相对于进程根目录的路径,对应 MountInfo.MountPoint
- - 字段之后的第一个字段,代表 filesystem type,对应 MountInfo.FsType;我们其实只需要 cgroup。
- 上面 fstype 字段之后的第二个字段,是 subsystems,subsystem之间用,分割;这里我们其实需要的是包含 cpu 的这个 subsystem
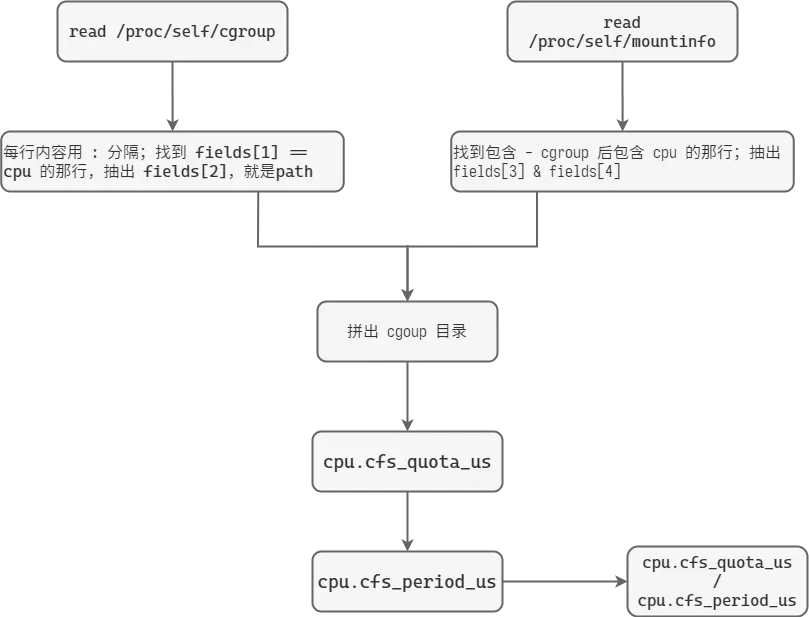
找到目标 cgroup path
有了前两步之后,就可以找到进程对应的 cpu 这个 subsystem 的 CGroup path。
1
2
3
4
|
// CGroup represents the data structure for a Linux control group.
type CGroup struct {
	path string
}
|
这部分操作在 lambda 函数 newMountPoint() 中。
总结起来就是:
- 在 mountinfo 文件中找到 fstype = cgroup && subsystems.contains(cpu) 的记录,分离出 root 和 mount-point。
- 在 cgroup 文件中找到 subsystems.contains(cpu) 的记录,分理出 pathname
- cgroupPath = Join(mount_point, relative(root, pathname))
relative() 函数返回 pathname 相对于 root 的相对路径
实践中发现 root 和 pathname 基本一致,这样返回的相对路径就是 .;最后组合的最终路径都是 /sys/fs/cgroup/cpu
不过考虑到不同发行版甚至不同版本的 docker / k8s 行为可能存在不一致,所以最具有移植性还是上面的做法。
计算 cpu 配额
有了前面的目录路径之后,该目录下的:
- cfs.cpu_period_us 文件记录了调度周期,单位是 us;默认值一般是 100'000,即 100 ms
- cfs.cpu_quota_us 记录了每个调度周期进程允许使用 cpu 的量,单位也是 us。值为 -1 表示无限制;对于 4C 的容器,这个值一般是 400'000
这两个值限制的是进程使用 cpu 的时间。
上述设置下表示:每 100ms 的调度周期内,该进程可以使用 400ms 的 cpu 时间,所以看起来的效果是可以使用4个CPU核心
更详细的内容请参考 Linux kernel 的文档:CFS Bandwidth Control
quota 和 period 的比值就是 docker 为容器设置的 CPU 核数配置。
这个值也是 automaxpROCs 为 runtime.GOMAXPROCS() 设置的值。
这部分逻辑对应库函数:CGoups.CPUQuota()
 1
 2
 3
 4
 5
 6
 7
 8
 9
10
11
12
13
14
15
16
17
18
19
20
21
|
// CPUQuota returns the CPU quota applied with the CPU cgroup controller.
// It is a result of `cpu.cfs_quota_us / cpu.cfs_period_us`. If the value of
// `cpu.cfs_quota_us` was not set (-1), the method returns `(-1, nil)`.
func (cg CGroups) CPUQuota() (float64, bool, error) {
	cpuCGroup, exists := cg[_cgroupSubsysCPU]
	if !exists {
		return -1, false, nil
	}

	cfsQuotaUs, err := cpuCGroup.readInt(_cgroupCPUCFSQuotaUsParam)
	if defined := cfsQuotaUs > 0; err != nil || !defined {
		return -1, defined, err
	}

	cfsPeriodUs, err := cpuCGroup.readInt(_cgroupCPUCFSPeriodUsParam)
	if err != nil {
		return -1, false, err
	}

	return float64(cfsQuotaUs) / float64(cfsPeriodUs), true, nil
}
|
总结
流程图:
容器技术(docker)通过 Linux kernel 提供的 cgroups 机制来实现资源隔离和限制,但是这种限制有时候会出现反直觉的结果。
上面的分析过程看,虽然这个库做的事情比较简单,但是要注意的是,我们是通过逆向工程(由果推因)来分析的这个问题。
如果需要从正面解决(执因索果),那么就需要对 1)容器实现细节 2)linux 内核中 cgroups 的实现细节 有很深的了解。
这恐怕也是过了一年多才找到解决方案,而且最后还是直接使用别人的solution的原因。
automaxprocs的限制
事实上,automaxpROCs 仅针对于使用 CFS 调度策略的实例。
CFS 调度测类只限制进程的运行配额,不设置 processor affinity。所以在 4C 的限制下,理论上 G-P-M 调度模型下的 M 可以运行在任意物理核心上
查看 /sys/fs/cgroup/cpuset/cpuset.cpus 这个文件可以发现没有做任何物理核心上的限制。
docker 创建容器时可以使用 –cpus=x 来实现。
对于只使用 cpuset 策略的容器来说,其实没必要使用这个库。
因为 cpuset 直接设置了容器的 processor affinity,然后神奇的是,golang 的 runtime.NumCores() 获取的核心数是考虑过 processor affinity 的。
参考
GOMAXPROCS 的坑
Uber-Automaxprocs 分析
uber automaxprocs 源码分析
golang gomaxprocs调高引起调度性能损耗