前言
本节会介绍 Go 语言的哈希的实现原理,哈希是除了数组之外,最常见的数据结构。几乎所有的语言都会有数组和哈希表两种集合元素,有的语言将数组实现成列表,而有的语言将哈希称作字典或者映射。无论如何命名或者如何实现,数组和哈希是两种设计集合元素的思路,数组用于表示元素的序列,而哈希表示的是键值对之间映射关系。
哈希表是一种古老的数据结构,在 1953 年就有人使用拉链法实现了哈希表,它能够通过键直接获取该键对应的值。
设计原理
哈希表是计算机科学中的最重要数据结构之一,这不仅因为它 𝑂(1) 的读写性能非常优秀,还因为它提供了键值之间的映射。想要实现一个性能优异的哈希表,需要注意两个关键点 —— 哈希函数和冲突解决方法。
哈希函数
实现哈希表的关键点在于哈希函数的选择,哈希函数的选择在很大程度上能够决定哈希表的读写性能。在理想情况下,哈希函数应该能够将不同键映射到不同的索引上,这要求哈希函数的输出范围大于输入范围,但是由于键的数量会远远大于映射的范围,所以在实际使用时,这个理想的效果是不可能实现的。
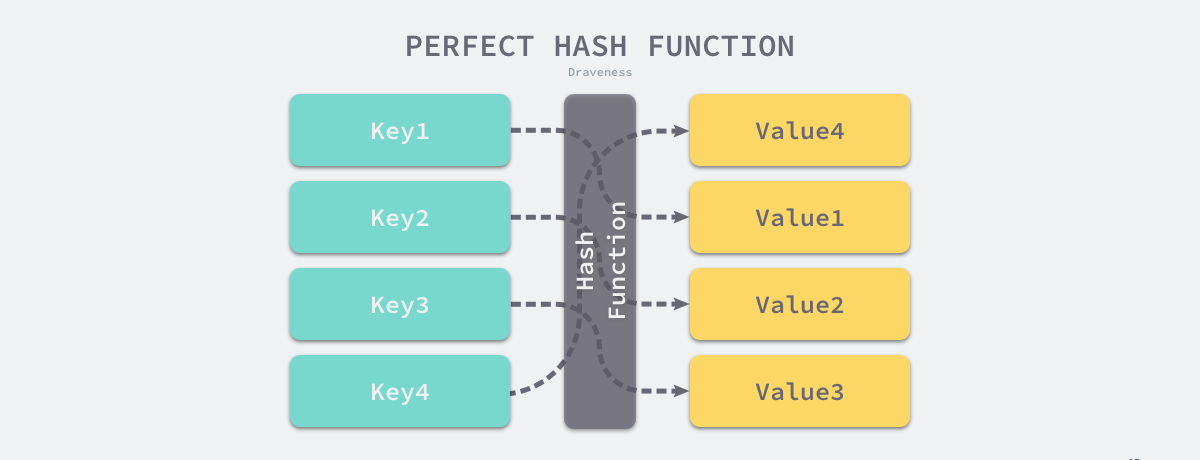
比较实际的方式是让哈希函数的结果能够尽可能的均匀分布,然后通过工程上的手段解决哈希碰撞的问题。哈希函数映射的结果一定要尽可能均匀,结果不均匀的哈希函数会带来更多的哈希冲突以及更差的读写性能。
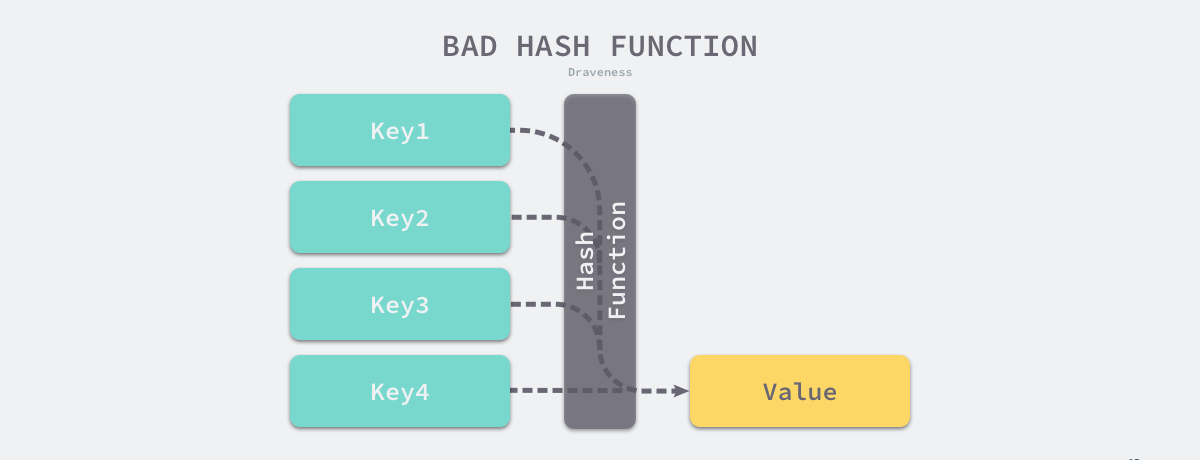
如果使用结果分布较为均匀的哈希函数,那么哈希的增删改查的时间复杂度为 𝑂(1);但是如果哈希函数的结果分布不均匀,那么所有操作的时间复杂度可能会达到 𝑂(𝑛),由此看来,使用好的哈希函数是至关重要的。
冲突解决
就像我们之前所提到的,在通常情况下,哈希函数输入的范围一定会远远大于输出的范围,所以在使用哈希表时一定会遇到冲突,哪怕我们使用了完美的哈希函数,当输入的键足够多也会产生冲突。然而多数的哈希函数都是不够完美的,所以仍然存在发生哈希碰撞的可能,这时就需要一些方法来解决哈希碰撞的问题,常见方法的就是开放寻址法和拉链法。
需要注意的是,这里提到的哈希碰撞不是多个键对应的哈希完全相等,可能是多个哈希的部分相等,例如:两个键对应哈希的前四个字节相同。
开放寻址法
开放寻址法是一种在哈希表中解决哈希碰撞的方法,这种方法的核心思想是依次探测和比较数组中的元素以判断目标键值对是否存在于哈希表中,如果我们使用开放寻址法来实现哈希表,那么实现哈希表底层的数据结构就是数组,不过因为数组的长度有限,向哈希表写入 (author, draven) 这个键值对时会从如下的索引开始遍历:
1
|
index := hash("author") % array.len
|
当我们向当前哈希表写入新的数据时,如果发生了冲突,就会将键值对写入到下一个索引不为空的位置:
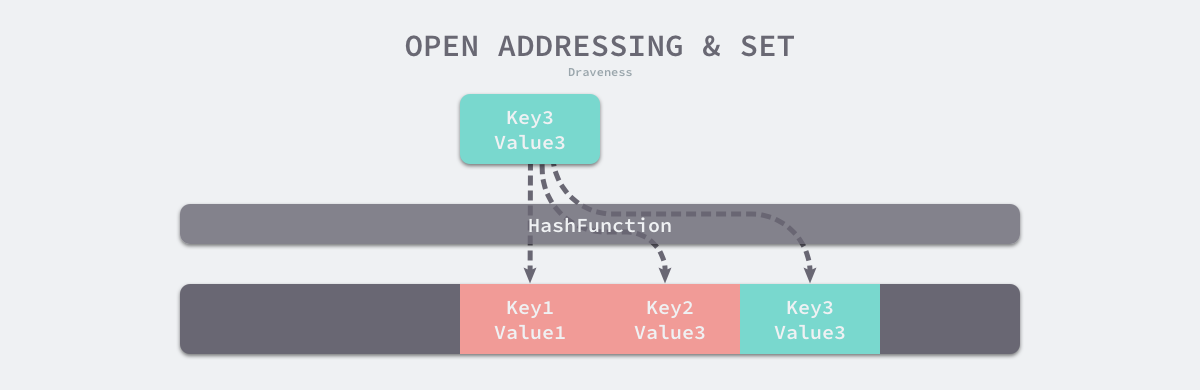
如上图所示,当 Key3 与已经存入哈希表中的两个键值对 Key1 和 Key2 发生冲突时,Key3 会被写入 Key2 后面的空闲位置。当我们再去读取 Key3 对应的值时就会先获取键的哈希并取模,这会先帮助我们找到 Key1,找到 Key1 后发现它与 Key 3 不相等,所以会继续查找后面的元素,直到内存为空或者找到目标元素。
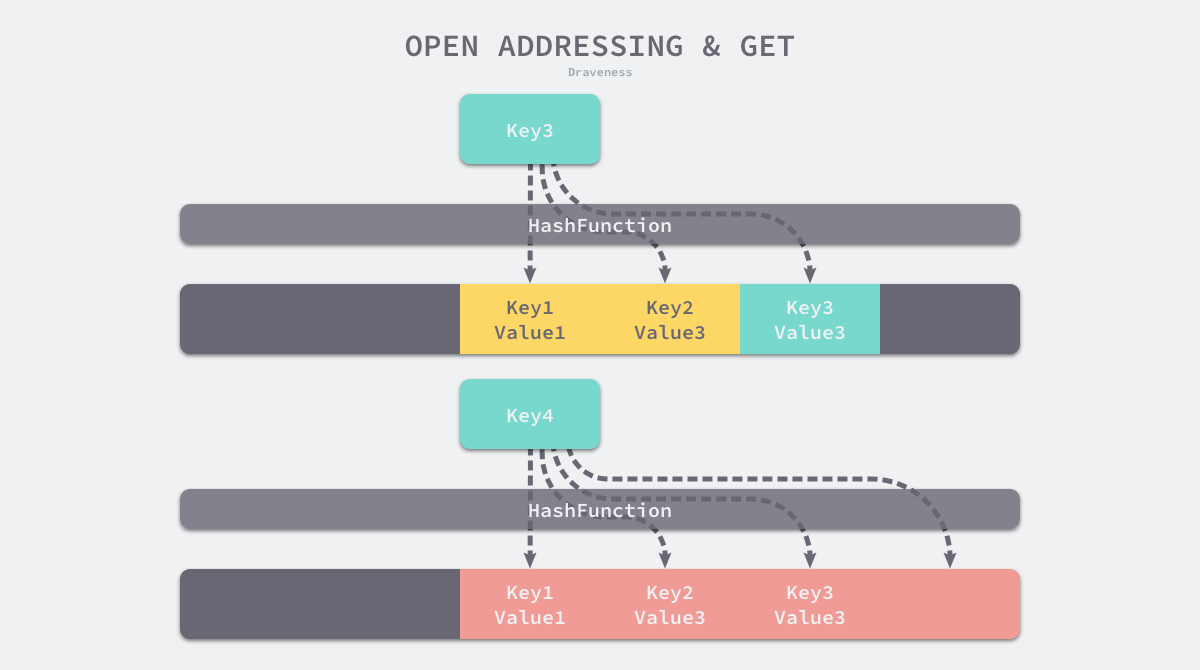
当需要查找某个键对应的值时,会从索引的位置开始线性探测数组,找到目标键值对或者空内存就意味着这一次查询操作的结束。
开放寻址法中对性能影响最大的是装载因子,它是数组中元素的数量与数组大小的比值。随着装载因子的增加,线性探测的平均用时就会逐渐增加,这会影响哈希表的读写性能。当装载率超过 70% 之后,哈希表的性能就会急剧下降,而一旦装载率达到 100%,整个哈希表就会完全失效,这时查找和插入任意元素的时间复杂度都是 𝑂(𝑛) 的,这时需要遍历数组中的全部元素,所以在实现哈希表时一定要关注装载因子的变化。
拉链法
与开放地址法相比,拉链法是哈希表最常见的实现方法,大多数的编程语言都用拉链法实现哈希表,它的实现比较开放地址法稍微复杂一些,但是平均查找的长度也比较短,各个用于存储节点的内存都是动态申请的,可以节省比较多的存储空间。
实现拉链法一般会使用数组加上链表,不过一些编程语言会在拉链法的哈希中引入红黑树以优化性能,拉链法会使用链表数组作为哈希底层的数据结构,我们可以将它看成可以扩展的二维数组:
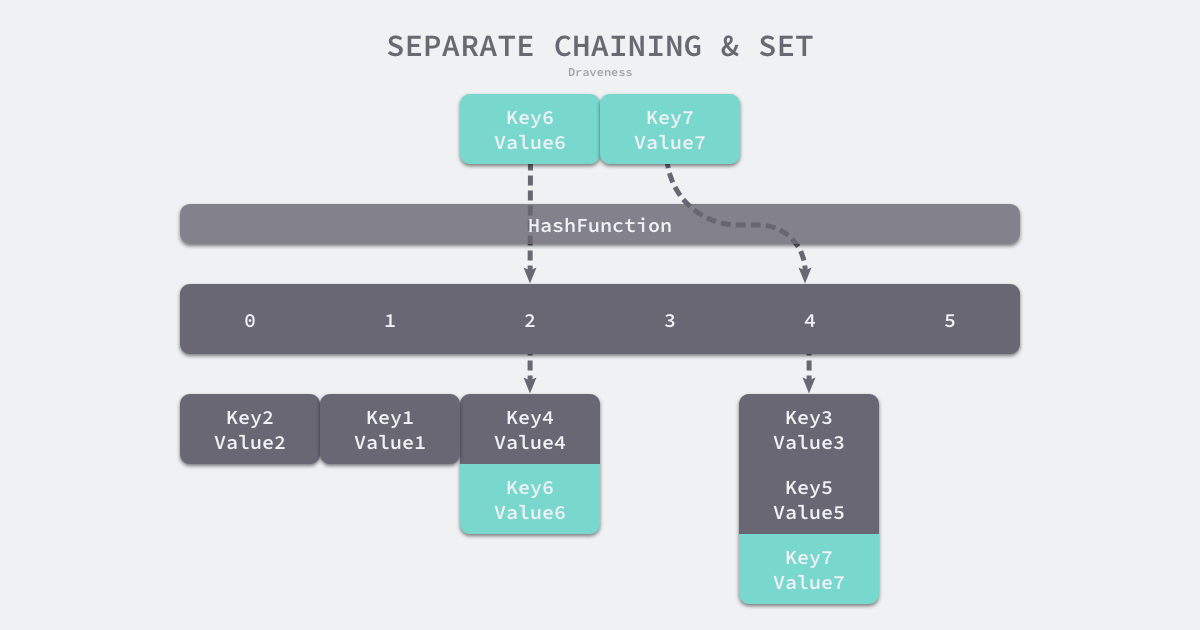
如上图所示,当我们需要将一个键值对 (Key6, Value6) 写入哈希表时,键值对中的键 Key6 都会先经过一个哈希函数,哈希函数返回的哈希会帮助我们选择一个桶,和开放地址法一样,选择桶的方式是直接对哈希返回的结果取模:
1
|
index := hash("Key6") % array.len
|
选择了 2 号桶后就可以遍历当前桶中的链表了,在遍历链表的过程中会遇到以下两种情况:
- 找到键相同的键值对 — 更新键对应的值;
- 没有找到键相同的键值对 — 在链表的末尾追加新的键值对;
如果要在哈希表中获取某个键对应的值,会经历如下的过程:
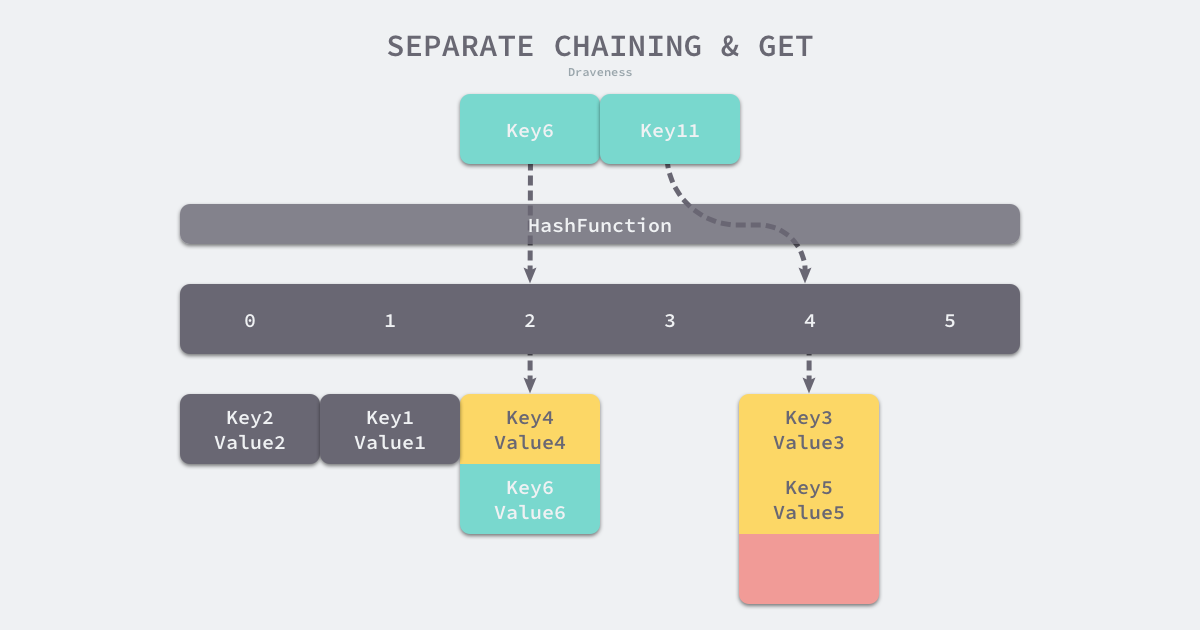
Key11 展示了一个键在哈希表中不存在的例子,当哈希表发现它命中 4 号桶时,它会依次遍历桶中的链表,然而遍历到链表的末尾也没有找到期望的键,所以哈希表中没有该键对应的值。
在一个性能比较好的哈希表中,每一个桶中都应该有 0~1 个元素,有时会有 2~3 个,很少会超过这个数量。计算哈希、定位桶和遍历链表三个过程是哈希表读写操作的主要开销,使用拉链法实现的哈希也有装载因子这一概念:
与开放地址法一样,拉链法的装载因子越大,哈希的读写性能就越差。在一般情况下使用拉链法的哈希表装载因子都不会超过 1,当哈希表的装载因子较大时会触发哈希的扩容,创建更多的桶来存储哈希中的元素,保证性能不会出现严重的下降。如果有 1000 个桶的哈希表存储了 10000 个键值对,它的性能是保存 1000 个键值对的 1/10,但是仍然比在链表中直接读写好 1000 倍。
hmap
Go 语言运行时同时使用了多个数据结构组合表示哈希表,其中 runtime.hmap 是最核心的结构体,它是 hashmap 的“缩写”,我们先来了解一下该结构体的内部字段:
 1
 2
 3
 4
 5
 6
 7
 8
 9
10
11
12
13
14
15
16
17
18
19
20
21
22
23
24
25
26
27
28
29
30
31
32
33
34
35
36
37
|
// A header for a Go map.
type hmap struct {
	// Note: the format of the hmap is also encoded in cmd/compile/internal/gc/reflect.go.
	// Make sure this stays in sync with the compiler's definition.
	// 元素个数,调用 len(map) 时,直接返回此值
	count     int // # live cells == size of map.  Must be first (used by len() builtin)
	//标志位
	// iterator     = 1 // 可能有遍历用buckets
	// oldIterator  = 2 // 可能有遍历用oldbuckets,用于扩容期间
	// hashWriting  = 4 // 标记写,用于并发读写检测
	// sameSizeGrow = 8 // 用于等大小buckets扩容,减少overflow桶
	flags     uint8
	// buckets 的对数 log_2
	// B 表示当前哈希表持有的 buckets 数量,但是因为哈希表中桶的数量都 2 的倍数,所以该字段会存储对数,也就是 `len(buckets) == 2^B`;
	B         uint8  // log_2 of # of buckets (can hold up to loadFactor * 2^B items)
	// overflow 的 bucket 近似数
	noverflow uint16 // approximate number of overflow buckets; see incrnoverflow for details
	// 计算 key 的哈希的时候会传入哈希函数
	// hash0 是哈希的种子,它能为哈希函数的结果引入随机性,这个值在创建哈希表时确定,并在调用哈希函数时作为参数传入;
	hash0     uint32 // hash seed
	// 指向 buckets 数组,大小为 2^B
   	// 如果元素个数为0,就为 nil
	// 指向第一个桶的指针 是一个连续的地址 因为是个数组
  	// 这里面存的是 *bmap
	buckets    unsafe.Pointer // array of 2^B Buckets. may be nil if count==0.
	// 扩容的时候,buckets 长度会是 oldbuckets 的两倍
	// oldbuckets 是哈希在扩容时用于保存之前 buckets 的字段,它的大小是当前 buckets 的一半
	// 旧桶第一个桶的指针,用于在扩容搬迁的时候未完成搬迁时保存之前的旧桶
	oldbuckets unsafe.Pointer // previous bucket array of half the size, non-nil only when growing
	// 指示扩容进度,小于此地址的 buckets 迁移完成
	// 搬迁桶的进度 就是处于扩容搬迁时,目前搬到哪了
	nevacuate  uintptr        // progress counter for evacuation (buckets less than this have been evacuated)
	// 溢出桶  当bmap中存储的数据过多
  	// 单个bmap已经装满时就会使用 extra.nextOverflow 中桶存储溢出的数据。
  	// 溢出桶不一定会使用,因为他是个可选字段
	extra *mapextra // optional fields
}
|
Map的最大桶的数量为2^255个,因为hmap.B为uint8类型,最大值为255.
桶的数量是2^B个
bmap
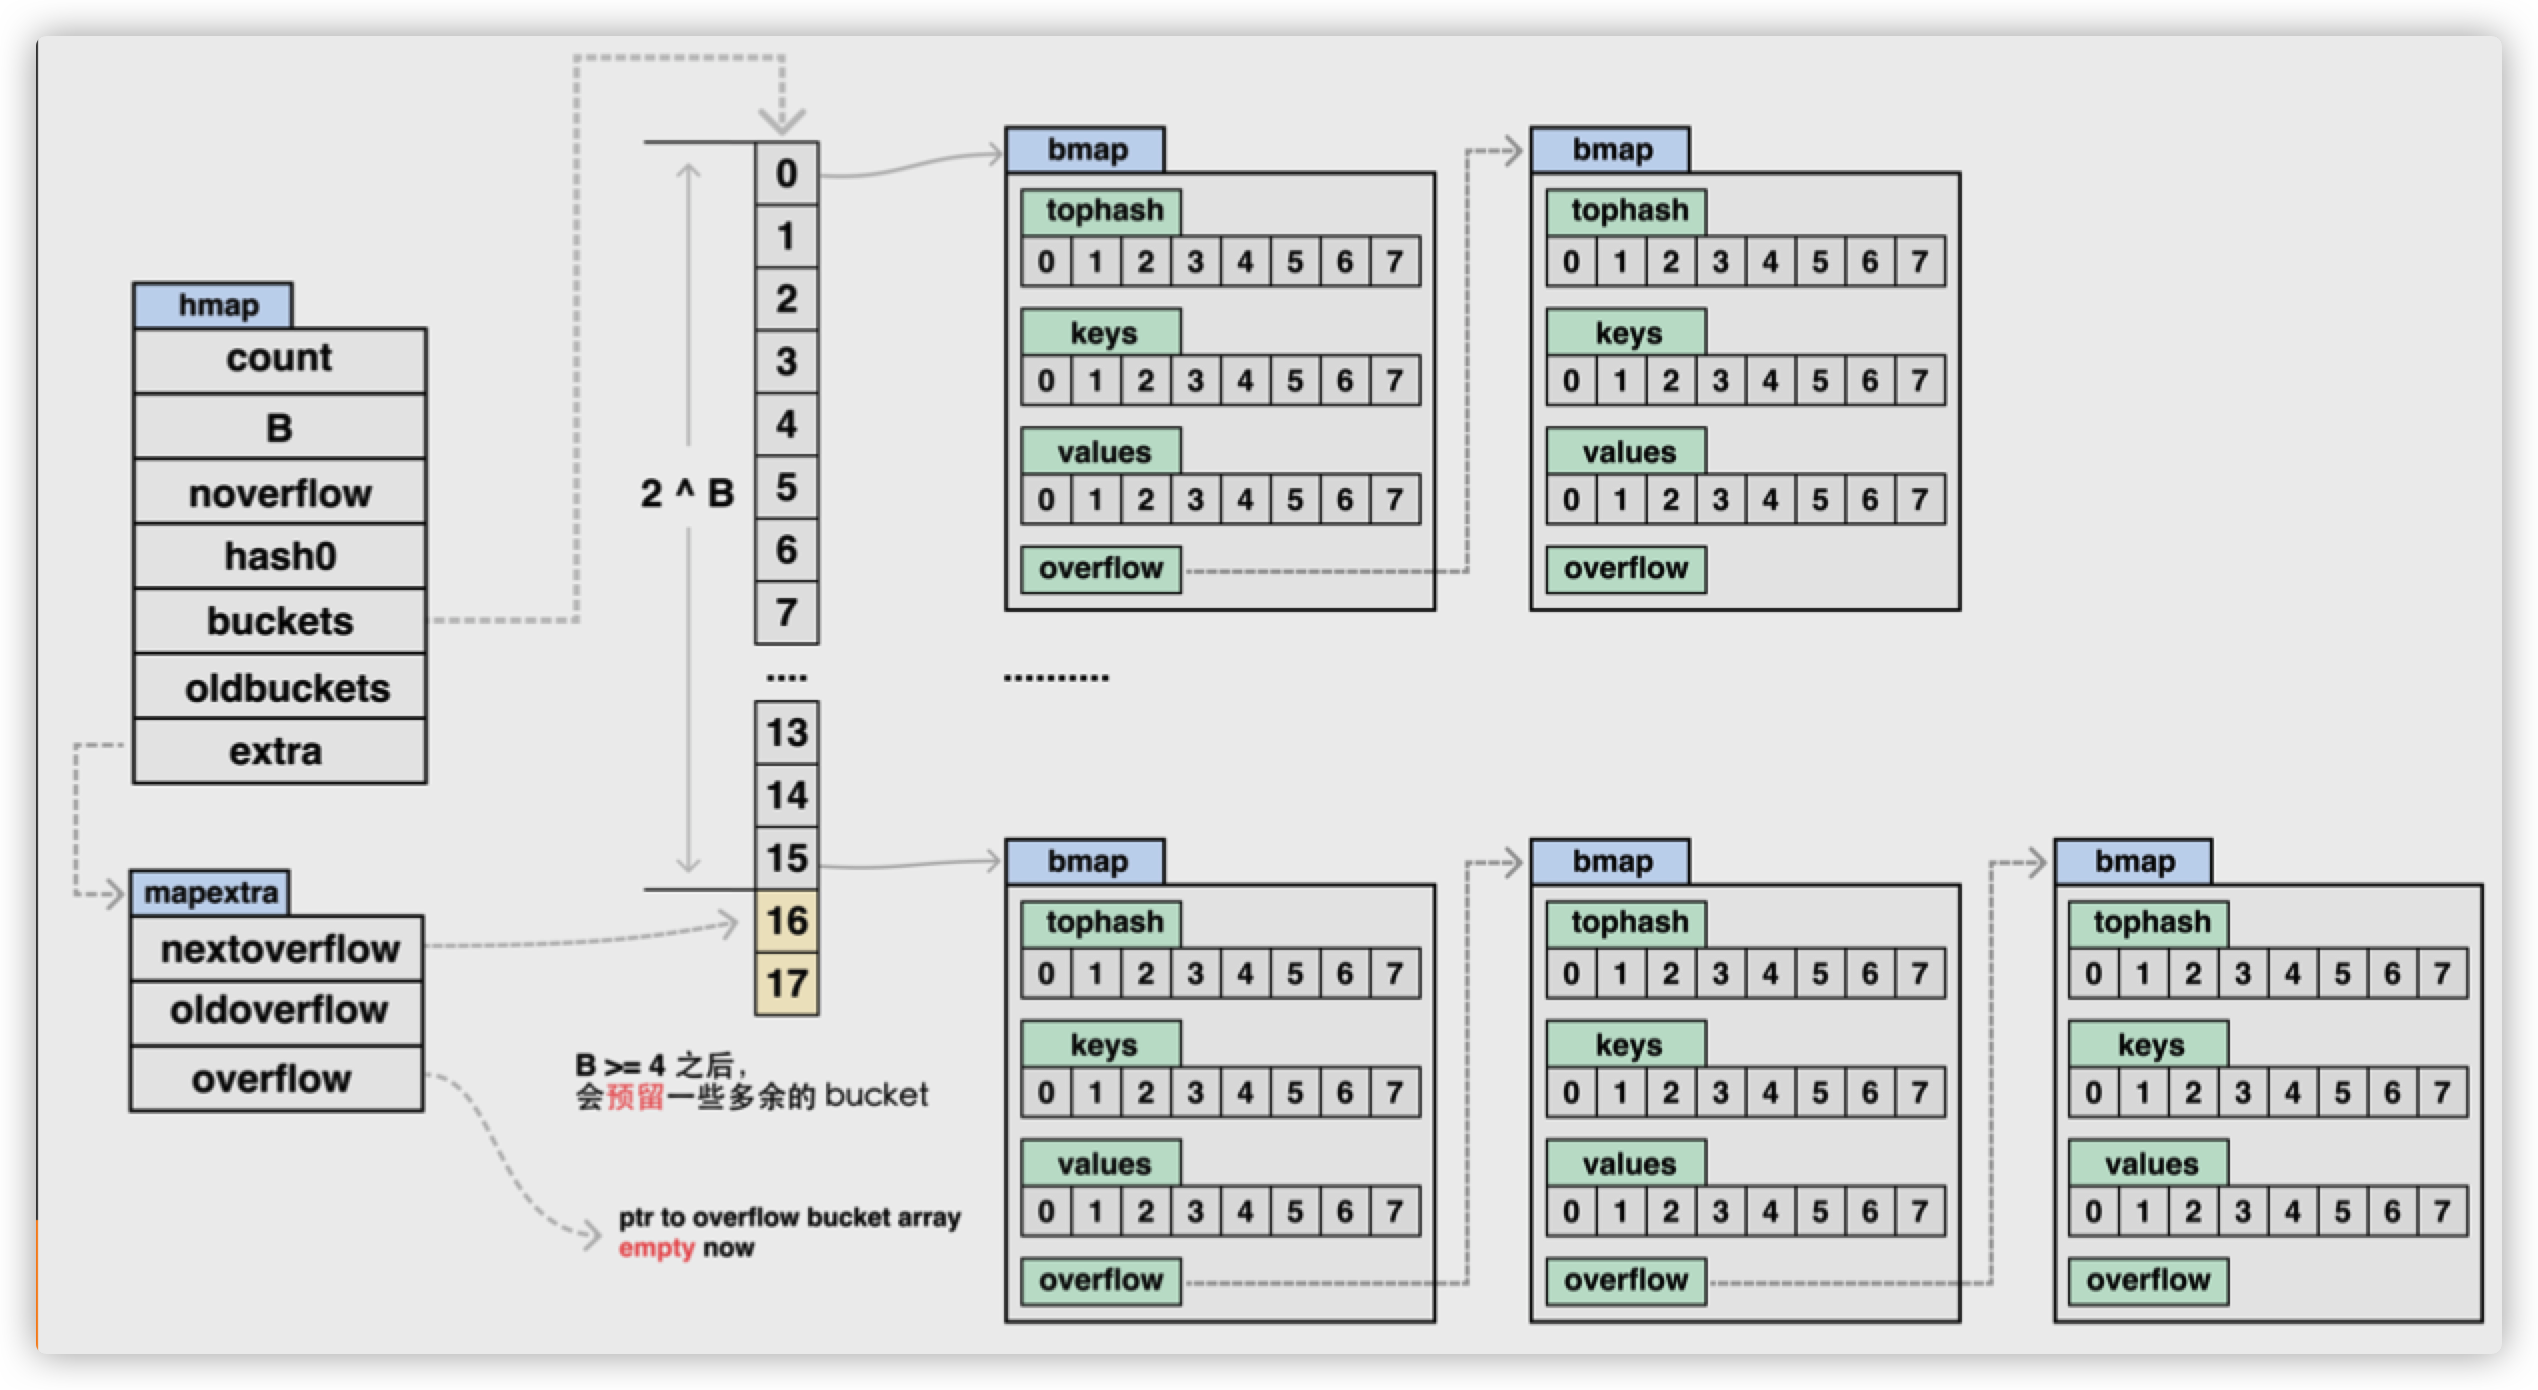
哈希表 runtime.hmap 的桶是 runtime.bmap。每一个 runtime.bmap 都能存储 8 个键值对,当哈希表中存储的数据过多,单个桶已经装满时就会使用 extra.nextOverflow 中桶存储溢出的数据。
上述两种不同的桶在内存中是连续存储的,我们在这里将它们分别称为正常桶和溢出桶,上图中黄色的 runtime.bmap 就是正常桶,绿色的 runtime.bmap 是溢出桶,溢出桶是在 Go 语言还使用 C 语言实现时使用的设计,由于它能够减少扩容的频率所以一直使用至今。
桶的结构体 runtime.bmap 在 Go 语言源代码中的定义只包含一个简单的 tophash 字段,tophash 存储了键的哈希的高 8 位,通过比较不同键的哈希的高 8 位可以减少访问键值对次数以提高性能:
 1
 2
 3
 4
 5
 6
 7
 8
 9
10
11
12
13
14
15
16
17
18
19
20
21
22
|
// Maximum number of key/elem pairs a bucket can hold.
bucketCntBits = 3
bucketCnt     = 1 << bucketCntBits
// A bucket for a Go map.
type bmap struct {
	// 记录桶内8个单元的高8位hash值,或标记空桶状态,用于快速定位key
	// emptyRest      = 0 // 此单元为空,且更高索引的单元也为空
	// emptyOne       = 1 // 此单元为空
	// evacuatedX     = 2 // 用于表示扩容迁移到新桶前半段区间
	// evacuatedY     = 3 // 用于表示扩容迁移到新桶后半段区间
	// evacuatedEmpty = 4 // 用于表示此单元已迁移
	// minTopHash     = 5 // 最小的空桶标记值,小于其则是空桶标志
	// tophash generally contains the top byte of the hash value
	// for each key in this bucket. If tophash[0] < minTopHash,
	// tophash[0] is a bucket evacuation state instead.
	tophash [bucketCnt]uint8
	// Followed by bucketCnt keys and then bucketCnt elems.
	// NOTE: packing all the keys together and then all the elems together makes the
	// code a bit more complicated than alternating key/elem/key/elem/... but it allows
	// us to eliminate padding which would be needed for, e.g., map[int64]int8.
	// Followed by an overflow pointer.
}
|
在运行期间,runtime.bmap 结构体其实不止包含 tophash 字段,因为哈希表中可能存储不同类型的键值对,而且 Go 语言也不支持泛型,所以键值对占据的内存空间大小只能在编译时进行推导。runtime.bmap 中的其他字段在运行时也都是通过计算内存地址的方式访问的,所以它的定义中就不包含这些字段,不过我们能根据编译期间的 cmd/compile/internal/gc.bmap 函数重建它的结构:
 1
 2
 3
 4
 5
 6
 7
 8
 9
10
11
12
13
14
15
16
17
18
|
// 实际存储k,v数据的桶
// 该结构体还有一些字段会在编译期添加
// 比如 下一个溢出桶的地址
// key,value所处的地址等
type bmap struct {
    // 这里存储可 Key的哈希值的高8位 例子 11111111 00000000
    // 用于在查找时快速的去判断当前Key是否存在这个桶里
    // 因此得出,每个桶只能存放8个Key-Value映射
    topbits  [8]uint8
    keys     [8]keytype
    values   [8]valuetype
    pad      uintptr
    // overflow 桶
    // otyp 类型为指针*Type,
    // 若keytype及elemtype不含指针,则为uintptr
    // 使bmap整体不含指针,避免gc去scan此类map
    overflow uintptr
}
|
随着哈希表存储的数据逐渐增多,我们会扩容哈希表或者使用额外的桶存储溢出的数据,不会让单个桶中的数据超过 8 个,不过溢出桶只是临时的解决方案,创建过多的溢出桶最终也会导致哈希的扩容。
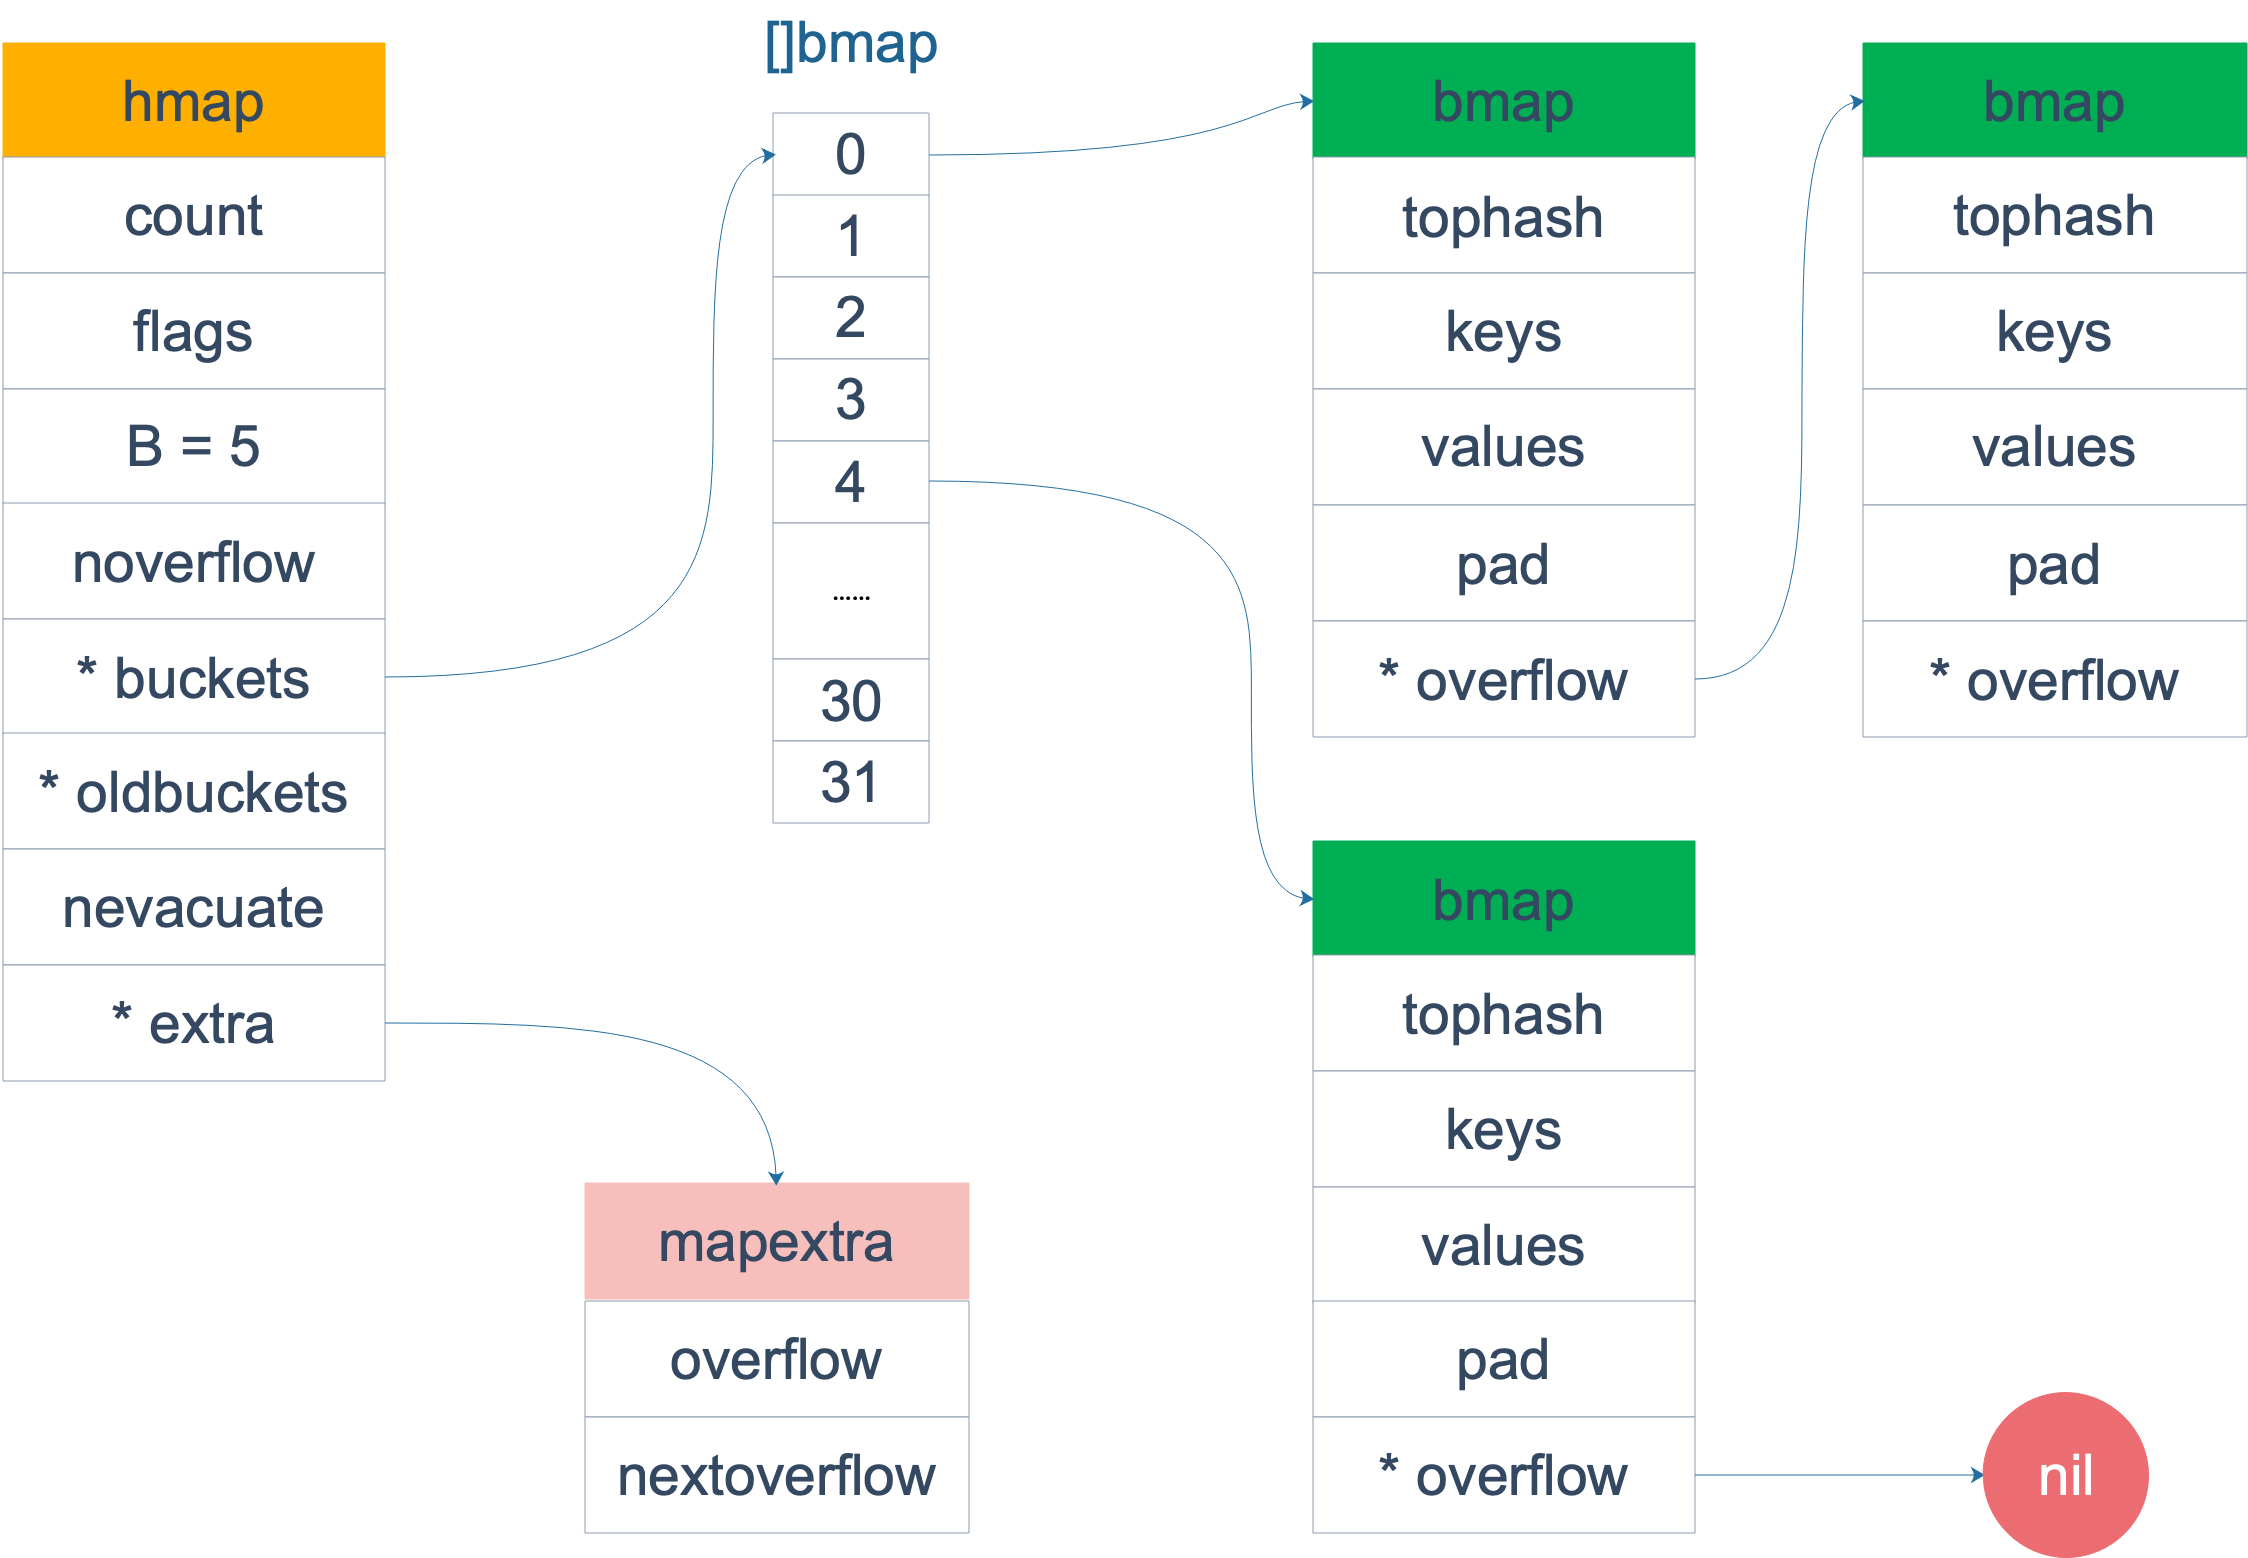
bmap 是存放 k-v 的地方,我们把视角拉近,仔细看 bmap 的内部组成。
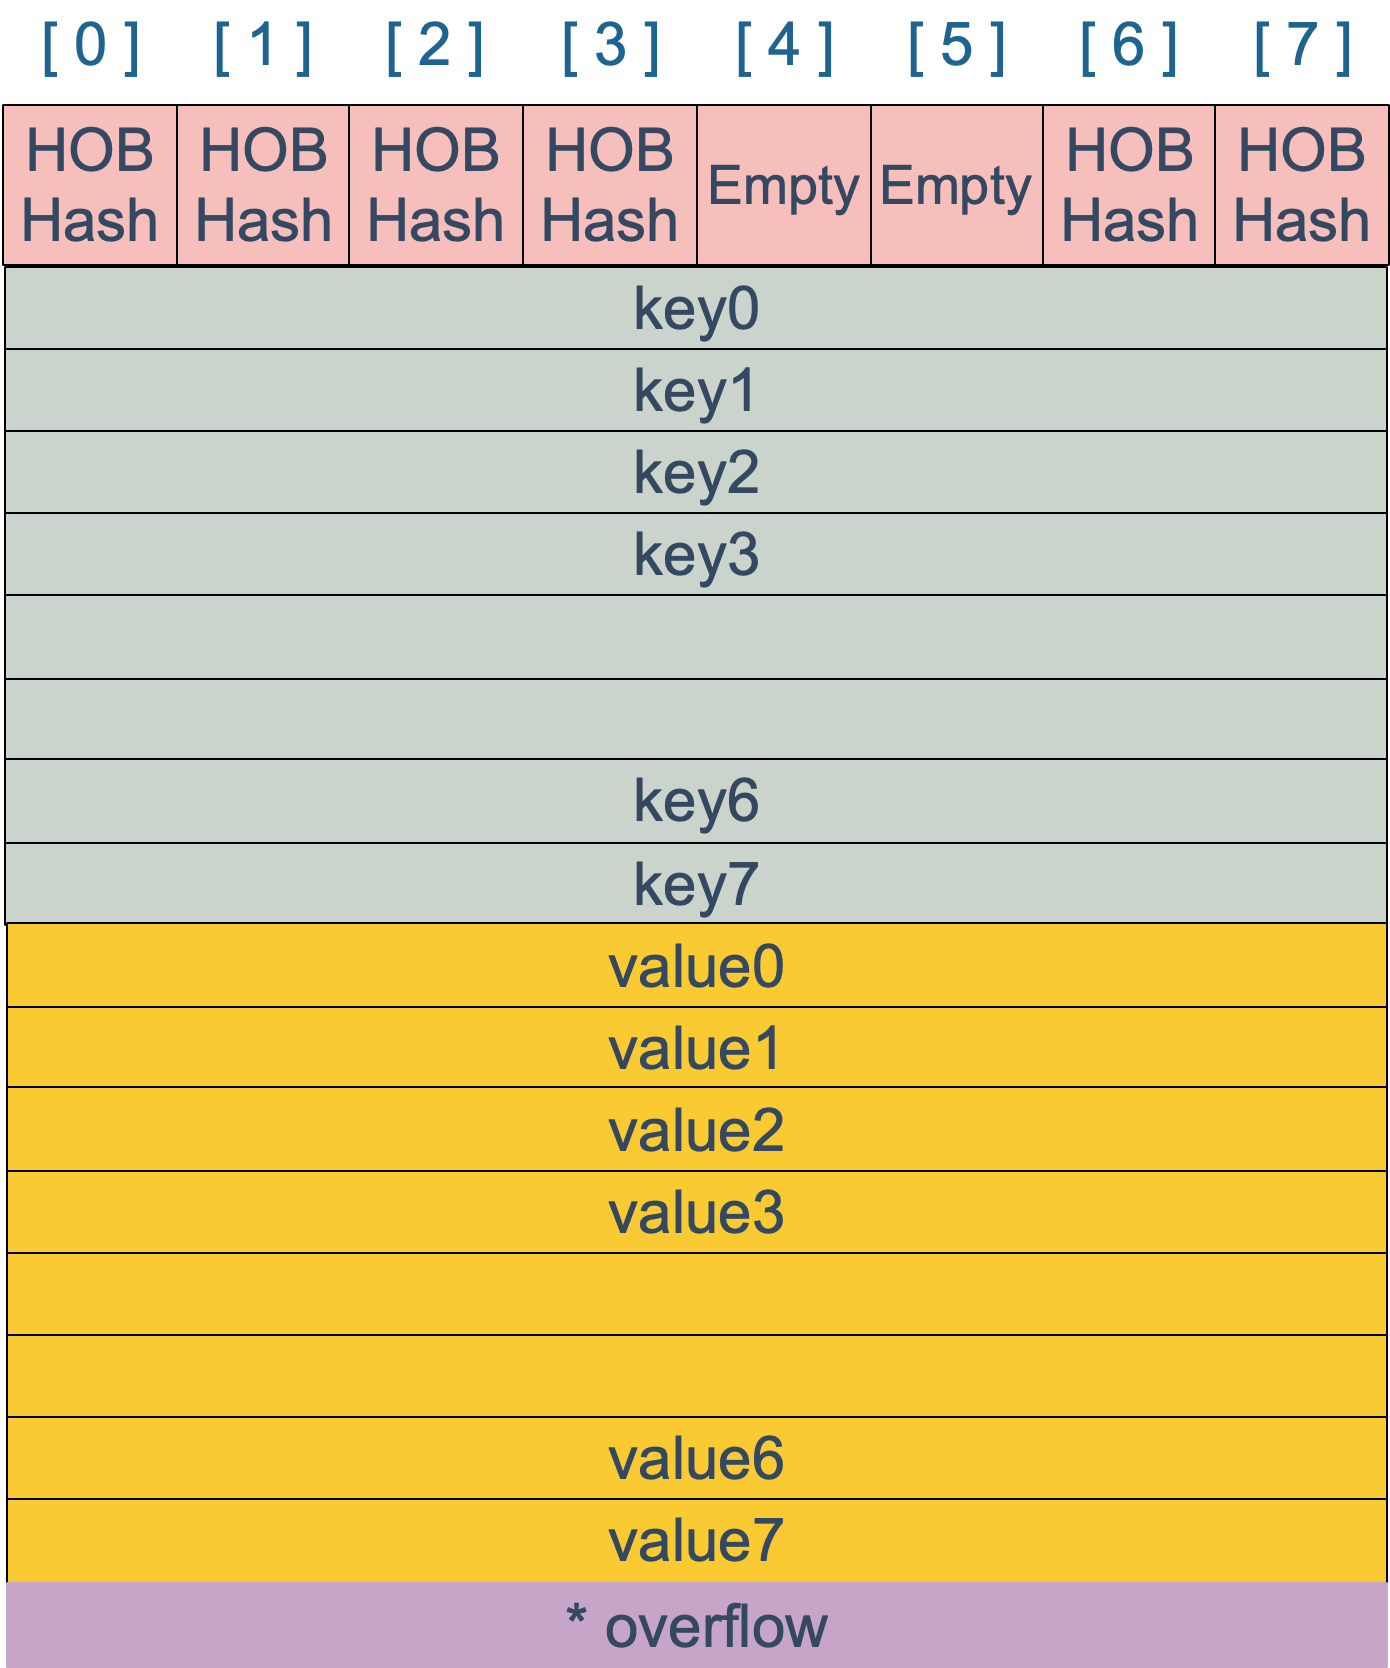
上图就是 bucket 的内存模型,HOB Hash 指的就是 top hash。 注意到 key 和 value 是各自放在一起的,并不是 key/value/key/value/… 这样的形式。源码里说明这样的好处是在某些情况下可以省略掉 padding 字段,节省内存空间。
例如,有这样一个类型的 map:
如果按照 key/value/key/value/... 这样的模式存储,那在每一个 key/value 对之后都要额外 padding 7 个字节;而将所有的 key,value 分别绑定到一起,这种形式 key/key/.../value/value/...,则只需要在最后添加 padding。
每个 bucket 设计成最多只能放 8 个 key-value 对,如果有第 9 个 key-value 落入当前的 bucket,那就需要再构建一个 bucket ,通过 overflow 指针连接起来。
正常情况key和elem直接使用用户声明的类型,但当其size大于128(MAXKEYSIZE/MAXELEMSIZE)时,则会转为指针去存储。(也就是indirectkey、indirectelem)
当 map 的 key 和 value 都不是指针,并且 size 都小于 128 字节的情况下,会把 bmap 标记为不含指针,这样可以避免 gc 时扫描整个 hmap。但是,我们看 bmap 其实有一个 overflow 的字段,是指针类型的,破坏了 bmap 不含指针的设想,这时会把 overflow 移动到 extra 字段来。
hmap.extra具体是为解决让gc不需要扫描此类bucket。只要bmap内不含指针就不需gc扫描。
当map的key和elem类型都不包含指针时,但其中的overflow是指针。此时bmap的生成函数会将overflow的类型转化为uintptr。而uintptr虽然是地址,但不会被gc认为是指针,指向的数据有被回收的风险。
此时为保证其中的overflow指针指向的数据存活,就用mapextra结构指向了这些buckets,这样bmap有被引用就不会被回收了。
 1
 2
 3
 4
 5
 6
 7
 8
 9
10
11
12
13
14
15
16
17
18
19
20
21
22
|
// mapextra holds fields that are not present on all maps.
type mapextra struct {
	// If both key and elem do not contain pointers and are inline, then we mark bucket
	// type as containing no pointers. This avoids scanning such maps.
	// However, bmap.overflow is a pointer. In order to keep overflow buckets
	// alive, we store pointers to all overflow buckets in hmap.extra.overflow and hmap.extra.oldoverflow.
	// overflow and oldoverflow are only used if key and elem do not contain pointers.
	// overflow contains overflow buckets for hmap.buckets.
	// oldoverflow contains overflow buckets for hmap.oldbuckets.
	// The indirection allows to store a pointer to the slice in hiter.
	// 如果key和value都不包含指针,而且是内联的,那么我们就将bucket类型标记为不包含指针。
 	// 这样就避免了对这类map的扫描。
 	// 然而,bmap.overflow 是一个指针。为了防止溢出桶被gc处理
 	// 我们在hmap.extra.overflow和hmap.extra.oldoverflow中存储所有溢出桶的指针。
 	// overflow和oldoverflow只在key和value不包含指针的情况下使用
	// 存储一个已经创建好了但是暂未使用的空bmap溢出桶
	overflow    *[]*bmap
	oldoverflow *[]*bmap

	// nextOverflow holds a pointer to a free overflow bucket.
	nextOverflow *bmap
}
|
另一方面,当 GC 在扫描 hmap 时,通过 extra.overflow 这条路径(指针)就可以将 overflow 的 bucket 正常标记成黑色,从而不会被 GC 错误地回收。
如果你用了 key 是 string 类型的 map,并且恰好这些 string 是定长的,那么就可以用 key 为数组类型的 map 来优化它。
maptype
 1
 2
 3
 4
 5
 6
 7
 8
 9
10
11
12
13
14
15
|
// map.go里很多函数的第1个入参是这个结构,从成员来看很明显,此结构标示了键值对和桶的大小等必要信息
// 有了这个结构的信息,map.go的代码就可以与键值对的具体数据类型解耦
// 所以map.go用内存偏移量和unsafe.Pointer指针来直接对内存进行存取,而无需关心key或value的具体类型
type maptype struct {
	typ    _type
	key    *_type
	elem   *_type
	bucket *_type // internal type representing a hash bucket
	// function for hashing keys (ptr to key, seed) -> hash
	hasher     func(unsafe.Pointer, uintptr) uintptr
	keysize    uint8  // size of key slot
	elemsize   uint8  // size of elem slot
	bucketsize uint16 // size of bucket
	flags      uint32
}
|
makemap
既然已经介绍了哈希表的基本原理和实现方法,那么就可以开始分析 Go 语言中哈希表的实现了,首先要分析的是 Go 语言初始化哈希的两种方法 — 通过字面量和运行时。
目前的现代编程语言基本都支持使用字面量的方式初始化哈希,一般都会使用 key: value 的语法来表示键值对,Go 语言中也不例外:
1
2
3
4
5
|
hash := map[string]int{
	"1": 2,
	"3": 4,
	"5": 6,
}
|
我们需要在初始化哈希时声明键值对的类型,这种使用字面量初始化的方式最终都会通过 cmd/compile/internal/gc.maplit 初始化,我们来分析一下该函数初始化哈希的过程:
 1
 2
 3
 4
 5
 6
 7
 8
 9
10
11
12
13
14
15
16
|
func maplit(n *Node, m*Node, init *Nodes) {
	a := nod(OMAKE, nil, nil)
	a.Esc = n.Esc
	a.List.Set2(typenod(n.Type), nodintconst(int64(n.List.Len())))
	litas(m, a, init)

	entries := n.List.Slice()
	if len(entries) > 25 {
		...
		return
	}

	// Build list of var[c] = expr.
	// Use temporaries so that mapassign1 can have addressable key, elem.
	...
}
|
当哈希表中的元素数量少于或者等于 25 个时,编译器会将字面量初始化的结构体转换成以下的代码,将所有的键值对一次加入到哈希表中:
1
2
3
4
|
hash := make(map[string]int, 3)
hash["1"] = 2
hash["3"] = 4
hash["5"] = 6
|
这种初始化的方式与的数组和切片几乎完全相同,由此看来集合类型的初始化在 Go 语言中有着相同的处理逻辑。
一旦哈希表中元素的数量超过了 25 个,编译器会创建两个数组分别存储键和值,这些键值对会通过如下所示的 for 循环加入哈希:
1
2
3
4
5
6
|
hash := make(map[string]int, 26)
vstatk := []string{"1", "2", "3", ... , "26"}
vstatv := []int{1, 2, 3, ... , 26}
for i := 0; i < len(vstak); i++ {
    hash[vstatk[i]] = vstatv[i]
}
|
这里展开的两个切片 vstatk 和 vstatv 还会被编辑器继续展开,具体的展开方式可以阅读上一节了解切片的初始化,不过无论使用哪种方法,使用字面量初始化的过程都会使用 Go 语言中的关键字 make 来创建新的哈希并通过最原始的 [] 语法向哈希追加元素。
从语法层面上来说,创建 map 很简单:
1
2
3
4
5
6
|
ageMp := make(map[string]int)
// 指定 map 长度
ageMp := make(map[string]int, 8)

// ageMp 为 nil,不能向其添加元素,会直接panic
var ageMp map[string]int
|
当创建的哈希被分配到堆上并且其容量小于 BUCKETSIZE = 8 时,Go 语言在编译阶段会使用如下方式快速初始化哈希,这也是编译器对小容量的哈希做的优化:
1
2
3
4
5
6
7
8
|
// makemap_small implements Go map creation for make(map[k]v) and
// make(map[k]v, hint) when hint is known to be at most bucketCnt
// at compile time and the map needs to be allocated on the heap.
func makemap_small() *hmap {
	h := new(hmap)
	h.hash0 = fastrand()
	return h
}
|
除了上述特定的优化之外,无论 make 是从哪里来的,只要我们使用 make 创建哈希,Go 语言编译器都会在类型检查期间将它们转换成 runtime.makemap,使用字面量初始化哈希也只是语言提供的辅助工具,最后调用的都是 runtime.makemap,主要做的工作就是初始化 hmap 结构体的各种字段,例如计算 B 的大小,设置哈希种子 hash0 等等:
 1
 2
 3
 4
 5
 6
 7
 8
 9
10
11
12
13
14
15
16
17
18
19
20
21
22
23
24
25
26
27
28
29
30
31
32
33
34
35
36
37
38
39
40
41
42
43
44
45
46
47
48
49
50
51
52
53
54
55
56
|
// makemap implements Go map creation for make(map[k]v, hint).
// If the compiler has determined that the map or the first bucket
// can be created on the stack, h and/or bucket may be non-nil.
// If h != nil, the map can be created directly in h.
// If h.buckets != nil, bucket pointed to can be used as the first bucket.
// 传入的三个参数分别为
// 1.map的类型即 key和value的类型信息等其他数据
// 2.长度 即 make 传入的len
// 3.hmap结构体 可以为nil
// 返回值为经过处理的 *hmap
func makemap(t *maptype, hint int, h *hmap) *hmap {
	// 校验一下需求的长度和类型占用字节数的乘积
  	// 是否超过内存限制
	mem, overflow := math.MulUintptr(uintptr(hint), t.bucket.size)
	if overflow || mem > maxAlloc {
		hint = 0
	}

	// initialize Hmap
	// 创建一个新的 hmap结构体
	if h == nil {
		h = new(hmap)
	}
	// 获取一个随机的哈希种子
	h.hash0 = fastrand()

	// Find the size parameter B which will hold the requested # of elements.
	// For hint < 0 overLoadFactor returns false since hint < bucketCnt.
	// 找到一个 B,使得 map 的装载因子在正常范围内
	B := uint8(0)
	// 通过输入的长度 算出一个合适的B值
	for overLoadFactor(hint, B) {
		B++
	}
	h.B = B

	// 初始化 hash table
	// 如果 B 等于 0,那么 buckets 就会在赋值的时候再分配
	// 如果长度比较大,分配内存会花费长一点
	// allocate initial hash table
	// if B == 0, the buckets field is allocated lazily later (in mapassign)
	// If hint is large zeroing this memory could take a while.
	// 如果B不为0
	if h.B != 0 {
		var nextOverflow *bmap
		// 调用makeBucketArray 返回一个溢出bmap和开辟完内存的桶的首地址指针
		h.buckets, nextOverflow = makeBucketArray(t, h.B, nil)
		// 如果有溢出bmap
		if nextOverflow != nil {
			h.extra = new(mapextra)
			h.extra.nextOverflow = nextOverflow
		}
	}

	return h
}
|
这个函数会按照下面的步骤执行:
- 计算哈希占用的内存是否溢出或者超出能分配的最大值;
- 调用 runtime.fastrand 获取一个随机的哈希种子;
- 根据传入的 hint 计算出需要的最小需要的桶的数量;
- 使用 runtime.makeBucketArray 创建用于保存桶的数组;
makeBucketArray
runtime.makeBucketArray 会根据传入的 B 计算出的需要创建的桶数量并在内存中分配一片连续的空间用于存储数据:
 1
 2
 3
 4
 5
 6
 7
 8
 9
10
11
12
13
14
15
16
17
18
19
20
21
22
23
24
25
26
27
28
29
30
31
32
33
34
35
36
37
|
func makeBucketArray(t *maptype, b uint8, dirtyalloc unsafe.Pointer) (buckets unsafe.Pointer, nextOverflow*bmap) {
	// 求出需要桶的个数 即返回 1<<B的值
	base := bucketShift(b)
	nbuckets := base
	// 如果需要的桶的个数小于4个 那么就不需要创建溢出bmap
  	// 为的是防止有可能不需要bmap的时候却创建了bmap
  	// 使其降低资源开销
	if b >= 4 {
		// 创建的溢出bmap的数量是1<<(B-4)个
    		// 获得所需的桶与溢出bmap的数量
		nbuckets += bucketShift(b - 4)
		// 计算类型 占用字节数 * 所需的桶与溢出bmap的数量的乘积
		sz := t.bucket.size * nbuckets
		// 获取对应长度的内存块的大小
		up := roundupsize(sz)
		if up != sz {
			nbuckets = up / t.bucket.size
		}
	}
	// 分配一个nbuckets 长度的bmap数组 返回首指针
    	// 正常情况下桶和溢出bmap是连续的
    	// 但是当溢出bmap过多的时候每次通过runtime.newobject申请的bmap
    	// 与最初创建的不一定是连续的了
	buckets = newarray(t.bucket, int(nbuckets))
	// 如果创建了溢出bmap
	if base != nbuckets {
	// 这里取巧了一点,预先分配的溢出桶的overflow都是nil,我们要想知道哪个溢出桶是
        // 最后一个,必须得给个标记,这里将last.overflow = buckets进行赋值,方便
        // 在分配overflow的时候能够高效的知道已经到了溢出桶的尾部。
	// 如果有溢出桶
    	// 就把溢出bmap设置为申请的bmap数组的 nbuckets-base处的那个当作空闲溢出bmap
		nextOverflow = (*bmap)(add(buckets, base*uintptr(t.bucketsize)))
		last := (*bmap)(add(buckets, (nbuckets-1)*uintptr(t.bucketsize)))
		last.setoverflow(t, (*bmap)(buckets))
	}
	return buckets, nextOverflow
}
|
- 当桶的数量小于 2^4 时,由于数据较少、使用溢出桶的可能性较低,会省略创建的过程以减少额外开销;
- 当桶的数量多于 2^4 时,会额外创建 2^(𝐵−4) 个溢出桶;
根据上述代码,我们能确定在正常情况下,正常桶和溢出桶在内存中的存储空间是连续的,只是被 runtime.hmap 中的不同字段引用,当溢出桶数量较多时会通过 runtime.newobject 创建新的溢出桶。
哈希定位
map 的一个关键点在于,哈希函数的选择。在程序启动时,会检测 cpu 是否支持 aes,如果支持,则使用 aes hash,否则使用 memhash,memhash是参考xxhash、cityhash实现的,性能非常好。这是在函数 alginit() 中完成,位于路径:src/runtime/alg.go 下。
 1
 2
 3
 4
 5
 6
 7
 8
 9
10
11
12
13
14
15
16
17
18
19
20
21
22
23
24
25
|
func alginit() {
	// Install AES hash algorithms if the instructions needed are present.
	if (GOARCH == "386" || GOARCH == "amd64") &&
		cpu.X86.HasAES && // AESENC
		cpu.X86.HasSSSE3 && // PSHUFB
		cpu.X86.HasSSE41 { // PINSR{D,Q}
		initAlgAES()
		return
	}
	if GOARCH == "arm64" && cpu.ARM64.HasAES {
		initAlgAES()
		return
	}
	getRandomData((*[len(hashkey) * sys.PtrSize]byte)(unsafe.Pointer(&hashkey))[:])
	hashkey[0] |= 1 // make sure these numbers are odd
	hashkey[1] |= 1
	hashkey[2] |= 1
	hashkey[3] |= 1
}

func initAlgAES() {
	useAeshash = true
	// Initialize with random data so hash collisions will be hard to engineer.
	getRandomData(aeskeysched[:])
}
|
key 经过哈希计算后得到哈希值,共 64 个 bit 位(64位机,32位机就不讨论了,现在主流都是64位机),计算它到底要落在哪个桶时,只会用到最后 B 个 bit 位。还记得前面提到过的 B 吗?如果 B = 5,那么桶的数量,也就是 buckets 数组的长度是 2^5 = 32。
例如,现在有一个 key 经过哈希函数计算后,得到的哈希结果是:
1
|
10010111 | 000011110110110010001111001010100010010110010101010 │ 01010
|
用最后的 5 个 bit 位,也就是 01010,值为 10,也就是 10 号桶。这个操作实际上就是取余操作,但是取余开销太大,所以代码实现上用的位操作代替。
再用哈希值的高 8 位,找到此 key 在 bucket 中的位置,这是在寻找已有的 key。最开始桶内还没有 key,新加入的 key 会找到第一个空位,放入。
buckets 编号就是桶编号,当两个不同的 key 落在同一个桶中,也就是发生了哈希冲突。冲突的解决手段是用链表法:在 bucket 中,从前往后找到第一个空位。这样,在查找某个 key 时,先找到对应的桶,再去遍历 bucket 中的 key。
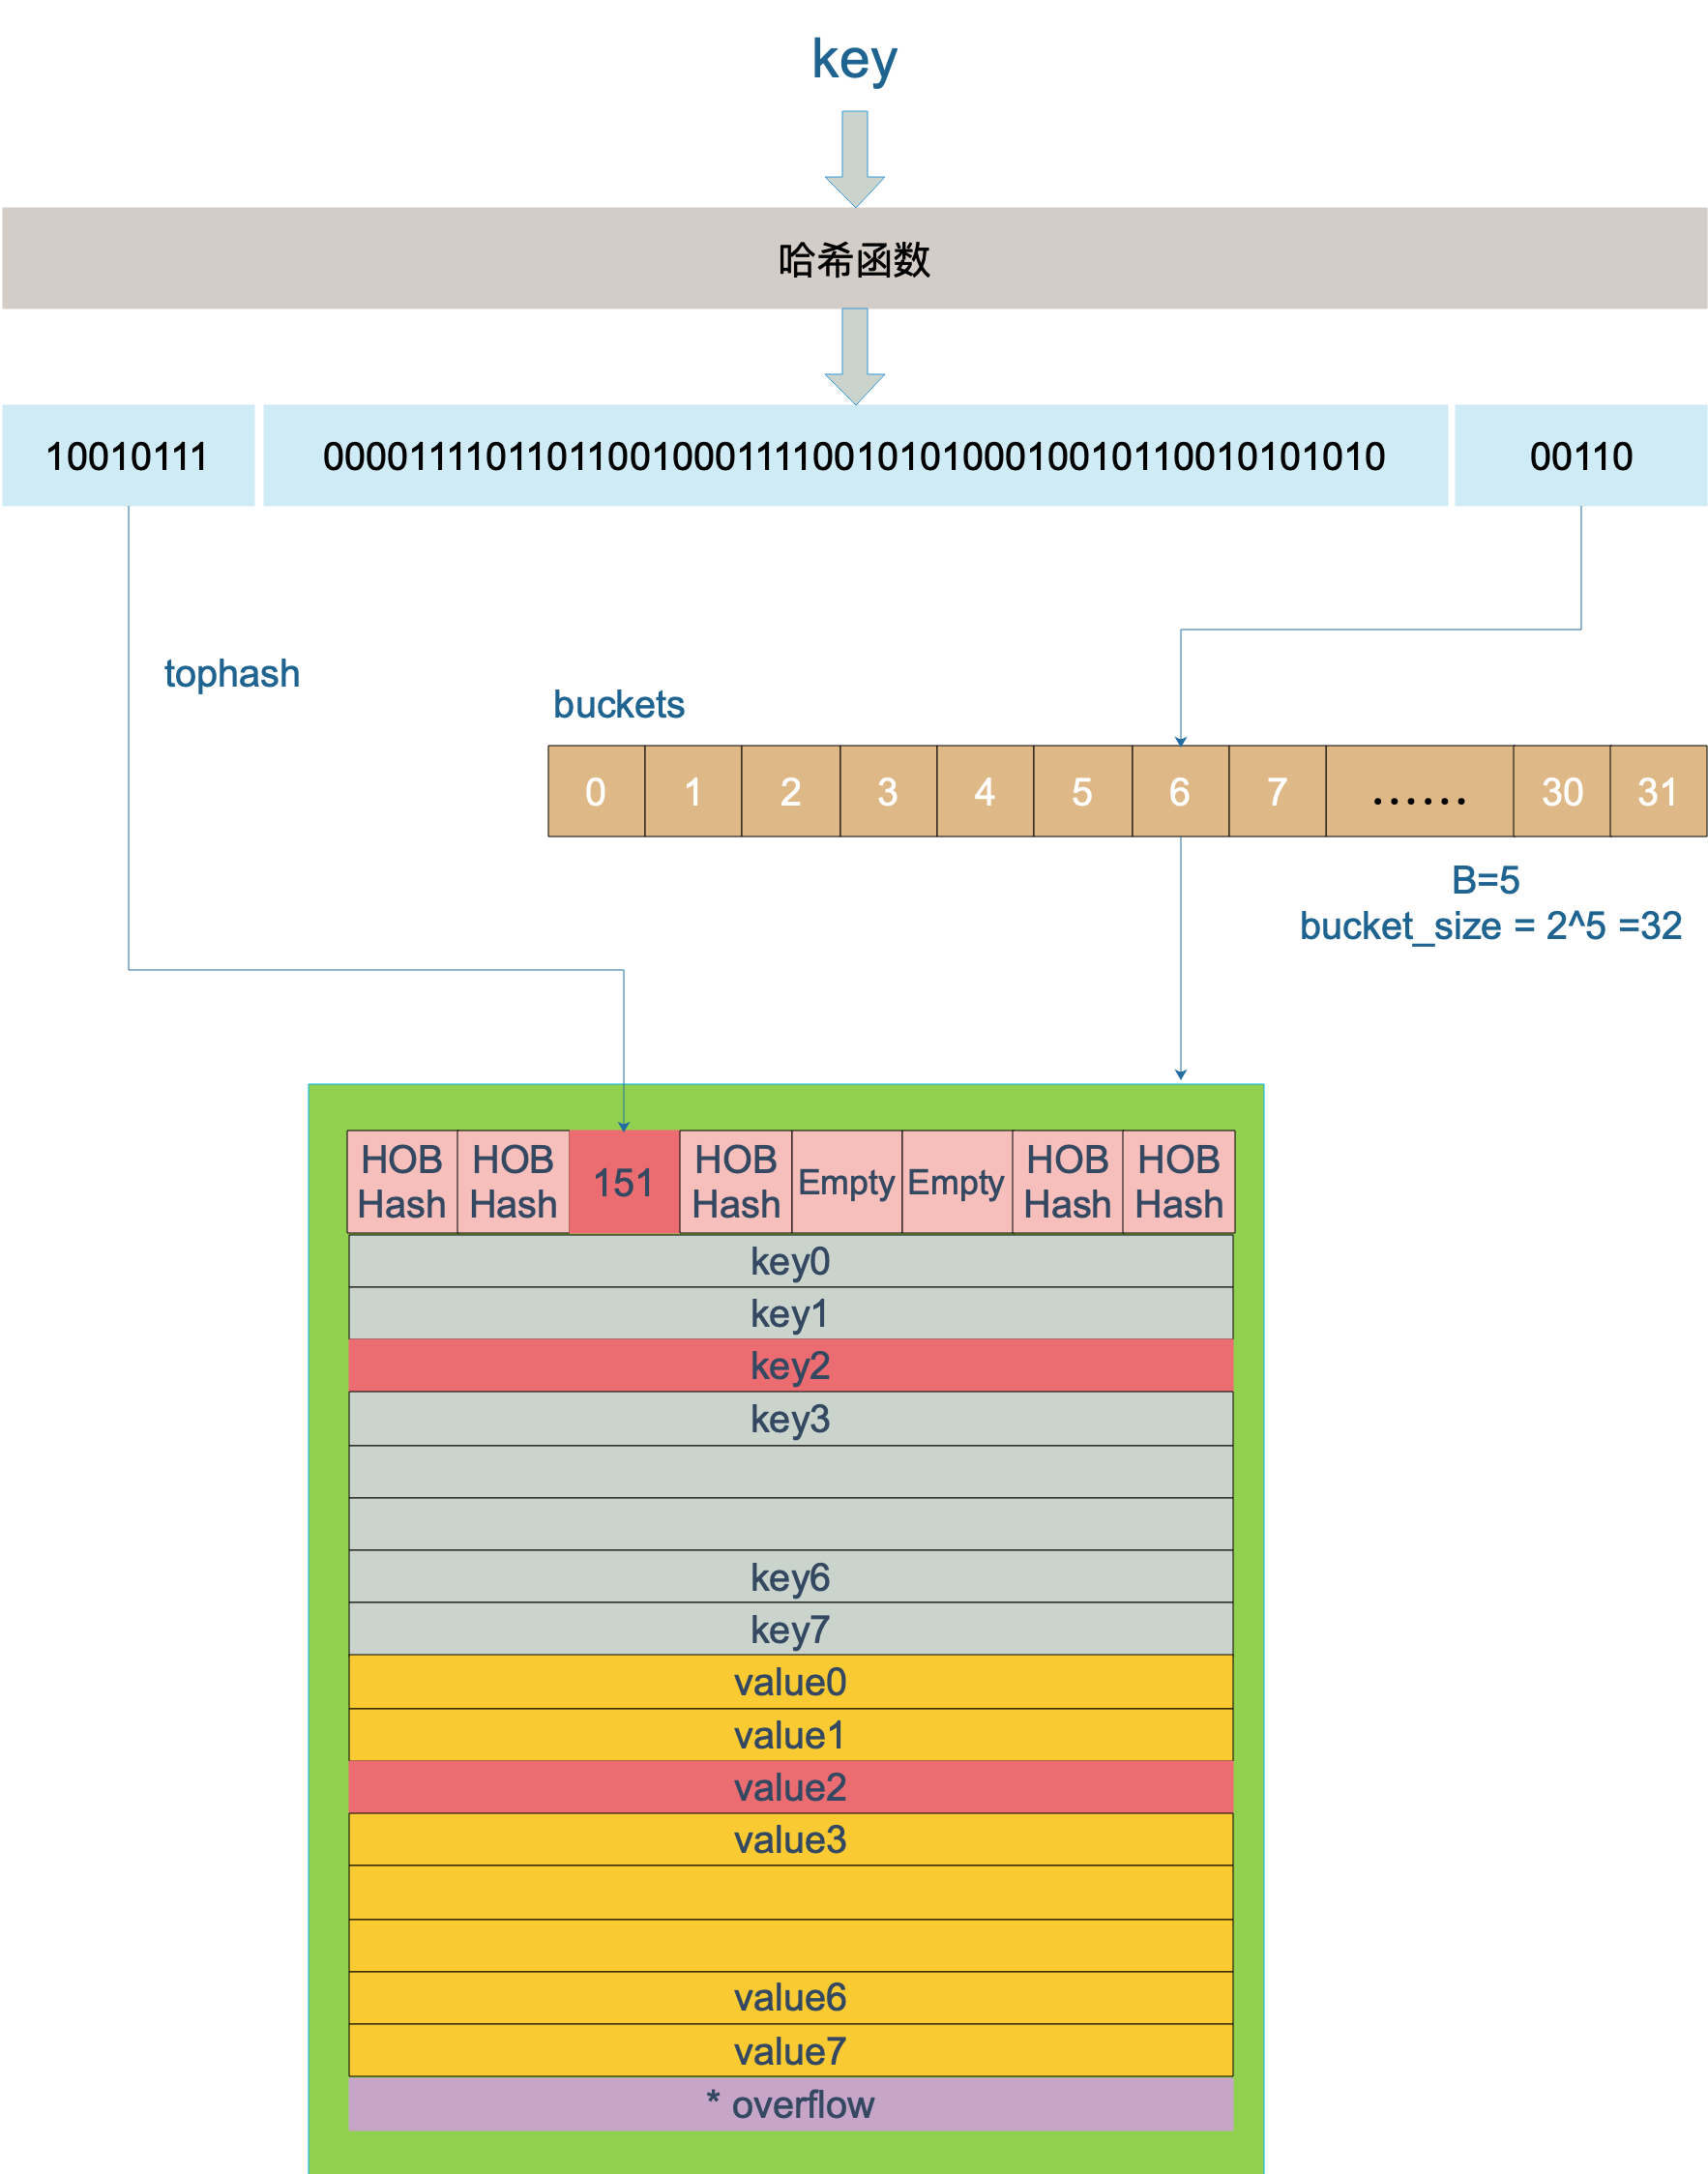
上图中,假定 B = 5,所以 bucket 总数就是 2^5 = 32。首先计算出待查找 key 的哈希,使用低 5 位 00110,找到对应的 6 号 bucket,使用高 8 位 10010111,对应十进制 151,在 6 号 bucket 中寻找 tophash 值(HOB hash)为 151 的 key,找到了 2 号槽位,这样整个查找过程就结束了。
如果在 bucket 中没找到,并且 overflow 不为空,还要继续去 overflow bucket 中寻找,直到找到或是所有的 key 槽位都找遍了,包括所有的 overflow bucket。
mapaccess
在编译的类型检查期间,hash[key] 以及类似的操作都会被转换成哈希的 OINDEXMAP 操作,中间代码生成阶段会在 cmd/compile/internal/gc.walkexpr 函数中将这些 OINDEXMAP 操作转换成如下的代码:
1
2
|
v     := hash[key] // => v     := *mapaccess1(maptype, hash, &key)
v, ok := hash[key] // => v, ok := mapaccess2(maptype, hash, &key)
|
赋值语句左侧接受参数的个数会决定使用的运行时方法:
- 当接受一个参数时,会使用
runtime.mapaccess1,该函数仅会返回一个指向目标值的指针;
- 当接受两个参数时,会使用
runtime.mapaccess2,除了返回目标值之外,它还会返回一个用于表示当前键对应的值是否存在的 bool 值:
另外,根据 key 的不同类型,编译器还会将查找、插入、删除的函数用更具体的函数替换,以优化效率:
| key 类型 |
查找 |
| uint32 |
mapaccess1_fast32(t *maptype, h *hmap, key uint32) unsafe.Pointer |
| uint32 |
mapaccess2_fast32(t *maptype, h *hmap, key uint32) (unsafe.Pointer, bool) |
| uint64 |
mapaccess1_fast64(t *maptype, h *hmap, key uint64) unsafe.Pointer |
| uint64 |
mapaccess2_fast64(t *maptype, h *hmap, key uint64) (unsafe.Pointer, bool) |
| string |
mapaccess1_faststr(t *maptype, h *hmap, ky string) unsafe.Pointer |
| string |
mapaccess2_faststr(t *maptype, h *hmap, ky string) (unsafe.Pointer, bool) |
这些函数的参数类型直接是具体的 uint32、unt64、string,在函数内部由于提前知晓了 key 的类型,所以内存布局是很清楚的,因此能节省很多操作,提高效率。
上面这些函数都是在文件 src/runtime/hashmap_fast.go 里。
mapaccess1
runtime.mapaccess1 会先通过哈希表设置的哈希函数、种子获取当前键对应的哈希,再通过 runtime.bucketMask 和 runtime.add 拿到该键值对所在的桶序号和哈希高位的 8 位数字。
map的读取大概就是以下几步:
- nil的Map或者len==0的Map直接返回对应类型零值
- 如果当前处于翻倍扩容状态且当前key的hash对应的桶还没搬迁完,那么就在旧桶里找对应的那个桶去找对应的key-value
- 跟写入一样 遍历桶及其溢出桶
- 找到了返回值,没找到返回返回对应类型零值
  1
  2
  3
  4
  5
  6
  7
  8
  9
 10
 11
 12
 13
 14
 15
 16
 17
 18
 19
 20
 21
 22
 23
 24
 25
 26
 27
 28
 29
 30
 31
 32
 33
 34
 35
 36
 37
 38
 39
 40
 41
 42
 43
 44
 45
 46
 47
 48
 49
 50
 51
 52
 53
 54
 55
 56
 57
 58
 59
 60
 61
 62
 63
 64
 65
 66
 67
 68
 69
 70
 71
 72
 73
 74
 75
 76
 77
 78
 79
 80
 81
 82
 83
 84
 85
 86
 87
 88
 89
 90
 91
 92
 93
 94
 95
 96
 97
 98
 99
100
101
102
103
104
105
106
107
108
109
110
|
// mapaccess1 returns a pointer to h[key].  Never returns nil, instead
// it will return a reference to the zero object for the elem type if
// the key is not in the map.
// NOTE: The returned pointer may keep the whole map live, so don't
// hold onto it for very long.
func mapaccess1(t *maptype, h *hmap, key unsafe.Pointer) unsafe.Pointer {
	if raceenabled && h != nil {
		callerpc := getcallerpc()
		pc := funcPC(mapaccess1)
		racereadpc(unsafe.Pointer(h), callerpc, pc)
		raceReadObjectPC(t.key, key, callerpc, pc)
	}
	if msanenabled && h != nil {
		msanread(key, t.key.size)
	}
	// map为空或者元素数量为0时快速返回
	// 如果 h 什么都没有,返回零值
	if h == nil || h.count == 0 {
		// 同写入
		if t.hashMightPanic() {
			t.hasher(key, 0) // see issue 23734
		}
		return unsafe.Pointer(&zeroVal[0])
	}
	// 写和读冲突
	// 在这里做并发判断,检测到并发写时,抛异常
	// 注意:go map的并发检测是伪检测,并不保证所有的并发都会被检测出来。而且这玩意是在运行期检测。
	// 所以对map有并发要求时,应使用sync.map来代替普通map,通过加锁来阻断并发冲突
	if h.flags&hashWriting != 0 {
		throw("concurrent map read and map write")
	}
	// 计算哈希值,并且加入 hash0 引入随机性
	hash := t.hasher(key, uintptr(h.hash0))
	// 比如 B=5,那 m 就是31,二进制是全 1
	// 求 bucket num 时,将 hash 与 m 相与,
	// 达到 bucket num 由 hash 的低 8 位决定的效果
	m := bucketMask(h.B)
	// b 就是 bucket 的地址
	b := (*bmap)(add(h.buckets, (hash&m)*uintptr(t.bucketsize)))
	// oldbuckets 不为 nil,说明发生了扩容
	if c := h.oldbuckets; c != nil {
		// 如果不是同 size 扩容(看后面扩容的内容)
	    	// 对应条件 1 的解决方案
		if !h.sameSizeGrow() {
			// There used to be half as many buckets; mask down one more power of two.
			// 新 bucket 数量是老的 2 倍
			m >>= 1
		}
		// 求出 key 在老的 map 中的 bucket 位置
		oldb := (*bmap)(add(c, (hash&m)*uintptr(t.bucketsize)))
		// 如果 oldb 没有搬迁到新的 bucket
		// 那就在老的 bucket 中寻找
		if !evacuated(oldb) {
			// 处于扩容过程中,应该从oldbuckets中去获取数据
			b = oldb
		}
	}
	// 计算出高 8 位的 hash
	// 相当于右移 56 位,只取高8位
	top := tophash(hash)
bucketloop:
	// 遍历桶和其溢出桶
	for ; b != nil; b = b.overflow(t) {
		//遍历桶的tophash
		for i := uintptr(0); i < bucketCnt; i++ {
			 // tophash 不匹配,继续
			if b.tophash[i] != top {
				if b.tophash[i] == emptyRest {
					// 提前返回,emptyRest表示在它之后不会存在非空值
					// 当前bucket内找完(还没找到),继续到 overflow bucket 里找
					break bucketloop
				}
				continue
			}
			// tophash 匹配,定位到 key 的位置
			k := add(unsafe.Pointer(b), dataOffset+i*uintptr(t.keysize))
			// key 是指针
			if t.indirectkey() {
				// 解引用
				k = *((*unsafe.Pointer)(k))
			}
			// 如果 key 相等
			// 防止仅top位相同的hash冲突
			if t.key.equal(key, k) {
				// 定位到 value 的位置
				e := add(unsafe.Pointer(b), dataOffset+bucketCnt*uintptr(t.keysize)+i*uintptr(t.elemsize))
				// value 解引用
				if t.indirectelem() {
					e = *((*unsafe.Pointer)(e))
				}
				return e
			}
		}
	}
	// overflow bucket 也找完了,说明没有目标 key
	// 返回零值
	return unsafe.Pointer(&zeroVal[0])
}
// bucketMask returns 1<<b - 1, optimized for code generation.
func bucketMask(b uint8) uintptr {
	return bucketShift(b) - 1
}
// bucketShift returns 1<<b, optimized for code generation.
func bucketShift(b uint8) uintptr {
	// Masking the shift amount allows overflow checks to be elided.
	return uintptr(1) << (b & (sys.PtrSize*8 - 1))
}
func (b *bmap) overflow(t *maptype) *bmap {
	return *(**bmap)(add(unsafe.Pointer(b), uintptr(t.bucketsize)-sys.PtrSize))
}
|
在 bucketloop 循环中,哈希会依次遍历正常桶和溢出桶中的数据,它会先比较哈希的高 8 位和桶中存储的 tophash,后比较传入的和桶中的值以加速数据的读写。用于选择桶序号的是哈希的最低几位,而用于加速访问的是哈希的高 8 位,这种设计能够减少同一个桶中有大量相等 tophash 的概率影响性能。
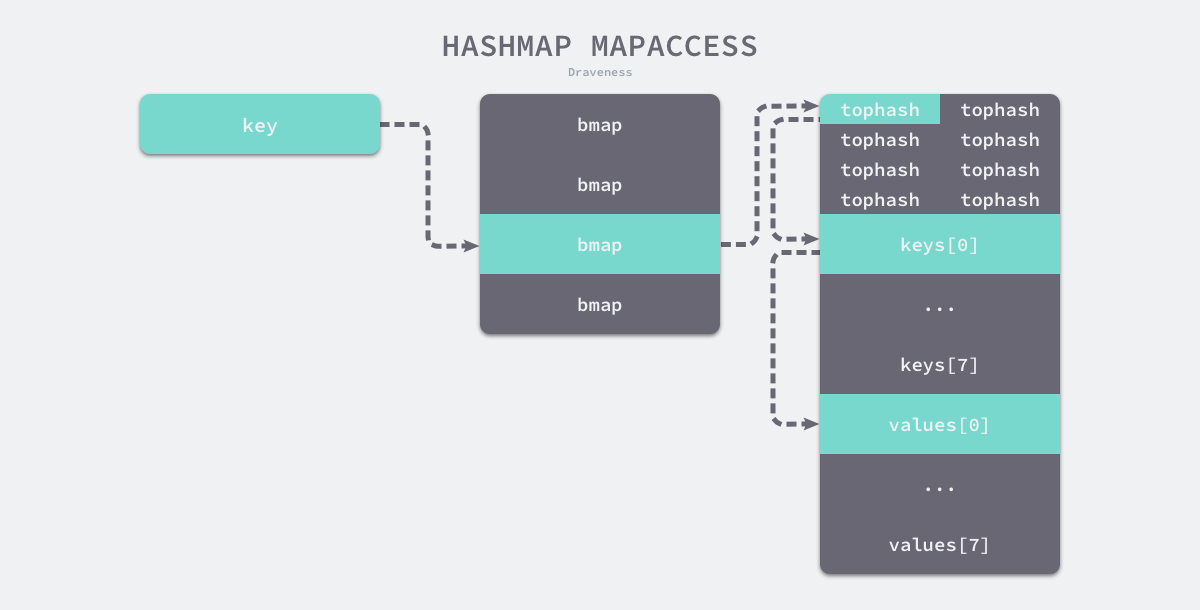
如上图所示,每一个桶都是一整片的内存空间,当发现桶中的 tophash 与传入键的 tophash 匹配之后,我们会通过指针和偏移量获取哈希中存储的键 keys[0] 并与 key 比较,如果两者相同就会获取目标值的指针 values[0] 并返回。
如果 h 中没有此 key,那就会返回一个 key 相应类型的零值,不会返回 nil。
这里,说一下定位 key 和 value 的方法以及整个循环的写法。
1
2
3
4
5
|
// key 定位公式
k := add(unsafe.Pointer(b), dataOffset+i*uintptr(t.keysize))

// value 定位公式
v := add(unsafe.Pointer(b), dataOffset+bucketCnt*uintptr(t.keysize)+i*uintptr(t.valuesize))
|
b 是 bmap 的地址,这里 bmap 还是源码里定义的结构体,只包含一个 tophash 数组,经编译器扩充之后的结构体才包含 key,value,overflow 这些字段。dataOffset 是 key 相对于 bmap 起始地址的偏移:
1
2
3
4
|
dataOffset = unsafe.Offsetof(struct {
		b bmap
		v int64
	}{}.v)
|
因此 bucket 里 key 的起始地址就是 unsafe.Pointer(b)+dataOffset。第 i 个 key 的地址就要在此基础上跨过 i 个 key 的大小;而我们又知道,value 的地址是在所有 key 之后,因此第 i 个 value 的地址还需要加上所有 key 的偏移。理解了这些,上面 key 和 value 的定位公式就很好理解了。
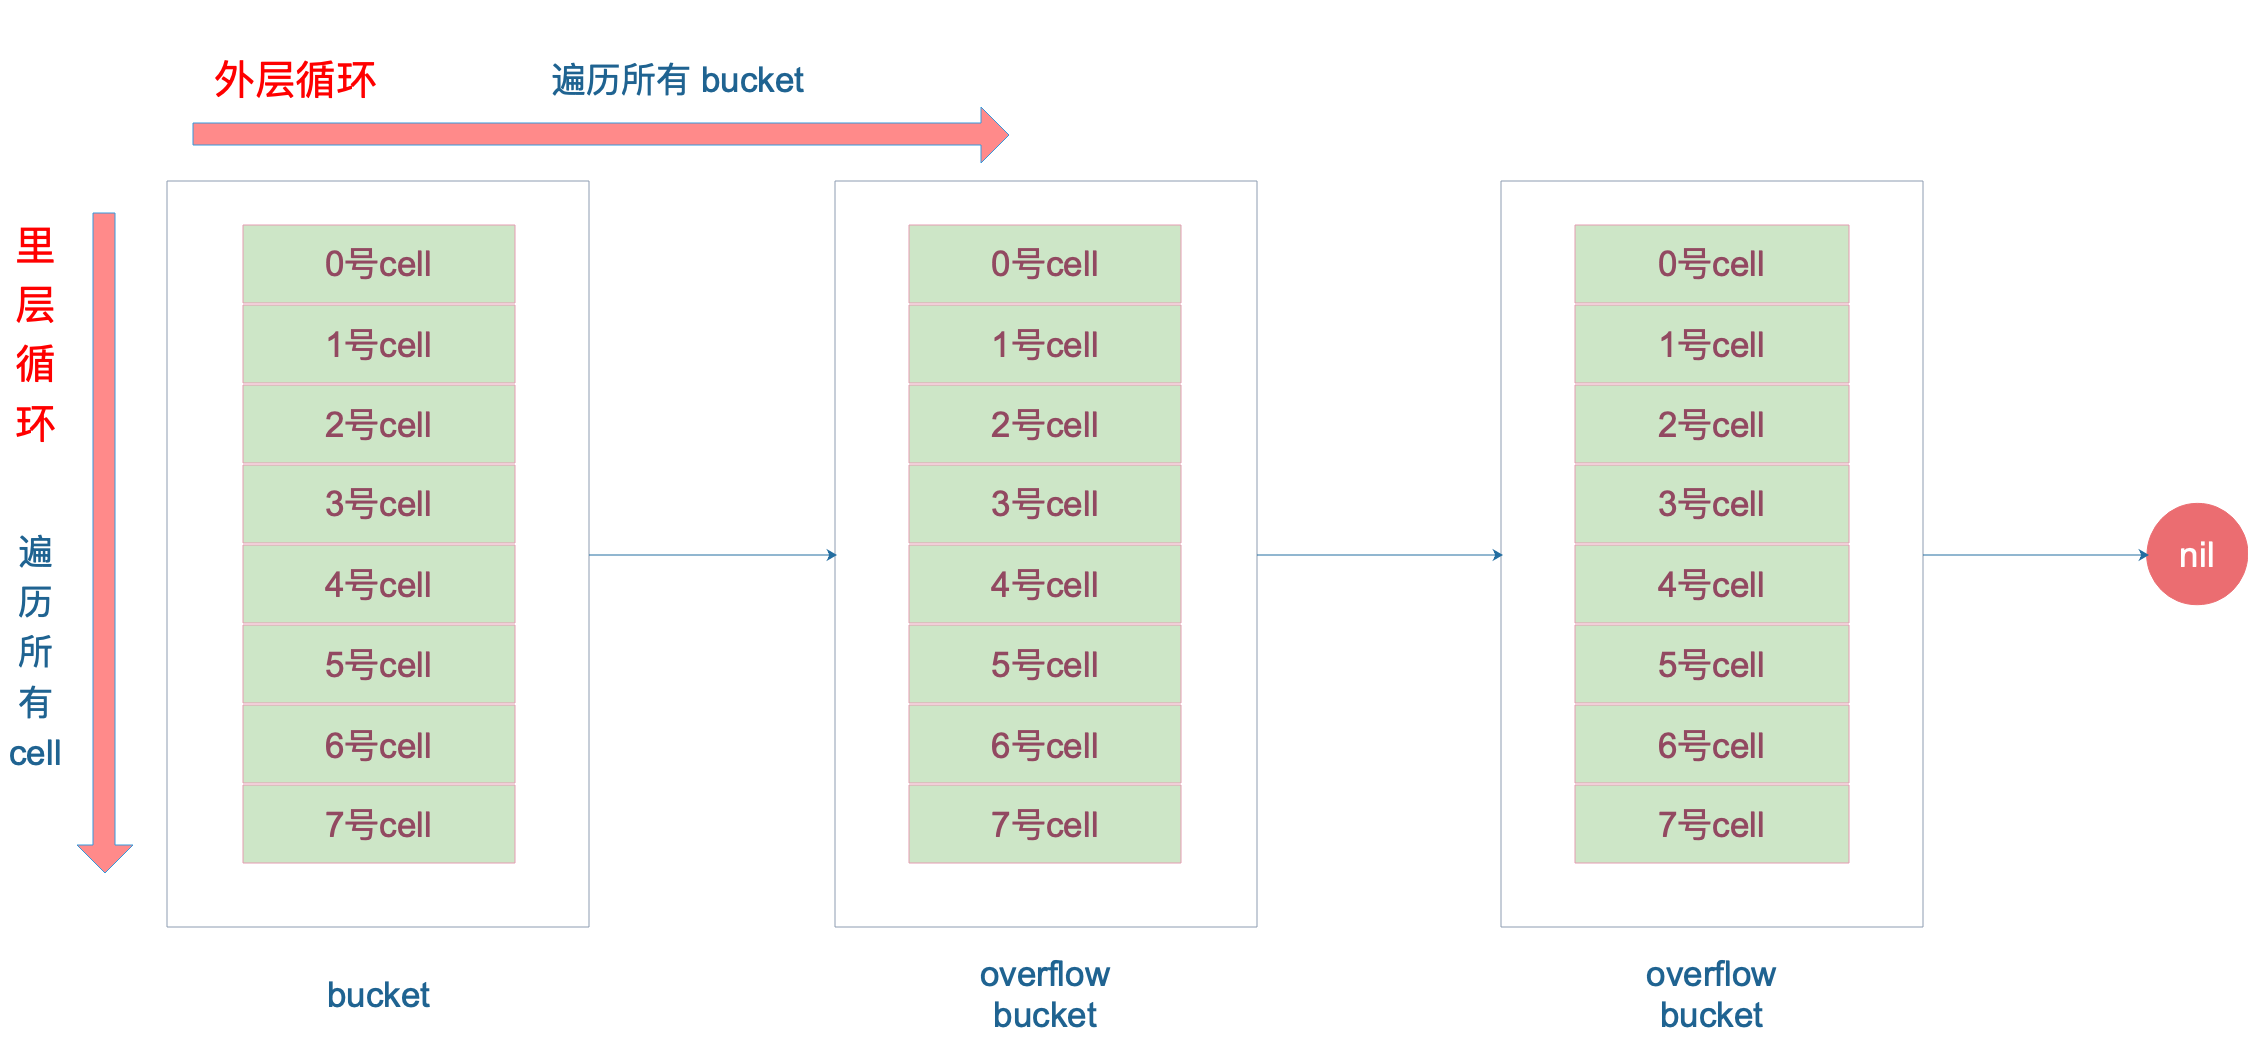
再说整个大循环的写法,最外层是一个无限循环,通过
遍历所有的 bucket,这相当于是一个 bucket 链表。
当定位到一个具体的 bucket 时,里层循环就是遍历这个 bucket 里所有的 cell,或者说所有的槽位,也就是 bucketCnt=8 个槽位。整个循环过程:
tophash
1
2
3
4
5
6
7
8
|
// tophash calculates the tophash value for hash.
func tophash(hash uintptr) uint8 {
	top := uint8(hash >> (sys.PtrSize*8 - 8))
	if top < minTopHash {
		top += minTopHash
	}
	return top
}
|
当一个 cell 的 tophash 值小于 minTopHash 时,标志这个 cell 的迁移状态。因为这个状态值是放在 tophash 数组里,为了和正常的哈希值区分开,会给 key 计算出来的哈希值一个增量:minTopHash。这样就能区分正常的 top hash 值和表示状态的哈希值。
下面的这几种状态就表征了 bucket 的情况:
 1
 2
 3
 4
 5
 6
 7
 8
 9
10
11
12
13
14
15
16
|
	// Possible tophash values. We reserve a few possibilities for special marks.
	// Each bucket (including its overflow buckets, if any) will have either all or none of its
	// entries in the evacuated* states (except during the evacuate() method, which only happens
	// during map writes and thus no one else can observe the map during that time).
	// tophash对应的位置为空,并且后续没有非空的值
	emptyRest      = 0 // this cell is empty, and there are no more non-empty cells at higher indexes or overflows.
	// tophash对应的位置为空,元素被删除后可能的标记值
	emptyOne       = 1 // this cell is empty
	// key/value是无效的,值被迁移到新table的前半段
	evacuatedX     = 2 // key/elem is valid.  Entry has been evacuated to first half of larger table.
	// key/value是无效的,值被迁移到新table的后半段
	evacuatedY     = 3 // same as above, but evacuated to second half of larger table.
	// tophash对应的值为空,但是表示正在迁移中
	evacuatedEmpty = 4 // cell is empty, bucket is evacuated.
	// 一个临界值,前面所有的值都代表一个特殊的含义,所以当top<5时,top+=5
	minTopHash     = 5 // minimum tophash for a normal filled cell.
|
源码里判断这个 bucket 是否已经搬迁完毕,用到的函数:
1
2
3
4
|
func evacuated(b *bmap) bool {
	h := b.tophash[0]
	return h > emptyOne && h < minTopHash
}
|
只取了 tophash 数组的第一个值,判断它是否在 2-4 之间。对比上面的常量,当 top hash 是 evacuatedEmpty、evacuatedX、evacuatedY 这三个值之一,说明此 bucket 中的 key 全部被搬迁到了新 bucket。
mapaccess2
另一个同样用于访问哈希表中数据的 runtime.mapaccess2 只是在 runtime.mapaccess1 的基础上多返回了一个标识键值对是否存在的 bool 值:
 1
 2
 3
 4
 5
 6
 7
 8
 9
10
11
12
13
14
15
16
17
18
19
20
21
22
23
24
25
26
27
28
29
30
31
32
33
34
35
36
37
38
39
40
41
42
43
44
45
46
47
48
49
50
51
52
53
54
55
56
57
|
func mapaccess2(t *maptype, h *hmap, key unsafe.Pointer) (unsafe.Pointer, bool) {
	if raceenabled && h != nil {
		callerpc := getcallerpc()
		pc := funcPC(mapaccess2)
		racereadpc(unsafe.Pointer(h), callerpc, pc)
		raceReadObjectPC(t.key, key, callerpc, pc)
	}
	if msanenabled && h != nil {
		msanread(key, t.key.size)
	}
	if h == nil || h.count == 0 {
		if t.hashMightPanic() {
			t.hasher(key, 0) // see issue 23734
		}
		return unsafe.Pointer(&zeroVal[0]), false
	}
	if h.flags&hashWriting != 0 {
		throw("concurrent map read and map write")
	}
	hash := t.hasher(key, uintptr(h.hash0))
	m := bucketMask(h.B)
	b := (*bmap)(unsafe.Pointer(uintptr(h.buckets) + (hash&m)*uintptr(t.bucketsize)))
	if c := h.oldbuckets; c != nil {
		if !h.sameSizeGrow() {
			// There used to be half as many buckets; mask down one more power of two.
			m >>= 1
		}
		oldb := (*bmap)(unsafe.Pointer(uintptr(c) + (hash&m)*uintptr(t.bucketsize)))
		if !evacuated(oldb) {
			b = oldb
		}
	}
	top := tophash(hash)
bucketloop:
	for ; b != nil; b = b.overflow(t) {
		for i := uintptr(0); i < bucketCnt; i++ {
			if b.tophash[i] != top {
				if b.tophash[i] == emptyRest {
					break bucketloop
				}
				continue
			}
			k := add(unsafe.Pointer(b), dataOffset+i*uintptr(t.keysize))
			if t.indirectkey() {
				k = *((*unsafe.Pointer)(k))
			}
			if t.key.equal(key, k) {
				e := add(unsafe.Pointer(b), dataOffset+bucketCnt*uintptr(t.keysize)+i*uintptr(t.elemsize))
				if t.indirectelem() {
					e = *((*unsafe.Pointer)(e))
				}
				return e, true
			}
		}
	}
	return unsafe.Pointer(&zeroVal[0]), false
}
|
使用 v, ok := hash[k] 的形式访问哈希表中元素时,我们能够通过这个布尔值更准确地知道当 v == nil 时,v 到底是哈希中存储的元素还是表示该键对应的元素不存在,所以在访问哈希时,更推荐使用这种方式判断元素是否存在。
mapassign
通过汇编语言可以看到,向 map 中插入或者修改 key,最终调用的是 mapassign 函数。
实际上插入或修改 key 的语法是一样的,只不过前者操作的 key 在 map 中不存在,而后者操作的 key 存在 map 中。
mapassign 有一个系列的函数,根据 key 类型的不同,编译器会将其优化为相应的“快速函数”。
| key |
类型 |
插入 |
| uint32 |
mapassign_fast32(t *maptype, h *hmap, key uint32) unsafe.Pointer |
|
| uint64 |
mapassign_fast64(t *maptype, h *hmap, key uint64) unsafe.Pointer |
|
| string |
mapassign_faststr(t *maptype, h *hmap, ky string) unsafe.Pointer |
|
我们只用研究最一般的赋值函数 mapassign。
Map写入操作过程:
- 首先会计算出传入Key的哈希,其低B位用于选择对应的bmap,其哈希值的高8位用于在对应的bmap中快速的查找是否有此key的存在,并且对该map打上写标记,防止并发读写。
- 遍历找到的bmap及其溢出bmap,并按照下面的条件执行
- 如果比较到当前的tophash不等于传入key的tophash,且未找到可用tophash地址时,如果当前tophash无已存放的key,那么记录下这个tophash的地址和其对应的k,v的地址,此条件为插入操作。
- 如果当前tophash是emptyRest,则代表后续没有溢出bmap或者可遍历的tophash了
- 如果当前的tophash==传入key的tophash,则会对比传入的Key以及tophash对应的Key的地址的值是否相等,如果相等则代表已经存在了当前传入的Key,则此操作为更新操作,此时计算出对应value的存放地址
- 如果上述条件都不满足则遍历溢出bmap(如果有)
- 如果在bmap及其溢出bmap中都没有找到可用的存放地址,则创建一个新的溢出bmap,因为没找到说明没有可用的tophash位置了,即所有的bmap都满了。
- 如果符合下列扩容条件就会产生扩容,扩容完毕后重新开始 序号2 的过程。
- 当装载因子>=6.5
- 溢出bmap过多,该情况只会出现在先大量的写然后再大量删除但装载因子并没有>=6.5的情况
- 如果不需要扩容则创建一个新的bmap,给传入Key的哈希,其低B位用于选择对应的bmap的溢出bmap链表尾部,然后获得可用的tophash,key,value地址。然后取消写标记,返回可用的value 存放地址 , 随后的赋值操作会在汇编中进行
  1
  2
  3
  4
  5
  6
  7
  8
  9
 10
 11
 12
 13
 14
 15
 16
 17
 18
 19
 20
 21
 22
 23
 24
 25
 26
 27
 28
 29
 30
 31
 32
 33
 34
 35
 36
 37
 38
 39
 40
 41
 42
 43
 44
 45
 46
 47
 48
 49
 50
 51
 52
 53
 54
 55
 56
 57
 58
 59
 60
 61
 62
 63
 64
 65
 66
 67
 68
 69
 70
 71
 72
 73
 74
 75
 76
 77
 78
 79
 80
 81
 82
 83
 84
 85
 86
 87
 88
 89
 90
 91
 92
 93
 94
 95
 96
 97
 98
 99
100
101
102
103
104
105
106
107
108
109
110
111
112
113
114
115
116
117
118
119
120
121
122
123
124
125
126
127
128
129
130
131
132
133
134
135
136
137
138
139
140
141
142
143
144
145
146
147
148
149
150
151
152
153
154
155
156
157
158
159
160
161
162
163
164
165
166
167
168
169
170
171
172
173
174
175
176
177
178
179
180
181
182
183
184
185
186
187
188
189
190
191
192
193
194
195
196
197
198
199
200
201
202
203
204
205
206
207
208
209
210
211
|
// Like mapaccess, but allocates a slot for the key if it is not present in the map.
// 该函数传入的参数分别为
// 1.map的类型即 key和value的类型信息等其他数据
// 2.那个map
// 3.key所在内存的地址
// 返回的参数为
// 1.找到的可用的可存储value的内存地址
// 返回后具体的赋值操作由汇编完成
func mapassign(t *maptype, h *hmap, key unsafe.Pointer) unsafe.Pointer {
	//判断 hmap 是否已经初始化(是否为 nil)
	if h == nil {
		panic(plainError("assignment to entry in nil map"))
	}
	if raceenabled {
		callerpc := getcallerpc()
		pc := funcPC(mapassign)
		racewritepc(unsafe.Pointer(h), callerpc, pc)
		raceReadObjectPC(t.key, key, callerpc, pc)
	}
	if msanenabled {
		msanread(key, t.key.size)
	}
	//判断是否并发读写 map,若是则抛出异常
	if h.flags&hashWriting != 0 {
		throw("concurrent map writes")
	}
	// 求出这个key的哈希值
	hash := t.hasher(key, uintptr(h.hash0))
	// 函数首先会检查 map 的标志位 flags。如果 flags 的写标志位此时被置 1 了,说明有其他协程在执行“写”操作,进而导致程序 panic。这也说明了 map 对协程是不安全的。
	// Set hashWriting after calling t.hasher, since t.hasher may panic,
	// in which case we have not actually done a write.
	// 设置 flags 标志位,表示有一个 goroutine 正在写入数据。因为 alg.hash 有可能出现 panic 导致异常
	h.flags ^= hashWriting
	// 判断 buckets 是否为 nil,若是则调用 newobject 根据当前 bucket 大小进行分配
    	// 初始化时没有初始 buckets,那么它在第一次赋值时就会对 buckets 分配
	// 懒初始化,在前面初始化map时,B为0,桶数组放到这里来进行初始化
	if h.buckets == nil {
		h.buckets = newobject(t.bucket) // newarray(t.bucket, 1)
	}
	// 首先是函数会根据传入的键拿到对应的哈希和桶:
again:
	// 根据低八位计算得到 bucket 的内存地址
	// 算出这个key应该落到哪个bmap里
	bucket := hash & bucketMask(h.B)
	// 如果 map 处在扩容的过程中,那么当 key 定位到了某个 bucket 后,需要确保这个 bucket 对应的老 bucket 完成了迁移过程。即老 bucket 里的 key 都要迁移到新的 bucket 中来(分裂到 2 个新 bucket),才能在新的 bucket 中进行插入或者更新的操作。
	// 只有进行完了这个搬迁操作后,我们才能放心地在新 bucket 里定位 key 要安置的地址,再进行之后的操作。
	// 判断是否处于搬迁桶的状态
  	// 如果处于该状态则进行旧桶 -> 新桶的搬迁
	if h.growing() {
		growWork(t, h, bucket)
	}
	// 通过位移操作获得 bucket := hash & bucketMask(h.B) 这个桶的对象
	b := (*bmap)(add(h.buckets, bucket*uintptr(t.bucketsize)))
	// 计算出key的哈希值之后的高8位哈希值
	top := tophash(hash)
	// 然后通过遍历比较桶中存储的 tophash 和键的哈希,如果找到了相同结果就会返回目标位置的地址。
	// 准备两个指针,一个(inserti)指向 key 的 hash 值在 tophash 数组所处的位置,另一个(insertk)指向 cell 的位置(也就是 key 最终放置的地址),当然,对应 value 的位置就很容易定位出来了。这三者实际上都是关联的,在 tophash 数组中的索引位置决定了 key 在整个 bucket 中的位置(共 8 个 key),而 value 的位置需要“跨过” 8 个 key 的长度。
	// 元素在bmap中tophash数组的地址
	var inserti *uint8
	// key的地址
	var insertk unsafe.Pointer
	// value 的地址
	var elem unsafe.Pointer
bucketloop:
	// for 循环会依次遍历正常桶和溢出桶中存储的数据,整个过程会分别判断 tophash 是否相等、key 是否相等,遍历结束后会从循环中跳出。
	for {
		// 遍历当前选中的bmap
		// 迭代 buckets 中的每一个 bucket(共 8 个)
		for i := uintptr(0); i < bucketCnt; i++ {
			// 对比 bucket.tophash 与 top(高八位)是否一致
			if b.tophash[i] != top {
				// 在循环的过程中,inserti 和 insertk 分别指向第一个找到的空闲的 cell。如果之后在 map 没有找到 key 的存在,也就是说原来 map 中没有此 key,这意味着插入新 key。那最终 key 的安置地址就是第一次发现的“空位”(tophash 是 empty)。
				// 若不一致,判断是否为空槽
				if isEmpty(b.tophash[i]) && inserti == nil {
					// 记录tophash中最早一次出现empty的情况,这里不一定是emptyRest,有可能是删除数据时的emptyOne状态
					inserti = &b.tophash[i]
					insertk = add(unsafe.Pointer(b), dataOffset+i*uintptr(t.keysize))
					// 把该位置标识为可插入 tophash 位置,这里就是第一个可以插入数据的地方
					elem = add(unsafe.Pointer(b), dataOffset+bucketCnt*uintptr(t.keysize)+i*uintptr(t.elemsize))
				}
				// 如果 b.tophash[i] == emptyRest
        			// 代表后续的b.tophash没有 溢出bmap或者可遍历的b.tophash了
				if b.tophash[i] == emptyRest {
					// 跳出循环
					break bucketloop
				}
				continue
			}
			// 若是匹配(也就是原本已经存在),则进行更新。最后跳出并返回 value 的内存地址
			k := add(unsafe.Pointer(b), dataOffset+i*uintptr(t.keysize))
			if t.indirectkey() {
				k = *((*unsafe.Pointer)(k))
			}
			// 计算当前k与传进来的key是否相等,有可能只是高位相等,则需要继续循环
			if !t.key.equal(key, k) {
				continue
			}
			// already have a mapping for key. Update it.
			// 如果相等那么就代表是更新操作
      			// 先把传入的key的赋值到k处
			if t.needkeyupdate() {
				typedmemmove(t.key, k, key)
			}
			// 计算出k对应value的地址
			elem = add(unsafe.Pointer(b), dataOffset+bucketCnt*uintptr(t.keysize)+i*uintptr(t.elemsize))
			// 直接跳转到结束
			goto done
		}
		// 判断是否迭代完毕,若是则结束迭代 buckets 并更新当前桶位置
		// 当前桶已经没有存储数据的位置了,则需要从overflow溢出桶中查询位置
		// 获取溢出bmap
    		// 代表在当前bmap里面么得找到可用的地址
		ovf := b.overflow(t)
		// 没有溢出bmap就跳出
		if ovf == nil {
			break
		}
		// 继续循环
		b = ovf
	}
	// 如果没找到可用的插槽,那么就创建一个
  	// 判断是否需要扩容
  	// 扩容条件为:
  	// 1.当装载因子>=6.5
  	// 2.溢出bmap过多
  	// 第二种情况只会出现在先大量的写然后再大量删除的情况
	// Did not find mapping for key. Allocate new cell & add entry.

	// If we hit the max load factor or we have too many overflow buckets,
	// and we're not already in the middle of growing, start growing.
	// 在正式安置 key 之前,还要检查 map 的状态,看它是否需要进行扩容。如果满足扩容的条件,就主动触发一次扩容操作。
	// 这之后,整个之前的查找定位 key 的过程,还得再重新走一次。因为扩容之后,key 的分布都发生了变化。
	if !h.growing() && (overLoadFactor(h.count+1, h.B) || tooManyOverflowBuckets(h.noverflow, h.B)) {
		// 扩容
		hashGrow(t, h)
		// 重新找
		goto again // Growing the table invalidates everything, so try again
	}
	// 所有的当前桶都是满的,需要构建一个新的溢出桶
	// 如果这个 bucket 的 8 个 key 都已经放置满了,那在跳出循环后,发现 inserti 和 insertk 都是空,这时候需要在 bucket 后面挂上 overflow bucket.哈希会调用 runtime.hmap.newoverflow 创建新桶或者使用 runtime.hmap 预先在 noverflow 中创建好的桶来保存数据,新创建的桶不仅会被追加到已有桶的末尾,还会增加哈希表的 noverflow 计数器。
	// 经过前面迭代寻找动作,若没有找到可插入的位置,意味着当前的所有桶都满了,将重新分配一个新溢出桶用于插入动作。最后再在上一步申请的新插入位置,存储键值对,返回该值的内存地址
	if inserti == nil {
		// The current bucket and all the overflow buckets connected to it are full, allocate a new one.
		newb := h.newoverflow(t, b)
		inserti = &newb.tophash[0]
		insertk = add(unsafe.Pointer(newb), dataOffset)
		elem = add(insertk, bucketCnt*uintptr(t.keysize))
	}
	// 将新key/elem存储在插入位置
	// store new key/elem at insert position
	// 最后,会更新 map 相关的值,如果是插入新 key,map 的元素数量字段 count 值会加 1;在函数之初设置的 hashWriting 写标志出会清零。
	if t.indirectkey() {
		kmem := newobject(t.key)
		*(*unsafe.Pointer)(insertk) = kmem
		insertk = kmem
	}
	//引用类型分配value所需空间,同时把value在槽中对应的位置指向这个空间
	if t.indirectelem() {
		vmem := newobject(t.elem)
		*(*unsafe.Pointer)(elem) = vmem
	}
	//将key写入刚分配的空间
	typedmemmove(t.key, insertk, key)
	//更新标记位
	*inserti = top
	//元素个数+1
	h.count++

done:
	// 再次校验并发写
	if h.flags&hashWriting == 0 {
		// 并发的写,标记在上面通过h.flags ^= hashWriting设置
		throw("concurrent map writes")
	}
	// 取消并发写的标记
	h.flags &^= hashWriting
	if t.indirectelem() {
		elem = *((*unsafe.Pointer)(elem))
	}
	// 返回可用的value 存放地址
  	// 随后的赋值操作会在汇编中进行
	return elem
}

func (h *hmap) newoverflow(t *maptype, b *bmap) *bmap {
	var ovf *bmap
	if h.extra != nil && h.extra.nextOverflow != nil {
		// We have preallocated overflow buckets available.
		// See makeBucketArray for more details.
		ovf = h.extra.nextOverflow
		if ovf.overflow(t) == nil {
			// We're not at the end of the preallocated overflow buckets. Bump the pointer.
			h.extra.nextOverflow = (*bmap)(add(unsafe.Pointer(ovf), uintptr(t.bucketsize)))
		} else {
			// This is the last preallocated overflow bucket.
			// Reset the overflow pointer on this bucket,
			// which was set to a non-nil sentinel value.
			ovf.setoverflow(t, nil)
			h.extra.nextOverflow = nil
		}
	} else {
		ovf = (*bmap)(newobject(t.bucket))
	}
	h.incrnoverflow()
	if t.bucket.ptrdata == 0 {
		h.createOverflow()
		*h.extra.overflow = append(*h.extra.overflow, ovf)
	}
	b.setoverflow(t, ovf)
	return ovf
}
|
如果当前键值对在哈希中不存在,哈希会为新键值对规划存储的内存地址,通过 runtime.typedmemmove 将键移动到对应的内存空间中并返回键对应值的地址 val。如果当前键值对在哈希中存在,那么就会直接返回目标区域的内存地址,哈希并不会在 runtime.mapassign 这个运行时函数中将值拷贝到桶中,该函数只会返回内存地址,真正的赋值操作是在编译期间插入的:
1
2
3
4
|
00018 (+5) CALL runtime.mapassign_fast64(SB)
00020 (5) MOVQ 24(SP), DI               ;; DI = &value
00026 (5) LEAQ go.string."88"(SB), AX   ;; AX = &"88"
00027 (5) MOVQ AX, (DI)                 ;; *DI = AX
|
runtime.mapassign_fast64 与 runtime.mapassign 函数的逻辑差不多,我们需要关注的是后面的三行代码,其中 24(SP) 是该函数返回的值地址,我们通过 LEAQ 指令将字符串的地址存储到寄存器 AX 中,MOVQ 指令将字符串 “88” 存储到了目标地址上完成了这次哈希的写入。
mapdelete
如果想要删除哈希中的元素,就需要使用 Go 语言中的 delete 关键字,这个关键字的唯一作用就是将某一个键对应的元素从哈希表中删除,无论是该键对应的值是否存在,这个内建的函数都不会返回任何的结果。
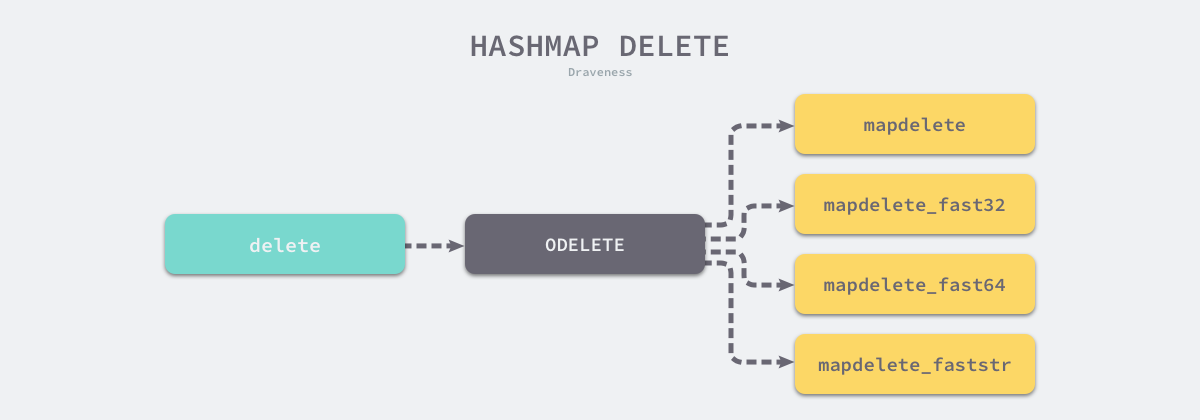
在编译期间,delete 关键字会被转换成操作为 ODELETE 的节点,而 cmd/compile/internal/gc.walkexpr 会将 ODELETE 节点转换成 runtime.mapdelete 函数簇中的一个,包括 runtime.mapdelete、mapdelete_faststr、mapdelete_fast32 和 mapdelete_fast64:
 1
 2
 3
 4
 5
 6
 7
 8
 9
10
11
12
13
14
15
16
17
|
func walkexpr(n *Node, init*Nodes) *Node {
	switch n.Op {
	case ODELETE:
		init.AppendNodes(&n.Ninit)
		map_ := n.List.First()
		key := n.List.Second()
		map_ = walkexpr(map_, init)
		key = walkexpr(key, init)

		t := map_.Type
		fast := mapfast(t)
		if fast == mapslow {
			key = nod(OADDR, key, nil)
		}
		n = mkcall1(mapfndel(mapdelete[fast], t), nil, init, typename(t), map_, key)
	}
}
|
这些函数的实现其实差不多,我们挑选其中的 runtime.mapdelete 分析一下。哈希表的删除逻辑与写入逻辑很相似,只是触发哈希的删除需要使用关键字,如果在删除期间遇到了哈希表的扩容,就会分流桶中的元素,分流结束之后会找到桶中的目标元素完成键值对的删除工作。
  1
  2
  3
  4
  5
  6
  7
  8
  9
 10
 11
 12
 13
 14
 15
 16
 17
 18
 19
 20
 21
 22
 23
 24
 25
 26
 27
 28
 29
 30
 31
 32
 33
 34
 35
 36
 37
 38
 39
 40
 41
 42
 43
 44
 45
 46
 47
 48
 49
 50
 51
 52
 53
 54
 55
 56
 57
 58
 59
 60
 61
 62
 63
 64
 65
 66
 67
 68
 69
 70
 71
 72
 73
 74
 75
 76
 77
 78
 79
 80
 81
 82
 83
 84
 85
 86
 87
 88
 89
 90
 91
 92
 93
 94
 95
 96
 97
 98
 99
100
101
102
103
104
105
106
107
108
109
110
111
112
113
114
115
116
117
118
119
120
121
122
123
124
125
126
127
128
|
func mapdelete(t *maptype, h *hmap, key unsafe.Pointer) {
	if raceenabled && h != nil {
		callerpc := getcallerpc()
		pc := funcPC(mapdelete)
		racewritepc(unsafe.Pointer(h), callerpc, pc)
		raceReadObjectPC(t.key, key, callerpc, pc)
	}
	if msanenabled && h != nil {
		msanread(key, t.key.size)
	}
	if h == nil || h.count == 0 {
		if t.hashMightPanic() {
			t.hasher(key, 0) // see issue 23734
		}
		return
	}
	// 检测是否有并发写
	if h.flags&hashWriting != 0 {
		throw("concurrent map writes")
	}

	hash := t.hasher(key, uintptr(h.hash0))

	// Set hashWriting after calling t.hasher, since t.hasher may panic,
	// in which case we have not actually done a write (delete).
	// 标记此时正在执行修改操作
	h.flags ^= hashWriting
	// 按低位进行桶的选择
	bucket := hash & bucketMask(h.B)
	// 计算 key 的哈希,找到落入的 bucket。检查此 map 如果正在扩容的过程中,直接触发一次搬迁操作。
	if h.growing() {
		// 进行扩容
		growWork(t, h, bucket)
	}
	b := (*bmap)(add(h.buckets, bucket*uintptr(t.bucketsize)))
	bOrig := b
	top := tophash(hash)
search:
	// 删除操作同样是两层循环,核心还是找到 key 的具体位置。寻找过程都是类似的,在 bucket 中挨个 cell 寻找。
	// 找到对应位置后,对 key 或者 value 进行“清零”操作:
	for ; b != nil; b = b.overflow(t) {
		for i := uintptr(0); i < bucketCnt; i++ {
			if b.tophash[i] != top {
				if b.tophash[i] == emptyRest {
					break search
				}
				continue
			}
			k := add(unsafe.Pointer(b), dataOffset+i*uintptr(t.keysize))
			k2 := k
			// 对 key 清零
			if t.indirectkey() {
				k2 = *((*unsafe.Pointer)(k2))
			}
			if !t.key.equal(key, k2) {
				continue
			}
			// Only clear key if there are pointers in it.
			// 对 value 清零
			// key是指针的需要置空,方便GC
			if t.indirectkey() {
				*(*unsafe.Pointer)(k) = nil
			} else if t.key.ptrdata != 0 {
				memclrHasPointers(k, t.key.size)
			}
			e := add(unsafe.Pointer(b), dataOffset+bucketCnt*uintptr(t.keysize)+i*uintptr(t.elemsize))
			if t.indirectelem() {
				*(*unsafe.Pointer)(e) = nil
			} else if t.elem.ptrdata != 0 {
				memclrHasPointers(e, t.elem.size)
			} else {
				memclrNoHeapPointers(e, t.elem.size)
			}
			// 标记删除位,证明这个位置已被删除
			b.tophash[i] = emptyOne
			// If the bucket now ends in a bunch of emptyOne states,
			// change those to emptyRest states.
			// It would be nice to make this a separate function, but
			// for loops are not currently inlineable.
			if i == bucketCnt-1 {
				// 如果是该tophash的最后一个,则需要判断overflow中tophash的第一位是否是emptyRest
				if b.overflow(t) != nil && b.overflow(t).tophash[0] != emptyRest {
					goto notLast
				}
			} else {
				// 如果不是当前tophash的最后一个,则直接判断当前tophash的下一个是否是emptyRest
				if b.tophash[i+1] != emptyRest {
					goto notLast
				}
			}
			// 当前值之后不存在其他的数据,则置为emptyRest
             		// 需要把该位置之前除非空之外的所有emptyOne位置也置为emptyRest
			for {
				// 将对应位置的 tophash 值置成 Empty
				b.tophash[i] = emptyRest
				if i == 0 {
					if b == bOrig {
						break // beginning of initial bucket, we're done.
					}
					// Find previous bucket, continue at its last entry.
					c := b
					for b = bOrig; b.overflow(t) != c; b = b.overflow(t) {
					}
					i = bucketCnt - 1
				} else {
					i--
				}
				if b.tophash[i] != emptyOne {
					break
				}
			}
		notLast:
			// 最后,将 count 值减 1。
			h.count--
			// Reset the hash seed to make it more difficult for attackers to
			// repeatedly trigger hash collisions. See issue 25237.
			if h.count == 0 {
				h.hash0 = fastrand()
			}
			break search
		}
	}
	// 抛出并发修改异常
	if h.flags&hashWriting == 0 {
		throw("concurrent map writes")
	}
	h.flags &^= hashWriting
}
|
我们其实只需要知道 delete 关键字在编译期间经过类型检查和中间代码生成阶段被转换成 runtime.mapdelete 函数簇中的一员,用于处理删除逻辑的函数与哈希表的 runtime.mapassign 几乎完全相同,不太需要刻意关注。
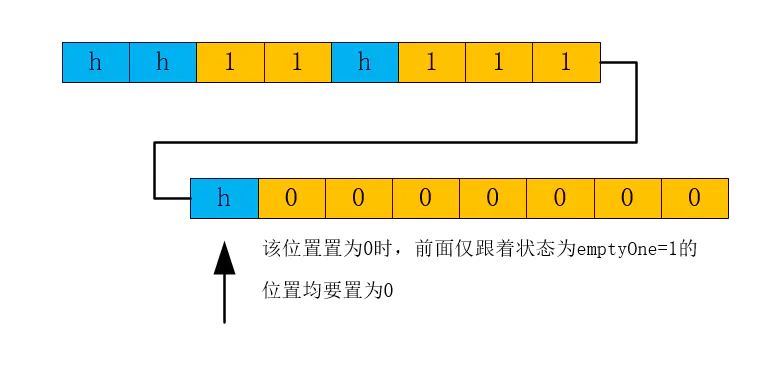
删除数据的逻辑不是很复杂,但是里面对tophash中的状态进行了置换,增加了阅读代码的复杂度。这里主要是emptyOne和emptyRest这两个状态的转化,里面有几个临界点,下面一一说明:
- 当前删除元素是tophash中的最后一个元素,则需要检查它的下一个溢出桶tophash的第一个元素是否是emptyRest。如果不是,则直接return。
- 当前删除元素不是tophash中的最后一个元素,则检查当前tophash的下一个元素是否是emptyRest即可。如果不是,则直接return。
- 前两个条件都不满足的情况下,则需要将当前位置置为emptyRest,同时还要检测它前面的emptyOne状态的元素,将其均置为emptyRest,如下图所示:
这种删除方式,以少量空间避免了被删除的数据再次插入时出现数据移动的情况。事实上,Go 数据一旦被插入到桶的确切位置,map 是不会再移动该数据在桶中的位置了。
扩容
使用哈希表的目的就是要快速查找到目标 key,然而,随着向 map 中添加的 key 越来越多,key 发生碰撞的概率也越来越大。bucket 中的 8 个 cell 会被逐渐塞满,查找、插入、删除 key 的效率也会越来越低。最理想的情况是一个 bucket 只装一个 key,这样,就能达到 O(1) 的效率,但这样空间消耗太大,用空间换时间的代价太高。
Go 语言采用一个 bucket 里装载 8 个 key,定位到某个 bucket 后,还需要再定位到具体的 key,这实际上又用了时间换空间。
当然,这样做,要有一个度,不然所有的 key 都落在了同一个 bucket 里,直接退化成了链表,各种操作的效率直接降为 O(n),是不行的。
扩容时机
因此,需要有一个指标来衡量前面描述的情况,这就是装载因子。
装载因子的计算公式是:装载因子=填入表中的元素个数/散列表的长度,装载因子越大,说明空闲位置越少,冲突越多,散列表的性能会下降。
1
|
loadFactor := count / (2^B)
|
count 就是 map 的元素个数,2^B 表示 bucket 数量。
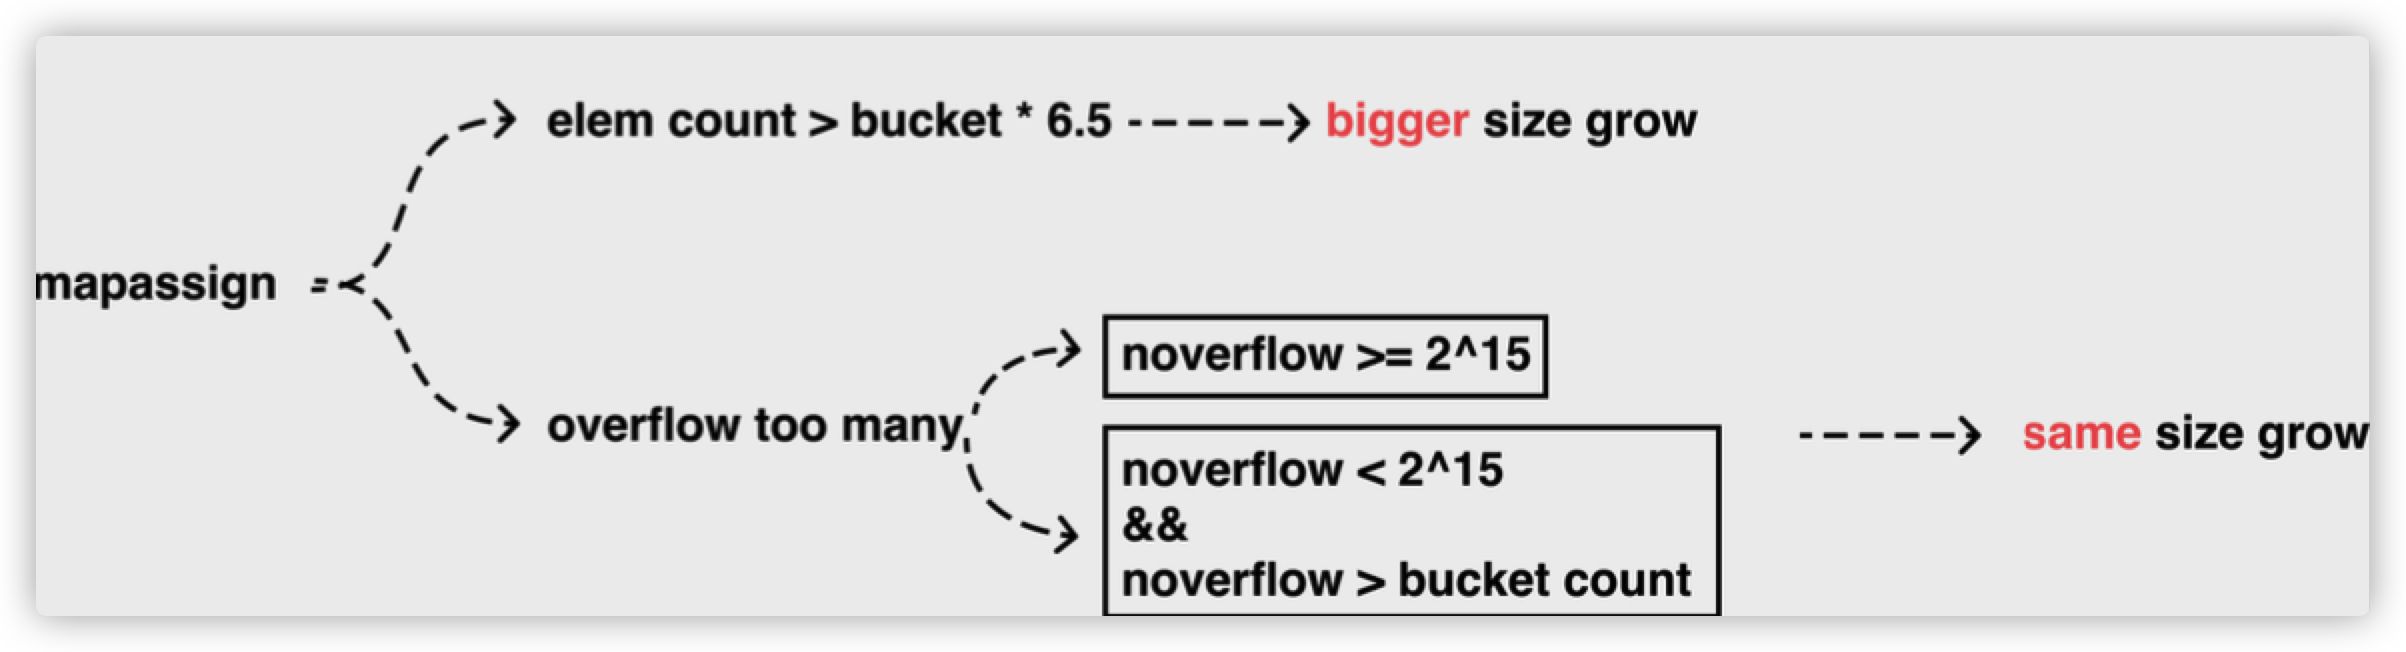
再来说触发 map 扩容的时机:在向 map 插入新 key 的时候,会进行条件检测,符合下面这 2 个条件,就会触发扩容:
- 装载因子超过阈值,源码里定义的阈值是 6.5。
- overflow 的 bucket 数量过多:
- 当 B < 15,也就是 bucket 总数 2^B 小于 2^15 时,如果 overflow 的 bucket 数量超过 2^B;
- 当 B >= 15,也就是 bucket 总数 2^B 大于等于 2^15,如果 overflow 的 bucket 数量超过 2^15。
不过因为 Go 语言哈希的扩容不是一个原子的过程,所以 runtime.mapassign 还需要判断当前哈希是否已经处于扩容状态,避免二次扩容造成混乱。
 1
 2
 3
 4
 5
 6
 7
 8
 9
10
11
12
13
14
15
16
17
18
19
20
21
|
// overLoadFactor reports whether count items placed in 1<<B buckets is over loadFactor.
// 装载因子超过 6.5
func overLoadFactor(count int, B uint8) bool {
	return count > bucketCnt && uintptr(count) > loadFactorNum*(bucketShift(B)/loadFactorDen)
}

// tooManyOverflowBuckets reports whether noverflow buckets is too many for a map with 1<<B buckets.
// Note that most of these overflow buckets must be in sparse use;
// if use was dense, then we'd have already triggered regular map growth.
// overflow buckets 太多
func tooManyOverflowBuckets(noverflow uint16, B uint8) bool {
	// If the threshold is too low, we do extraneous work.
	// If the threshold is too high, maps that grow and shrink can hold on to lots of unused memory.
	// "too many" means (approximately) as many overflow buckets as regular buckets.
	// See incrnoverflow for more details.
	if B > 15 {
		B = 15
	}
	// The compiler doesn't see here that B < 16; mask B to generate shorter shift code.
	return noverflow >= uint16(1)<<(B&15)
}
|
我们知道,每个 bucket 有 8 个空位,在没有溢出,且所有的桶都装满了的情况下,装载因子算出来的结果是 8。因此当装载因子超过 6.5 时,表明很多 bucket 都快要装满了,查找效率和插入效率都变低了。在这个时候进行扩容是有必要的。
就是说在装载因子比较小的情况下,这时候 map 的查找和插入效率也很低,而第 1 点识别不出来这种情况。表面现象就是计算装载因子的分子比较小,即 map 里元素总数少,但是 bucket 数量多(真实分配的 bucket 数量多,包括大量的 overflow bucket)。
不难想像造成这种情况的原因:不停地插入、删除元素。先插入很多元素,导致创建了很多 bucket,但是装载因子达不到第 1 点的临界值,未触发扩容来缓解这种情况。之后,删除元素降低元素总数量,再插入很多元素,导致创建很多的 overflow bucket,但就是不会触犯第 1 点的规定,你能拿我怎么办?overflow bucket 数量太多,导致 key 会很分散,查找插入效率低得吓人,因此出台第 2 点规定。这就像是一座空城,房子很多,但是住户很少,都分散了,找起人来很困难。
对于命中条件 1,2 的限制,都会发生扩容。但是扩容的策略并不相同,毕竟两种条件应对的场景不同。
扩容方案
对于条件 1,元素太多,而 bucket 数量太少,很简单:将 B 加 1,bucket 最大数量(2^B)直接变成原来 bucket 数量的 2 倍。于是,就有新老 bucket 了。注意,这时候元素都在老 bucket 里,还没迁移到新的 bucket 来。而且,新 bucket 只是最大数量变为原来最大数量(2^B)的 2 倍(2^B * 2)。
对于条件 2,其实元素没那么多,但是 overflow bucket 数特别多,说明很多 bucket 都没装满。解决办法就是开辟一个新 bucket 空间,将老 bucket 中的元素移动到新 bucket,使得同一个 bucket 中的 key 排列地更紧密。这样,原来,在 overflow bucket 中的 key 可以移动到 bucket 中来。结果是节省空间,提高 bucket 利用率,map 的查找和插入效率自然就会提升。
对于条件 2 的解决方案,有一个极端的情况:如果插入 map 的 key 哈希都一样,就会落到同一个 bucket 里,超过 8 个就会产生 overflow bucket,结果也会造成 overflow bucket 数过多。移动元素其实解决不了问题,因为这时整个哈希表已经退化成了一个链表,操作效率变成了 O(n)。
再来看一下扩容具体是怎么做的。由于 map 扩容需要将原有的 key/value 重新搬迁到新的内存地址,如果有大量的 key/value 需要搬迁,会非常影响性能。因此 Go map 的扩容采取了一种称为“渐进式”地方式,原有的 key 并不会一次性搬迁完毕,每次最多只会搬迁 2 个 bucket。
hashGrow() 函数实际上并没有真正地“搬迁”,它只是分配好了新的 buckets,并将老的 buckets 挂到了 oldbuckets 字段上。真正搬迁 buckets 的动作在 growWork() 函数中,而调用 growWork() 函数的动作是在 mapassign 和 mapdelete 函数中。也就是插入或修改、删除 key 的时候,都会尝试进行搬迁 buckets 的工作。先检查 oldbuckets 是否搬迁完毕,具体来说就是检查 oldbuckets 是否为 nil。
扩容过程:
- 当装载因子>=6.5或者溢出bmap过多时,会产生扩容
- 如果是装载因子>=6.5的扩容则为翻倍扩容,创建一个比当前桶个数*2的桶列表,如果溢出桶过多但装载因子<6.5时为等量扩容,即把当前稀疏的桶内元素进行整理,使其没有那么多的溢出桶。
- 然后会把当前的桶放到hmap.oldbuckets字段作为旧桶,然后把当前的溢出桶(如果有)也放到hmap.extra.oldoverflow作为旧的溢出桶。
- 在扩容时不会触发搬迁操作,搬迁操作只会在写入/删除操作时被触发。
- 搬迁操作过程:
- 翻倍扩容搬迁过程:
- 找到当前key的hash对应的旧桶然后算出对应的新桶保存其上下文xy[0],再找到一个根据当前新桶+旧桶数量偏移的哪个桶xy[1],也保存其上下文。比如当前key的哈希对应的旧桶是3号,那么xy[0]也是新桶的3号桶,然后xy[1]的桶号就为3+旧桶的个数、比如7号。
- 由于翻倍扩容时当前旧桶对应两个新桶,所以需要针对当前旧桶中的key做重新hash,选择一个目标桶出来,即当前key处于3号桶,经过重新哈希后可能放到了7号桶,找到目标桶后,将对应的key,value,tophash复制过去,完成一个key-value的搬迁。然后循环此过程。
- 等量扩容搬迁过程:
- 与翻倍扩容相同,但只保存一个新桶的上下文,因为等量扩容没有创建更多的桶,扩容是对应的关系,即当前的key处于3号桶,搬迁后也属于3号桶。
- 剩余过程与翻倍扩容相同。
- 搬迁完毕后,将旧桶做一些标记以便可以gc清除,然后如果此次搬迁是按照顺序搬迁,即 h.nevacuate记录的桶搬迁的,则更新 h.nevacuate到下次应该搬迁的桶上。
扩容中:
- mapasssign:将命中的 bucket 从 oldbuckets 顺手搬运到buckets 中,顺便再多搬运一个 bucket
- mapdelete:将命中的 bucket 从 oldbuckets 顺手搬运到buckets 中,顺便再多搬运一个 bucket
- mapaccess: 优先在 oldbuckets 中找,如果命中,则说明这个 bucket 没有被搬运
- 搬运 bucket x 时,会被该桶的 overflow 桶也一并搬完
hashGrow
我们先看 hashGrow() 函数所做的工作,再来看具体的搬迁 buckets 是如何进行的。
 1
 2
 3
 4
 5
 6
 7
 8
 9
10
11
12
13
14
15
16
17
18
19
20
21
22
23
24
25
26
27
28
29
30
31
32
33
34
35
36
37
38
39
40
41
42
43
44
45
46
47
48
49
50
51
52
53
54
55
56
57
58
59
60
61
62
63
64
|
func hashGrow(t *maptype, h *hmap) {
	// If we've hit the load factor, get bigger.
	// Otherwise, there are too many overflow buckets,
	// so keep the same number of buckets and "grow" laterally.
	// 需要扩容多少bmap
  	// 默认为翻倍扩容
  	// 此情况为装载因子>=6.5
	// B+1 相当于是原来 2 倍的空间
	bigger := uint8(1)
	// 对应条件 2
	if !overLoadFactor(h.count+1, h.B) {
		// 这里表示是溢出桶数量数量过多,但是map中元素数量还达不到过载,则无需增长桶数量
        	// 分配一个与之前一样的即可,将所有数据摊平,减少溢出桶的数量
		// 进行等量的内存扩容,所以 B 不变
		bigger = 0
		h.flags |= sameSizeGrow
	}
	// 将老 buckets 挂到 buckets 上
	oldbuckets := h.buckets
	// 申请新的 buckets 空间
	newbuckets, nextOverflow := makeBucketArray(t, h.B+bigger, nil)

	flags := h.flags &^ (iterator | oldIterator)
	// 如果当前状态不是迭代状态
	if h.flags&iterator != 0 {
		// 让迭代的时候去迭代旧桶
    		// 因为还没有搬迁完毕
		flags |= oldIterator
	}
	// commit the grow (atomic wrt gc)
	// 提交 grow 的动作
	h.B += bigger
	h.flags = flags
	h.oldbuckets = oldbuckets
	h.buckets = newbuckets
	// 搬迁进度为 0
	h.nevacuate = 0
	// overflow buckets 数为 0
	h.noverflow = 0
	// 如果之前有溢出bmap的话,把原来所持有的溢出bmap也变成旧的溢出bmap
	if h.extra != nil && h.extra.overflow != nil {
		// Promote current overflow buckets to the old generation.
		if h.extra.oldoverflow != nil {
			throw("oldoverflow is not nil")
		}
		h.extra.oldoverflow = h.extra.overflow
		h.extra.overflow = nil
	}
	// 如果扩容的新bmap列表存在可用溢出bmap
  	// 那就设置一下
	if nextOverflow != nil {
		if h.extra == nil {
			h.extra = new(mapextra)
		}
		h.extra.nextOverflow = nextOverflow
	}

	// the actual copying of the hash table data is done incrementally
	// by growWork() and evacuate().
	// 此处没有发现扩容时的数据搬迁(从旧bmap中拷贝原数据到新的bmap中)工作
 	// 因为哈希表数据的实际复制是由growWork()和evacuate()逐步完成的。
  	// 这两个函数的触发时机是在写/删除操作时触发
}
|
主要是申请到了新的 buckets 空间,把相关的标志位都进行了处理:例如标志 nevacuate 被置为 0, 表示当前搬迁进度为 0。
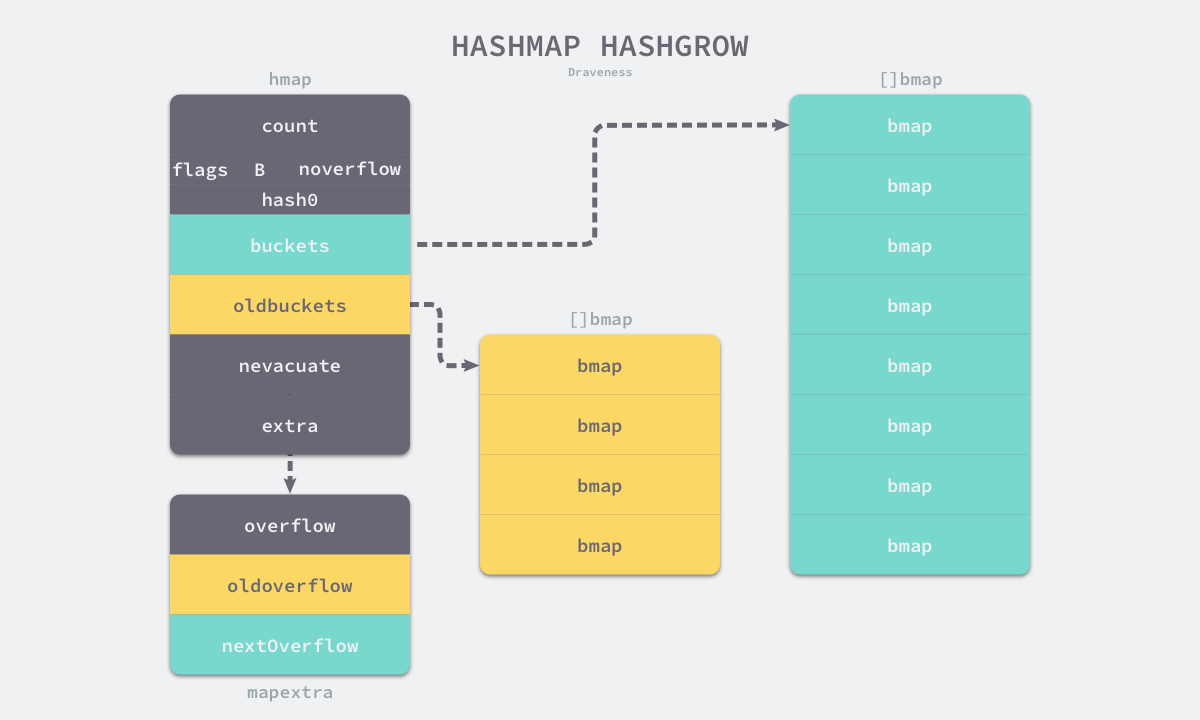
哈希在扩容的过程中会通过 runtime.makeBucketArray 创建一组新桶和预创建的溢出桶,随后将原有的桶数组设置到 oldbuckets 上并将新的空桶设置到 buckets 上,溢出桶也使用了相同的逻辑更新,下图展示了触发扩容后的哈希:
扩容基本采取2*N + N/16的方式(2倍扩容),多出来的N/16用于槽满的情况,新增的节点就从这多出来的地方取,如果多出来的槽也用完了就直接new新的内存
值得一说的是对 h.flags 的处理:
1
2
3
4
|
flags := h.flags &^ (iterator | oldIterator)
if h.flags&iterator != 0 {
	flags |= oldIterator
}
|
这里得先说下运算符:&^。这叫按位置0运算符。例如:
1
2
3
|
x = 01010011
y = 01010100
z = x &^ y = 00000011
|
如果 y bit 位为 1,那么结果 z 对应 bit 位就为 0,否则 z 对应 bit 位就和 x 对应 bit 位的值相同。
所以上面那段对 flags 一顿操作的代码的意思是:先把 h.flags 中 iterator 和 oldIterator 对应位清 0,然后如果发现 iterator 位为 1,那就把它转接到 oldIterator 位,使得 oldIterator 标志位变成 1。潜台词就是:buckets 现在挂到了 oldBuckets 名下了,对应的标志位也转接过去吧。
growWork
再来看看真正执行搬迁工作的 growWork() 函数。
 1
 2
 3
 4
 5
 6
 7
 8
 9
10
11
12
13
14
15
16
17
18
19
|
func growWork(t *maptype, h *hmap, bucket uintptr) {
	// make sure we evacuate the oldbucket corresponding
	// to the bucket we're about to use
	// 确认搬迁老的 bucket 对应正在使用的 bucket
	// 要确保我们迁移的桶和当前用的桶是一致的
	evacuate(t, h, bucket&h.oldbucketmask())

	// evacuate one more oldbucket to make progress on growing
	// 如果搬完了一个之后发现还没搬迁完
  	// 就再搬一个
	// 进行辅助迁移,当前桶迁移完成查看map是否还在扩容过程中,并帮助进行迁移
	if h.growing() {
		evacuate(t, h, h.nevacuate)
	}
}
// oldbucketmask provides a mask that can be applied to calculate n % noldbuckets().
func (h *hmap) oldbucketmask() uintptr {
	return h.noldbuckets() - 1
}
|
h.growing() 函数非常简单:
1
2
3
4
|
// growing reports whether h is growing. The growth may be to the same size or bigger.
func (h *hmap) growing() bool {
	return h.oldbuckets != nil
}
|
如果 oldbuckets 不为空,说明还没有搬迁完毕,还得继续搬。
bucket&h.oldbucketmask() 这行代码,如源码注释里说的,是为了确认搬迁的 bucket 是我们正在使用的 bucket.oldbucketmask() 函数返回扩容前的 map 的 bucketmask。
所谓的 bucketmask,作用就是将 key 计算出来的哈希值与 bucketmask 相与,得到的结果就是 key 应该落入的桶。比如 B = 5,那么 bucketmask 的低 5 位是 11111,其余位是 0,hash 值与其相与的意思是,只有 hash 值的低 5 位决策 key 到底落入哪个 bucket。
evacuate
搬迁的目的就是将老的 buckets 搬迁到新的 buckets。而通过前面的说明我们知道,应对条件 1,新的 buckets 数量是之前的一倍,应对条件 2,新的 buckets 数量和之前相等。
对于条件 2,从老的 buckets 搬迁到新的 buckets,由于 bucktes 数量不变,因此可以按序号来搬,比如原来在 0 号 bucktes,到新的地方后,仍然放在 0 号 buckets。
对于条件 1,就没这么简单了。要重新计算 key 的哈希,才能决定它到底落在哪个 bucket。例如,原来 B = 5,计算出 key 的哈希后,只用看它的低 5 位,就能决定它落在哪个 bucket。扩容后,B 变成了 6,因此需要多看一位,它的低 6 位决定 key 落在哪个 bucket。这称为 rehash。
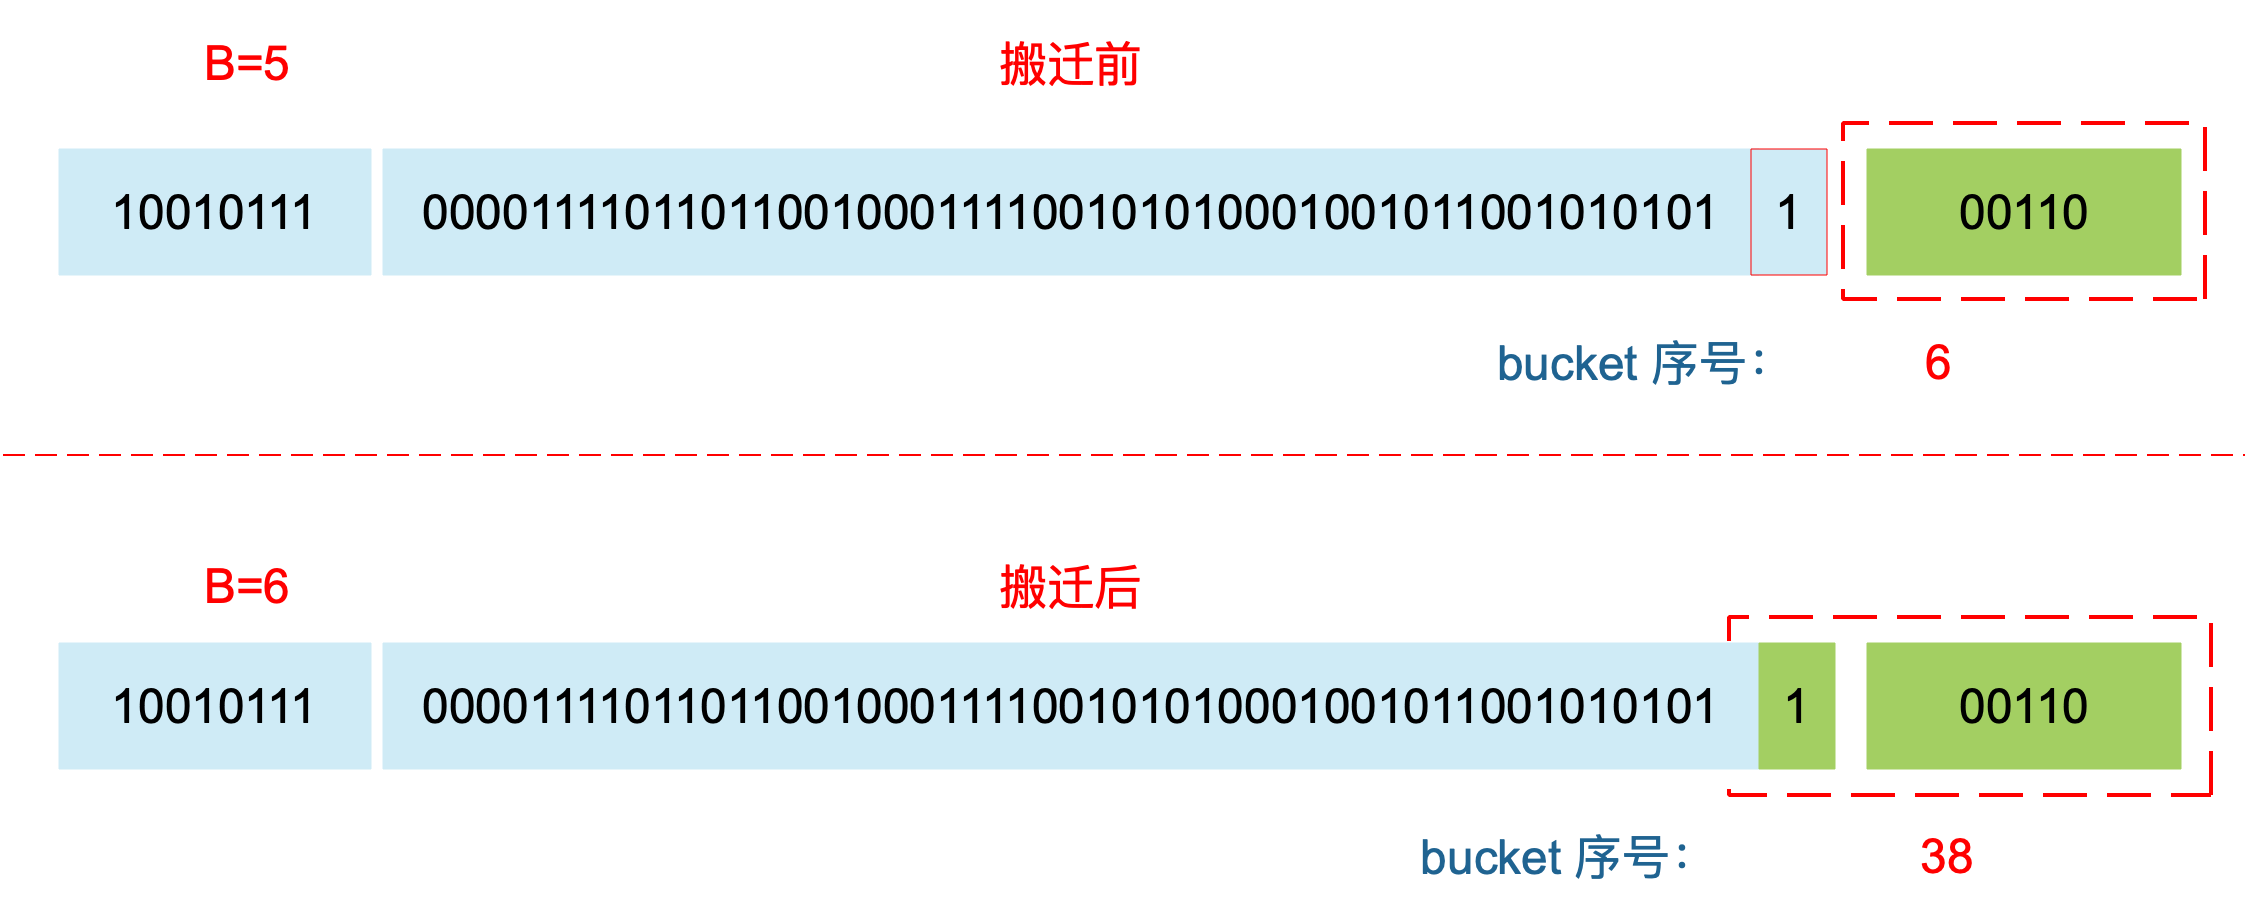
因此,某个 key 在搬迁前后 bucket 序号可能和原来相等,也可能是相比原来加上 2^B(原来的 B 值),取决于 hash 值 第 6 bit 位是 0 还是 1。
理解了上面 bucket 序号的变化,我们就可以回答另一个问题了:为什么遍历 map 是无序的?
map 在扩容后,会发生 key 的搬迁,原来落在同一个 bucket 中的 key,搬迁后,有些 key 就要远走高飞了(bucket 序号加上了 2^B)。而遍历的过程,就是按顺序遍历 bucket,同时按顺序遍历 bucket 中的 key。搬迁后,key 的位置发生了重大的变化,有些 key 飞上高枝,有些 key 则原地不动。这样,遍历 map 的结果就不可能按原来的顺序了。
当然,如果我就一个 hard code 的 map,我也不会向 map 进行插入删除的操作,按理说每次遍历这样的 map 都会返回一个固定顺序的 key/value 序列吧。的确是这样,但是 Go 杜绝了这种做法,因为这样会给新手程序员带来误解,以为这是一定会发生的事情,在某些情况下,可能会酿成大错。
当然,Go 做得更绝,当我们在遍历 map 时,并不是固定地从 0 号 bucket 开始遍历,每次都是从一个随机值序号的 bucket 开始遍历,并且是从这个 bucket 的一个随机序号的 cell 开始遍历。这样,即使你是一个写死的 map,仅仅只是遍历它,也不太可能会返回一个固定序列的 key/value 对了。
多说一句,“迭代 map 的结果是无序的”这个特性是从 go 1.0 开始加入的。
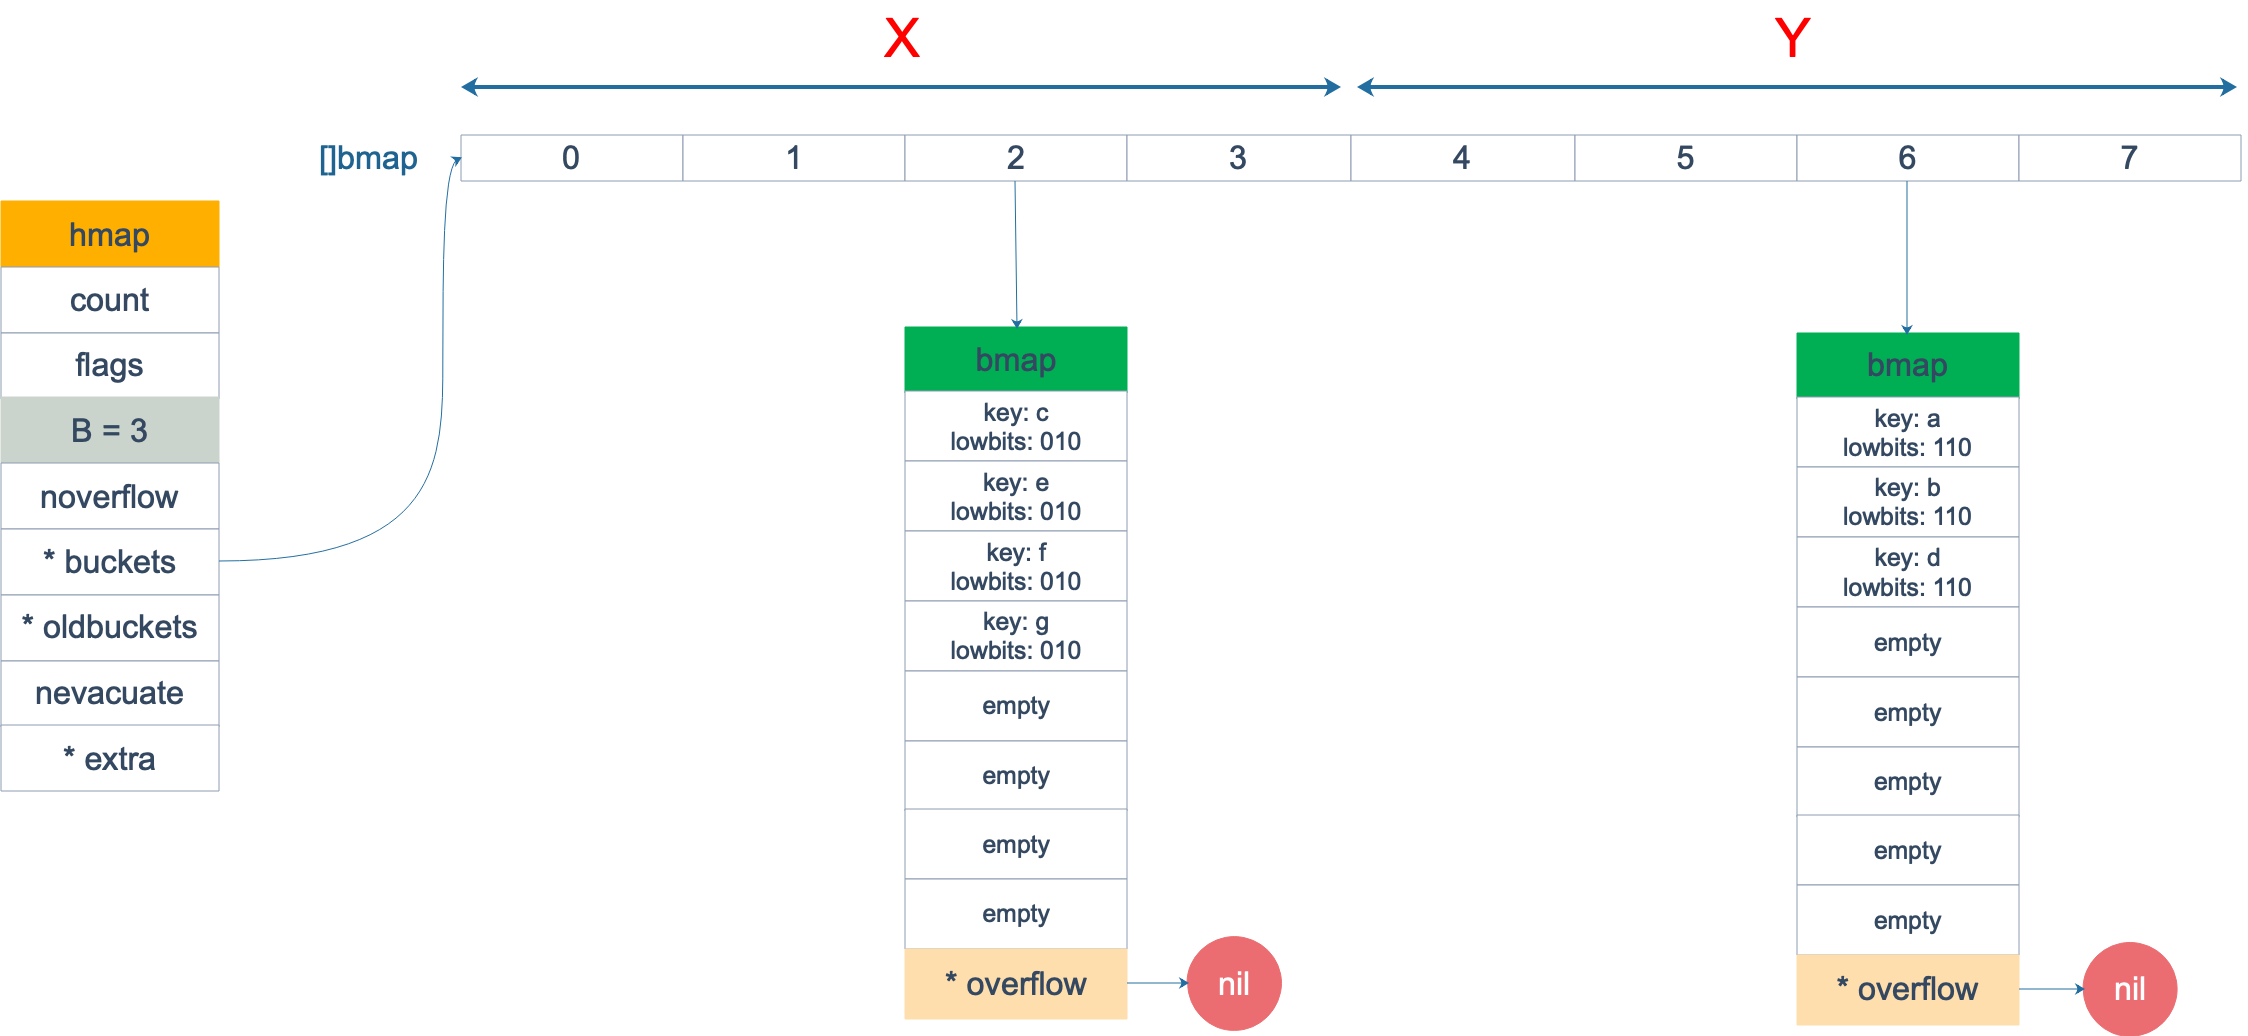
再明确一个问题:如果扩容后,B 增加了 1,意味着 buckets 总数是原来的 2 倍,原来 1 号的桶“裂变”到两个桶。
例如,原始 B = 2,1号 bucket 中有 2 个 key 的哈希值低 3 位分别为:010,110。由于原来 B = 2,所以低 2 位 10 决定它们落在 2 号桶,现在 B 变成 3,所以 010、110 分别落入 2、6 号桶。

理解了这个,后面讲 map 迭代的时候会用到。
源码如下:
  1
  2
  3
  4
  5
  6
  7
  8
  9
 10
 11
 12
 13
 14
 15
 16
 17
 18
 19
 20
 21
 22
 23
 24
 25
 26
 27
 28
 29
 30
 31
 32
 33
 34
 35
 36
 37
 38
 39
 40
 41
 42
 43
 44
 45
 46
 47
 48
 49
 50
 51
 52
 53
 54
 55
 56
 57
 58
 59
 60
 61
 62
 63
 64
 65
 66
 67
 68
 69
 70
 71
 72
 73
 74
 75
 76
 77
 78
 79
 80
 81
 82
 83
 84
 85
 86
 87
 88
 89
 90
 91
 92
 93
 94
 95
 96
 97
 98
 99
100
101
102
103
104
105
106
107
108
109
110
111
112
113
114
115
116
117
118
119
120
121
122
123
124
125
126
127
128
129
130
131
132
133
134
135
136
137
138
139
140
141
142
143
144
145
146
147
148
149
150
151
152
153
154
155
156
157
158
159
160
161
162
163
164
165
166
167
168
169
170
171
172
173
174
175
176
177
178
179
180
181
182
183
184
185
186
187
188
189
190
191
192
193
194
195
196
197
198
199
200
201
202
203
204
205
206
207
208
209
210
211
212
213
214
215
216
217
218
219
220
221
222
223
224
225
226
227
228
229
230
231
232
233
|
// evacDst is an evacuation destination.
//  用于保存分配上下文的结构体
type evacDst struct {
	// 表示bucket 移动的目标地址
	b *bmap          // current destination bucket
	// 指向 x,y 中的 key/val
	i int            // key/elem index into b
	// 指向 x,y 中的 key
	k unsafe.Pointer // pointer to current key storage
	// 指向 x,y 中的 value
	e unsafe.Pointer // pointer to current elem storage
}
 // 实际的旧bmap 搬迁到新bmap的逻辑
 // 第三个参数是搬迁的那个桶
func evacuate(t *maptype, h *hmap, oldbucket uintptr) {
	// 定位老的 bucket 地址
	b := (*bmap)(add(h.oldbuckets, oldbucket*uintptr(t.bucketsize)))
	// 结果是 2^B,如 B = 5,结果为32
	// 算一下之前有多少个桶
	newbit := h.noldbuckets()
	// 如果 b 没有被搬迁过
	if !evacuated(b) {
		// TODO: reuse overflow buckets instead of using new ones, if there
		// is no iterator using the old buckets.  (If !oldIterator.)

		// xy contains the x and y (low and high) evacuation destinations.
		// 这里分为X区和Y区,即低位区和高位区,扩容之后桶容量翻倍,需要把原有数据
        	// 均匀的分散在这两个区域
		// 表示bucket 移动的目标地址
		// 生成两个用于保存新桶上下文的结构体
		var xy [2]evacDst
		// 先保存一个 新bmap的上下文信息
		x := &xy[0]
		// 默认是等 size 扩容,前后 bucket 序号不变
		// 使用 x 来进行搬迁
		x.b = (*bmap)(add(h.buckets, oldbucket*uintptr(t.bucketsize)))
		x.k = add(unsafe.Pointer(x.b), dataOffset)
		x.e = add(x.k, bucketCnt*uintptr(t.keysize))
		// 如果不是等 size 扩容,前后 bucket 序号有变
		// 使用 y 来进行搬迁
		// 如果当前不是等量扩容(整理)
    		// 那么就搬两个桶
    		// 再获取一个新的bmap的上下文信息
		if !h.sameSizeGrow() {
			// Only calculate y pointers if we're growing bigger.
			// Otherwise GC can see bad pointers.
			// y 代表的 bucket 序号增加了 2^B
			// 仅仅在map容量翻倍之后再计算Y区的地址,否则GC会看到一个不存在的指针。
			y := &xy[1]
			y.b = (*bmap)(add(h.buckets, (oldbucket+newbit)*uintptr(t.bucketsize)))
			y.k = add(unsafe.Pointer(y.b), dataOffset)
			y.e = add(y.k, bucketCnt*uintptr(t.keysize))
		}
		// 遍历所有的 bucket,包括 overflow buckets
		// b 是老的 bucket 地址
		// 循环当前需要搬迁的bmap及其溢出bmap
		for ; b != nil; b = b.overflow(t) {
			// 找到第一个key和对应的value的地址
			k := add(unsafe.Pointer(b), dataOffset)
			e := add(k, bucketCnt*uintptr(t.keysize))
			// 遍历 bucket 中的所有 cell
			for i := 0; i < bucketCnt; i, k, e = i+1, add(k, uintptr(t.keysize)), add(e, uintptr(t.elemsize)) {
				// 当前 cell 的 top hash 值
				top := b.tophash[i]
				// 如果 cell 为空,即没有 key
				if isEmpty(top) {
					// 那就标志它被"搬迁"过
					b.tophash[i] = evacuatedEmpty
					// 继续下个 cell
					continue
				}
				// 正常不会出现这种情况
				// 未被搬迁的 cell 只可能是 empty 或是
				// 正常的 top hash(大于 minTopHash)
				if top < minTopHash {
					throw("bad map state")
				}
				k2 := k
				// 如果 key 是指针,则解引用
				if t.indirectkey() {
					k2 = *((*unsafe.Pointer)(k2))
				}
				var useY uint8
				// 如果不是等量扩容
				if !h.sameSizeGrow() {
					// Compute hash to make our evacuation decision (whether we need
					// to send this key/elem to bucket x or bucket y).
					// 那么就需要重新计算当前这个key应该落到xy[0]还是xy[1]这两个新桶的哪个中去
          				// 因为等量扩容是整理,桶的数量并没有增加,所以原来在哪还是在哪
          				// 但是翻倍扩容则是增加了新的桶,就需要重新计算hash
          				// 也就是说翻倍扩容可能导致当前key的哈希值和之后的不是同一个
					// 计算 hash 值,和 key 第一次写入时一样
					hash := t.hasher(k2, uintptr(h.hash0))
					// 如果有协程正在遍历 map
					// 如果出现 相同的 key 值,算出来的 hash 值不同
					// 这个是计算到底该把当前的key-value 放到xy[0]还是xy[1]
					if h.flags&iterator != 0 && !t.reflexivekey() && !t.key.equal(k2, k2) {
						// 只有在 float 变量的 NaN() 情况下会出现
						// If key != key (NaNs), then the hash could be (and probably
						// will be) entirely different from the old hash. Moreover,
						// it isn't reproducible. Reproducibility is required in the
						// presence of iterators, as our evacuation decision must
						// match whatever decision the iterator made.
						// Fortunately, we have the freedom to send these keys either
						// way. Also, tophash is meaningless for these kinds of keys.
						// We let the low bit of tophash drive the evacuation decision.
						// We recompute a new random tophash for the next level so
						// these keys will get evenly distributed across all buckets
						// after multiple grows.
                        			// key != key,只有在 float 数的 NaN 时会出现
                        			// 比如:
                        			// n1 := math.NaN()
                        			// n2 := math.NaN()
                        			// 这种情况下 n1 和 n2 的哈希值也完全不一样,
                        			// 同时 tophash 对于 NaN 也没啥意义
                        			// 所以对于这种 key 我们也可以随意对其目标进行发配
                        			// 还是按正常的情况下算一个随机的 tophash
                        			// 然后公平地把这些 key 平均分布到各 bucket 就好
						useY = top & 1 // 保证这个key有一半的几率落到Y区,随机发配
						top = tophash(hash)
					} else {
						// 例如newbit=8,其二进制即1000,如果hash&1000!=0,则第四位必须不为0
                        			// 即xxxx1xxx,则在翻倍扩容后,桶位置肯定是oldsize+hash
						if hash&newbit != 0 {
							useY = 1
						}
					}
				}

				if evacuatedX+1 != evacuatedY || evacuatedX^1 != evacuatedY {
					throw("bad evacuatedN")
				}
				// 标志老的 cell 的 top hash 值,表示搬移到 X 部分
				b.tophash[i] = evacuatedX + useY // evacuatedX + 1 == evacuatedY
				dst := &xy[useY]                 // evacuation destination
				// 如果 xi 等于 8,说明要溢出了
				if dst.i == bucketCnt {
					// 当前桶装满了,则需要分配一个溢出桶让其使用
					// 新建一个 bucket
					dst.b = h.newoverflow(t, dst.b)
					// 从 0 开始计数
					dst.i = 0
					// 表示 key 要移动到的位置
					dst.k = add(unsafe.Pointer(dst.b), dataOffset)
					// 表示 value 要移动到的位置
					dst.e = add(dst.k, bucketCnt*uintptr(t.keysize))
				}
				// 设置 top hash 值
				dst.b.tophash[dst.i&(bucketCnt-1)] = top // mask dst.i as an optimization, to avoid a bounds check
				// key 是指针
				if t.indirectkey() {
					// 将原 key(是指针)复制到新位置
					*(*unsafe.Pointer)(dst.k) = k2 // copy pointer
				} else {
					// 将原 key(是值)复制到新位置
					typedmemmove(t.key, dst.k, k) // copy elem
				}
				// value 是指针,操作同 key
				if t.indirectelem() {
					*(*unsafe.Pointer)(dst.e) = *(*unsafe.Pointer)(e)
				} else {
					typedmemmove(t.elem, dst.e, e)
				}
				// 定位到下一个 cell
				dst.i++
				// These updates might push these pointers past the end of the
				// key or elem arrays.  That's ok, as we have the overflow pointer
				// at the end of the bucket to protect against pointing past the
				// end of the bucket.
				dst.k = add(dst.k, uintptr(t.keysize))
				dst.e = add(dst.e, uintptr(t.elemsize))
			}
		}
		// Unlink the overflow buckets & clear key/elem to help GC.
		// 如果没有协程在使用老的 buckets,就把老 buckets 清除掉,帮助gc
		// 把搬完了的旧桶做一些标记以便等待gc清除
		if h.flags&oldIterator == 0 && t.bucket.ptrdata != 0 {
			b := add(h.oldbuckets, oldbucket*uintptr(t.bucketsize))
			// Preserve b.tophash because the evacuation
			// state is maintained there.
			// 只清除bucket 的 key,value 部分,保留 top hash 部分,指示搬迁状态
			ptr := add(b, dataOffset)
			n := uintptr(t.bucketsize) - dataOffset
			memclrHasPointers(ptr, n)
		}
	}
	// 更新搬迁进度
	// 如果此次搬迁的 bucket 等于当前进度
	// 辅助清理
	// 如果此次搬迁是按照 h.nevacuate的搬迁则
	// 做个标记,代表下一次要搬迁的桶是哪个
	if oldbucket == h.nevacuate {
		advanceEvacuationMark(h, t, newbit)
	}
}

func advanceEvacuationMark(h *hmap, t *maptype, newbit uintptr) {
	// 进度加 1
	h.nevacuate++
	// Experiments suggest that 1024 is overkill by at least an order of magnitude.
	// Put it in there as a safeguard anyway, to ensure O(1) behavior.
	// 尝试往后看 1024 个 bucket
	stop := h.nevacuate + 1024
	if stop > newbit {
		stop = newbit
	}
	// 寻找没有搬迁的 bucket
	// 判断当前bucket的tophash的第一个元素是否已经被迁移,如果已经迁移,则自增
	for h.nevacuate != stop && bucketEvacuated(t, h, h.nevacuate) {
		h.nevacuate++
	}
	// 现在 h.nevacuate 之前的 bucket 都被搬迁完毕

	// 所有的 buckets 搬迁完毕
	if h.nevacuate == newbit { // newbit == # of oldbuckets
		// Growing is all done. Free old main bucket array.
		// 所有都已经迁移完毕,则将oldbuckets置空
		// 清除老的 buckets
		h.oldbuckets = nil
		// Can discard old overflow buckets as well.
		// If they are still referenced by an iterator,
		// then the iterator holds a pointers to the slice.
		// 清除老的 overflow bucket
		// 回忆一下:[0] 表示当前 overflow bucket
		// [1] 表示 old overflow bucket
		// 丢弃掉老的溢出桶,如果它们还在被迭代器引用,此时迭代器只是引用一个切片的指针
		if h.extra != nil {
			h.extra.oldoverflow = nil
		}
		// 清除正在扩容的标志位
		h.flags &^= sameSizeGrow
	}
}
|
evacuate 函数每次只完成一个 bucket 的搬迁工作,因此要遍历完此 bucket 的所有的 cell,将有值的 cell copy 到新的地方。bucket 还会链接 overflow bucket,它们同样需要搬迁。因此会有 2 层循环,外层遍历 bucket 和 overflow bucket,内层遍历 bucket 的所有 cell。这样的循环在 map 的源码里到处都是,要理解透了。
有一个特殊情况是:有一种 key,每次对它计算 hash,得到的结果都不一样。这个 key 就是 math.NaN() 的结果,它的含义是 not a number,类型是 float64。当它作为 map 的 key,在搬迁的时候,会遇到一个问题:再次计算它的哈希值和它当初插入 map 时的计算出来的哈希值不一样!
你可能想到了,这样带来的一个后果是,这个 key 是永远不会被 Get 操作获取的!当我使用 m[math.NaN()] 语句的时候,是查不出来结果的。这个 key 只有在遍历整个 map 的时候,才有机会现身。所以,可以向一个 map 插入任意数量的 math.NaN() 作为 key。
当搬迁碰到 math.NaN() 的 key 时,只通过 tophash 的最低位决定分配到 X part 还是 Y part(如果扩容后是原来 buckets 数量的 2 倍)。如果 tophash 的最低位是 0 ,分配到 X part;如果是 1 ,则分配到 Y part。
这是通过 tophash 值与新算出来的哈希值进行运算得到的:
 1
 2
 3
 4
 5
 6
 7
 8
 9
10
11
12
13
14
15
16
17
18
19
20
21
|
if h.flags&iterator != 0 && !t.reflexivekey() && !t.key.equal(k2, k2) {
	// 只有在 float 变量的 NaN() 情况下会出现
	// If key != key (NaNs), then the hash could be (and probably
	// will be) entirely different from the old hash. Moreover,
	// it isn't reproducible. Reproducibility is required in the
	// presence of iterators, as our evacuation decision must
	// match whatever decision the iterator made.
	// Fortunately, we have the freedom to send these keys either
	// way. Also, tophash is meaningless for these kinds of keys.
	// We let the low bit of tophash drive the evacuation decision.
	// We recompute a new random tophash for the next level so
	// these keys will get evenly distributed across all buckets
	// after multiple grows.
	useY = top & 1
	top = tophash(hash)
} else {
	 // 新算出来的 hash 值的 B 位置 0
	if hash&newbit != 0 {
		useY = 1
	}
}
|
其实这样的 key 我随便搬迁到哪个 bucket 都行,当然,还是要搬迁到上面裂变那张图中的两个 bucket 中去。但这样做是有好处的,在后面讲 map 迭代的时候会再详细解释,暂时知道是这样分配的就行。
确定了要搬迁到的目标 bucket 后,搬迁操作就比较好进行了。将源 key/value 值 copy 到目的地相应的位置。
设置 key 在原始 buckets 的 tophash 为 evacuatedX 或是 evacuatedY,表示已经搬迁到了新 map 的 x part 或是 y part。新 map 的 tophash 则正常取 key 哈希值的高 8 位。
下面通过图来宏观地看一下扩容前后的变化。
扩容前,B = 2,共有 4 个 buckets,lowbits 表示 hash 值的低位。假设我们不关注其他 buckets 情况,专注在 2 号 bucket。并且假设 overflow 太多,触发了等量扩容(对应于前面的条件 2)。
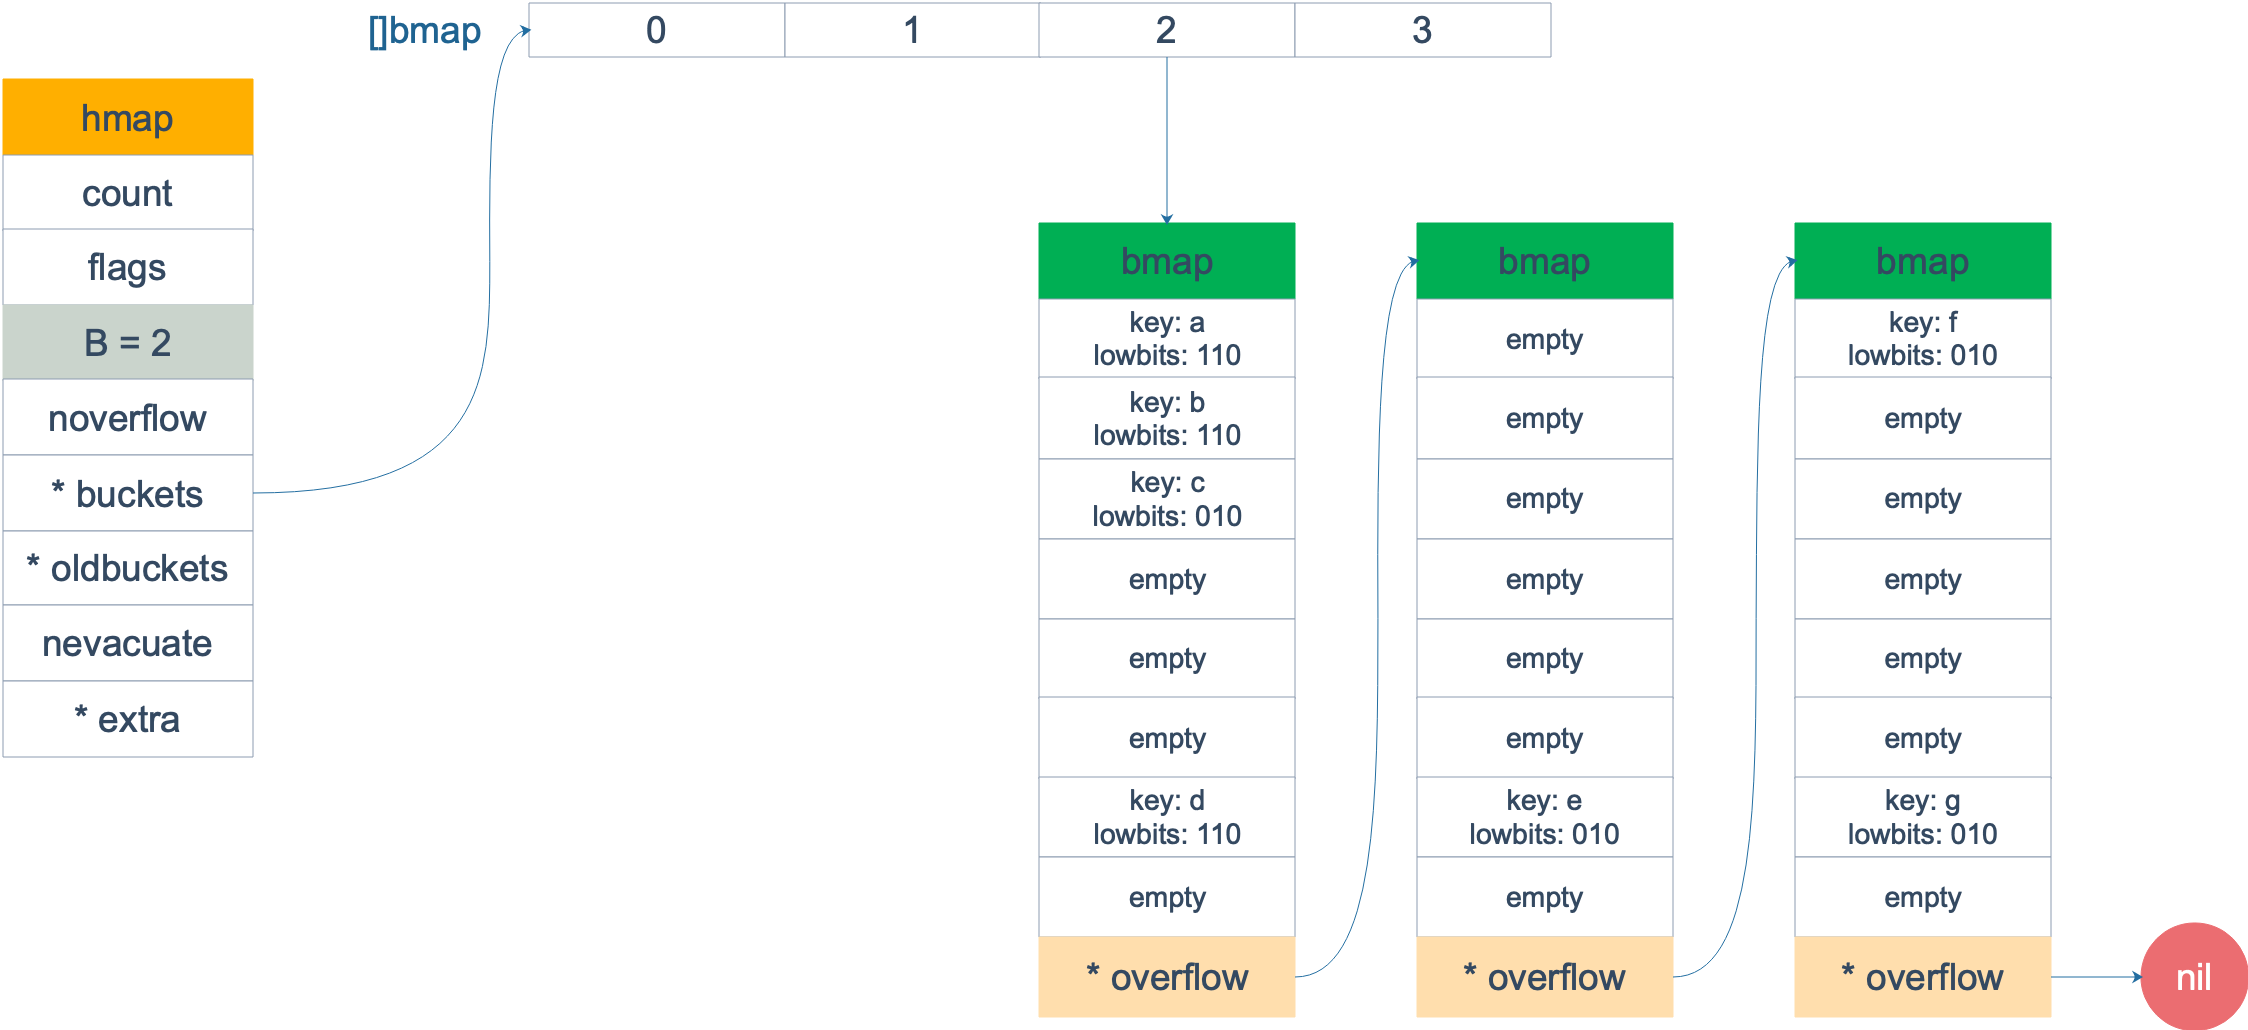
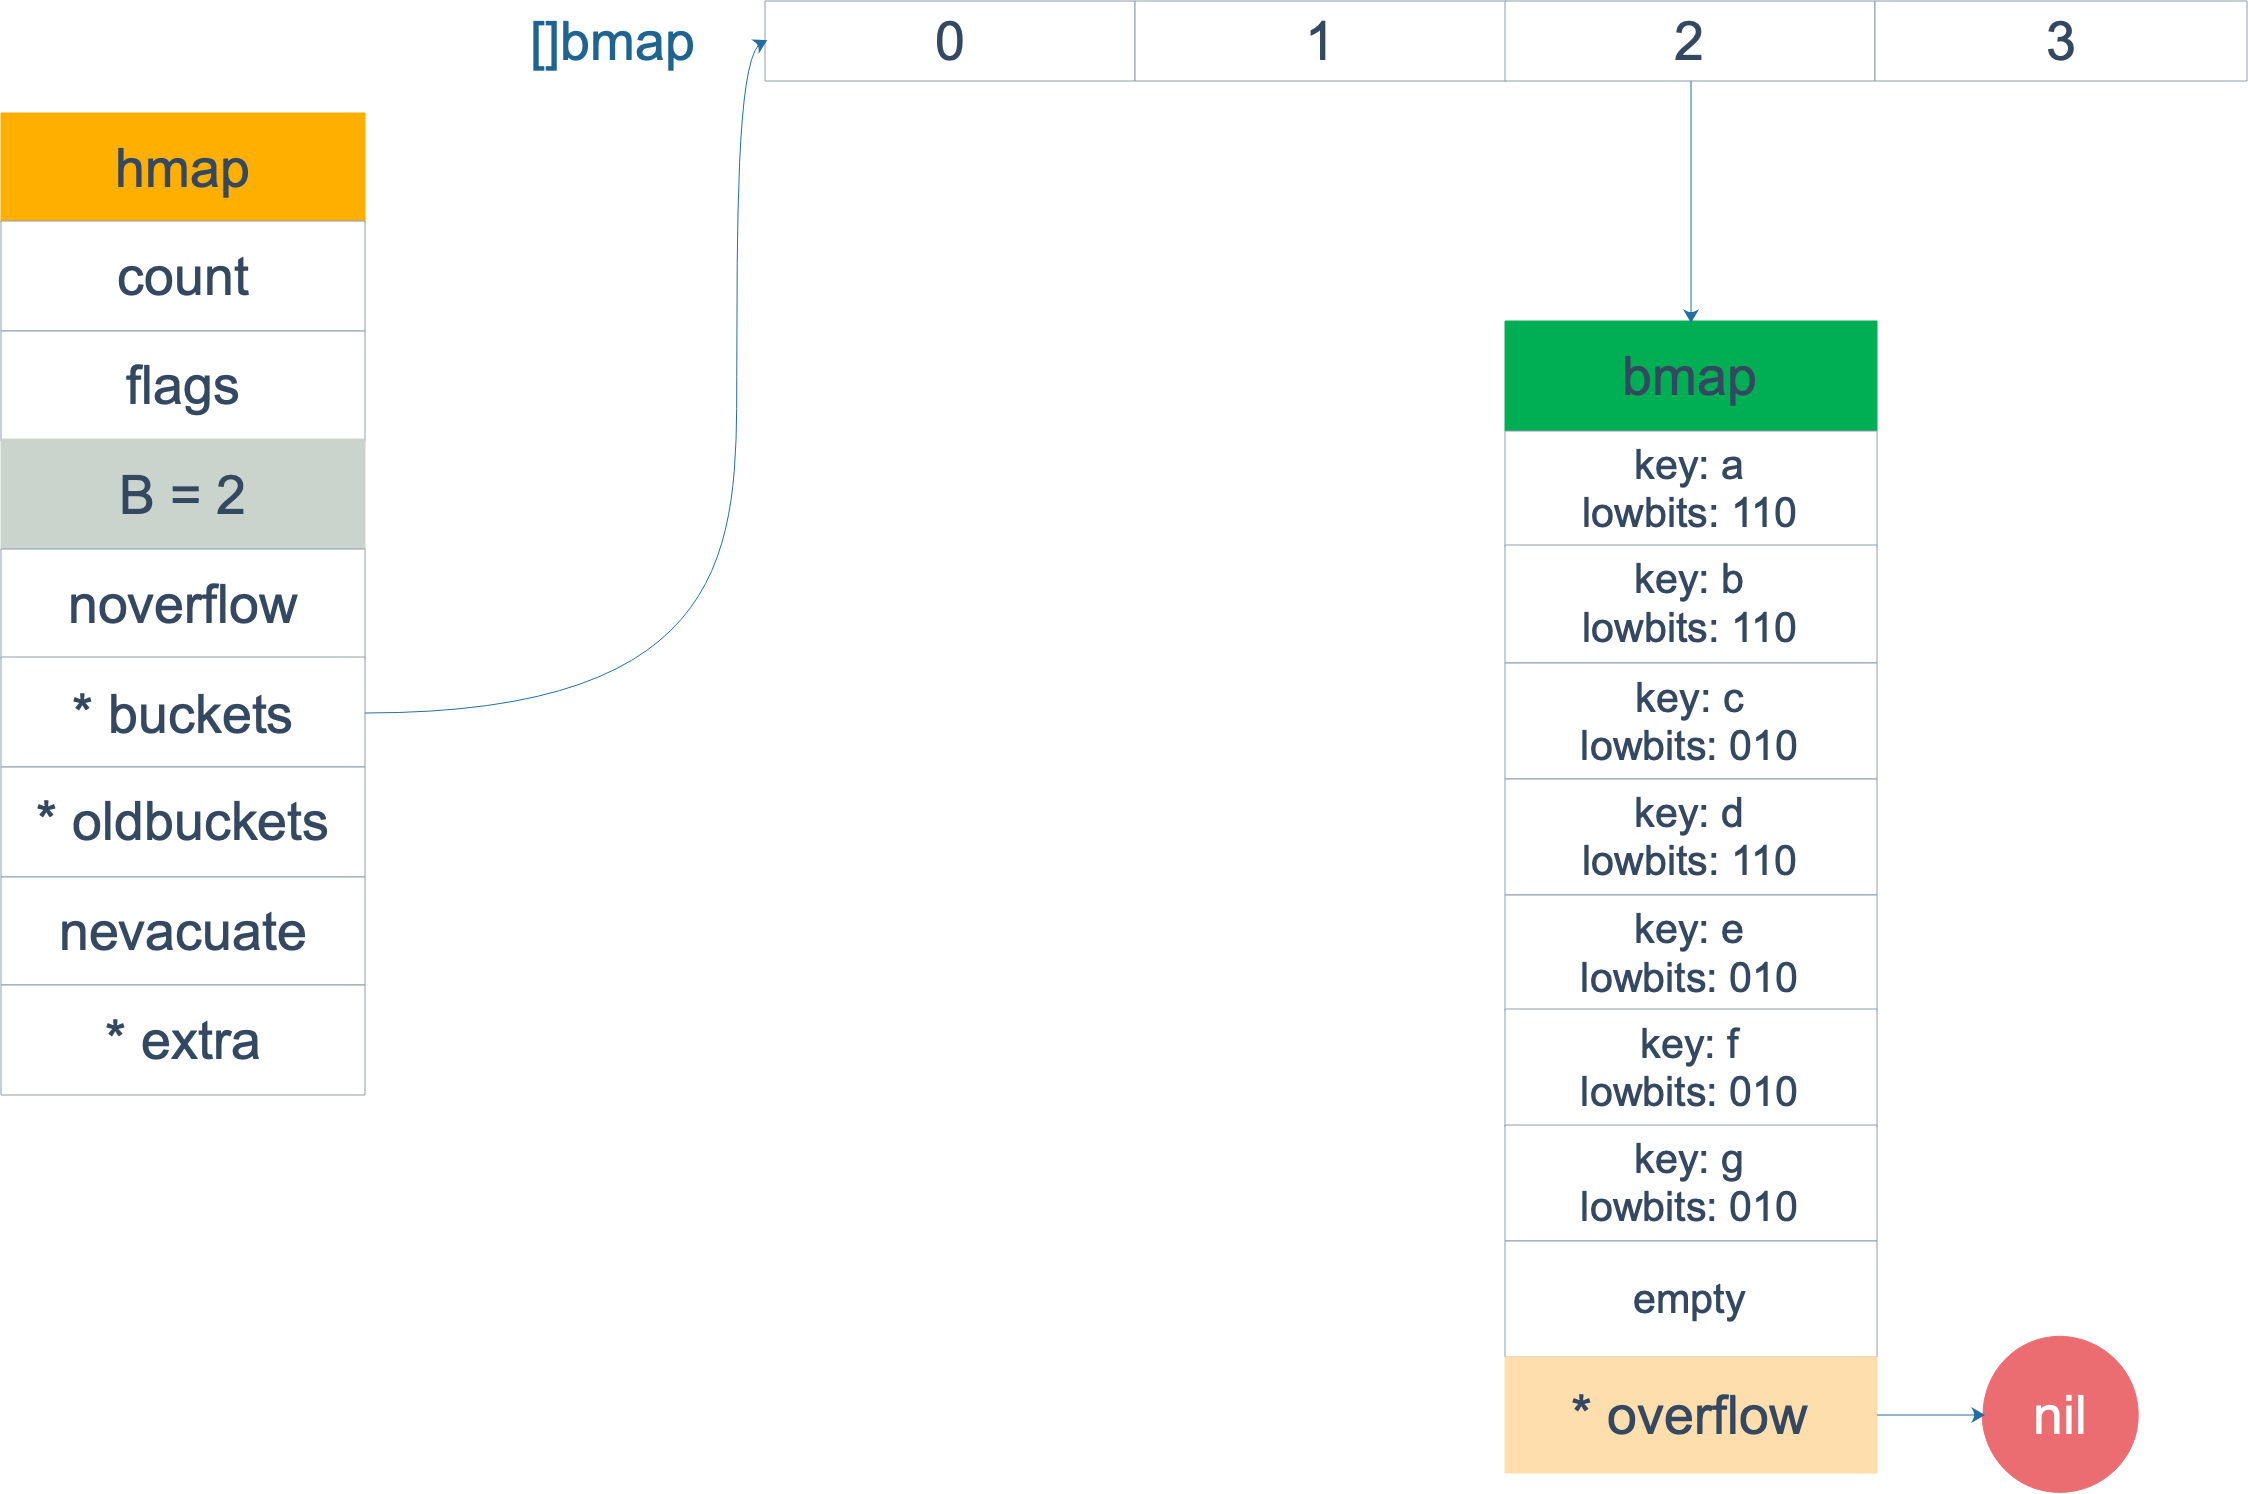
扩容完成后,overflow bucket 消失了,key 都集中到了一个 bucket,更为紧凑了,提高了查找的效率。
假设触发了 2 倍的扩容,那么扩容完成后,老 buckets 中的 key 分裂到了 2 个 新的 bucket。一个在 x part,一个在 y 的 part。依据是 hash 的 lowbits。新 map 中 0-3 称为 x part,4-7 称为 y part。
注意,上面的两张图忽略了其他 buckets 的搬迁情况,表示所有的 bucket 都搬迁完毕后的情形。实际上,我们知道,搬迁是一个“渐进”的过程,并不会一下子就全部搬迁完毕。所以在搬迁过程中,oldbuckets 指针还会指向原来老的 []bmap,并且已经搬迁完毕的 key 的 tophash 值会是一个状态值,表示 key 的搬迁去向。
遍历
本来 map 的遍历过程比较简单:遍历所有的 bucket 以及它后面挂的 overflow bucket,然后挨个遍历 bucket 中的所有 cell。每个 bucket 中包含 8 个 cell,从有 key 的 cell 中取出 key 和 value,这个过程就完成了。
但是,现实并没有这么简单。还记得前面讲过的扩容过程吗?扩容过程不是一个原子的操作,它每次最多只搬运 2 个 bucket,所以如果触发了扩容操作,那么在很长时间里,map 的状态都是处于一个中间态:有些 bucket 已经搬迁到新家,而有些 bucket 还待在老地方。
因此,遍历如果发生在扩容的过程中,就会涉及到遍历新老 bucket 的过程,这是难点所在。
我先写一个简单的代码样例,假装不知道遍历过程具体调用的是什么函数:
 1
 2
 3
 4
 5
 6
 7
 8
 9
10
11
12
|
package main

import "fmt"

func main() {
	ageMp := make(map[string]int)
	ageMp["qcrao"] = 18

	for name, age := range ageMp {
		fmt.Println(name, age)
	}
}
|
执行命令:
1
|
go tool compile -S main.go
|
得到汇编命令。这里就不逐行讲解了,可以去看之前的几篇文章,说得很详细。
关键的几行汇编代码如下:
 1
 2
 3
 4
 5
 6
 7
 8
 9
10
|
// ......
0x0124 00292 (test16.go:9)      CALL    runtime.mapiterinit(SB)

// ......
0x01fb 00507 (test16.go:9)      CALL    runtime.mapiternext(SB)
0x0200 00512 (test16.go:9)      MOVQ    ""..autotmp_4+160(SP), AX
0x0208 00520 (test16.go:9)      TESTQ   AX, AX
0x020b 00523 (test16.go:9)      JNE     302

// ......
|
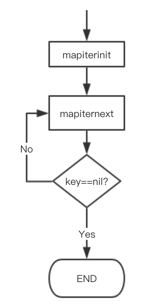
这样,关于 map 迭代,底层的函数调用关系一目了然。先是调用 mapiterinit 函数初始化迭代器,然后循环调用 mapiternext 函数进行 map 迭代。
迭代器的结构体定义:
 1
 2
 3
 4
 5
 6
 7
 8
 9
10
11
12
13
14
15
16
17
18
19
20
21
22
23
24
25
26
27
28
29
30
31
32
|
// A hash iteration structure.
// If you modify hiter, also change cmd/compile/internal/gc/reflect.go to indicate
// the layout of this structure.
type hiter struct {
	// key 指针
	key         unsafe.Pointer // Must be in first position.  Write nil to indicate iteration end (see cmd/compile/internal/gc/range.go).
	// value 指针
	elem        unsafe.Pointer // Must be in second position (see cmd/compile/internal/gc/range.go).
	// map 类型,包含如 key size 大小等
	t           *maptype
	h           *hmap
	// 初始化时指向的 bucket
	buckets     unsafe.Pointer // bucket ptr at hash_iter initialization time
	// 当前遍历到的 bmap
	bptr        *bmap          // current bucket
	overflow    *[]*bmap       // keeps overflow buckets of hmap.buckets alive
	oldoverflow *[]*bmap       // keeps overflow buckets of hmap.oldbuckets alive
	// 起始遍历的 bucet 编号
	startBucket uintptr        // bucket iteration started at
	// 遍历开始时 cell 的编号(每个 bucket 中有 8 个 cell)
	offset      uint8          // intra-bucket offset to start from during iteration (should be big enough to hold bucketCnt-1)
	// 是否从头遍历了
	wrapped     bool           // already wrapped around from end of bucket array to beginning
	// B 的大小
	B           uint8
	// 指示当前 cell 序号
	i           uint8
	// 指向当前的 bucket
	bucket      uintptr
	// 因为扩容,需要检查的 bucket
	checkBucket uintptr
}
|
mapiterinit 就是对 hiter 结构体里的字段进行初始化赋值操作。
前面已经提到过,即使是对一个写死的 map 进行遍历,每次出来的结果也是无序的。下面我们就可以近距离地观察他们的实现了。
 1
 2
 3
 4
 5
 6
 7
 8
 9
10
11
12
13
14
15
16
17
18
19
20
21
22
23
24
25
26
27
28
29
30
31
32
33
34
35
36
37
38
39
40
41
42
43
44
45
46
47
48
49
50
51
52
53
54
55
56
57
58
59
60
61
62
63
64
65
66
67
68
69
|
// mapiterinit initializes the hiter struct used for ranging over maps.
// The hiter struct pointed to by 'it' is allocated on the stack
// by the compilers order pass or on the heap by reflect_mapiterinit.
// Both need to have zeroed hiter since the struct contains pointers.
func mapiterinit(t *maptype, h *hmap, it *hiter) {
	if raceenabled && h != nil {
		callerpc := getcallerpc()
		racereadpc(unsafe.Pointer(h), callerpc, funcPC(mapiterinit))
	}

	if h == nil || h.count == 0 {
		return
	}

	if unsafe.Sizeof(hiter{})/sys.PtrSize != 12 {
		throw("hash_iter size incorrect") // see cmd/compile/internal/gc/reflect.go
	}
	it.t = t
	it.h = h

	// grab snapshot of bucket state
	it.B = h.B
	it.buckets = h.buckets
	if t.bucket.ptrdata == 0 {
		// Allocate the current slice and remember pointers to both current and old.
		// This preserves all relevant overflow buckets alive even if
		// the table grows and/or overflow buckets are added to the table
		// while we are iterating.
		h.createOverflow()
		it.overflow = h.extra.overflow
		it.oldoverflow = h.extra.oldoverflow
	}

	// decide where to start
	// 生成随机数 r
	r := uintptr(fastrand())
	if h.B > 31-bucketCntBits {
		r += uintptr(fastrand()) << 31
	}
	// 从哪个 bucket 开始遍历
	it.startBucket = r & bucketMask(h.B)
	// 从 bucket 的哪个 cell 开始遍历
	it.offset = uint8(r >> h.B & (bucketCnt - 1))

	// iterator state
	it.bucket = it.startBucket

	// Remember we have an iterator.
	// Can run concurrently with another mapiterinit().
	if old := h.flags; old&(iterator|oldIterator) != iterator|oldIterator {
		atomic.Or8(&h.flags, iterator|oldIterator)
	}

	mapiternext(it)
}
//go:nosplit
func fastrand() uint32 {
	mp := getg().m
	// Implement xorshift64+: 2 32-bit xorshift sequences added together.
	// Shift triplet [17,7,16] was calculated as indicated in Marsaglia's
	// Xorshift paper: https://www.jstatsoft.org/article/view/v008i14/xorshift.pdf
	// This generator passes the SmallCrush suite, part of TestU01 framework:
	// http://simul.iro.umontreal.ca/testu01/tu01.html
	s1, s0 := mp.fastrand[0], mp.fastrand[1]
	s1 ^= s1 << 17
	s1 = s1 ^ s0 ^ s1>>7 ^ s0>>16
	mp.fastrand[0], mp.fastrand[1] = s0, s1
	return s0 + s1
}
|
例如,B = 2,那 uintptr(1)<<h.B - 1 结果就是 3,低 8 位为 0000 0011,将 r 与之相与,就可以得到一个 0~3 的 bucket 序号;bucketCnt - 1 等于 7,低 8 位为 0000 0111,将 r 右移 2 位后,与 7 相与,就可以得到一个 0~7 号的 cell。
于是,在 mapiternext 函数中就会从 it.startBucket 的 it.offset 号的 cell 开始遍历,取出其中的 key 和 value,直到又回到起点 bucket,完成遍历过程。
假设我们有下图所示的一个 map,起始时 B = 1,有两个 bucket,后来触发了扩容(这里不要深究扩容条件,只是一个设定),B 变成 2。并且, 1 号 bucket 中的内容搬迁到了新的 bucket,1 号裂变成 1 号和 3 号;0 号 bucket 暂未搬迁。老的 bucket 挂在在 *oldbuckets 指针上面,新的 bucket 则挂在*buckets 指针上面。
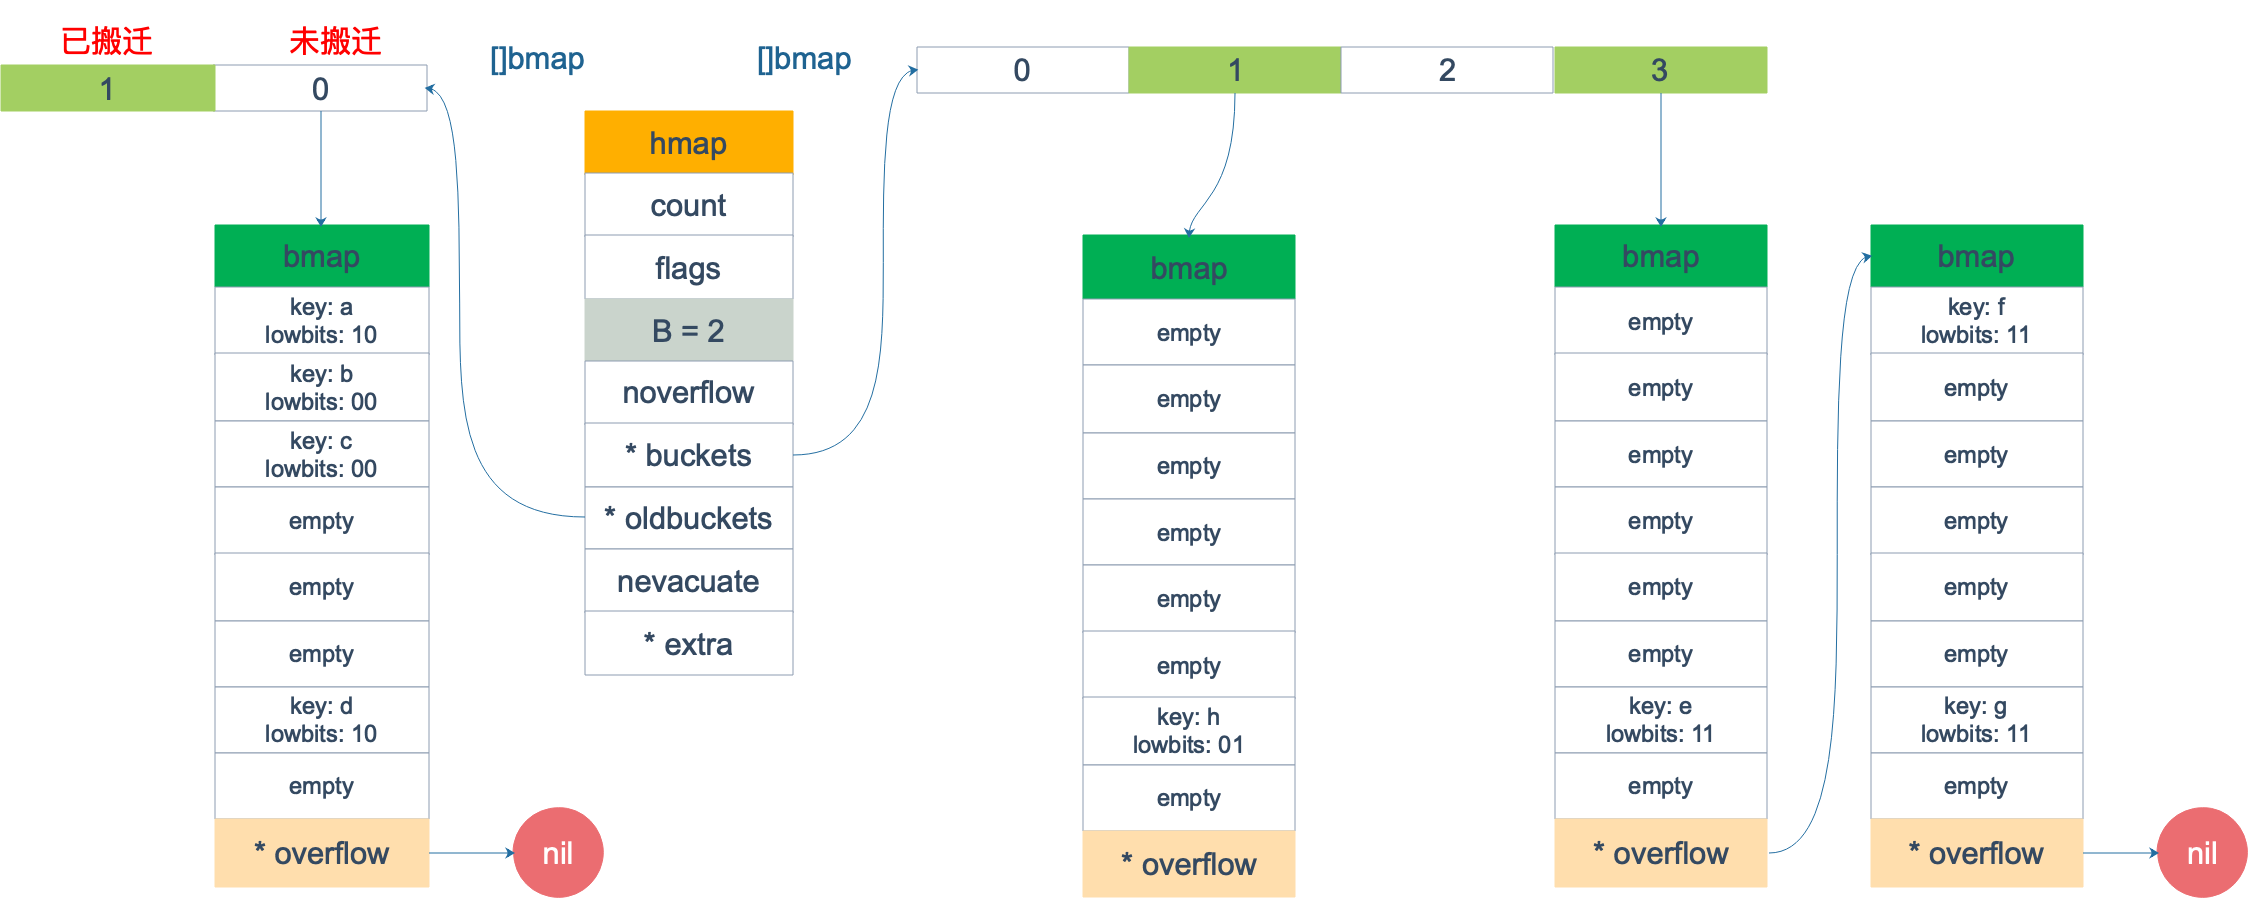
这时,我们对此 map 进行遍历。假设经过初始化后,startBucket = 3,offset = 2。于是,遍历的起点将是 3 号 bucket 的 2 号 cell,下面这张图就是开始遍历时的状态:
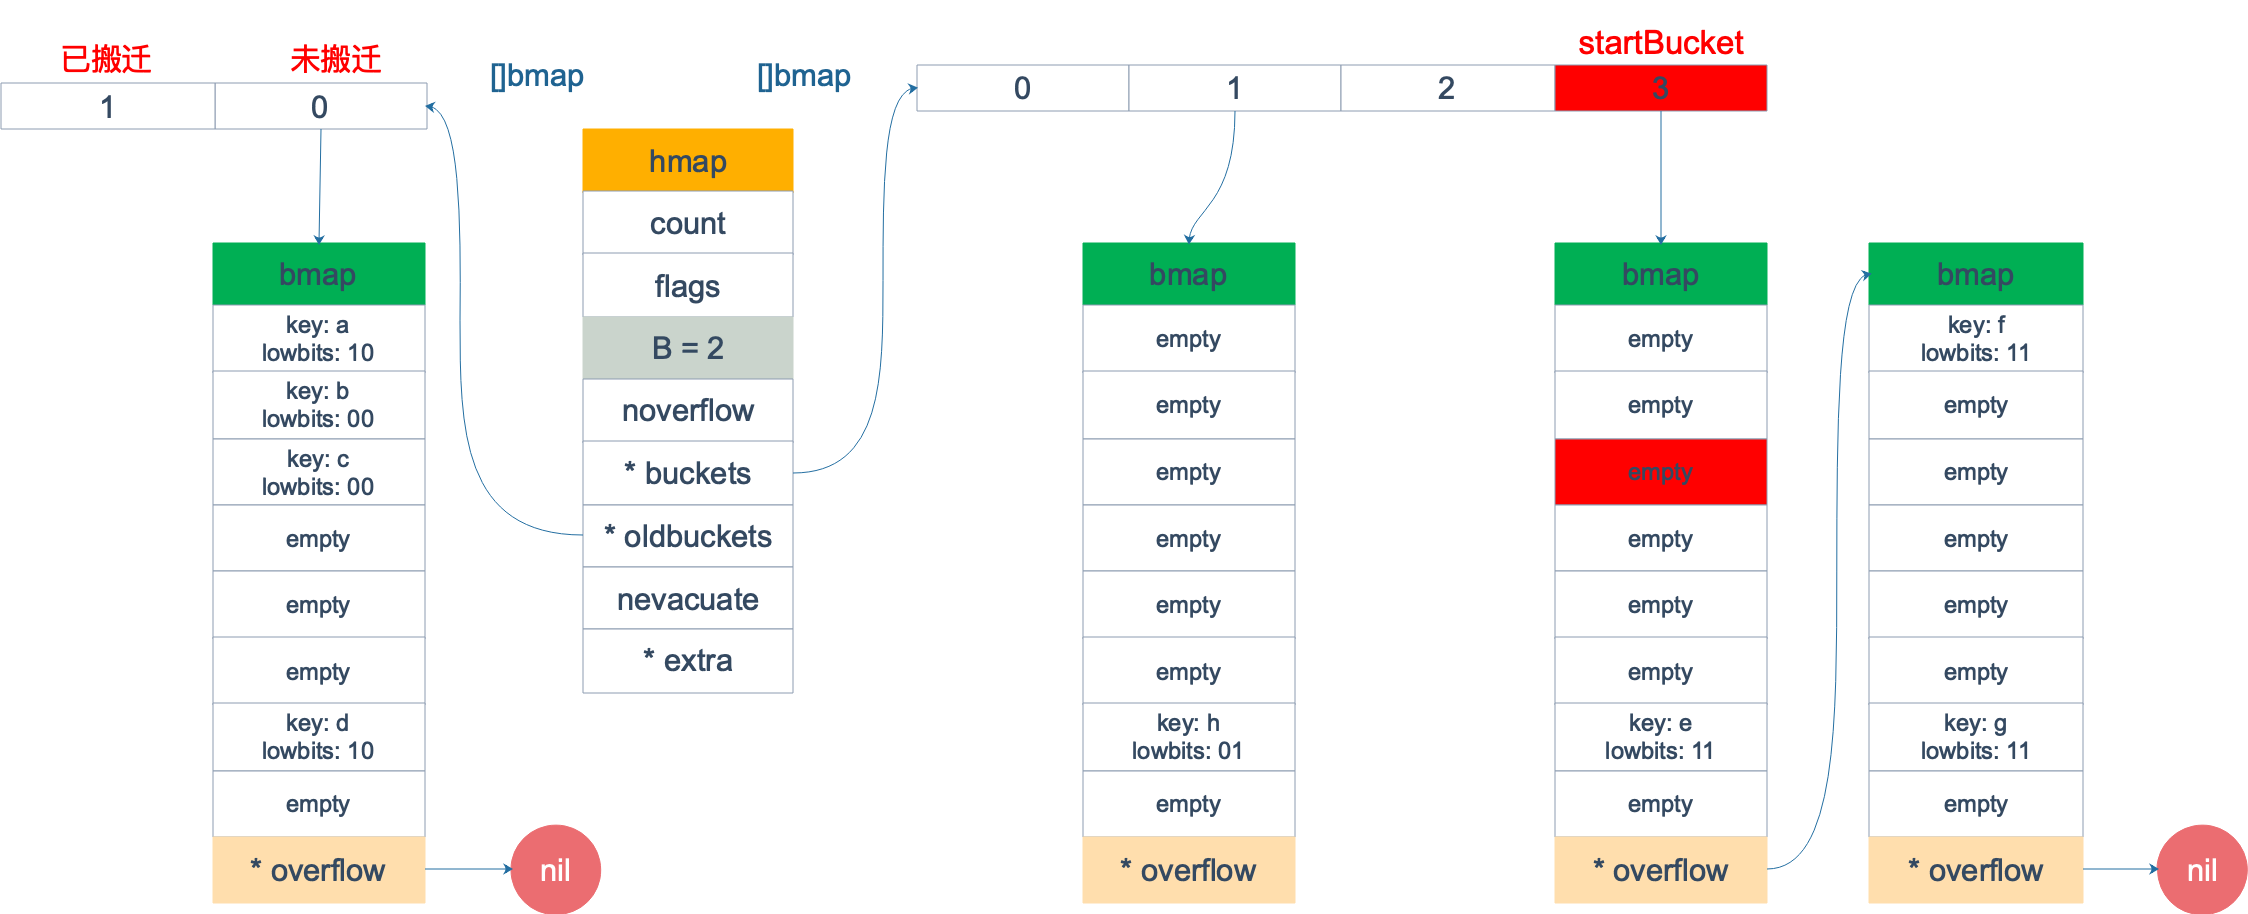
标红的表示起始位置,bucket 遍历顺序为:3 -> 0 -> 1 -> 2。
因为 3 号 bucket 对应老的 1 号 bucket,因此先检查老 1 号 bucket 是否已经被搬迁过。判断方法就是:
1
2
3
4
|
func evacuated(b *bmap) bool {
	h := b.tophash[0]
	return h > empty && h < minTopHash
}
|
如果 b.tophash[0] 的值在标志值范围内,即在 (0,4) 区间里,说明已经被搬迁过了。
在本例中,老 1 号 bucket 已经被搬迁过了。所以它的 tophash[0] 值在 (0,4) 范围内,因此只用遍历新的 3 号 bucket。
依次遍历 3 号 bucket 的 cell,这时候会找到第一个非空的 key:元素 e。到这里,mapiternext 函数返回,这时我们的遍历结果仅有一个元素:
由于返回的 key 不为空,所以会继续调用 mapiternext 函数。
继续从上次遍历到的地方往后遍历,从新 3 号 overflow bucket 中找到了元素 f 和 元素 g。
遍历结果集也因此壮大:

新 3 号 bucket 遍历完之后,回到了新 0 号 bucket。0 号 bucket 对应老的 0 号 bucket,经检查,老 0 号 bucket 并未搬迁,因此对新 0 号 bucket 的遍历就改为遍历老 0 号 bucket。那是不是把老 0 号 bucket 中的所有 key 都取出来呢?
并没有这么简单,回忆一下,老 0 号 bucket 在搬迁后将裂变成 2 个 bucket:新 0 号、新 2 号。而我们此时正在遍历的只是新 0 号 bucket(注意,遍历都是遍历的 *bucket 指针,也就是所谓的新 buckets)。所以,我们只会取出老 0 号 bucket 中那些在裂变之后,分配到新 0 号 bucket 中的那些 key。
因此,lowbits == 00 的将进入遍历结果集:

和之前的流程一样,继续遍历新 1 号 bucket,发现老 1 号 bucket 已经搬迁,只用遍历新 1 号 bucket 中现有的元素就可以了。结果集变成:

继续遍历新 2 号 bucket,它来自老 0 号 bucket,因此需要在老 0 号 bucket 中那些会裂变到新 2 号 bucket 中的 key,也就是 lowbit == 10 的那些 key。
这样,遍历结果集变成:

最后,继续遍历到新 3 号 bucket 时,发现所有的 bucket 都已经遍历完毕,整个迭代过程执行完毕。
顺便说一下,如果碰到 key 是 math.NaN() 这种的,处理方式类似。核心还是要看它被分裂后具体落入哪个 bucket。只不过只用看它 top hash 的最低位。如果 top hash 的最低位是 0 ,分配到 X part;如果是 1 ,则分配到 Y part。据此决定是否取出 key,放到遍历结果集里。
map 遍历的核心在于理解 2 倍扩容时,老 bucket 会分裂到 2 个新 bucket 中去。而遍历操作,会按照新 bucket 的序号顺序进行,碰到老 bucket 未搬迁的情况时,要在老 bucket 中找到将来要搬迁到新 bucket 来的 key。
  1
  2
  3
  4
  5
  6
  7
  8
  9
 10
 11
 12
 13
 14
 15
 16
 17
 18
 19
 20
 21
 22
 23
 24
 25
 26
 27
 28
 29
 30
 31
 32
 33
 34
 35
 36
 37
 38
 39
 40
 41
 42
 43
 44
 45
 46
 47
 48
 49
 50
 51
 52
 53
 54
 55
 56
 57
 58
 59
 60
 61
 62
 63
 64
 65
 66
 67
 68
 69
 70
 71
 72
 73
 74
 75
 76
 77
 78
 79
 80
 81
 82
 83
 84
 85
 86
 87
 88
 89
 90
 91
 92
 93
 94
 95
 96
 97
 98
 99
100
101
102
103
104
105
106
107
108
109
110
111
112
113
114
115
116
117
118
119
120
121
122
123
124
125
|
func mapiternext(it *hiter) {
	h := it.h
	if raceenabled {
		callerpc := getcallerpc()
		racereadpc(unsafe.Pointer(h), callerpc, funcPC(mapiternext))
	}
	if h.flags&hashWriting != 0 {
		throw("concurrent map iteration and map write")
	}
	t := it.t
	bucket := it.bucket
	b := it.bptr
	i := it.i
	checkBucket := it.checkBucket

next:
	if b == nil {
		if bucket == it.startBucket && it.wrapped {
			// end of iteration
			it.key = nil
			it.elem = nil
			return
		}
		if h.growing() && it.B == h.B {
			// Iterator was started in the middle of a grow, and the grow isn't done yet.
			// If the bucket we're looking at hasn't been filled in yet (i.e. the old
			// bucket hasn't been evacuated) then we need to iterate through the old
			// bucket and only return the ones that will be migrated to this bucket.
			oldbucket := bucket & it.h.oldbucketmask()
			b = (*bmap)(add(h.oldbuckets, oldbucket*uintptr(t.bucketsize)))
			if !evacuated(b) {
				checkBucket = bucket
			} else {
				b = (*bmap)(add(it.buckets, bucket*uintptr(t.bucketsize)))
				checkBucket = noCheck
			}
		} else {
			b = (*bmap)(add(it.buckets, bucket*uintptr(t.bucketsize)))
			checkBucket = noCheck
		}
		bucket++
		if bucket == bucketShift(it.B) {
			bucket = 0
			it.wrapped = true
		}
		i = 0
	}
	for ; i < bucketCnt; i++ {
		offi := (i + it.offset) & (bucketCnt - 1)
		if isEmpty(b.tophash[offi]) || b.tophash[offi] == evacuatedEmpty {
			// TODO: emptyRest is hard to use here, as we start iterating
			// in the middle of a bucket. It's feasible, just tricky.
			continue
		}
		k := add(unsafe.Pointer(b), dataOffset+uintptr(offi)*uintptr(t.keysize))
		if t.indirectkey() {
			k = *((*unsafe.Pointer)(k))
		}
		e := add(unsafe.Pointer(b), dataOffset+bucketCnt*uintptr(t.keysize)+uintptr(offi)*uintptr(t.elemsize))
		if checkBucket != noCheck && !h.sameSizeGrow() {
			// Special case: iterator was started during a grow to a larger size
			// and the grow is not done yet. We're working on a bucket whose
			// oldbucket has not been evacuated yet. Or at least, it wasn't
			// evacuated when we started the bucket. So we're iterating
			// through the oldbucket, skipping any keys that will go
			// to the other new bucket (each oldbucket expands to two
			// buckets during a grow).
			if t.reflexivekey() || t.key.equal(k, k) {
				// If the item in the oldbucket is not destined for
				// the current new bucket in the iteration, skip it.
				hash := t.hasher(k, uintptr(h.hash0))
				if hash&bucketMask(it.B) != checkBucket {
					continue
				}
			} else {
				// Hash isn't repeatable if k != k (NaNs).  We need a
				// repeatable and randomish choice of which direction
				// to send NaNs during evacuation. We'll use the low
				// bit of tophash to decide which way NaNs go.
				// NOTE: this case is why we need two evacuate tophash
				// values, evacuatedX and evacuatedY, that differ in
				// their low bit.
				if checkBucket>>(it.B-1) != uintptr(b.tophash[offi]&1) {
					continue
				}
			}
		}
		if (b.tophash[offi] != evacuatedX && b.tophash[offi] != evacuatedY) ||
			!(t.reflexivekey() || t.key.equal(k, k)) {
			// This is the golden data, we can return it.
			// OR
			// key!=key, so the entry can't be deleted or updated, so we can just return it.
			// That's lucky for us because when key!=key we can't look it up successfully.
			it.key = k
			if t.indirectelem() {
				e = *((*unsafe.Pointer)(e))
			}
			it.elem = e
		} else {
			// The hash table has grown since the iterator was started.
			// The golden data for this key is now somewhere else.
			// Check the current hash table for the data.
			// This code handles the case where the key
			// has been deleted, updated, or deleted and reinserted.
			// NOTE: we need to regrab the key as it has potentially been
			// updated to an equal() but not identical key (e.g. +0.0 vs -0.0).
			rk, re := mapaccessK(t, h, k)
			if rk == nil {
				continue // key has been deleted
			}
			it.key = rk
			it.elem = re
		}
		it.bucket = bucket
		if it.bptr != b { // avoid unnecessary write barrier; see issue 14921
			it.bptr = b
		}
		it.i = i + 1
		it.checkBucket = checkBucket
		return
	}
	b = b.overflow(t)
	i = 0
	goto next
}
|
小结
Go 语言使用拉链法来解决哈希碰撞的问题实现了哈希表,它的访问、写入和删除等操作都在编译期间转换成了运行时的函数或者方法。哈希在每一个桶中存储键对应哈希的前 8 位,当对哈希进行操作时,这些 tophash 就成为可以帮助哈希快速遍历桶中元素的缓存。
哈希表的每个桶都只能存储 8 个键值对,一旦当前哈希的某个桶超出 8 个,新的键值对就会存储到哈希的溢出桶中。随着键值对数量的增加,溢出桶的数量和哈希的装载因子也会逐渐升高,超过一定范围就会触发扩容,扩容会将桶的数量翻倍,元素再分配的过程也是在调用写操作时增量进行的,不会造成性能的瞬时巨大抖动。
缺陷
已经扩容的 map,无法收缩
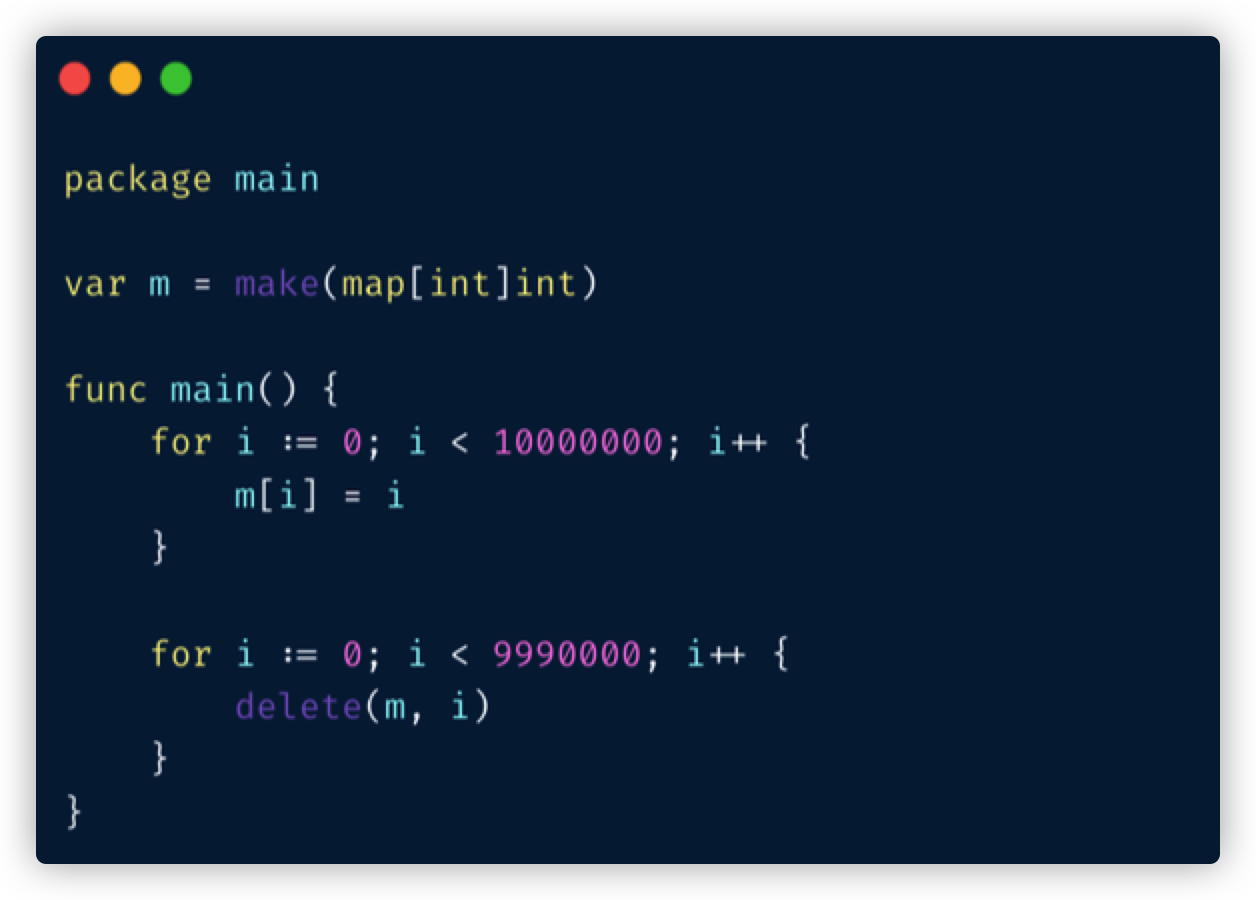
保证并发安全时,要手动读写锁,易出错,多核心下表现差
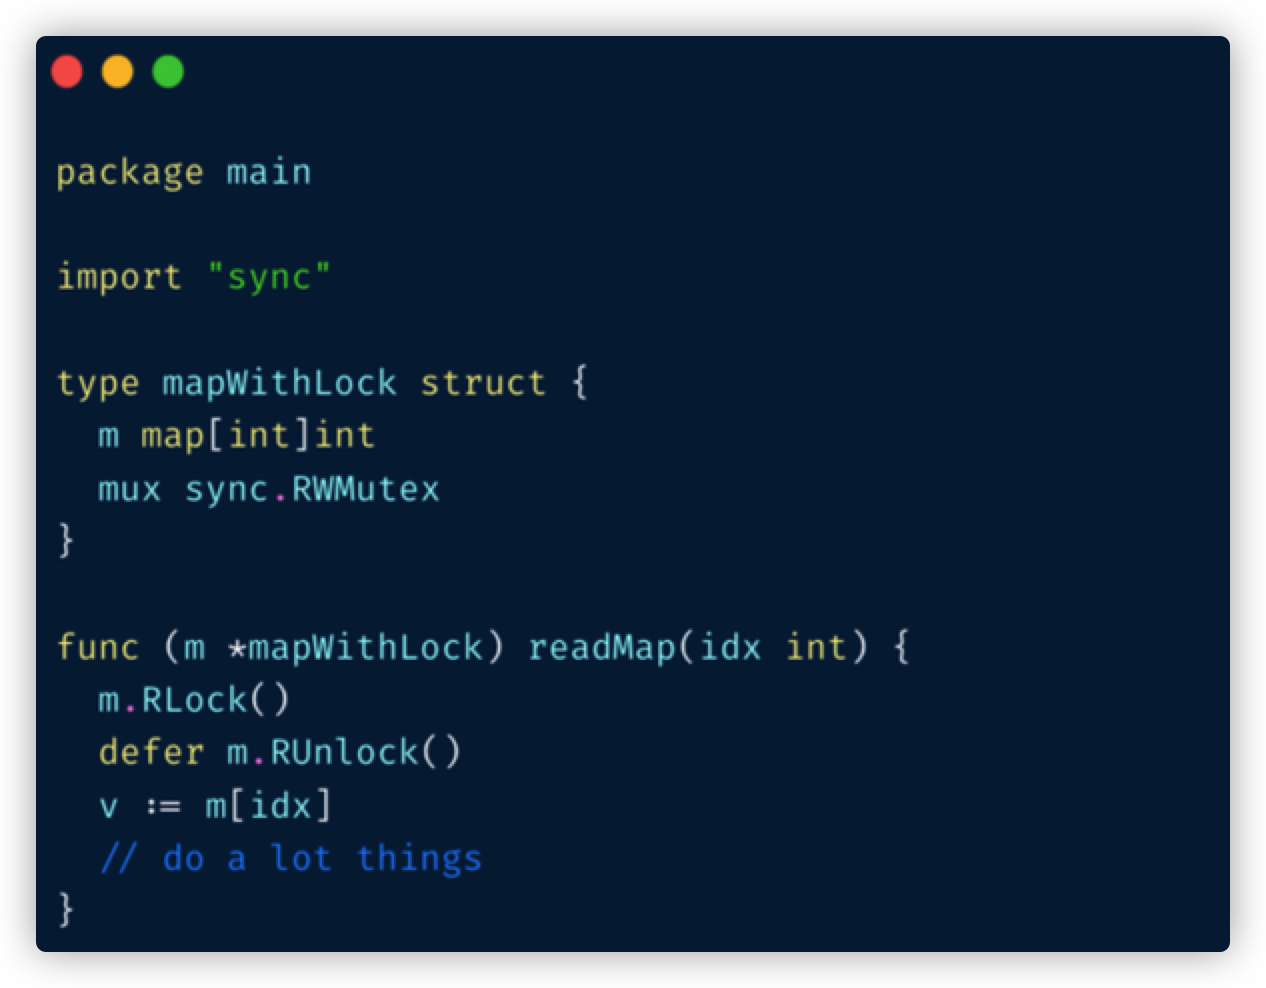
难以使用 sync.Pool 进行重用
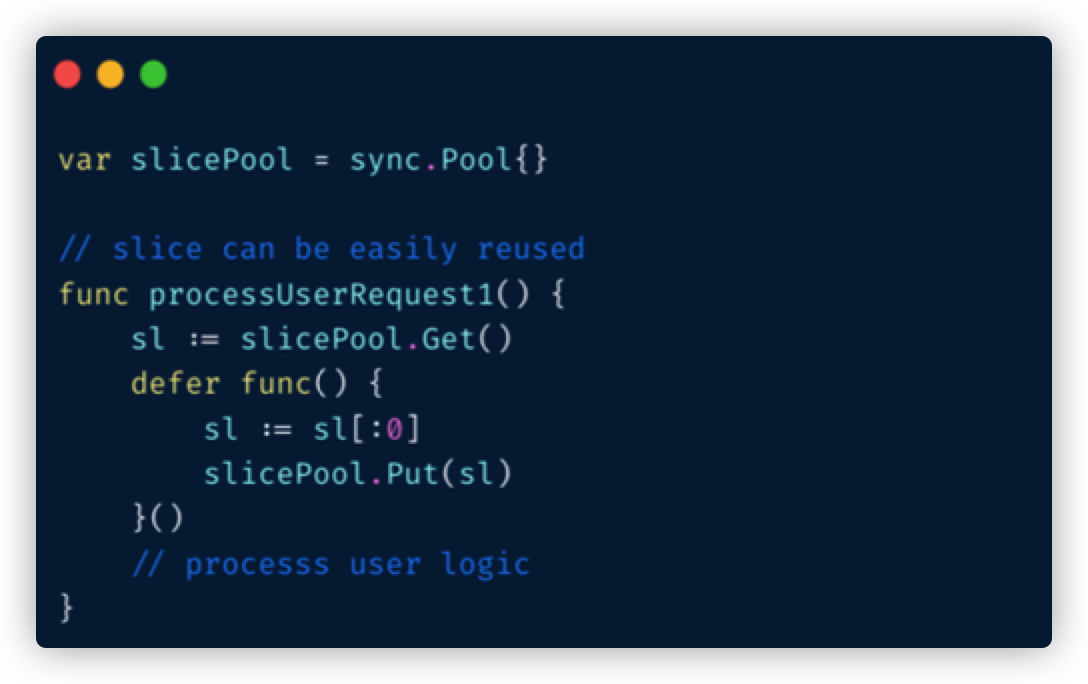
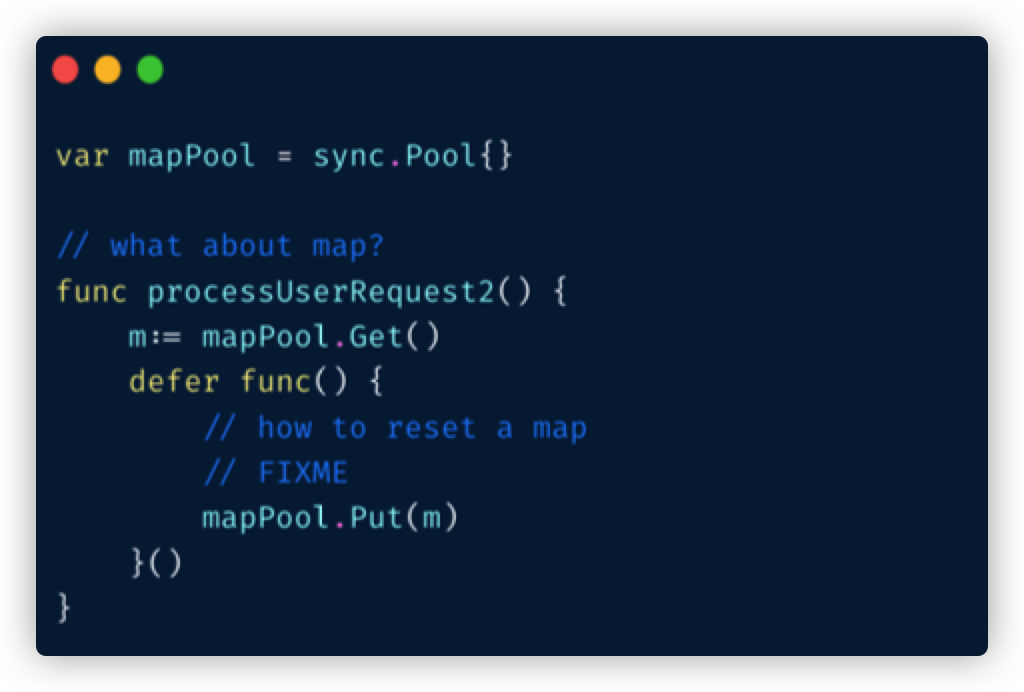
参考
3.3 哈希表
Go-Map源码解读
深度解密Go语言之map
「Golang」 Map源码解析